

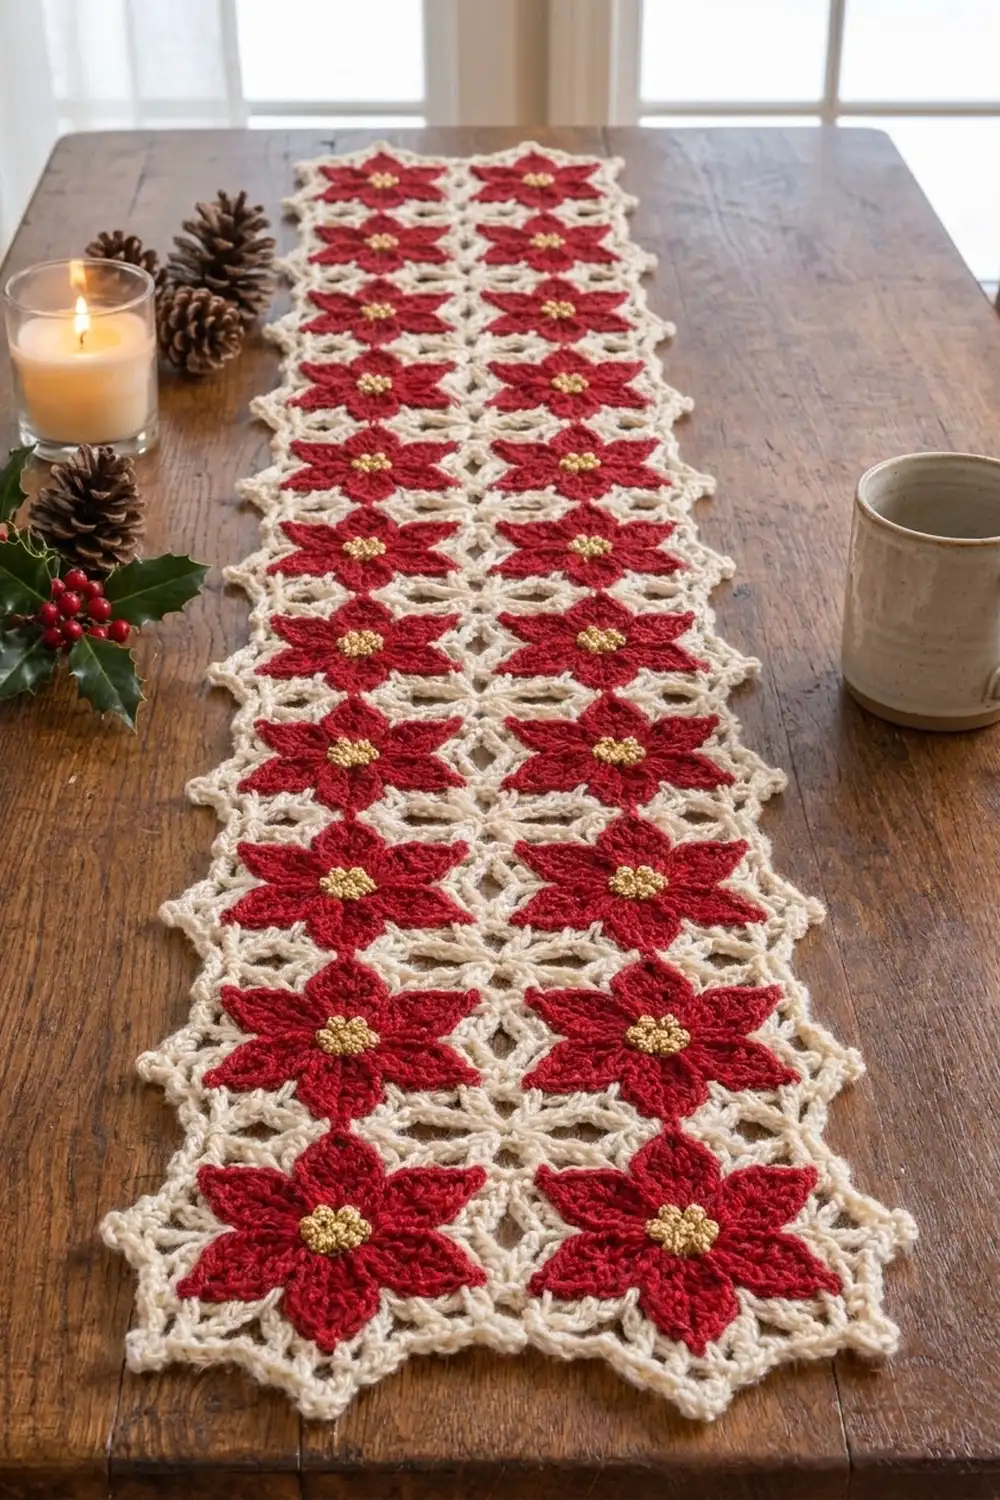
This table mat is made from twelve hexagon motifs. Each one has a red six-petal poinsettia with a cluster of small gold bobbles in the center, framed by a lacy cream hexagon. Small chain stars fill the gaps between the motifs, so the panel reads as one piece of lace with points along the top and bottom.
The palette is classic Christmas: deep red petals, warm gold centers and a soft cream frame. The look is traditional and a little vintage. It works as a centerpiece mat, a dresser scarf or a tray liner.
The pattern uses US crochet terms. The finished mat measures 11.3 x 16.8 in (28.7 x 42.7 cm) after blocking, border included.
Construction is simple. You make twelve identical motifs from the center out, join them with flat slip-stitch seams and work six filler stars into the gaps. Two rounds of single crochet finish the edge.
Finished Size and Construction
- Finished size: 11.3 x 16.8 in (28.7 x 42.7 cm)
- Skill level: Intermediate
- Terminology: US crochet terms
- Yarn weight: Sport (#2) cotton or cotton blend
- Hook: 3.0 mm (US C/2 or D/3)
- Number of pieces: 12 hexagon motifs, plus 6 filler stars worked into the gaps after joining
- Layout: 3 motifs across x 4 motifs down, points at top and bottom
- Motif size: 4 in (10.2 cm) point to point, 3.5 in (8.9 cm) flat side to flat side, 2 in (5.1 cm) per side
- Size before border: 10.5 x 16 in (26.7 x 40.6 cm)
- Border depth: 0.4 in (1.0 cm) on every edge
Materials
Use a smooth cotton or cotton-blend sport yarn, about 150 m per 50 g. Cotton gives crisp stitches, blocks into sharp points and lies flat on a table.
- Red (petals): 50 g, about 150 m
- Cream (frames, joining, fillers, border): 100 g, about 300 m
- Gold (centers): 10 g, about 30 m
These amounts include a margin of about 20 to 25 percent, which leaves room for a test motif and a few redone rounds.
Tools
- 3.0 mm crochet hook
- Tapestry needle
- Stitch markers
- Measuring tape
- Scissors
- Blocking mats, rustproof pins and a spray bottle
Abbreviations (US Terms)
- ch: chain
- sl st: slip stitch
- sc: single crochet
- hdc: half double crochet
- dc: double crochet
- tr: treble crochet
- sc2tog: single crochet 2 together
- sc3tog: single crochet 3 together
- sp: space
- RS: right side
Special stitch: mini bobble (mb). Yarn over, insert the hook in the ring, yarn over and pull up a loop, yarn over and pull through 2 loops. Repeat from * once more, then yarn over and pull through all 3 loops on the hook. This is a 2-dc cluster.
Gauge and Checkpoints
Gauge: 26 sc = 4 in (10.2 cm), or 6.5 sc per inch. At this gauge, each 13-sc motif side measures 2 in (5.1 cm).
Make one complete motif and block it before you make the rest. Check it at these points:
- After Round 1: the gold center is about 0.75 in (1.9 cm) across.
- After Round 4: about 3 in (7.6 cm) from one petal tip to the opposite tip.
- After Round 6: 4 in (10.2 cm) point to point and 3.5 in (8.9 cm) flat side to flat side.
If your motif is too big, go down 0.25 mm in hook size. If it’s too small, go up 0.25 mm. Being off by just 0.25 in (0.6 cm) per motif adds up to 0.75 in (1.9 cm) across the width and 1 in (2.5 cm) down the length.
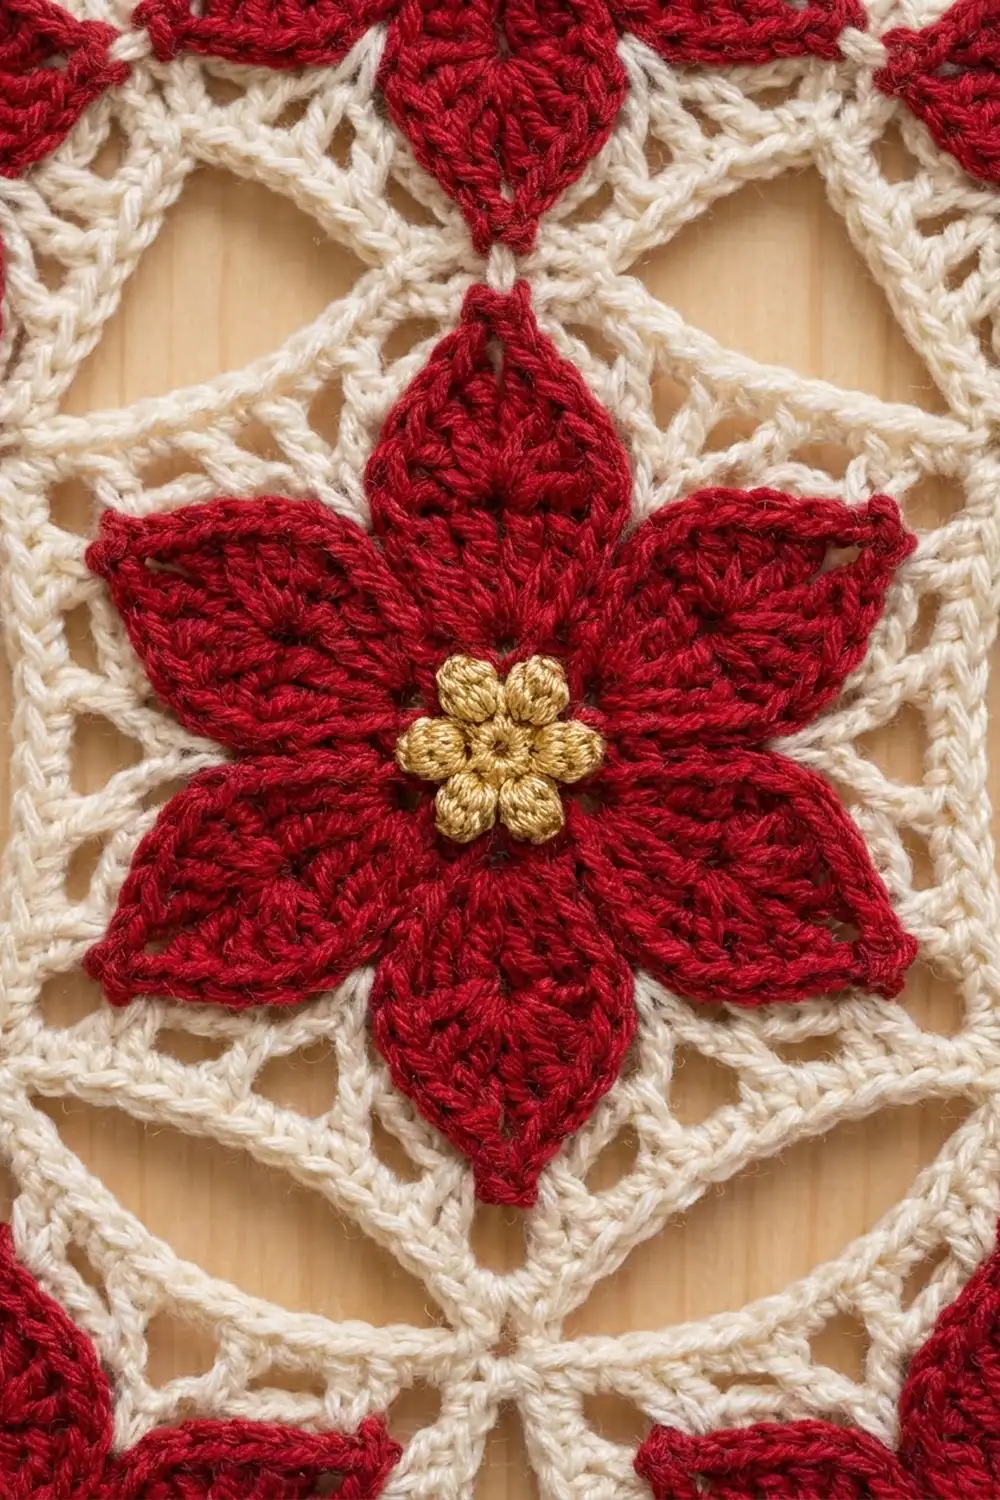
Hexagon Motif (make 12)
Work every round with the RS facing you. Do not turn.
Round 1 (gold): Make a magic ring. Ch 2 and work 1 dc in the ring; together these count as the first mb. Ch 1. Mb in the ring, ch 1. Repeat from * 4 more times. Sl st to the top of the first mb. Pull the ring closed and fasten off. (6 mb, 6 ch-1 sps)
Round 2 (red): Join red in any ch-1 sp. Ch 1. 2 sc in the ch-1 sp, sc in the top of the next mb. Repeat from * 5 more times. Sl st to the first sc. (18 sc)
Round 3 (red): Ch 1, sc in the same st. Ch 6, skip 2 sc, sc in the next sc. Repeat from * 4 more times. Ch 6, skip 2 sc, sl st to the first sc. (6 sc, 6 ch-6 sps)
Round 4 (red, petals): In the next ch-6 sp, work (sc, hdc, dc, tr, tr, ch 2, tr, tr, dc, hdc, sc). Sl st in the next sc. Repeat from * 5 more times. Fasten off. (6 petals of 10 sts each with a ch-2 tip = 60 sts, plus 6 ch-2 tips and 6 sl sts)
Each petal builds from sc up to tr and back down, and the ch-2 tip makes the point. The 10 stitches crowd the ch-6 space slightly, which cups each petal.
Round 5 (cream, lace frame): Join cream in any ch-2 petal tip. Ch 1. (Sc, ch 3, sc) in the ch-2 tip, ch 4, tr in the sl st between the petals, ch 4. Repeat from * 5 more times. Sl st to the first sc. (12 sc, 6 tr, 6 corner ch-3 sps, 12 ch-4 sps)
The petal tips become the six corners of the hexagon. Each tr reaches down into a valley between two petals, which leaves an open lace triangle on each side of it.
Round 6 (cream, solid edge): Sl st into the first corner ch-3 sp. Ch 1. (2 sc, ch 2, 2 sc) in the corner sp, 4 sc in the next ch-4 sp, sc in the tr, 4 sc in the next ch-4 sp. Repeat from * 5 more times. Sl st to the first sc and fasten off. (78 sc, 6 corner ch-2 sps)
Per-side count: each side has 13 sc between two corner ch-2 sps (2 + 4 + 1 + 4 + 2). The corner sps are not counted in the 13. Six sides x 13 sc = 78 sc.
Weave in the ends, then block this first motif and confirm the Round 6 checkpoint.
Make All Pieces
Make 12 motifs. For the full set you need:
- Gold: 12 centers (Round 1)
- Red: 12 flowers (Rounds 2 to 4)
- Cream: 12 frames (Rounds 5 and 6)
Block every motif to 4 in (10.2 cm) point to point. Arrange them with a point at the top, as shown below (M = motif, * = filler star):
 M   M   M
   *   *
 M   M   M
   *   *
 M   M   M
   *   *
 M   M   M
Joining
Side seams (within a row): Place two motifs RS up so their vertical sides touch. Join cream in the matching corner ch-2 sps at the top of the seam. Then, working through the back loops of both edges, sl st in each pair of sts:
- 1 sl st in the top corner sps
- 1 sl st in each of the 13 sc pairs
- 1 sl st in the bottom corner sps
That makes 15 sl sts per seam. With 2 seams in each of the 4 rows, there are 8 side seams.
Because you join stitch to stitch, nothing stretches or bunches. Keep the sl sts as loose as your sc. If a seam puckers, redo it with a hook 0.5 mm larger.
Point joins (between rows): In each column, the bottom point of one motif meets the top point of the motif below it. Join cream through both corner ch-2 sps with 1 sc, fasten off and knot the tails on the wrong side. That makes 9 point joins (3 columns x 3 row gaps).
Filler stars: Six diamond-shaped gaps sit inside the mat, each bordered by 4 motif sides. To fill each one, make a magic ring in cream and ch 1. Then work six arms clockwise, starting at the top of the gap:
- Arm 1: Sc in the ring, ch 6, sl st in the joined corner sps at the bottom of the side seam above, then sl st back down the 6 ch.
- Arm 2: Sc in the ring, ch 5, sl st in the 7th (center) sc of the upper-right side, then sl st back down the 5 ch.
- Arm 3: Work as Arm 2, into the lower-right side.
- Arm 4: Work as Arm 1, into the joined corner sps at the top of the side seam below.
- Arms 5 and 6: Work as Arm 2, into the lower-left side and then the upper-left side.
Sl st to the first sc, close the ring and fasten off. (6 sc in the ring, 6 arms) The left and right points of each diamond, where motifs meet point to point, stay open.
Size checkpoint: The joined mat should measure 10.5 in (26.7 cm) wide (3 x 3.5 in) by 16 in (40.6 cm) long (4 x 4 in). Each long side has three V-shaped notches.
Border
Border gauge: the same 6.5 sc per inch as the motifs. Each round adds about 0.2 in (0.5 cm), so the two rounds add 0.4 in (1.0 cm) per edge.
The outline: The outer edge is made of 32 motif sides of 13 sc each. That’s 72 sides in total (12 x 6), minus 16 sides in the side seams and 24 sides around the filler gaps.
- Top edge: 3 motifs x 2 sides x 13 sc = 78 sc
- Bottom edge: 3 x 2 x 13 = 78 sc
- Right edge: 4 vertical sides + 6 notch sides = 10 sides x 13 = 130 sc
- Left edge: 10 x 13 = 130 sc
The outline also has two kinds of corners:
- 22 convex (outward) corners. The 4 mat corners are among these.
- 10 inward points, where two motif corners touch: 2 on the top edge, 2 on the bottom edge and 3 notches on each long side.
Border Round 1 (cream): Join in any sc and ch 1. Work:
- Sc in each sc.
- (Sc, ch 2, sc) in each convex corner ch-2 sp.
- At each inward point, sc2tog, with one leg in each of the two touching corner sps.
Sl st to the first sc.
(416 sc worked one per existing sc + 44 corner sc + 10 sc2tog = 470 sts, plus 22 ch-2 sps)
| Section | Sts | Ch-2 sps |
|---|---|---|
| Top edge | 78 + 6 + 2 = 86 | 3 |
| Bottom edge | 86 | 3 |
| Right edge | 130 + 12 + 3 = 145 | 6 |
| Left edge | 145 | 6 |
| Mat corners | 4 x 2 = 8 | 4 |
Total: 86 + 86 + 145 + 145 + 8 = 470 sts.
Border Round 2 (cream): Ch 1. Work:
- Sc in each sc.
- (Sc, ch 2, sc) in each ch-2 sp.
- At each inward point, sc3tog over the sc before the sc2tog, the sc2tog itself and the sc after it.
Sl st to the first sc and fasten off.
(440 sc worked one per existing st + 44 corner sc + 10 sc3tog = 494 sts, plus 22 ch-2 sps)
The 440 is the 470 sts minus the 30 sts used up by the 10 sc3tog.
| Section | Sts |
|---|---|
| Top edge | 80 + 6 + 2 = 88 |
| Bottom edge | 88 |
| Right edge | 136 + 12 + 3 = 151 |
| Left edge | 151 |
| Mat corners | 8 + 8 = 16 |
Total: 88 + 88 + 151 + 151 + 16 = 494 sts.
Why the math works:
- Every side keeps its 13 sc, so the border sits at the same gauge as the motifs.
- Each convex corner gains 2 sc per round, which lets the points turn without cupping.
- The decreases at the inward points keep the V-shapes from ruffling.
So the border follows the zigzag outline and adds 0.4 in (1.0 cm) to every edge. That gives 10.5 + 0.8 = 11.3 in (28.7 cm) wide and 16 + 0.8 = 16.8 in (42.7 cm) long.
Final Blocking
- Weave in all remaining ends along the cream seams.
- Soak the mat in cool water for 10 minutes, then roll it in a towel to press out the water. Don’t wring it.
- Lay it RS up on blocking mats.
- Pin the four mat corners to 11.3 x 16.8 in (28.7 x 42.7 cm).
- Pin every outer point and every inward V so all the motif sides are straight.
- Pin each petal tip toward its hexagon corner, and pull the filler-star arms taut.
- Let it dry completely, at least 24 hours, before you remove the pins.
Final Quality-Control Checklist
- All 12 motifs measure 4 in (10.2 cm) point to point.
- Every motif side has 13 sc.
- All 8 side seams have 15 sl sts each and lie flat.
- All 9 point joins are secure.
- All 6 filler stars are centered and taut.
- Border Round 1 has 470 sts and Round 2 has 494 sts, each with 22 ch-2 corners.
- The mat measures 11.3 x 16.8 in (28.7 x 42.7 cm).
- No ends show on the RS.
Troubleshooting
- Petals ruffle: your tr stitches are too tall. Pull up shorter loops.
- The motif cups: your Round 5 chains are too tight. Loosen them, or use a hook 0.25 mm larger for that round.
- The hexagon corners look soft: check that each corner has exactly (2 sc, ch 2, 2 sc), then pin the points sharply when blocking.
- Seams pucker: loosen your sl sts or use a larger hook.
- The border waves: recount each section, especially the decreases at the inward points.
- A filler star sags: shorten each arm by 1 ch.
Care
Hand wash in cool water with a mild detergent. Lay flat to dry, re-pinning the points if needed.
Final Notes
The measurements build in a short chain:
- 13 sc per motif side = 2 in (5.1 cm).
- Each motif is 3.5 in (8.9 cm) wide and 4 in (10.2 cm) tall.
- Three motifs across and four down = 10.5 x 16 in (26.7 x 40.6 cm).
- The 0.4 in (1.0 cm) border brings the mat to 11.3 x 16.8 in (28.7 x 42.7 cm).
If your first motif matches its checkpoints, the rest of the mat will follow.
Happy crocheting!