

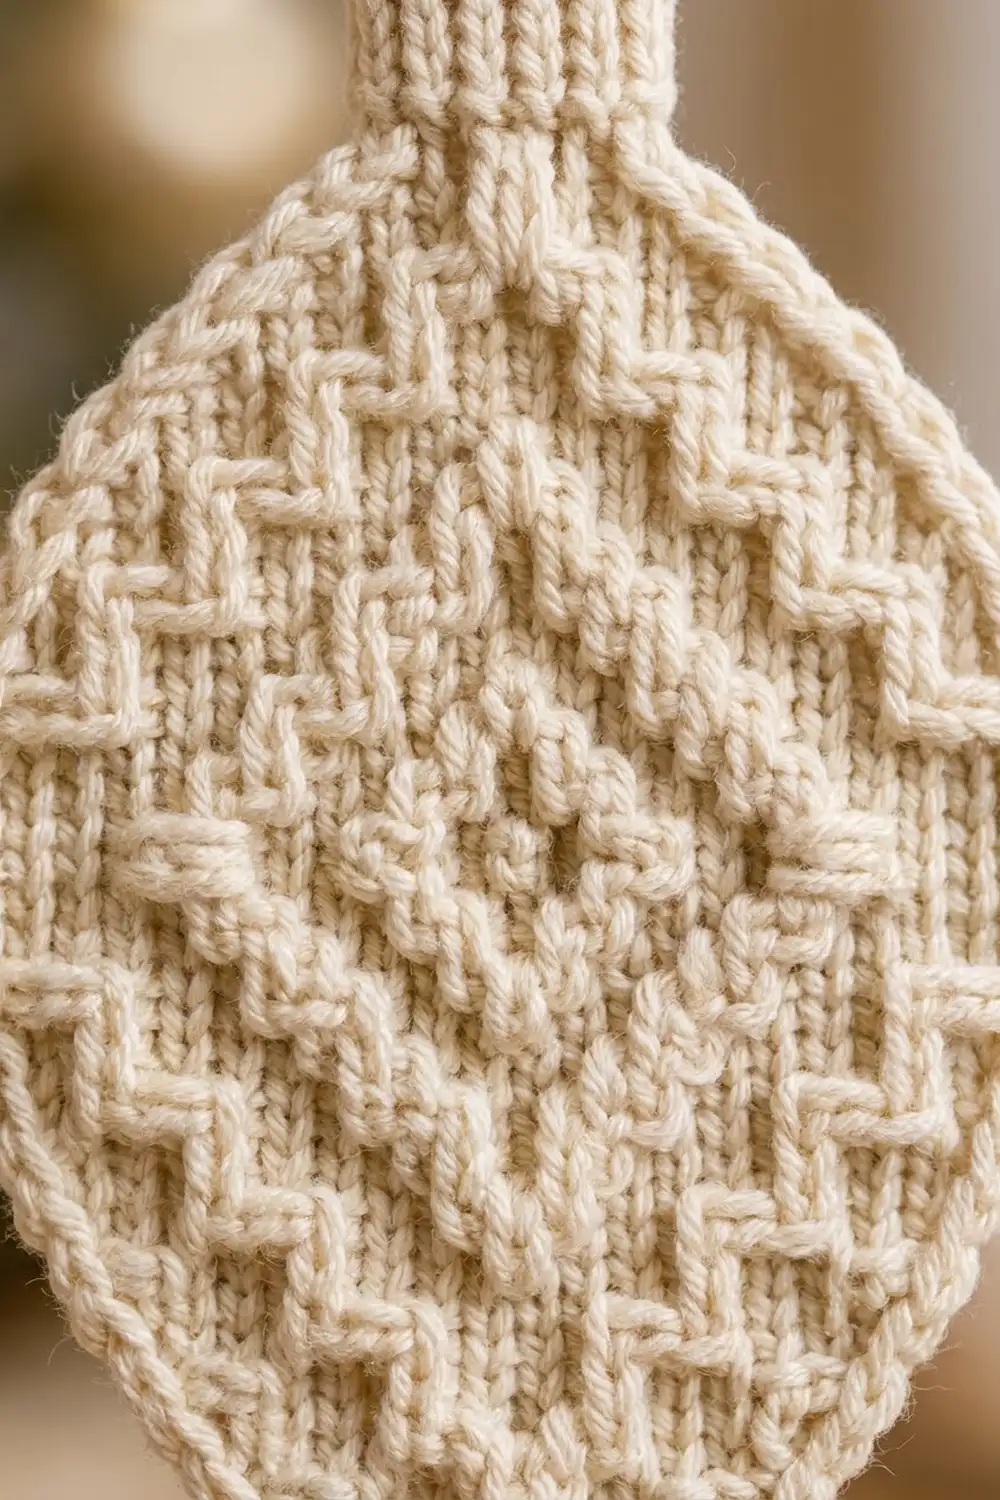
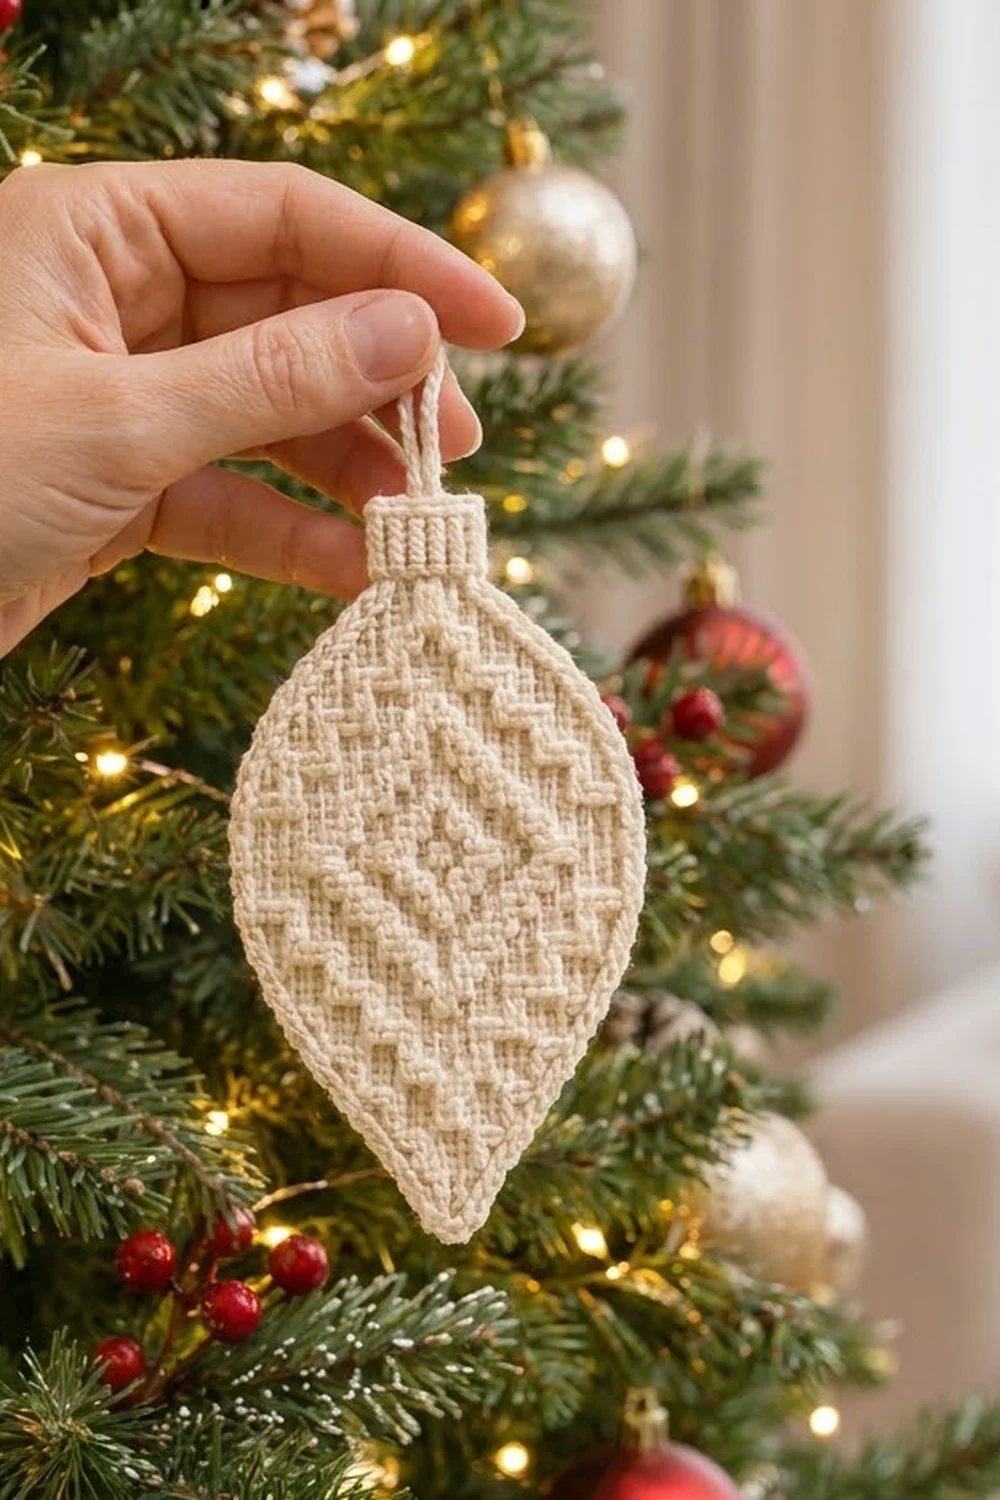
This textured flat ornament has a classic bauble shape: a pointed tip at the bottom, softly rounded shoulders and a small ribbed cap with a hanging loop. Raised front-post stitches draw four nested diamonds on the front, with a small solid diamond in the center. They stand out like embossed lines on the cream background.
It’s made in a single cream or ivory color, so all the interest comes from texture. The finished ornament looks calm and Nordic-inspired, and it suits natural, white, gold or rustic tree themes. A rolled reverse single crochet edge outlines the shape with a neat corded finish.
The pattern uses US crochet terms. The finished ornament measures 4.2 in wide x 6.1 in tall (10.7 cm x 15.5 cm) without the loop, or about 7.6 in (19.3 cm) including it.
Construction overview: The body is worked flat in rows from the bottom tip upward. It increases to the widest point, then decreases toward the top. The cap is worked straight off the center stitches of the last body row. Two border rounds go around the whole outline, and then you add the hanging loop. It’s one piece, so there’s no sewing.
Finished Size and Construction
- Finished size: 4.2 in x 6.1 in (10.7 cm x 15.5 cm), plus about a 1.5 in (3.8 cm) loop
- Skill level: Intermediate (front-post stitches, shaping, reverse sc)
- Terminology: US
- Yarn weight: DK (#3)
- Hook: 3.5 mm (E-4)
- Number of pieces: 1
- Layout: single flat ornament, no joining
- Piece size before border: 3.8 in x 5.7 in (9.7 cm x 14.5 cm), cap included
- Body only: 3.8 in x 5 in (9.7 cm x 12.7 cm); cap 1 in x 0.7 in (2.5 cm x 1.8 cm)
- Border depth: about 0.2 in (0.5 cm) per side
Materials
Yarn: Use a smooth DK cotton or cotton blend in cream or ivory. Cotton shows the raised posts crisply and holds its flat shape well. Fuzzy or very loose yarns will blur the diamonds, so avoid them.
- Cream (one color): 20 g / about 46 m (50 yd) per ornament
The quantity includes a safety margin of about 30% for the gauge swatch and weaving in ends. If you plan more than one ornament, allow the same amount for each.
Tools:
- 3.5 mm (E-4) crochet hook
- Tapestry needle
- 2 stitch markers
- Scissors
- Blocking mat, rust-proof pins and a spray bottle
- Ruler or tape measure
Abbreviations (US Terms)
- ch – chain
- sc – single crochet
- sc2tog – single crochet 2 together
- sl st – slip stitch
- st(s) – stitch(es)
- RS / WS – right side / wrong side
- rev sc – reverse single crochet (crab stitch)
Special stitch – FPdc (front-post double crochet, two rows below): Yarn over and insert the hook from front to back to front around the post of the matching stitch two rows below. Then complete a double crochet as usual. Always skip the stitch on the current row that sits behind the FPdc. That way each FPdc replaces one stitch, and the stitch count doesn’t change.
Rev sc: Working from left to right (right-handed), insert the hook into the next stitch to the right, pull up a loop, yarn over and pull through both loops.
Gauge and Checkpoints
Gauge: 20 sc and 24 rows = 4 in (10.2 cm) in plain sc rows. That’s 5 sts and 6 rows per inch.
Test first: Chain 25 and work 24 sc per row for 28 rows. Measure 4 in (10.2 cm) in the center, away from the edges. Front-post stitches can pull the fabric in slightly, so treat the Row 17 checkpoint below as your real test.
Checkpoints:
- After Row 17: 19 sts, 3.8 in (9.7 cm) wide, about 2.8 in (7.1 cm) tall
- After Row 22: still 3.8 in (9.7 cm) wide, about 3.7 in (9.4 cm) tall
- After Row 30: body 5 in (12.7 cm) tall
- After Row 34: 5.7 in (14.5 cm) tall including the cap
- After the border: 4.2 in x 6.1 in (10.7 cm x 15.5 cm)
If your piece is too big, go down 0.25 to 0.5 mm in hook size. If it’s too small, go up by the same amount. Change the hook rather than the stitch counts, because the diamonds depend on the exact counts.
Body
All RS (odd) rows can contain FPdc stitches. All WS (even) rows are plain sc. Turn at the end of every row, and the ch 1 at the start of a row doesn’t count as a stitch. Increases are always “2 sc in the first/last st” on RS rows. When you see “FPdc,” work it around the stitch directly below, two rows down, and skip the stitch behind it.
Row 1 (RS): Ch 4, sc in 2nd ch from hook and in next 2 ch. (3 sts)
Row 2 (WS): Ch 1, sc in each st across. (3)
Row 3: Ch 1, 2 sc in first st, FPdc around the center st of Row 1, 2 sc in last st. (5 sts: 4 sc, 1 FPdc)
Row 4 and every even row through Row 18: Ch 1, sc in each st across. The count matches the row before.
Row 5: Ch 1, 2 sc in first st, FPdc, sc, FPdc, 2 sc in last st. (7 sts: 2 FPdc)
Row 7: Ch 1, 2 sc in first st, [FPdc, sc] 2 times, FPdc, 2 sc in last st. (9 sts: 3 FPdc)
Row 9: Ch 1, 2 sc in first st, [FPdc, sc] 3 times, FPdc, 2 sc in last st. (11 sts: 4 FPdc)
Row 11: Ch 1, 2 sc in first st, [FPdc, sc] 4 times, FPdc, 2 sc in last st. (13 sts: 5 FPdc)
Row 13: Ch 1, 2 sc in first st, [FPdc, sc] 5 times, FPdc, 2 sc in last st. (15 sts: 6 FPdc)
Row 15: Ch 1, 2 sc in first st, [FPdc, sc] 6 times, FPdc, 2 sc in last st. (17 sts: 7 FPdc)
Row 17 (widest, diamond centers): Ch 1, 2 sc in first st, [FPdc, sc] 3 times, FPdc 3 times, [sc, FPdc] 3 times, 2 sc in last st. (19 sts: 9 FPdc)
The three FPdc in a row at the center close the small solid diamond. Each FPdc line moves out by one stitch every RS row, and you can see the posts stepping diagonally. That’s what draws the nested outlines.
Row 18: Ch 1, sc across. (19)
Row 19: Ch 1, sc in first 3 sts, [FPdc, sc] 6 times, FPdc, sc in last 3 sts. (19 sts: 7 FPdc)
Row 20: Ch 1, sc across. (19)
Row 21: Ch 1, sc in first 4 sts, [FPdc, sc] 5 times, FPdc, sc in last 4 sts. (19 sts: 6 FPdc)
Row 22: Ch 1, sc across. (19)
Now the posts step back inward and close the diamonds above the center.
Row 23: Ch 1, sc2tog, sc in next 3 sts, [FPdc, sc] 4 times, FPdc, sc in next 3 sts, sc2tog. (17 sts: 5 FPdc)
Row 24: Ch 1, sc across. (17)
Row 25: Ch 1, sc2tog, sc in next 3 sts, [FPdc, sc] 3 times, FPdc, sc in next 3 sts, sc2tog. (15 sts: 4 FPdc)
Row 26: Ch 1, sc across. (15)
Row 27: Ch 1, sc2tog, sc in next 3 sts, [FPdc, sc] 2 times, FPdc, sc in next 3 sts, sc2tog. (13 sts: 3 FPdc)
Row 28 (WS): Ch 1, sc2tog, sc in next 9 sts, sc2tog. (11)
Row 29: Ch 1, sc2tog, sc in next 2 sts, FPdc, sc, FPdc, sc in next 2 sts, sc2tog. (9 sts: 2 FPdc)
Row 30: Ch 1, sc across. (9)
The decreases on Rows 27, 28 and 29 come close together, which rounds the shoulders. The bottom stays pointed because it increases more slowly.
Checkpoint: The body is 5 in (12.7 cm) tall and 3.8 in (9.7 cm) wide at Rows 17–22.
Cap
Row 31 (RS): Ch 1, sl st loosely in first 2 sts, ch 1, sc in next 2 sts, FPdc around the center st of Row 29, sc in next 2 sts. Leave the last 2 sts unworked. (5 sts: 1 FPdc)
This FPdc is the top point of the outermost diamond.
Row 32: Ch 1, sc across. (5)
Row 33: Ch 1, sc in first st, FPdc around each of the next 3 sts of Row 31, sc in last st. (5 sts: 3 FPdc)
Row 34: Ch 1, sc across. (5)
The three raised posts make the vertical ribs on the cap. Don’t fasten off. Ch 1 and turn so the RS faces you.
Checkpoint: The cap is 1 in (2.5 cm) wide and about 0.7 in (1.8 cm) tall. The total height is 5.7 in (14.5 cm).
Border
Border gauge: Along the shaped edges, 1 sc per row end gives about 5 sts per inch, which matches the stitch gauge.
Round 1 (RS): Work in this order:
- Cap top: 3 sc in first st, sc in next 3 sts, 3 sc in last st. (9 sts)
- Left side: 1 sc in each of the 4 cap row ends, then sc in each of the 2 sts of Row 30 beside the cap (through the sl sts), then 1 sc in each of the 30 body row ends. (36 sts)
- Bottom tip: Working in the free loops of the foundation ch: sc in first loop, 3 sc in center loop, sc in last loop. (5 sts)
- Right side: 1 sc in each of the 30 body row ends, sc in each of the 2 unworked sts of Row 30, then 1 sc in each of the 4 cap row ends. (36 sts)
Join with a sl st to the first sc. (86 sts)
Round 2: Ch 1, rev sc in each st around. Join with a sl st to the first rev sc. (86 sts) Fasten off.
Why the math works: The tapered edge from Row 1 to Row 17 rises 2.8 in (7.1 cm) and runs 1.8 in (4.6 cm) sideways. That makes the diagonal about 3.4 in (8.6 cm) long. Its 17 row ends at 1 sc each give roughly 5 sc per inch, which matches the stitch gauge, so the edge lies flat. The two 3-sc corners on the cap and the 3-sc tip at the bottom are the only extra stitches. The corners need them to turn without pulling.
Hanging loop: Join the yarn in the center (5th) stitch of the cap top. Ch 18, sl st in the same stitch, then sl st in each ch back along the loop to firm it into a cord. Fasten off. The loop hangs about 1.5 in (3.8 cm) high.
Checkpoint: 4.2 in x 6.1 in (10.7 cm x 15.5 cm) without the loop.
Final Blocking
- Weave in all ends on the WS, following the stitch lines so they don’t show through.
- Lightly mist the ornament with water until it’s damp, not soaked.
- Lay it RS up on the blocking mat.
- Pin the bottom tip, the two widest points (Rows 17–22) and the two cap corners first.
- Check the size: 4.2 in (10.7 cm) at the widest point and 6.1 in (15.5 cm) from tip to cap top.
- Add pins along the curves to keep the outline smooth and symmetrical. Don’t press or flatten the raised posts.
- Let it dry completely, ideally overnight, before you unpin it.
Final Quality-Control Checklist
- The stitch count was 19 at the widest rows and 86 in both border rounds.
- There are four complete nested diamond outlines plus a solid 3-post center diamond.
- The diagonal lines step evenly, one stitch per RS row, with no breaks.
- The cap is centered over the body, with 2 body stitches on each side.
- The cap has 3 vertical ribs.
- The bottom tip is a clean point.
- The rev sc edge is even and doesn’t ripple.
- The loop is centered and firmly attached.
- Both sides are the same width and the ornament hangs straight.
Troubleshooting
The diamonds are lopsided: You probably worked a FPdc into the wrong column. Each FPdc goes around the stitch directly below it, two rows down, and you skip the stitch behind it. Count both halves of the row from the edges.
The stitch count grows on RS rows: You forgot to skip the stitch behind a FPdc. Recount before you continue.
The fabric curls or puckers: Your FPdc stitches are too tight. Pull up a slightly taller loop around the post.
The border ruffles: You probably worked more than 1 sc into some row ends. Go down a hook size for the border only.
The border cups: Your border tension is too tight. Go up 0.5 mm for Round 2.
The cap is off-center: Make sure Row 31 skips exactly 2 sts at each end.
The point is blunt: Work the 3-sc group into the center foundation loop and pin the tip firmly while blocking.
Care
Hand wash in cool water with mild soap, then press the water out gently in a towel. Reshape and dry flat. Store the ornament flat between tissue paper so the edge stays crisp.
Final Notes
Here’s the measurement chain: a gauge of 20 sc x 24 rows = 4 in (10.2 cm) gives a 19-stitch body 3.8 in (9.7 cm) wide. The 30 body rows make it 5 in (12.7 cm) tall, and the 4-row cap brings it to 5.7 in (14.5 cm). The two 86-stitch border rounds add 0.2 in (0.5 cm) on every side, so the ornament finishes at 4.2 in x 6.1 in (10.7 cm x 15.5 cm). If you check each stage as you go, the diamonds will line up and the shape will block cleanly.
Happy crocheting!