

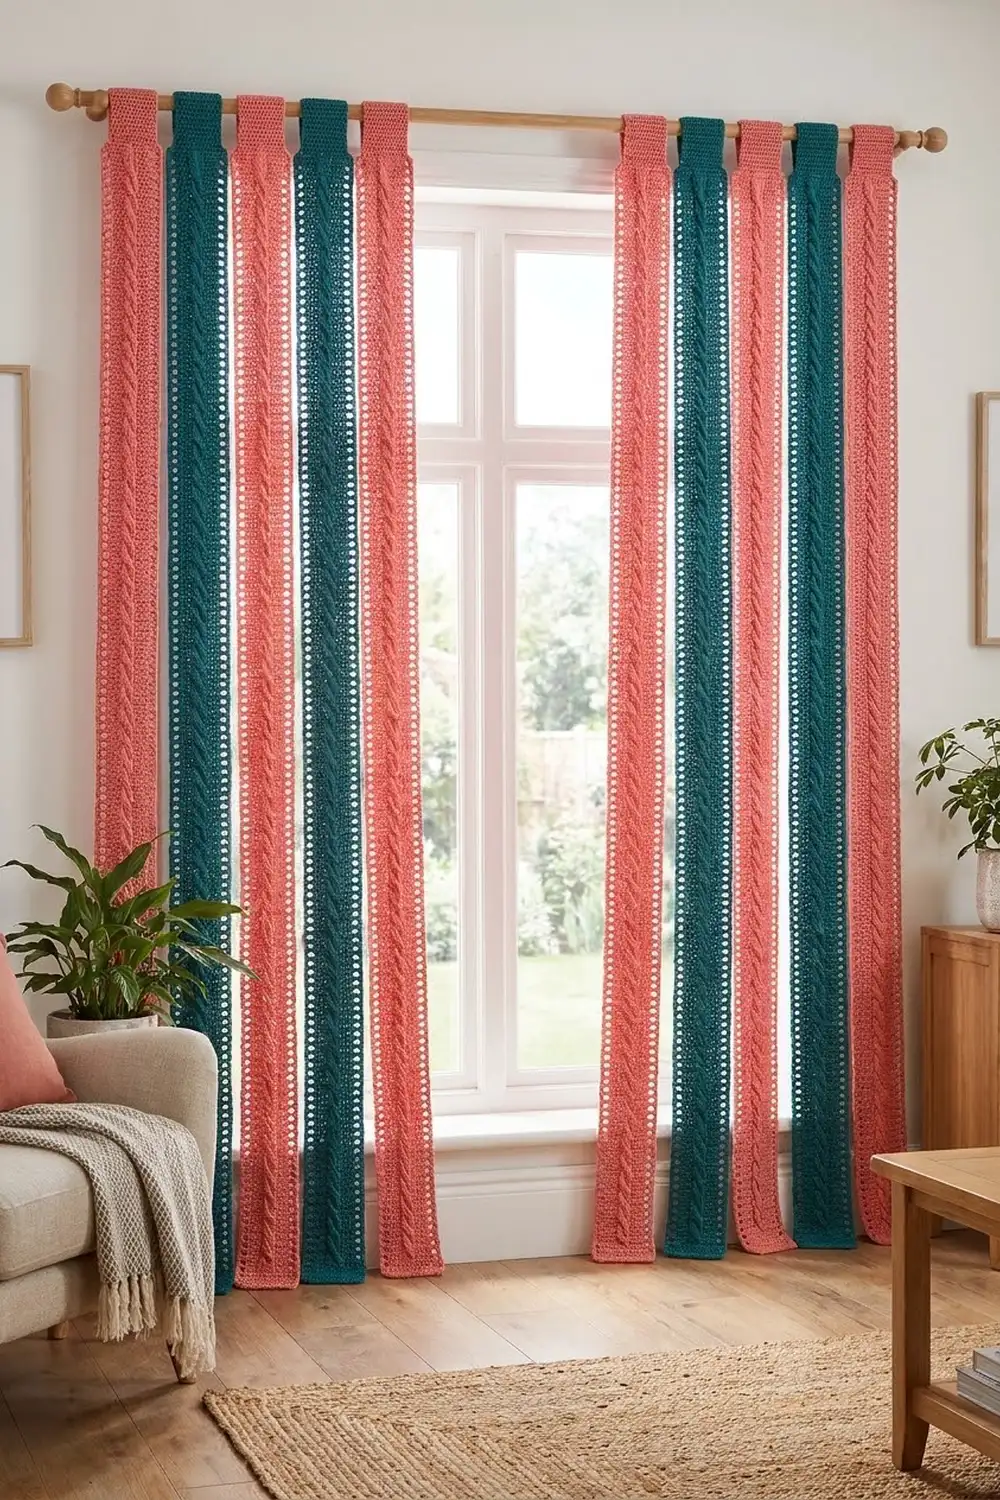
This curtain is made of tall, separate crochet strips. Each strip has a raised rope cable down the middle and an airy ladder edge on both long sides. The strips alternate coral and deep teal and hang one by one from a wooden rod, so light comes through the ladder openings while the cables add a hand-knit look.
The style is warm and a little retro. The fabric is solid enough to soften a bright window but open enough that the room still feels airy. Since every strip hangs separately, the curtain moves easily and you can push strips aside without opening the whole panel.
This pattern uses US crochet terms. Each finished strip is 5.5 in (14.0 cm) wide and 78 in (198.1 cm) long, plus a 3 in (7.6 cm) folded hanging tab. One curtain panel of 6 strips covers 33 in (83.8 cm). The full set is 2 panels of 6 strips, 12 strips in total.
Each strip has three parts. First you work a 14-stitch cable panel in rows from the bottom up. Then you add a three-row ladder border down each long edge. Last, you crochet a tab at the top and fold it to the back. The strips are never sewn together.
Finished Size and Construction
- Finished strip size: 5.5 in x 78 in (14.0 cm x 198.1 cm), tab not included
- Hanging length: about 81 in (205.7 cm) from top of rod to hem
- Skill level: Intermediate (front post stitches, cable crossings)
- Terminology: US crochet terms
- Yarn weight: Worsted (#4)
- Hook: 5.0 mm (H-8)
- Number of pieces: 12 separate strips (6 coral, 6 teal)
- Layout: 2 panels, 6 strips each, colors alternating
- Cable panel width (before border): 3.5 in (8.9 cm)
- Border depth: 1 in (2.5 cm) on each long side
- Panel width with 6 strips: 33 in (83.8 cm)
Materials
Pick a smooth worsted cotton or cotton blend. Cotton shows the cables clearly, holds its shape on a long drop, and stands up to sunlight better than most acrylics. Avoid fuzzy or very stretchy yarn, because a 78 in (198.1 cm) strip will sag under its own weight.
Amounts are based on a yarn of about 200 m (219 yd) per 100 g:
- Coral: 1,500 g, about 3,000 m (3,281 yd), for 6 strips
- Teal: 1,500 g, about 3,000 m (3,281 yd), for 6 strips
Each strip uses about 230 g, roughly 460 m (503 yd). The amounts above include a margin for gauge swatches and small length changes.
Tools:
– 5.0 mm (H-8) crochet hook
– Locking stitch markers
– Tapestry needle
– Measuring tape (at least 80 in / 203.2 cm long, or mark it on the floor)
– Rust-proof pins and a long blocking surface
– Spray bottle
– Scissors
Abbreviations (US Terms)
- ch – chain
- sc – single crochet
- dc – double crochet
- FPdc – front post double crochet
- FPtr – front post treble crochet
- sk – skip
- sp – space
- st(s) – stitch(es)
- RS / WS – right side / wrong side
Special stitch – Cable Cross (CC): Sk the next 3 FP sts. FPtr around each of the next 3 FP sts. Then, working in front of the 3 sts you just made, FPtr around each of the 3 skipped sts. That is 6 sts, all leaning the same way, which makes the rope twist.
Post stitch rule: Every FP st on a RS row goes around the matching FP st two rows below. Always skip the sc behind each FP st, so the count stays at 14.
Gauge and Checkpoints
Panel gauge: 14 sts = 3.5 in (8.9 cm) wide, and 10 rows = 4 in (10.2 cm) in cable pattern.
Tab gauge (sc): 14 sts and 16 rows = 4 in (10.2 cm).
Make one complete strip and check it before you start the other eleven. Measure at these points:
- After Row 25: 10 in (25.4 cm) long, 3.5 in (8.9 cm) wide.
- After Row 100: 40 in (101.6 cm) long. Hang it from a clip for a few minutes and measure again. Expect it to stretch about 0.5 in (1.3 cm).
- After Row 195: 78 in (198.1 cm) long.
- After border: 5.5 in (14.0 cm) wide.
Too wide or too long: Change to a 4.5 mm (7) hook.
Too narrow or too short: Change to a 5.5 mm (I-9) hook.
Width matters more than length, because length is easy to adjust in 4-row repeats.
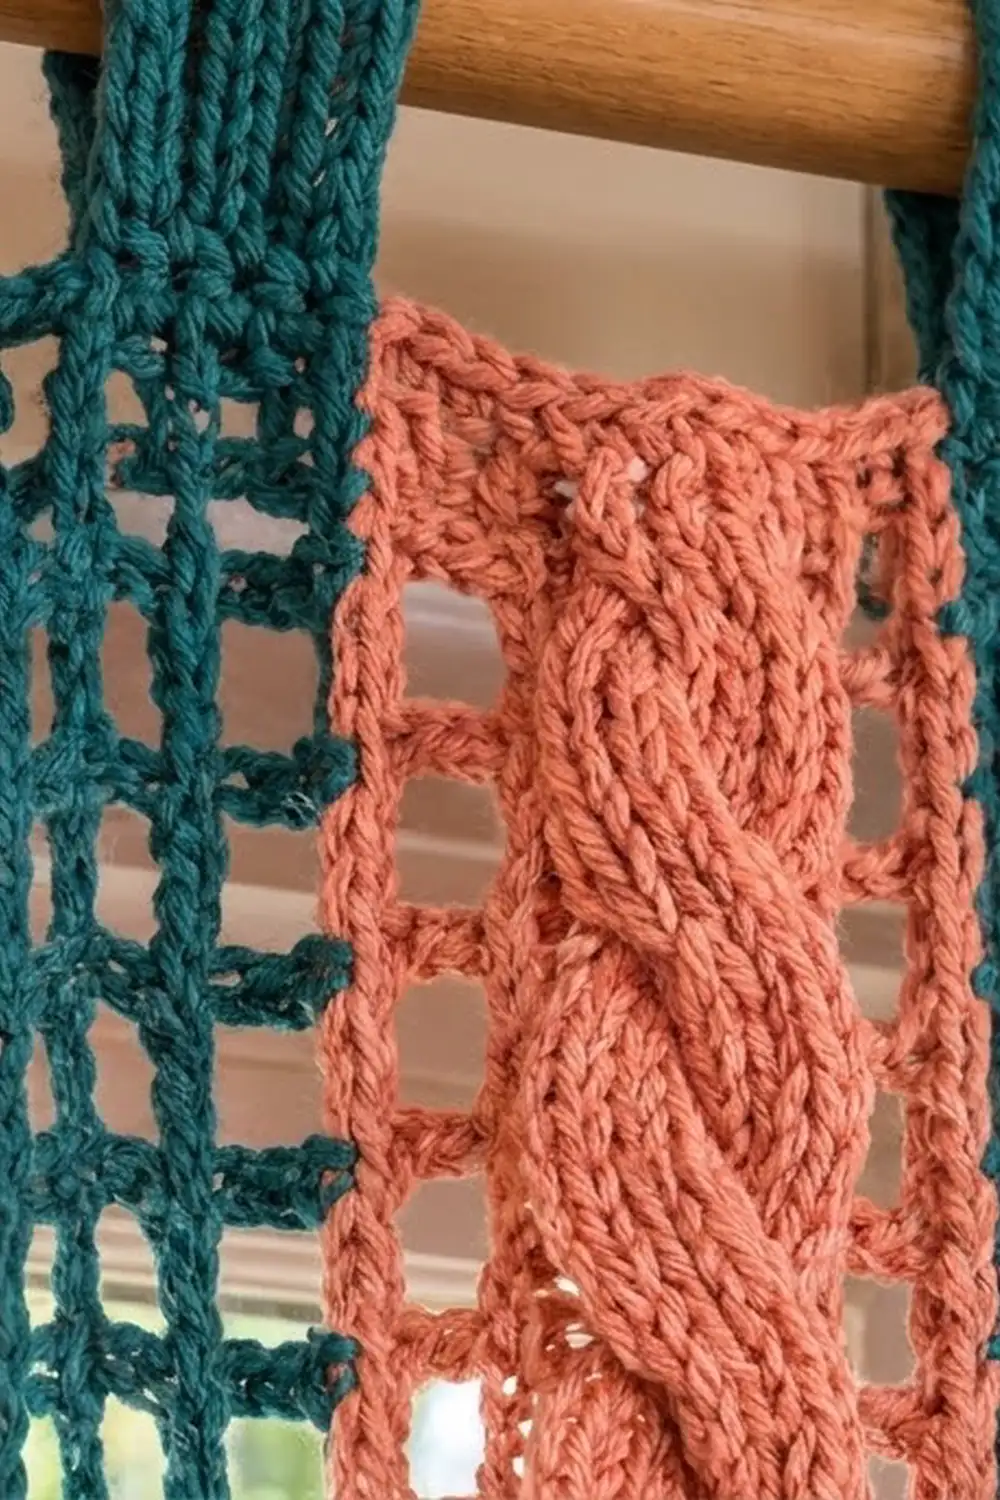
Cable Panel
Make 1 per strip. The turning ch does not count as a st on any row.
Foundation: Ch 15.
Row 1 (WS): Sc in 2nd ch from hook and in each ch across, turn. (14 sc)
Row 2 (RS): Ch 2, dc in first 4 sts, FPdc around each of next 6 sts, dc in last 4 sts, turn. (14 sts: 8 dc, 6 FPdc)
Row 3 (WS): Ch 1, sc in each st across, turn. (14 sc)
Row 4 (RS): Ch 2, dc in first 4 sts, FPtr around each of next 6 FP sts two rows below, dc in last 4 sts, turn. (14 sts)
Row 5 (WS): Repeat Row 3. (14 sc)
Row 6 (RS, cross row): Ch 2, dc in first 4 sts, CC over next 6 FP sts two rows below, dc in last 4 sts, turn. (14 sts)
Row 7 (WS): Repeat Row 3. (14 sc)
Row 8 (RS, plain row): Repeat Row 4. (14 sts)
Row 9 (WS): Repeat Row 3. (14 sc)
Rows 10–193: Repeat Rows 6–9 another 46 times. With the first repeat (Rows 6–9) that makes 47 repeats, or 188 rows, ending on a WS sc row.
Rows 194–195: Repeat Rows 6–7 once, for one last cross and a closing sc row.
Row total: 5 setup rows + 188 repeat rows + 2 closing rows = 195 rows. At 2.5 rows per inch, that is 78 in (198.1 cm). Rows 1 to 195 alternate sc rows and dc rows: 98 odd-numbered sc rows and 97 even-numbered dc rows.
Fasten off and weave in the ends.
To change length: Add or remove whole 4-row repeats. Each one is 1.6 in (4.1 cm). If you change the row count, see the border note below.
Make All Pieces
Make 12 complete strips (panel, border, and tab):
- Coral: 6 strips
- Teal: 6 strips
Finish each strip completely before starting the next one. That way every strip gets the same tension from start to end.
Layout grid (as seen from the room side):
Panel A (left of window)     Panel B (right of window)
| C | T | C | T | C | T |    | C | T | C | T | C | T |
C = Coral, T = Teal. Each column is one 5.5 in (14.0 cm) strip, so each panel is 33 in (83.8 cm) wide.
Joining (Hanging Method, No Seams)
The strips are not sewn together. That is a deliberate part of the design. Each strip hangs from its own tab, so it can swing freely, and you can wash or replace a single strip.
How they line up: Slide the tabs onto the rod in the order of the grid. Push each strip up against the one before it, so the ladder edges touch without overlapping. The outer rails of neighboring strips sit side by side, which visually makes the openings look doubled.
Tension: Don’t stretch any strip to make it “fit.” If one strip hangs more than 0.5 in (1.3 cm) longer than its neighbors, block it again rather than tugging it.
Size checkpoint: Six strips edge to edge should measure 33 in (83.8 cm) across at the rod and at the hem. If the hem is wider, the borders were blocked too wide. Re-block them to 5.5 in (14.0 cm).
Border (Ladder Edging)
The border is worked along each long edge separately, with the RS facing you. The short ends get no border.
Border gauge: 292 sc along 78 in (198.1 cm), which is about 3.75 sc per inch. That is a little denser than the panel’s 3.5 sts per inch. The extra sts stop the ladder from pulling the edge in when the strip hangs.
Edge spacing rule: Work 1 sc in the end of each sc row and 2 sc in the end of each dc row.
Side 1
Row A1 (inner rail): With RS facing, join yarn at the top corner of the right edge. Working down the edge, follow the spacing rule. That gives 98 sc for the sc rows plus 194 sc for the dc rows, for 292 sc. Turn.
Row A2 (rungs): Ch 3 (counts as dc), ch 2, sk 2 sts, dc in next st. Repeat from * across. That gives 98 dc posts and 97 ch-2 sps, turn.
Row A3 (outer rail): Ch 1, sc in each dc and 2 sc in each ch-2 sp across. That gives 98 sc + 194 sc = 292 sc. Fasten off.
Side 2
Join at the bottom corner of the other long edge and work up toward the top. Repeat Rows A1–A3 exactly: 292 sc, then 98 dc and 97 ch-2 sps, then 292 sc.
Why the math works: The rung row needs a multiple of 3 plus 1. Each repeat uses 3 sts (2 skipped and 1 dc), and the last dc needs 1 more. 3 x 97 + 1 = 292, so the rung row ends exactly in the last st. The outer rail adds back the same 2 sts for each space, so it ends at 292 again. Each opening covers about 0.8 in (2.0 cm) of length, which gives the tall rectangular windows.
Width check: 3.5 in (8.9 cm) panel + 1 in (2.5 cm) border + 1 in (2.5 cm) border = 5.5 in (14.0 cm).
If you changed the length: Each added or removed 4-row repeat changes Row A1 by 6 sc (2 sc rows at 1 sc each, plus 2 dc rows at 2 sc each). The count stays a multiple of 3 plus 1, so the ladder still comes out even.
Hanging Tab
Row T1: With RS facing, sk the first 2 sts of Row 195 and join yarn in the 3rd st. Sc in the same st and in each of the next 9 sts, turn. That leaves 2 sts unworked at the other end. (10 sc)
Rows T2–T24: Ch 1, sc in each st across, turn. (10 sc)
The tab is now 6 in (15.2 cm) long and about 2.9 in (7.4 cm) wide. Fasten off, leaving an 18 in (45.7 cm) tail.
Fold the tab to the WS and line its last row up with the base of Row T1. Whipstitch it in place through the back loops of Row 195. This makes a loop 3 in (7.6 cm) tall, which fits rods up to 1.5 in (3.8 cm) across.
Final Blocking
- Weave in all ends first, along the WS of the sc rows.
- Pin the strip flat to 5.5 in x 78 in (14.0 cm x 198.1 cm). If your surface is short, block it in sections.
- Pin one pin at every 3rd ladder opening on both outer rails, so the rungs sit straight across.
- Mist the strip evenly until it is damp, not soaked.
- Press the cable lightly with your palm so it stays raised and rounded. Don’t flatten it.
- Let it dry completely, at least 24 hours.
- Unpin it and let it hang from its tab overnight before you take the final measurement.
Final Quality-Control Checklist
- Every panel row has 14 sts, and the cable crosses every 4 rows.
- All crossings lean the same way.
- Each long edge has 292 sc, then 98 rungs and 97 openings, then 292 sc.
- Each strip is 5.5 in (14.0 cm) wide and 78 in (198.1 cm) long after hanging.
- Tabs are centered, 10 sc wide, and sewn down securely.
- Strip lengths match within 0.5 in (1.3 cm).
- There are 6 coral and 6 teal strips, hung in the grid order.
Troubleshooting
The cable looks flat. Your FPtr sts are too tight. Pull the first loop up to the full height of the row.
The strip curls toward the RS. This is normal with post stitches. Block it again with extra pins along the cable.
The rungs slant. The ladder count is off. Count Row A1 again and fix it to 292.
The edges ripple. You have too many border sts, or the tension was loose. Use a hook one size smaller for the border.
The edges pull in. The tension is too tight. Use a hook one size larger for the border, or check that you worked 2 sc in each dc row-end.
One strip hangs longer. Take off one 4-row repeat at the top, or block that strip again under less pull.
The tab is too tight on the rod. Add 4 rows to the tab, which is 1 in (2.5 cm).
Care
Hand wash or machine wash cold on a gentle cycle in a mesh laundry bag. Then lay each strip flat to dry, and never hang it wet.
Final Notes
The measurements build on each other in a chain. 14 stitches give a 3.5 in (8.9 cm) cable panel. 195 rows give 78 in (198.1 cm). Two 1 in (2.5 cm) ladder borders bring each strip to 5.5 in (14.0 cm). Six strips make a 33 in (83.8 cm) panel. If you check each stage before moving on, all 12 strips will hang straight and even.
Happy crocheting!