

These tab-top curtains are made from rows of half-circle fan motifs that look like small sunrises. Each fan has an open center arch, a round of chain-space spokes, a solid band of double crochet, and a tiny scalloped rim. A cream frame squares each fan into a rectangle, and the frames together form a lacy cream lattice.
The colors are warm terracotta and soft sky blue, alternating row by row, set in natural cream. The style is relaxed and a little retro. The curtains filter sunlight without fully blocking the view.
This pattern uses US crochet terms. Each finished panel measures 43.5 in (110.5 cm) wide and 74.25 in (188.6 cm) long, measured from the top edge to the tips of the hem points. The tabs add about 2.5 in (6.4 cm), so each panel hangs about 76.75 in (194.9 cm) long overall.
Here is the construction in brief:
– Crochet each fan in rows.
– Frame it with two cream rounds to make a 7 x 4 in (17.8 x 10.2 cm) block.
– Join 108 blocks into a grid 6 blocks wide and 18 blocks tall.
– Add a three-round border with a pointed hem, then add seven tabs.
Make two panels for a pair.
Finished Size and Construction
- Finished panel size: 43.5 x 74.25 in (110.5 x 188.6 cm), plus tabs
- Skill level: Intermediate
- Terminology: US
- Yarn weight: Worsted (#4) cotton or cotton blend
- Hook: 5.0 mm (H-8)
- Number of pieces: 216 blocks (108 per panel), joined into 2 panels
- Layout per panel: 6 blocks wide x 18 blocks tall
- Block size: 7 x 4 in (17.8 x 10.2 cm)
- Size before border: 42 x 72 in (106.7 x 182.9 cm)
- Border depth: 0.75 in (1.9 cm) on the top and sides; 1.5 in (3.8 cm) at the hem points
Materials
Choose a smooth combed or mercerized cotton in worsted weight. Cotton drapes well, holds the fan shape, and stands up to sunlight. The amounts below assume balls of about 100 g / 180 m.
- Terracotta: 600 g / 1,080 m (54 fans per panel)
- Sky blue: 600 g / 1,080 m (54 fans per panel)
- Cream: 1,600 g / 2,880 m (block frames, joining, borders, tabs)
These amounts include a margin of roughly 15–20% for swatching and tension differences. Buy each color from a single dye lot.
Tools:
- 5.0 mm (H-8) crochet hook
- Tapestry needle
- Locking stitch markers
- Tape measure
- Blocking mats, rustproof pins, spray bottle
- Scissors
- Curtain rod up to 1.5 in (3.8 cm) in diameter
Abbreviations (US Terms)
- ch – chain
- sl st – slip stitch
- sc – single crochet
- hdc – half double crochet
- dc – double crochet
- tr – treble crochet
- dtr – double treble crochet
- sk – skip
- sp(s) – space(s)
- st(s) – stitch(es)
- BLO – back loop only
- RS / WS – right side / wrong side
Special stitch – Picot: Ch 3, sl st in 3rd ch from hook.
Gauge and Checkpoints
Base gauge: 14 dc and 8 rows = 4 in (10.2 cm) in dc worked flat.
Before you make all 216 blocks, make one complete block and measure it. Every later measurement is a multiple of this block.
Checkpoints for one block:
- After Fan Row 6: 6 in (15.2 cm) wide along the straight edge, 3 in (7.6 cm) tall at the center.
- After Cream Round 1: about 6.5 x 3.75 in (16.5 x 9.5 cm).
- After Cream Round 2: 7 x 4 in (17.8 x 10.2 cm).
If the block is too big: Go down to a 4.5 mm hook, and check that your spoke chains in Rows 2 and 3 aren’t loose.
If the block is too small: Go up to a 5.5 mm (I-9) hook. Small errors add up fast. A block that is 0.25 in (0.6 cm) too narrow makes the panel 1.5 in (3.8 cm) too narrow.
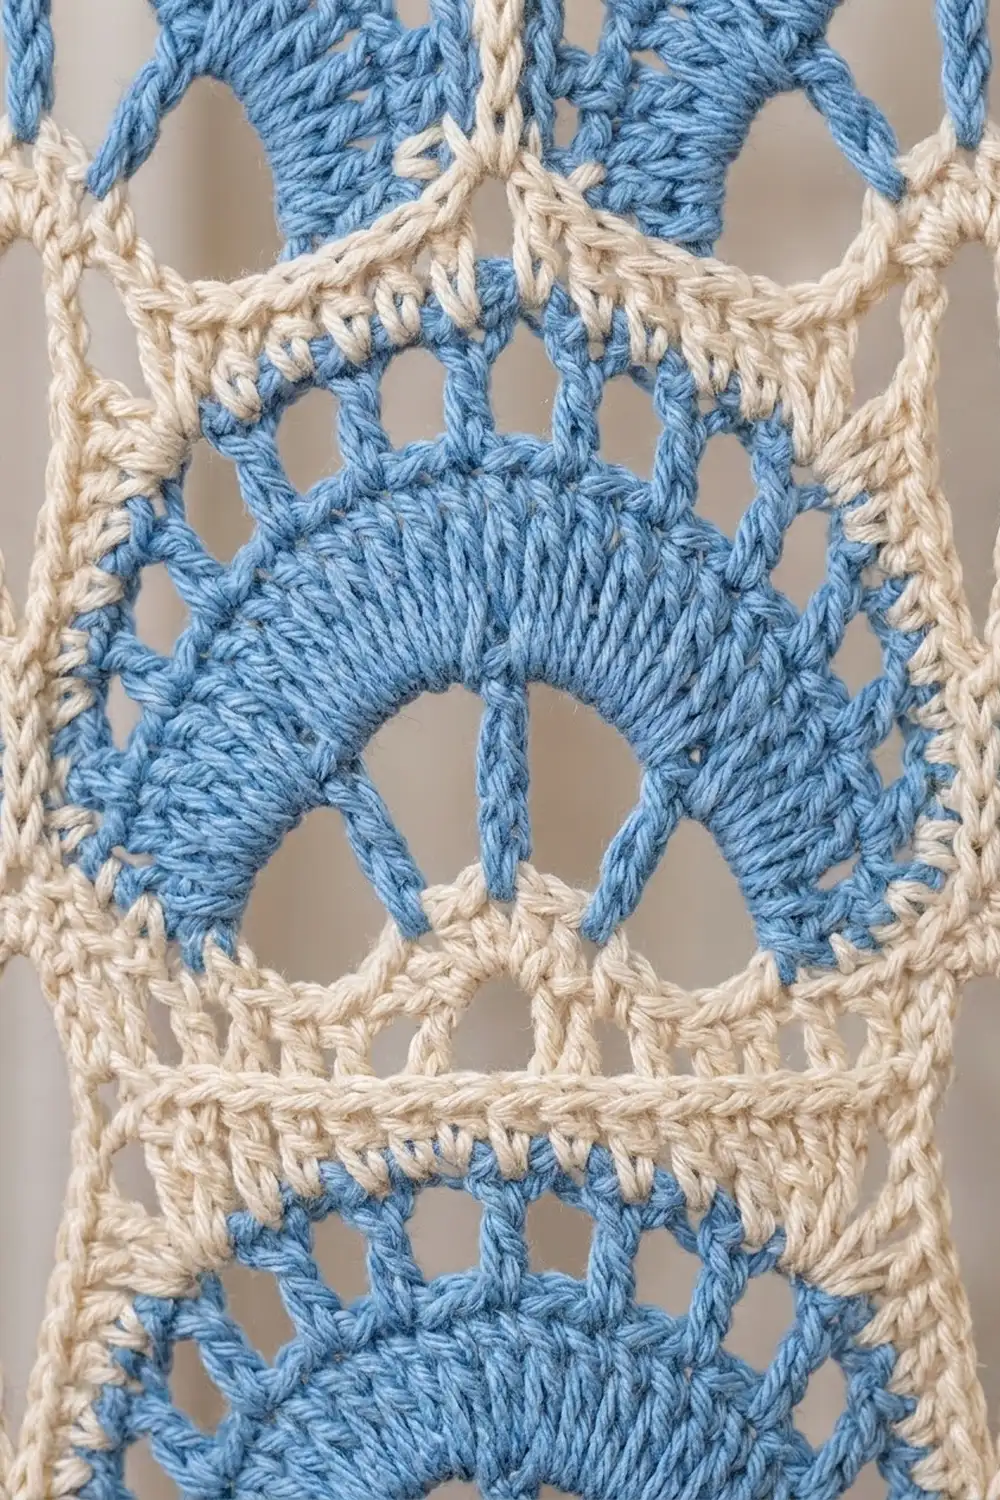
The Fan Motif
For each panel, make 54 fans in terracotta and 54 in sky blue. Row 1 is the RS.
Foundation: Ch 6, sl st in first ch to form a ring.
Row 1 (RS): Ch 3 (counts as dc), 6 dc in ring. Do not join. (7 dc) The dc cover only half the ring. The other half stays open and becomes the center arch.
Row 2 (spokes): Ch 5 (counts as dc + ch 2), turn; [dc in next dc, ch 2] 5 times, dc in top of turning ch. (7 dc, 6 ch-2 sps)
Row 3 (long spokes): Ch 6 (counts as dc + ch 3), turn; [dc in next dc, ch 3] 5 times, dc in 3rd ch of turning ch-5. (7 dc, 6 ch-3 sps)
Row 4 (solid band): Ch 3 (counts as dc), turn; [3 dc in next ch-3 sp, dc in next dc] 6 times. The final dc goes in the 3rd ch of the turning ch-6. (25 dc)
Row 5 (solid band, increase): Ch 3 (counts as dc), turn; dc in next st, [2 dc in next st, dc in next 3 sts] 5 times, 2 dc in next st, dc in last 2 sts. (31 dc)
Row 6 (WS, scalloped rim): Ch 1, turn; sc in first st, [ch 3, sk 1 st, sc in next st] 15 times. (16 sc, 15 ch-3 loops)
Fasten off and weave in the ends. You now have a half-ring: an arch with an open center, spokes, a solid band, and 15 small scallops around the curve.
The Cream Frame
These two rounds square the fan into a rectangle. Short stitches go where the curve touches the frame. Taller stitches fill the two upper corners.
Number the ch-3 loops 1–15. With the RS facing and the curve at the top, loop 1 is at the right-hand end.
Cream Round 1: Join cream with a sl st in loop 1.
- Ch 1, 3 sc in loop 1; 3 hdc in loop 2; 3 dc in loop 3.
- Top-right corner: (tr, dtr, ch 2, dtr, tr) in loop 4.
- 3 tr in loop 5; 2 dc in loop 6; 2 hdc in loop 7; 3 sc in loop 8 (top center); 2 hdc in loop 9; 2 dc in loop 10; 3 tr in loop 11.
- Top-left corner: (tr, dtr, ch 2, dtr, tr) in loop 12.
- 3 dc in loop 13; 3 hdc in loop 14; 3 sc in loop 15.
- Bottom-left corner: Ch 2.
- Straight edge: Work into the row ends along the flat edge of the fan, starting on the left half:
- 1 sc in the Row 6 end
- 2 sc in each of the Row 5, 4 and 3 ends
- 1 sc in each of the Row 2 and Row 1 ends (9 sc on this half)
- 3 sc around the open part of the ring
- 9 sc up the right half, in the same pattern in reverse (21 sc on the straight edge)
- Bottom-right corner: Ch 2, sl st in first sc.
Count:
– Top: 21 sts (dtr, tr, 3 tr, 2 dc, 2 hdc, 3 sc, 2 hdc, 2 dc, 3 tr, tr, dtr)
– Each side: 11 sts (9 from loops 1–3 or 13–15, plus the tr and dtr from the corner loop)
– Bottom: 21 sc
(64 sts, 4 ch-2 corner sps)
Cream Round 2: Ch 1, sc in each st around, working (sc, ch 2, sc) in each ch-2 corner sp; sl st in first sc. Fasten off.
Count: 23 sc across the top and bottom, and 13 sc down each side. Each side count already includes the corner sc at both ends. (72 sc, 4 ch-2 corner sps)
The block should now measure 7 x 4 in (17.8 x 10.2 cm).
Make All Pieces
For each panel, make 54 terracotta blocks and 54 sky blue blocks. For the pair, that’s 108 of each color, 216 blocks in all. Lay every block with its curve pointing up. Alternate the colors by row, starting with terracotta at the top.
Rows 1, 3, 5, 7, 9, 11, 13, 15, 17:   T T T T T T
Rows 2, 4, 6, 8, 10, 12, 14, 16, 18:  B B B B B B
T = terracotta   B = sky blue   (row 1 = top)
Lightly block each block to 7 x 4 in (17.8 x 10.2 cm) before joining. Blocks of matching size give you straight seams.
Joining
Method: A flat slip stitch seam in cream, worked through the back loops with the RS facing up.
Step 1 – Join blocks into rows:
1. Lay two blocks side by side.
2. Sl st through both of the touching corner ch-2 sps.
3. Sl st through the BLO of each matching pair of side sts: 13 sts to 13 sts, corner sc to corner sc.
4. Finish with a sl st through the next pair of corner sps.
5. Keep adding blocks until the row has 6 blocks (5 seams per row).
Step 2 – Join the rows:
1. Lay Row 1 above Row 2.
2. Join the bottom edge of each upper block to the top edge of the block below it, 23 sts to 23 sts.
3. Where four corners meet, work 1 sl st through all four corner sps, then continue.
4. Join all 18 rows this way.
Stitch logic: Every seam matches stitches one to one, so you don’t add or lose any stitches. Along the outer edges, each block keeps exactly 23 sts across the top or bottom and 13 sts down each side.
Tension: Keep the slip stitches as loose as the fabric. Tight seams pucker, and across 18 rows they will shorten the panel. If you crochet tightly, use a 5.5 mm hook for the seams.
Checkpoint: The joined panel should measure 42 x 72 in (106.7 x 182.9 cm).
Border
Border gauge: Along the top and bottom, 23 sts = 7 in (17.8 cm). Along the sides, 13 sts = 4 in (10.2 cm). Both work out to about 3.3 sts per inch, the same as the block edges.
Starting counts:
– Top and bottom: 6 blocks x 23 sts = 138 sts
– Sides: 18 blocks x 13 sts = 234 sts
At the seams, skip the joined corner sps; they are part of the seam.
Round 1: With the RS facing, join cream at the top-right corner. Ch 1, sc in each st around, with ch 2 at each of the 4 panel corners; sl st in first sc. (138 / 234 / 138 / 234 sc, 4 ch-2 corners)
Round 2: Ch 1, sc in each sc around, with ch 2 at each corner; sl st in first sc. (Counts unchanged: 744 sc)
Round 3:
1. Ch 1. Sc in each sc across the top (138 sc), ch 2 at the corner, then sc in each sc down the left side (234 sc). Ch 2 at the corner.
2. Pointed hem (bottom edge): *Sc in next st, hdc in next 2 sts, dc in next 2 sts, (tr, picot, tr) in next st, dc in next 2 sts, hdc in next 2 sts, sc in next st; repeat from * once more, sl st in next st. That 23-st sequence makes 2 points. Work it 5 more times for 12 points in all.
3. Ch 2 at the corner. Sc in each sc up the right side (234 sc), ch 2, sl st in first sc. Fasten off.
Why the math works: Each point uses 11 sts, so 2 points plus 1 sl st use 23 sts, exactly one block’s width. The 12 points sit evenly across the 6 blocks with nothing left over. On the top and sides, the border adds one stitch per edge stitch, so the edges neither flare nor pull in.
Tabs (make 7):
– Placement: Divide the 138 top sts into 7 tab sections of 6 sts, with 16 free sts between tabs: 7 x 6 + 6 x 16 = 138.
– Row 1: Join cream in the first st of a tab section. Ch 1, sc in the same st and in the next 5 sts. (6 sc)
– Rows 2–20: Ch 1, turn, sc BLO in each st. (6 sc)
– Finishing: Each tab measures 1.8 x 5 in (4.6 x 12.7 cm). Fold it to the back and sew the end to the back of Border Round 1 to form a loop.
Final Blocking
- Mist the panel until it is evenly damp.
- Lay it RS up on mats. If you don’t have room for the whole panel, work in sections.
- Pin the straight edges first. Check that the width is 43.5 in (110.5 cm) at the top, middle and bottom.
- Pin every hem point 1.5 in (3.8 cm) below the last seam.
- Use your fingers to round each fan and open up its spokes.
- Let the panel dry completely, then unpin it and steam the tabs flat.
Final Quality-Control Checklist
- 108 blocks per panel, with terracotta in the top row
- All fan curves pointing up
- Each block 7 x 4 in (17.8 x 10.2 cm)
- Flat seams, with block corners meeting in straight lines
- Border counts of 138 / 234 / 138 / 234
- 12 even hem points per panel
- 7 evenly spaced, securely sewn tabs per panel
- All ends woven in on the WS
Troubleshooting
Fan cups: The spokes are too tight. Loosen the chains in Rows 2–3.
Fan ruffles: Check that Row 5 has 31 sts. If it does, go down a hook size.
Top corners of the block dip: Make sure each dtr in loops 4 and 12 is worked to its full height.
Block isn’t rectangular: Recount Cream Round 1. It should be 21 / 11 / 21 / 11 sts.
Panel pulls in at the seams: The seams are too tight. Pull them out and rejoin with a larger hook.
Hem points are uneven: Recount each 23-st repeat, and block every point to the same depth.
Care
Hand wash in cool water, or machine wash on a gentle cycle inside a laundry bag. Lay flat to dry and reshape. Don’t hang the panels while they’re wet, because the weight will stretch them.

Final Notes
Each stage builds on the one before:
– A 6 x 3 in (15.2 x 7.6 cm) fan becomes a 7 x 4 in (17.8 x 10.2 cm) block.
– 108 blocks make a 42 x 72 in (106.7 x 182.9 cm) panel.
– The border brings the panel to 43.5 x 74.25 in (110.5 x 188.6 cm).
– The tabs add about 2.5 in (6.4 cm) above the top edge.
If your first block measures correctly, the rest of the curtains will come out to size.
Happy crocheting!