

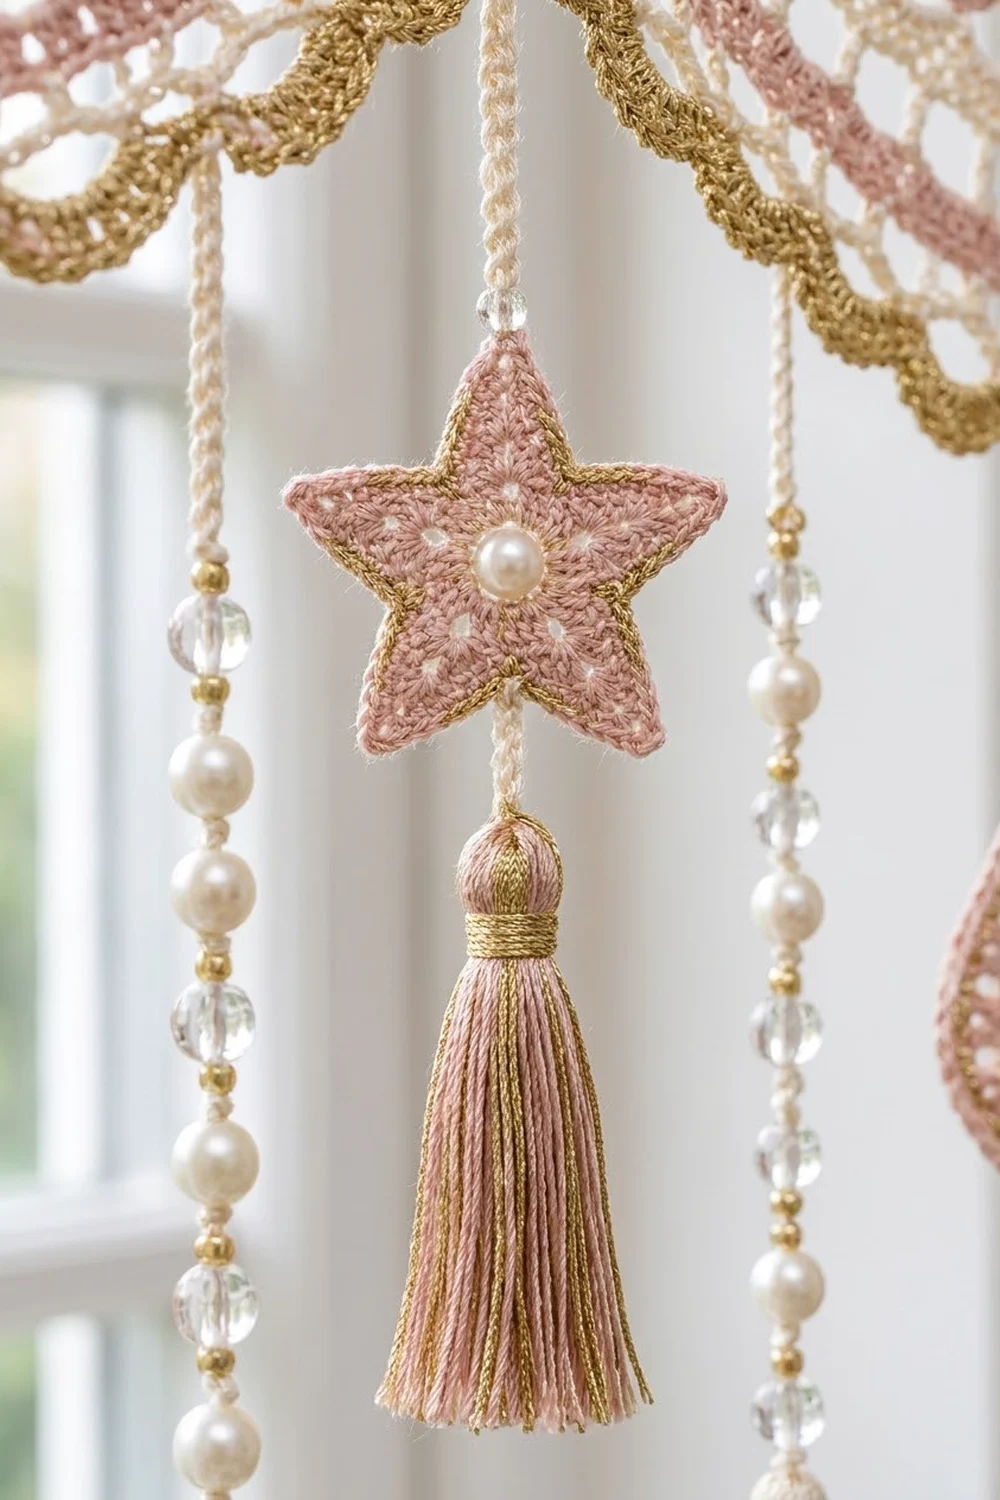
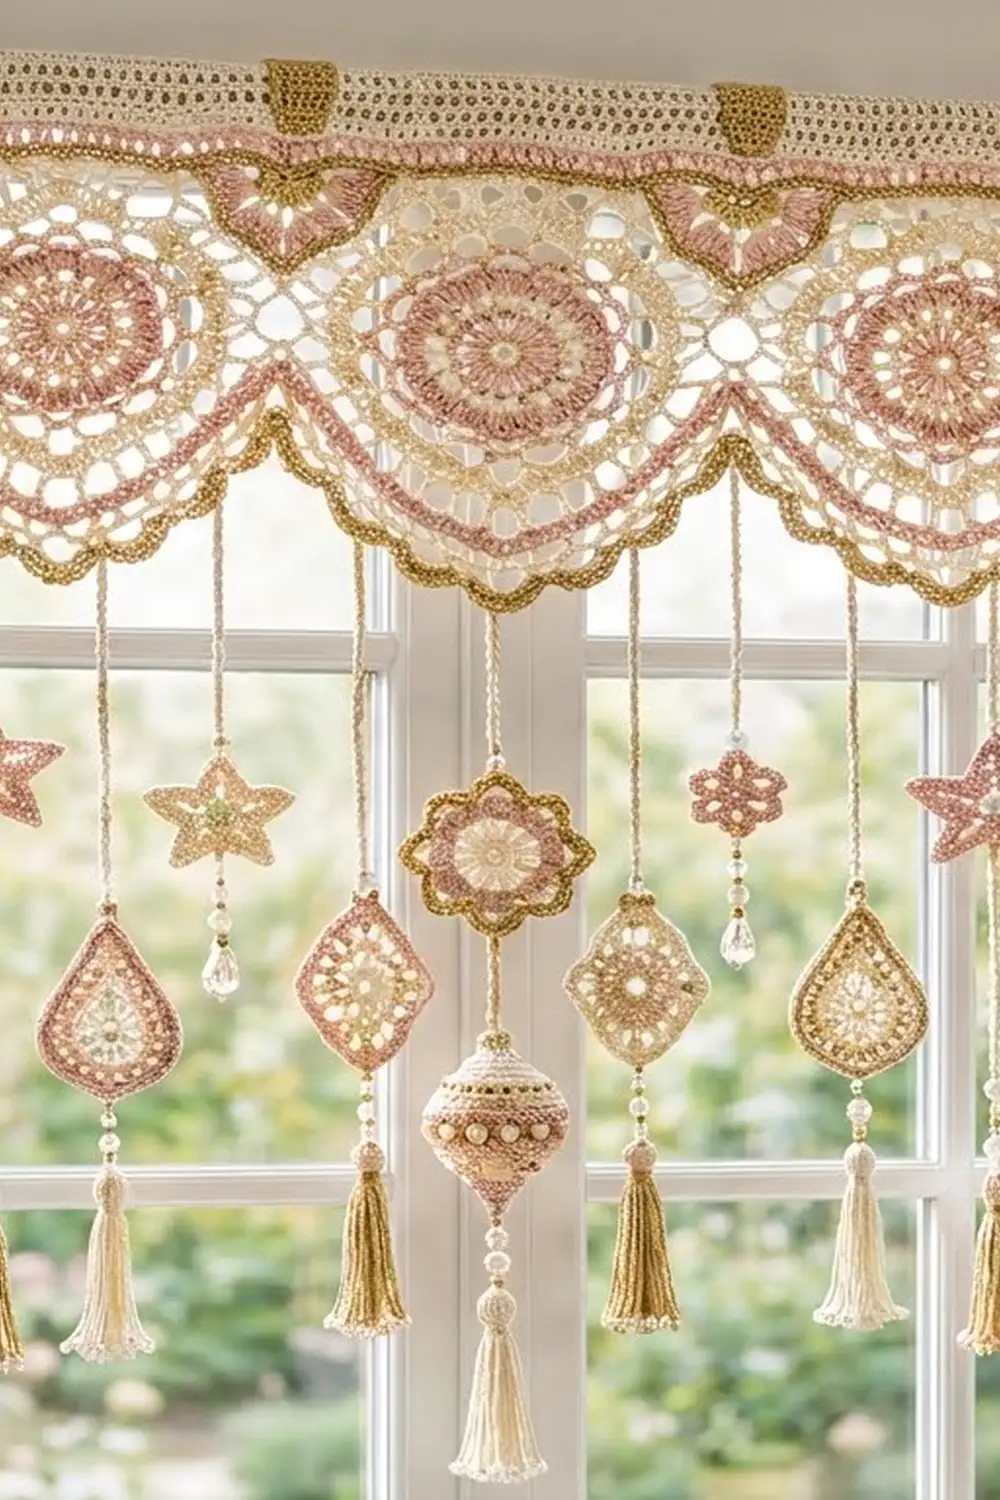
This window valance has a straight lace header and a row of seven round medallions with a scalloped lower edge. Beaded cords hang below it, each holding a small crocheted ornament and a soft tassel.
The colors are blush pink, warm cream and soft gold. Each medallion has a pink spoked center, a lacy cream middle and a gold scalloped rim. The header is open cream mesh with pink and gold stripes, and gold tabs hold it on the rod. The style is romantic cottage, light and airy against the glass.
The pattern uses US terms. The valance body is 38.5 in (97.8 cm) wide and about 10 in (25.4 cm) deep. The drops add 12–15 in (30.5–38.1 cm).
Construction overview:
1. Make seven medallions, joining them as you go in the last round.
2. Work the header across the top of the strip.
3. Work the scalloped edging across the bottom.
4. Add the tabs.
5. Add the 13 beaded drops, each with an ornament and a tassel.
Finished Size and Construction
- Finished size: 38.5 in (97.8 cm) wide x about 10 in (25.4 cm) deep, plus drops of 12–15 in (30.5–38.1 cm)
- Skill level: Intermediate
- Terminology: US
- Yarn weight: Sport (2) mercerized cotton
- Hook: 3.5 mm (E-4)
- Number of pieces: 7 medallions joined into one strip, plus 13 ornaments and 13 tassels
- Layout: 1 row of 7 medallions
- Piece size: 5.5 in (14.0 cm) diameter per medallion
- Size before border: 38.5 in (97.8 cm) x 5.5 in (14.0 cm)
- Border depth: header about 3.25 in (8.3 cm); bottom edging about 1.25 in (3.2 cm)
Materials
Use a smooth sport-weight mercerized cotton, about 155 m per 50 g. Cotton gives crisp lace that won’t sag on the rod. For the gold, use a matte mustard-gold cotton or a cotton blend with a little metallic thread.
- Color A, Blush Pink: 100 g (310 m)
- Color B, Cream: 150 g (465 m)
- Color C, Soft Gold: 100 g (310 m)
These quantities include a margin of about 15%. The tassels use more yarn than you might expect.
Tools and notions:
– 3.5 mm (E-4) hook and a tapestry needle
– Fine beading needle or a dental-floss threader
– 52 beads, 6 mm, for the cords (26 pearl and 26 clear)
– 7 pearls, 10 mm, for the medallion centers (optional)
– 7 pearls, 6 mm, for the star and flower centers
– 16 pearls, 4 mm, for the baubles
– Small amount of fiberfill
– Card 3 in (7.6 cm) wide, for the tassels
– Stitch markers, blocking mats and rust-proof pins
– Curtain rod up to 3/4 in (1.9 cm) in diameter
Abbreviations (US Terms)
- ch: chain
- sl st: slip stitch
- sc: single crochet
- hdc: half double crochet
- dc: double crochet
- tr: treble crochet (yarn over twice)
- dtr: double treble crochet (yarn over 3 times)
- sp: space
- st(s): stitch(es)
- RS / WS: right side / wrong side
Picot (special stitch): Work (sc, ch 3, sc) in the stitch named. The ch-3 is the picot, and it is not counted as a stitch.
Gauge and Checkpoints
Make and block one complete medallion before you start the others. Check it at these stages:
- After Rnd 3: 2.75 in (7.0 cm) across
- After Rnd 5: 4.5 in (11.4 cm) across
- After Rnd 7, blocked: 5.5 in (14.0 cm) across, tip to tip
- Header mesh: 20 sts and 10 rows = 4 in (10.2 cm)
If the medallion is larger than 5.75 in (14.6 cm), change to a 3.25 mm hook. If it is smaller than 5.25 in (13.3 cm), change to a 3.75 mm hook. The error multiplies by seven: a difference of 0.25 in (0.6 cm) per medallion changes the total width by 1.75 in (4.4 cm).
Medallion (make 7)
Work Rnds 1–3 in A, Rnds 4–6 in B and Rnd 7 in C.
Rnd 1 (A): Make a magic ring. Ch 3 (counts as dc), work 15 dc in the ring, sl st to the top of the ch-3. (16 dc)
Rnd 2: Ch 5 (counts as dc + ch 2), dc in next dc, ch 2; rep from * 14 more times, sl st to the 3rd ch of the beginning ch-5. (16 dc, 16 ch-2 sps)*
Rnd 3: Sl st into the first ch-2 sp. Ch 3 (counts as dc) and work 2 dc in the same sp. Work 3 dc in each remaining ch-2 sp, sl st to the top of the ch-3. (48 dc) Fasten off.
Checkpoint: 2.75 in (7.0 cm).
Rnd 4 (B): Join B in any dc. Ch 1, sc in the same dc, ch 5, skip 2 dc, sc in next dc, ch 5, skip 2 dc; rep from * 14 more times, sl st to the first sc. (16 sc, 16 ch-5 loops)*
Rnd 5: Sl st into the first 3 ch of the first loop. Ch 1, sc in the same loop, ch 5, sc in next loop, ch 5; rep from * 14 more times, sl st to the first sc. (16 sc, 16 ch-5 loops)
Checkpoint: 4.5 in (11.4 cm).*
Rnd 6: Sl st into the first loop. Ch 1, sc in the same loop, ch 3, 7 dc in next loop, ch 3, sc in next loop, ch 3, 7 dc in next loop, ch 3; rep from * 6 more times, sl st to the first sc. (8 sc, 8 fans of 7 dc = 56 dc, 16 ch-3 sps)* Fasten off.
Rnd 7 (C): Join C in any sc. Ch 1, sc in the same sc, then 3 sc in next ch-3 sp, sc in next 3 dc, picot in next dc, sc in next 3 dc, 3 sc in next ch-3 sp, sc in next sc; rep from * around. On the last repeat, sl st to the first sc instead of working the final sc. (120 sc, 8 picots)*
Each section has 3 + 3 + 2 + 3 + 3 + 1 = 15 sc, and 15 x 8 = 120. The 8 picots sit 45 degrees apart, at 12, 1:30, 3, 4:30, 6, 7:30, 9 and 10:30 o’clock. If you like, sew a 10 mm pearl into the center ring.
Make All Pieces
- Medallions: 7, each in A (Rnds 1–3), B (Rnds 4–6) and C (Rnd 7)
- Stars: 4, in A with a C edge
- Flowers: 3, in A with a C edge
- Teardrops: 4, in B, A and C
- Baubles: 2, in B with C trim
- Tassels: 13, of which 7 are C and 6 are A
Header + 7 tabs
[M1]-[M2]-[M3]-[M4]-[M5]-[M6]-[M7]
Bottom edging
Drops:  1  2  3  4  5  6  7  8  9 10 11 12 13
        B  S  T  F  T  S  F  S  T  F  T  S  B
Key: B = bauble, S = star, T = teardrop, F = flower. Odd-numbered drops hang below the medallion bottoms, and even-numbered drops hang below the joins.
Joining
The medallions are joined as you go in Rnd 7, with a single picot-to-picot join between each pair.
- Work M1 completely.
- For M2, work Rnd 7 up to the first picot. Sc in that dc, ch 1, sl st into any picot of M1, ch 1, then sc in the same dc of M2. Complete the round as normal.
- For M3 through M7, join the first picot of the new medallion to the picot directly opposite the previous join. To find it, count 4 picots past the joined picot on the previous medallion.
Joining this way keeps all seven centers on one straight line. No stitches are added, so each medallion still has 120 sc and 8 picots. Keep the joining chains relaxed so that the medallions lie flat and just touch.
Size checkpoint: the strip should measure 7 x 5.5 in = 38.5 in (97.8 cm).
Picot names used below:
– Top: 12 o’clock
– Upper diagonals: 10:30 and 1:30
– Lower diagonals: 4:30 and 7:30
– Bottom: 6 o’clock
Border
Border gauge: 20 sts = 4 in (10.2 cm).
Header
Row 1 (C, RS): Join C in the upper-left diagonal picot of M1. Ch 5 (counts as dtr). Ch 9, sc in the top picot, ch 9, dtr in the upper-right diagonal picot, ch 7, dtr in the upper-left diagonal picot of the next medallion. Rep from * 5 more times, then rep from * to ** once. Turn. (189 sts)*
Each medallion uses 1 + 9 + 1 + 9 + 1 = 21 sts, and 7 x 21 = 147. The 6 bridges add 6 x 7 = 42, for a total of 189. The diagonal picots sit about 0.8 in (2.0 cm) below the top picot, which is the height of a dtr, so the row stays level. The valleys below each bridge stay open as lace.
Row 2 (A): Ch 3 (counts as dc), dc in each st and each ch across. Turn. (189 dc)
Row 3 (B): Ch 4 (counts as dc + ch 1), skip 1 st, dc in next st. Ch 1, skip 1 st, dc in next st; rep from * across. Turn. (95 dc + 94 ch-1 sps = 189 sts)*
Rows 4–8: Ch 4, dc in next dc, ch 1; rep from * across, ending with dc in the 3rd ch of the turning ch. Turn. (189 sts)*
Row 9: Ch 1, sc in each dc and in each ch-1 sp across. (189 sc) Fasten off.
The mesh pattern needs an odd count: 189 = (2 x 94) + 1.
Checkpoint: the header should measure 189 ÷ 5 = 37.8 in (96.0 cm) wide and about 3.25 in (8.3 cm) tall. The outer medallions extend about 0.35 in (0.9 cm) past each end, which softens the corners.
Tabs (make 7)
Number the Row 9 stitches 1–189. The top picots sit under sts 11, 39, 67, 95, 123, 151 and 179. Work a tab centered over each one, on these stitches:
– 7–15
– 35–43
– 63–71
– 91–99
– 119–127
– 147–155
– 175–183
Tab Row 1 (C): Join C in the first st of the tab. Ch 1, sc in the same st and in the next 8 sts. Turn. (9 sc)
Tab Rows 2–16: Ch 1, sc in each sc. Turn. (9 sc)
Fasten off, leaving a long tail. Fold the tab to the WS and whipstitch the last row to the back of Row 8.
Check the spacing: 6 + (7 x 9) + (6 x 19) + 6 = 189. For a thicker rod, add 4 rows to each tab for every extra 1/4 in (0.6 cm) of rod diameter.
Bottom Edging
Row A (B, RS): Join B in the left side picot (9 o’clock) of M1. Ch 1, sc in the same picot. Ch 9, sc in the next picot along the lower edge; rep from * until you reach the right side picot of M7. At each join, work the sc through both joined picots. Turn. (29 sc, 28 ch-9 arcs)*
Each medallion has 4 arcs, and 7 x 4 = 28. The arcs share their end stitches, so there are 28 + 1 = 29 sc.
Row B (A): Ch 1, sc in the first sc, 11 hdc in next arc, sc in next sc; rep from * across. Turn. (308 hdc + 29 sc = 337 sts)*
Row C (C): Ch 1, sc in the first sc, sc in next 5 hdc, picot in next hdc, sc in next 5 hdc, sc in next sc; rep from * across. (1 + 28 x 13 = 365 sc, 28 picots)* Fasten off.
Why the math works: each arc spans about 2.1 in (5.3 cm) between picots, and 11 hdc fill that distance without cupping or ruffling. The picots fall at the center of each arc, which echoes the medallion rims.
Ornaments, Tassels and Drops
Star (make 4)
1. With A, make a magic ring and work 10 sc, then sl st to the first sc.
2. Ch 5, sl st in 2nd ch from hook, sc in next ch, hdc in next ch, dc in next ch, skip next sc, sl st in next sc; rep from * 4 more times. (5 points)*
3. With C, sl st around the edge. Sew a 6 mm pearl to the center.
Finished size: 2 in (5.1 cm).
Flower (make 3)
1. With A, make a magic ring and work 10 sc, then sl st to the first sc.
2. In the next sc, work (sl st, ch 2, 3 dc). In the following sc, work (3 dc, ch 2, sl st). Rep from * 4 more times. (5 petals)*
3. With C, sl st around the edge. Sew a 6 mm pearl to the center.
Finished size: 1.75 in (4.4 cm).
Teardrop (make 4)
– Rnd 1 (B): Make a magic ring. Ch 3 (counts as dc), work 11 dc in the ring, sl st to the top of the ch-3. (12 dc)
– Rnd 2 (A): Ch 1, 2 sc in each dc, sl st to the first sc. (24 sc)
– Rnd 3: Ch 1, sc in next 5 sts, hdc in next 3, dc in next 2, tr in next, (tr, ch 3, tr) in next, tr in next, dc in next 2, hdc in next 3, sc in next 6, sl st to the first sc. (25 sts + ch-3 tip)
– Rnd 4 (C): Ch 1, sc in each st around, working (2 sc, ch 4, 2 sc) in the ch-3 tip, sl st to the first sc. (29 sc + ch-4 hanging loop)
Finished height: 2.5 in (6.4 cm).
Bauble (make 2)
1. With B, make a magic ring with 6 sc and work in a spiral.
2. Increase evenly to 12, then 18, then 24 sc.
3. Work 4 rounds of 24 sc.
4. Decrease evenly to 18, then 12. Stuff firmly.
5. Decrease to 6 sc and close the top.
6. With C, surface sl st once around the middle. Sew eight 4 mm pearls along that line, then make a ch-6 loop at the top in C.
Finished size: 2 in (5.1 cm) across.
Tassel (make 13)
1. Wrap the yarn 25 times around the 3 in (7.6 cm) card.
2. Tie the strands together at the top, then cut through the loops at the bottom.
3. Wrap the neck 0.5 in (1.3 cm) below the top.
Drops
The 13 hanging points are the Row C sc above these Row A sc: #3, 5, 7 and so on, through #27.
- Thread 4 beads onto B, alternating pearl and clear.
- Sl st into a hanging point.
- Make the cord:
- Odd drops: ch 6, then (slide up a bead, ch 6) 4 times, for 30 ch, about 6 in (15.2 cm).
- Even drops: ch 9, then (slide up a bead, ch 9) 4 times, for 45 ch, about 9 in (22.9 cm).
- Sl st into the ornament’s top and sew it in place.
- With C, ch 5 below the ornament and tie on a tassel.
Final Blocking
- Soak the valance in cool water and roll it in a towel to press out the water.
- Pin the header straight to 37.8 in (96.0 cm) along a ruled line.
- Pin each medallion into a 5.5 in (14.0 cm) circle, with a pin in every picot.
- Pin each edging picot so the arcs form even scallops.
- Shape the star points and flower petals by hand.
- Let everything dry fully, then comb the tassels and trim them to 3 in (7.6 cm).
Final Quality-Control Checklist
- 7 medallions, each with 120 sc and 8 picots
- 6 joins, all on one straight line
- 189 sts in every header row
- 7 tabs centered over the medallion tops
- Edging with 28 arcs, 365 sc and 28 picots
- 13 drops in the layout order, symmetric from the center
- Width 38.5 in (97.8 cm) and body depth about 10 in (25.4 cm)
- All ends woven in and all beads secure
Troubleshooting
- Medallion cups: Loosen Rnd 5 by using ch 6 loops instead of ch 5.
- Medallion ruffles: Work Rnds 6–7 with a 3.25 mm hook.
- Header Row 1 bows: Use tr in the diagonal picots if the row bulges up, or trtr if it dips.
- Header too wide: Work Rows 2–9 with a hook one size smaller.
- Edging arcs flare: Work Row B with a 3.25 mm hook.
- Drops twist: Block them hanging, with a light weight attached to each ornament.
Care
Hand-wash in cool water with mild soap, then dry flat with the medallions re-pinned. Never hang the valance while it is wet, because the weight of the drops will stretch the header.
Final Notes
The measurements build in a simple chain. One medallion is 5.5 in (14.0 cm), so seven make 38.5 in (97.8 cm). The 189-stitch header measures 37.8 in (96.0 cm) at 5 sts per inch. The edging has 28 arcs, four per medallion, and 13 evenly spaced drops hang below them. Check each stage before you move on, and the valance will hang straight and balanced.
Happy crocheting!