

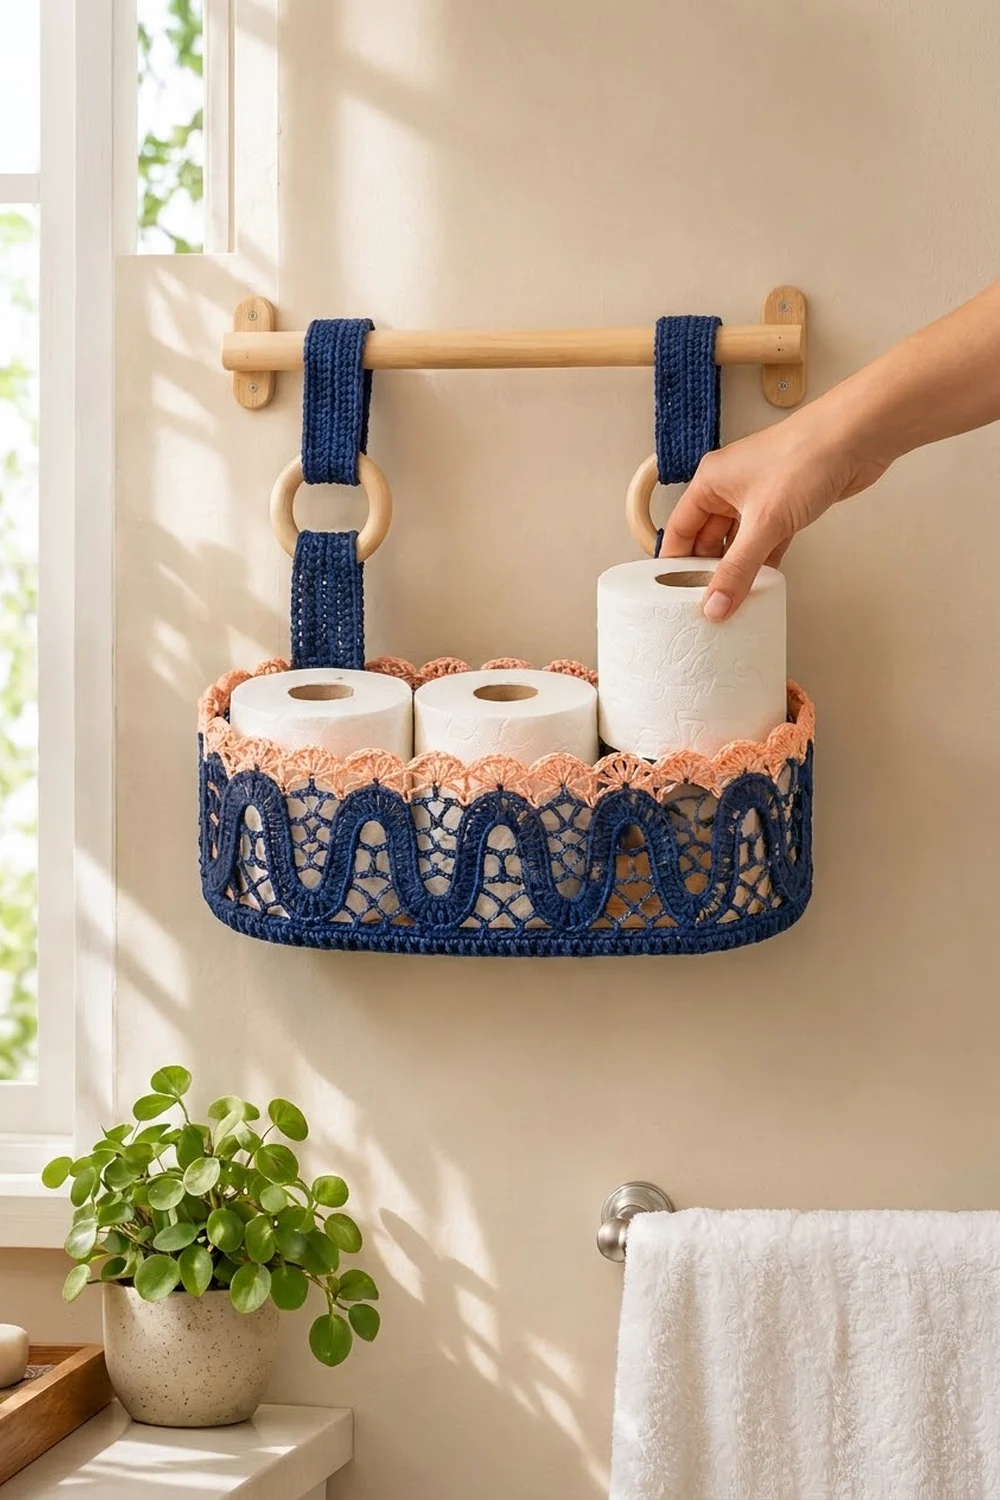
The Navy Tide Hanging Basket is a long oval bathroom basket that holds three standard toilet rolls side by side. A navy wavy cord runs all the way around the open lace walls. A soft peach scallop finishes the rim, and two ribbed straps with wooden rings hang it from a towel rod or dowel.
It uses only two colors. Navy forms the base, walls and straps, and peach is used only for the rim. The look is coastal and a little vintage, and the cotton yarn makes it sturdy enough for daily use.
This pattern uses US crochet terms. The finished basket measures about 14 in (35.6 cm) long, 5 in (12.7 cm) deep and 5.25 in (13.3 cm) tall, not counting the straps.
Construction overview: you crochet a solid oval base in rounds, then make three wavy lace strips. You join the strips into a ring, crochet the ring to the base, and work the scallop border into the top edge. Finally, you make two straps and sew them on.
Finished Size and Construction
- Finished size: 14 in (35.6 cm) long x 5 in (12.7 cm) deep x 5.25 in (13.3 cm) tall
- Skill level: Intermediate
- Terminology: US
- Yarn weight: Worsted (#4) cotton
- Hook: 4.5 mm (US 7)
- Number of pieces: 6 crocheted (1 base, 3 side strips, 2 straps) + 2 wooden rings
- Layout: 3 strips joined end to end into one 36 in (91.4 cm) ring
- Piece size: base 14 x 5 in (35.6 x 12.7 cm); each strip 12 x 4 in (30.5 x 10.2 cm); each strap 15.75 x 2 in (40.0 x 5.1 cm)
- Size before border: 14 x 5 x 4 in (35.6 x 12.7 x 10.2 cm)
- Border depth: 1.25 in (3.2 cm)
Materials
Use a smooth, firm, 100% cotton or cotton-blend worsted yarn. Cotton holds its shape and stands up to bathroom humidity. Avoid fluffy or very soft acrylics, because the walls will slump.
- Navy: 250 g (about 425 m)
- Peach: 40 g (about 68 m)
Quantities include a margin of about 20%.
Tools:
– 4.5 mm (US 7) crochet hook
– Two wooden rings, 3 in (7.6 cm) outer diameter
– Wooden rod or towel bar, at least 18 in (45.7 cm) long
– Tapestry needle, scissors, stitch markers
– Rust-proof pins and a blocking mat
– Optional: fabric stiffener
Abbreviations (US Terms)
- ch – chain
- sl st – slip stitch
- sc – single crochet
- hdc – half double crochet
- dc – double crochet
- tr – treble crochet
- BLO – back loop only
- sk – skip
- sp – space
- st(s) – stitch(es)
Special stitch – Wave Arc: Ch 8 and sl st in the first of those ch to form a ring. Ch 2 (does not count as a stitch), then work 15 dc into the ring. The dc cover about three-quarters of the ring and leave a short stretch of bare chain, called the ring gap. Each arc forms a horseshoe about 2 in (5.1 cm) wide.
Gauge and Checkpoints
Gauge: 14 dc and 8 rows = 4 in (10.2 cm). That works out to 3.5 sts per inch. Aim for the same 3.5 sts per inch across your sc edge rows.
Make the base first and treat it as your gauge test. Check these measurements as you go:
- After base Rnd 1: about 1 in (2.5 cm) wide
- After base Rnd 3: about 3 in (7.6 cm) wide
- After base Rnd 5: 5 in (12.7 cm) wide x 14 in (35.6 cm) long
- Each finished strip: 12 in (30.5 cm) long
Too big? Go down 0.5 mm. Too small? Go up 0.5 mm. If your sc rows are a little off but your dc gauge is right, keep the stitch counts exactly as written. Matching the counts one-to-one matters more than the measurement.
Oval Base (Navy, Make 1)
Ch 36.
Rnd 1: Work 6 dc in the 3rd ch from hook (the 2 skipped ch do not count). Dc in each of the next 32 ch, then 6 dc in the last ch. Rotate the work and dc in the unused loop of each of the next 32 ch. Sl st to the first dc. (76 sts: 6 + 32 + 6 + 32)
From here on, each round starts with ch 2, which does not count as a stitch.
Rnd 2: Ch 2. [2 dc in each of the next 6 sts, dc in each of the next 32 sts] twice. Sl st to the first dc. (88 sts)
Rnd 3: Ch 2. [(dc in next st, 2 dc in next st) 6 times, dc in each of the next 32 sts] twice. Sl st to join. (100 sts)
Rnd 4: Ch 2. [(dc in each of next 2 sts, 2 dc in next st) 6 times, dc in each of the next 32 sts] twice. Sl st to join. (112 sts)
Rnd 5: Ch 2. [(dc in each of next 3 sts, 2 dc in next st) 6 times, dc in each of the next 32 sts] twice. Sl st to join. (124 sts)
Each curved end now has 30 sts and each straight side has 32 sts.
Rnd 6 (ridge trim): Ch 1. Sc BLO in each st around, but work 2 sc BLO in the 15th st of each curved end. Sl st to join. (124 sts worked 1-per-stitch + 2 added = 126 sc)
Working through the back loops creates the ridge where the wall will rise. The edge measures 126 ÷ 3.5 = 36 in (91.4 cm). Fasten off.
Wavy Lace Side Strip (Navy, Make 3)
Part 1: Serpentine Cord
Arc 1: Work a Wave Arc so that the 15 dc curve over the top and the ring gap faces down. This arc is a crest.
Arc 2: Ch 8 and sl st in the first of these ch so the new ring hangs below Arc 1. Ch 2, then work 15 dc curving around the bottom, so the ring gap faces up. This arc is a trough.
Arcs 3–6: Repeat Arcs 1 and 2 twice more.
You now have 6 arcs (90 dc in total). The cord is about 12 in (30.5 cm) long and 2.5 in (6.4 cm) tall. Odd-numbered arcs are crests and even-numbered arcs are troughs. Fasten off.
Part 2: Mesh Edges
Work Rows 1–3 along the top edge first, then repeat them along the bottom edge.
Row 1 (top): Join yarn with a sc in dc 1 of Arc 1. Then work a ch 5 followed by a sc into each of these points in order:
– dc 4, dc 8 and dc 12 of Arc 1
– the ring gap of Arc 2
– dc 4, dc 8 and dc 12 of Arc 3
– the ring gap of Arc 4
– dc 4, dc 8 and dc 12 of Arc 5
– the ring gap of Arc 6
– dc 15 of Arc 6
That gives 14 sc and 13 ch-5 sps.
Row 1 (bottom): Join yarn with a sc in dc 1 of Arc 1. Then work a ch 5 followed by a sc into each of these points in order:
– the ring gap of Arc 1
– dc 4, dc 8 and dc 12 of Arc 2
– the ring gap of Arc 3
– dc 4, dc 8 and dc 12 of Arc 4
– the ring gap of Arc 5
– dc 4, dc 8 and dc 12 of Arc 6
– dc 15 of Arc 6
That gives 14 sc and 13 ch-5 sps.
Row 2 (leveling): Turn and ch 1. Work 3 sts into each ch-5 sp and skip the sc between them. Choose the stitch height so the edge comes out straight:
– 3 sc in a sp that runs along a crest (dc 4 to dc 8, or dc 8 to dc 12)
– 3 tr in any sp that touches a ring gap
– (tr, dc, hdc) in a sp that starts at dc 1, or (hdc, dc, tr) in a sp that ends at dc 15
Count: (39 sts: 13 sps x 3)
Row 3: Turn and ch 1. Sc in each st, working 2 sc in the 10th, 20th and 30th sts. (39 sts worked 1-per-stitch + 3 added = 42 sc)
The 42 sc measure 12 in (30.5 cm). Do not fasten off after the bottom edge.
Short-end edging: Work 12 sc evenly along each short end. Fasten off.
Strip checkpoint: 12 x 4 in (30.5 x 10.2 cm), with 42 sc along each long edge.
Hanging Strap (Navy, Make 2)
Ch 57.
Row 1: Hdc in the 3rd ch from hook and in each ch across. (55 hdc)
Rows 2–6: Ch 2 (does not count) and turn. Hdc BLO in each st across. (55 hdc)
Working through the back loops makes the ribs that run along the strap.
Rounded end: Ch 1 and work across the row ends of one short edge as follows: sc in the Row 6 end, hdc in the Row 5 end, 3 dc in the Row 4 end, 3 dc in the Row 3 end, hdc in the Row 2 end, sc in the Row 1 end. (10 sts) Fasten off.
Strap checkpoint: 15.75 x 2 in (40.0 x 5.1 cm), plus a 0.5 in (1.3 cm) rounded tip.
Make All Pieces
Navy: 1 base, 3 strips, 2 straps. Peach: border only, worked directly onto the basket. You will also need 2 wooden rings.
Layout of the side wall, seen from above with the front at the bottom:
        [ Strip 1 (back-left) | Strip 3 (back-right) ]
   (left end)                                (right end)
        [        Strip 2 (front, centered)          ]
Strip 2 sits centered on the front. Strips 1 and 3 wrap around the curved ends and meet at center back.
Joining
Strip-to-strip: Hold two short ends right sides together. Sl st through the back loops of the 12 matching sc pairs. Join all three seams so the strips form a ring. These seams add no stitches to the top or bottom edges.
Ring-to-base: With the base right side out, place the ring’s bottom edge on top of the base’s Rnd 6 sc. Line up one strip seam with center back. Join navy yarn and sc through both layers, one stitch to one stitch, all around. (126 sc: 3 strips x 42 = 126 base sts)
Tension: Keep the seam firm but not tight. If it pulls tight, the walls will lean inward.
Size checkpoint: 14 x 5 in (35.6 x 12.7 cm) footprint and 4 in (10.2 cm) wall height.
Border
Border gauge: 3.5 sts per inch, the same as the main gauge. One scallop takes up 6 sts, or about 1.7 in (4.3 cm).
Rnd 1 (navy): Join at a back seam. Ch 1, sc in each st around, sl st to join. (126 sc: 42 per strip) Fasten off.
Rnd 2 (peach): Join peach. Sc in next st, sk 2, 7 dc in next st, sk 2. Repeat from * around and sl st to the first sc. (21 scallops: 7 per strip; 21 sc + 147 dc = 168 sts)
Rnd 3 (peach): Sk the sc. (Sc in next dc, ch 3) 6 times, then sc in the 7th dc. Repeat from * around and sl st to join. (147 sc + 126 ch-3 loops: 7 sc and 6 loops per scallop) Fasten off.
Why the math works: 126 sts ÷ 6 sts per repeat = 21 scallops exactly. Each strip carries 42 ÷ 6 = 7 scallops, so the repeats line up with the seams and you never need a half scallop. The border adds about 1.25 in (3.2 cm) of height.
Attaching the Straps
- Lay the rounded end of each strap flat against the inside of the back wall, overlapping it by 2 in (5.1 cm).
- Space the straps with their centers 7 in (17.8 cm) apart, centered on the back. Whipstitch all the way around each overlap.
- Loop the straight end of each strap over the rod from back to front. Bring it down the front of the strap, then slip both layers through a wooden ring.
- Slide the ring up to sit 2.5 in (6.4 cm) below the rod. Stitch the strap tip to the layer behind it, just below the ring.
Final Blocking
- Wet the basket in cool water and gently squeeze out the excess. Do not wring it.
- Optional: dip it in fabric stiffener for firmer walls.
- Stuff the basket with towels or three rolls wrapped in plastic so it holds a 14 x 5 in (35.6 x 12.7 cm) shape.
- Pin each peach scallop out evenly and open the picot loops.
- Lay the straps flat and pin them straight to 2 in (5.1 cm) wide.
- Let everything dry completely, which takes 24–48 hours.
Final Quality-Control Checklist
- Base Rnd 6 has 126 sc, with the ridge on the outside.
- Each strip has 6 arcs and 42 sc along each long edge.
- All three seams are flat, and one sits at center back.
- The base join has 126 sc with no puckering.
- There are 21 scallops in total, 7 between each pair of seams.
- Each strap measures 15.75 in (40.0 cm), and the rings are captured securely.
- All yarn ends are woven in and trimmed.
Troubleshooting
Base ruffles: Your gauge is loose. Go down a hook size, or check that each round has exactly 12 increases.
Base cups upward: You skipped increases. Recount Rnds 2–5.
Strip edge is wavy: Your Row 2 stitch heights don’t match the dips. Use taller stitches over the ring gaps.
Strip is too long or too short: Keep 42 sc on the edge and let blocking even out small differences.
Walls lean inward: Your joining seam is too tight. Redo it with a larger hook.
Scallops are crowded: Check that Rnd 1 has exactly 126 sts.
Care
Hand wash in cool water with mild soap, then reshape and lay flat to dry. If you used stiffener, reapply it after washing.

Final Notes
Here is the full measurement chain: a 14 x 5 in (35.6 x 12.7 cm) base ending in 126 sc, three 12 in (30.5 cm) strips of 42 sc each, a one-to-one join of 126 sc, and a 21-scallop border that adds 1.25 in (3.2 cm) of height. Keep every count exact and the pieces will fit together without any easing.
Happy crocheting!