

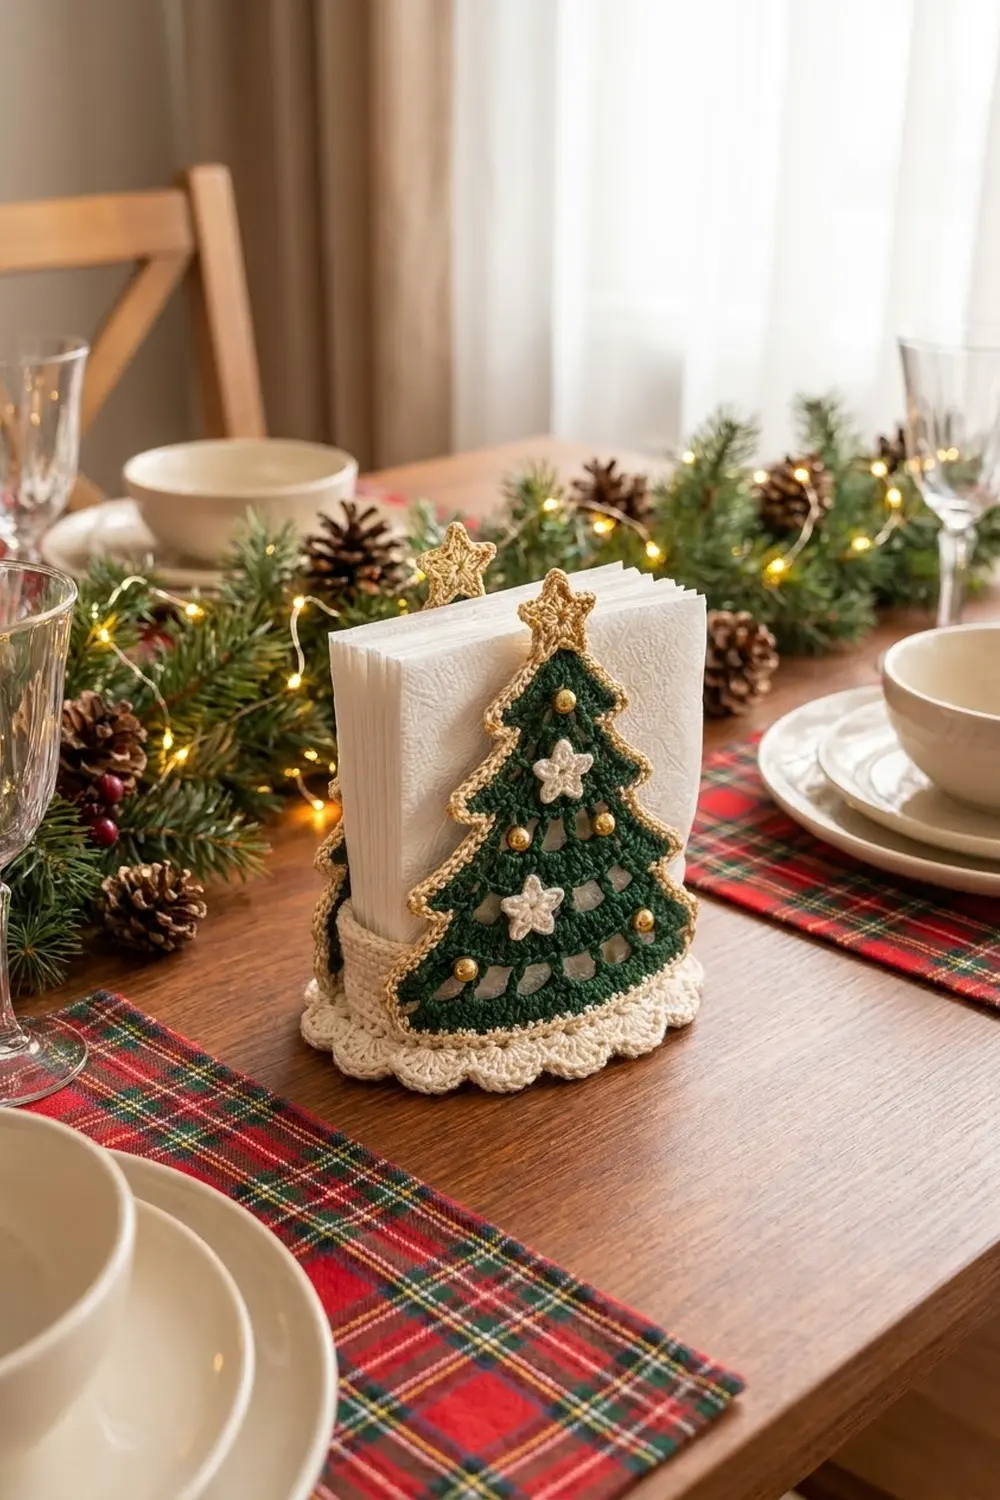
This napkin holder sets two lacy Christmas trees on either side of a napkin slot. The trees are deep forest green with four stepped tiers and rows of open windows, and a thin gold edging outlines each one. A cream oval base with a scalloped edge sits underneath.
Gold stars sit on the treetops. Small cream stars and gold beads serve as ornaments, so the holder looks festive even when it’s empty. The style is classic and cozy, close to vintage lace, with no fussy shaping.
This pattern uses US crochet terms. The finished holder measures 8.0 in (20.3 cm) long, 5.4 in (13.7 cm) deep and about 7.75 in (19.7 cm) tall with the star toppers. It holds folded cocktail napkins up to 5 in (12.7 cm) wide.
Construction overview: You crochet the base in joined rounds, and the napkin wall grows straight up from it in back loops only. Each tree panel is worked flat from the top point down, with step-ins at each tier, and then edged in gold. You sew the trees against the wall, add the scalloped border to the base, and finish with stars and beads.
Finished Size and Construction
- Finished size: 8.0 x 5.4 in (20.3 x 13.7 cm) footprint; 7.75 in (19.7 cm) tall
- Skill level: Intermediate
- Terminology: US
- Yarn weight: DK (#3) cotton
- Hook: 3.5 mm (E-4)
- Number of pieces: 11 crocheted pieces (1 base with wall, 2 trees, 2 gold stars, 6 cream stars) plus 8 beads
- Layout: front tree | napkin slot | back tree, centered on the oval base
- Tree panel size: 7.0 x 7.0 in (17.8 x 17.8 cm) with edging
- Base size before border: 7.0 x 4.4 in (17.8 x 11.2 cm)
- Border depth: 0.5 in (1.3 cm)
Materials
Use a smooth, mercerized DK cotton. It holds its shape, shows the lace clearly and takes stiffener well. Avoid acrylic, which tends to droop. For the gold, use a metallic DK-weight blend so the edging stays the same thickness as the green.
- Forest green: 35 g / 77 m
- Cream: 50 g / 110 m
- Metallic gold: 10 g / 25 m
The quantities include a margin of about 15% for swatching and tails.
Tools:
– 3.5 mm (E-4) crochet hook
– 8 gold beads, 6 mm, with sewing thread and a beading needle
– Tapestry needle
– 4 stitch markers
– Fabric stiffener or heavy spray starch
– Blocking mat and rustproof pins
– Scissors and a tape measure
Abbreviations (US Terms)
- ch: chain
- sl st: slip stitch
- sc: single crochet
- hdc: half double crochet
- dc: double crochet
- sk: skip
- sp: space
- st(s): stitch(es)
- BLO / FLO: back loop only / front loop only
- Rnd / Row: round / row
Special stitch: Shell. Work 5 dc in the same stitch.
Gauge and Checkpoints
Gauge: 20 sc and 20 rows = 4 in (10.2 cm). One dc row = 0.4 in (1.0 cm).
At this gauge, each sc is 0.2 in (0.5 cm) wide and each sc row is 0.2 in (0.5 cm) tall. Every measurement in this pattern comes from those numbers.
Make one tree first. It’s the best gauge test, because the tier widths tell you right away whether you’re on target.
Tree checkpoints:
– After Row 8: 3.0 in (7.6 cm) wide, 1.8 in (4.6 cm) tall
– After Row 15: 4.2 in (10.7 cm) wide, 3.4 in (8.6 cm) tall
– After Row 22: 5.4 in (13.7 cm) wide, 5.0 in (12.7 cm) tall
– After Row 29: 6.6 in (16.8 cm) wide, 6.6 in (16.8 cm) tall
Base checkpoints:
– After Rnd 7: 5.4 x 2.8 in (13.7 x 7.1 cm)
– After Rnd 11: 7.0 x 4.4 in (17.8 x 11.2 cm)
If your piece is too big, change to a 3.25 mm hook. If it’s too small, change to a 3.75 mm hook. Keep the lace windows open. If they close up, your tension is too tight.

Base and Napkin Wall (Cream)
Each round is joined with a sl st to the first sc. Start each round with ch 1, which doesn’t count as a stitch, and work the first sc in the same stitch as the join. Every round starts at End A.
Rnd 1: Ch 16. Work 3 sc in the 2nd ch from hook (End A) and sc in each of the next 13 ch. Work 3 sc in the last ch (End B). Rotate and work along the underside of the chain: sc in each of the next 13 ch. Join. (32 sts: 13 per straight side, 3 per end)
Rnd 2: At End A, work 2 sc in each of the next 3 sts. Sc in the next 13. At End B, 2 sc in each of the next 3. Sc in the next 13. Join. (38 sts)
Rnds 3–7: On Rnd n, work each end as [sc in the next (n – 2) sts, 2 sc in the next st] 3 times. Work sc in each of the 13 straight-side sts. This adds 3 sts per end, or 6 per round.
– Rnd 3: 44 sts
– Rnd 4: 50 sts
– Rnd 5: 56 sts
– Rnd 6: 62 sts
– Rnd 7: 68 sts (13 per straight side, 21 per end)
Check that the oval measures 5.4 x 2.8 in (13.7 x 7.1 cm). This inner oval is the floor of the napkin slot.
Wall Rnd 1: Ch 1. Sc in the BLO of each st around and join. (68 sts) The unused front loops form a ridge on the outside.
Wall Rnds 2–10: Ch 1, sc in each st around and join. (68 sts each)
Fasten off. The wall should be 2.0 in (5.1 cm) tall with a circumference of 13.6 in (34.5 cm).
Rnd 8: Join cream in the first unused front loop of Rnd 7, at the start of End A. Ch 1, and work this round only in those front loops. Work each end as [sc in the next 6, 2 sc in the next] 3 times. Work sc in the 13 straight-side sts. Join. (74 sts)
Rnds 9–11: Continue in both loops with the same end formula (n – 2 sc between increases).
– Rnd 9: 80 sts
– Rnd 10: 86 sts
– Rnd 11: 92 sts (13 per straight side, 33 per end)
Don’t fasten off. Place your loop on a marker and leave it for the border.
Tree Panels (Make 2, Green)
Each tree is worked flat from the tip down. Turn at the end of every row. On sc rows, the ch 1 at the start doesn’t count as a stitch.
The four mesh rows (Rows 7, 14, 21 and 28) all follow the same instruction:
Mesh row: Ch 5 (counts as dc + ch 2), sk the next 2 sts, dc in the next st. Ch 2, sk 2, dc in the next st, repeat from * to the end.
Each row after a mesh row (Rows 8, 15, 22 and 29) follows this instruction:
Increase sc row: Ch 1, 2 sc in the first dc. 2 sc in the ch-2 sp, sc in the next dc, repeat across. On the last repeat, work 2 sc in the 3rd ch of the turning ch instead of 1 sc.
When counting stitches, each ch-2 space counts as 2 sts.
Tier 1
– Row 1: Ch 2, 3 sc in the 2nd ch from hook. (3)
– Row 2: Ch 1, 2 sc in the first st, sc in the next st, 2 sc in the last st. (5)
– Rows 3–6: Ch 1, 2 sc in the first st, sc in each st to the last, 2 sc in the last st. (7, 9, 11, 13)
– Row 7: Mesh row. (13 sts: 5 dc, 4 spaces)
– Row 8: Increase sc row. (15)
Tier 2 begins with a step-in.
– Row 9: Sl st in each of the first 3 sts. Ch 1, sc in the same st as the last sl st and in each of the next 10 sts. Leave the last 2 sts unworked. (11) The 2 sts left at each end form the pointed tips of the tier above.
– Rows 10–13: Increase 1 st at each end as in Row 3. (13, 15, 17, 19)
– Row 14: Mesh row. (19: 7 dc, 6 spaces)
– Row 15: Increase sc row. (21)
Tier 3
– Row 16: Step in as in Row 9: sl st in 3, ch 1, sc in the same st and in the next 16. Leave 2 unworked. (17)
– Rows 17–20: (19, 21, 23, 25)
– Row 21: Mesh row. (25: 9 dc, 8 spaces)
– Row 22: Increase sc row. (27)
Tier 4
– Row 23: Step in: sl st in 3, ch 1, sc in the same st and in the next 22. Leave 2 unworked. (23)
– Rows 24–27: (25, 27, 29, 31)
– Row 28: Mesh row. (31: 11 dc, 10 spaces)
– Row 29: Increase sc row. (33)
Fasten off green.
Gold Tree Edging
Join gold in the first st of Row 29, with the right side facing.
- Bottom: Work 3 sc in the first st and sc in each of the next 31. Work 3 sc in the last st. (37 sc)
- First side: Work up the side, working into the end of each row from Row 28 to Row 1. Work 1 sc in the end of each sc row (24 sc rows) and 2 sc in the end of each mesh row (4 mesh rows, so 8 sc). At each of the 3 tier steps, also sc in each of the 2 unworked sts. (24 + 8 + 6 = 38 sc)
- Tip: Work (sc, ch 2, sc) in the foundation ch. (2 sc + ch-2 sp)
- Second side: Work down the other side to match. (38 sc)
Join to the first sc. Total: 115 sc + 1 ch-2 sp. Fasten off.
The edging adds 0.2 in (0.5 cm) on each edge, so the tree measures 7.0 x 7.0 in (17.8 x 17.8 cm).
Stars
Gold star (make 2): Make a magic ring.
– Rnd 1: 10 sc in the ring. Join. (10)
– Rnd 2: Ch 4, sl st in the 2nd ch from hook, sc in the next ch, hdc in the next ch, sk the next sc, sl st in the next sc. Repeat from * 4 more times. (5 points)
The star measures about 1.2 in (3.0 cm) across. Leave a 10 in (25.4 cm) tail for sewing.
Cream star (make 6): Make a magic ring.
– Rnd 1: 5 sc in the ring. Join. (5)
– Rnd 2: Ch 3, sl st in the 2nd ch from hook, sc in the next ch, sl st in the next sc. Repeat from * 4 more times. (5 points)
The star measures about 0.8 in (2.0 cm) across. Leave a tail for sewing.
Make All Pieces
- Cream: 1 base with wall, 6 small stars
- Green with gold edging: 2 tree panels
- Gold: 2 stars
- Purchased: 8 gold beads
Layout (top view):
   (  scalloped border  )
   [==== FRONT TREE ====]
   ( wall | NAPKIN SLOT | wall )
   [==== BACK TREE =====]
   (  scalloped border  )
Ornaments on each tree:
        * gold star at tip
   Tier 2:  o    (cream star)
   Tier 3:  o  (star)  o   (beads)
   Tier 4:  (star) o  o  (star)
Joining
Lightly stiffen both trees and let them dry flat before joining (see Final Blocking). A firm panel is much easier to sew straight.
Method: Whip stitch with cream and a tapestry needle.
Stitch-to-stitch logic: Center one tree along a straight side of the wall so the tree’s back faces the wall. Count in 12 sts from each corner of the tree’s 37-st bottom edging. That leaves the center 13 sts, which match the 13 straight-side sts of Base Rnd 8 one to one.
Whip stitch those 13 edging sts to the posts of Rnd 8, just outside the wall. Then tack the 13 straight-side sts of Wall Rnd 10 to the back of Tree Row 22. Row 22 sits about 2.0 in (5.1 cm) above the bottom edge of the edged tree. Add one tack every 2 sts, for 7 tacks.
Repeat with the second tree on the opposite side.
Tension: Pull each stitch just snug. Overtightening puckers the gold edging and pulls the tree off vertical.
Size checkpoint: The trees should stand parallel, with an inner slot of 2.8 in (7.1 cm). Leave the tree corners loose for now so they’re out of the way for the border.
Border (Base Scallops)
Border gauge: One shell is 0.8 in (2.0 cm) wide and 0.5 in (1.3 cm) deep.
Starting count: Rnd 11 has 92 sts: 13 on each straight side and 33 on each end.
Border Rnd: Pick up the live loop. Ch 1, sc in the first st. Sk 1, shell in the next st, sk 1, sc in the next st. Repeat from * around, ending with sk 1, shell, sk 1, and join to the first sc. (23 shells and 23 sc = 115 dc + 23 sc)
Why the math works: Each repeat uses 4 sts, and 92 = 23 x 4, so the repeat closes perfectly with no partial scallop. Each half of the oval (one straight side plus one end) has 46 sts, which works out to 11.5 repeats per half. The scallops run continuously around the curve and come out evenly spaced and symmetrical.
The shells add 0.5 in (1.3 cm) on every edge. The base grows from 7.0 x 4.4 in (17.8 x 11.2 cm) to 8.0 x 5.4 in (20.3 x 13.7 cm).
Fasten off. Tack each tree’s bottom corners to the border with 2 small stitches.
Final Blocking
- Lightly mist the base and pin it flat into an 8.0 x 5.4 in (20.3 x 13.7 cm) oval, pinning out each scallop.
- Brush fabric stiffener onto both trees, working it into the mesh windows.
- Pin each tree flat at 7.0 x 7.0 in (17.8 x 17.8 cm). Open each window and sharpen each tier tip.
- Stuff the wall with a folded towel or a small box so it dries upright and smooth.
- Let everything dry completely, for at least 12 hours.
- Sew the gold stars to the tree tips: overlap the ch-2 sp by half a star so the star stands above the tip.
- Sew 3 cream stars and 4 beads onto the front face of each tree, following the layout.
Final Quality-Control Checklist
- Each tree has 33 sts at Row 29 and is 7.0 in (17.8 cm) wide with edging.
- Both trees have 4 mesh bands with the windows lined up.
- The gold edging lies flat, with no ruffling at the tier tips.
- The base has 92 sts at Rnd 11 and exactly 23 even scallops.
- The wall is 2.0 in (5.1 cm) tall and stands upright without leaning.
- The trees are parallel, and the slot is 2.8 in (7.1 cm) wide.
- The stars, beads and all yarn ends are secure, with the ends woven in on the back.
Troubleshooting
- The base cups upward: Your increases are bunching. Check that the ends add exactly 3 sts each per round, or go up a hook size for Rnds 8–11.
- The base ruffles: You’ve added extra stitches. Recount against the totals above.
- The tree tiers lean: You stepped in unevenly. Leave exactly 2 sts unworked at each end of Rows 9, 16 and 23.
- The mesh windows are closed: Loosen your dc and keep the ch-2s relaxed.
- The gold edging ruffles: Your tension is too loose. Use a smaller hook for the edging only.
- The wall slumps: Add another coat of stiffener, or slide a 13.6 x 2.0 in (34.5 x 5.1 cm) strip of plastic canvas inside it.
Care
Spot clean with a damp cloth, or hand wash cool and reshape. Re-stiffen the trees after any full washing.
Final Notes
Everything starts from one gauge: 0.2 in (0.5 cm) per sc and per sc row. From there:
– The tree tiers grow to 3.0, 4.2, 5.4 and 6.6 in (7.6, 10.7, 13.7 and 16.8 cm), and the edging brings the tree to 7.0 in (17.8 cm).
– The base floor reaches 5.4 x 2.8 in (13.7 x 7.1 cm) at Rnd 7, then 7.0 x 4.4 in (17.8 x 11.2 cm) at Rnd 11.
– The scallops finish the base at 8.0 x 5.4 in (20.3 x 13.7 cm).
Check your gauge first, and every later stage should measure as written.
Happy crocheting!