

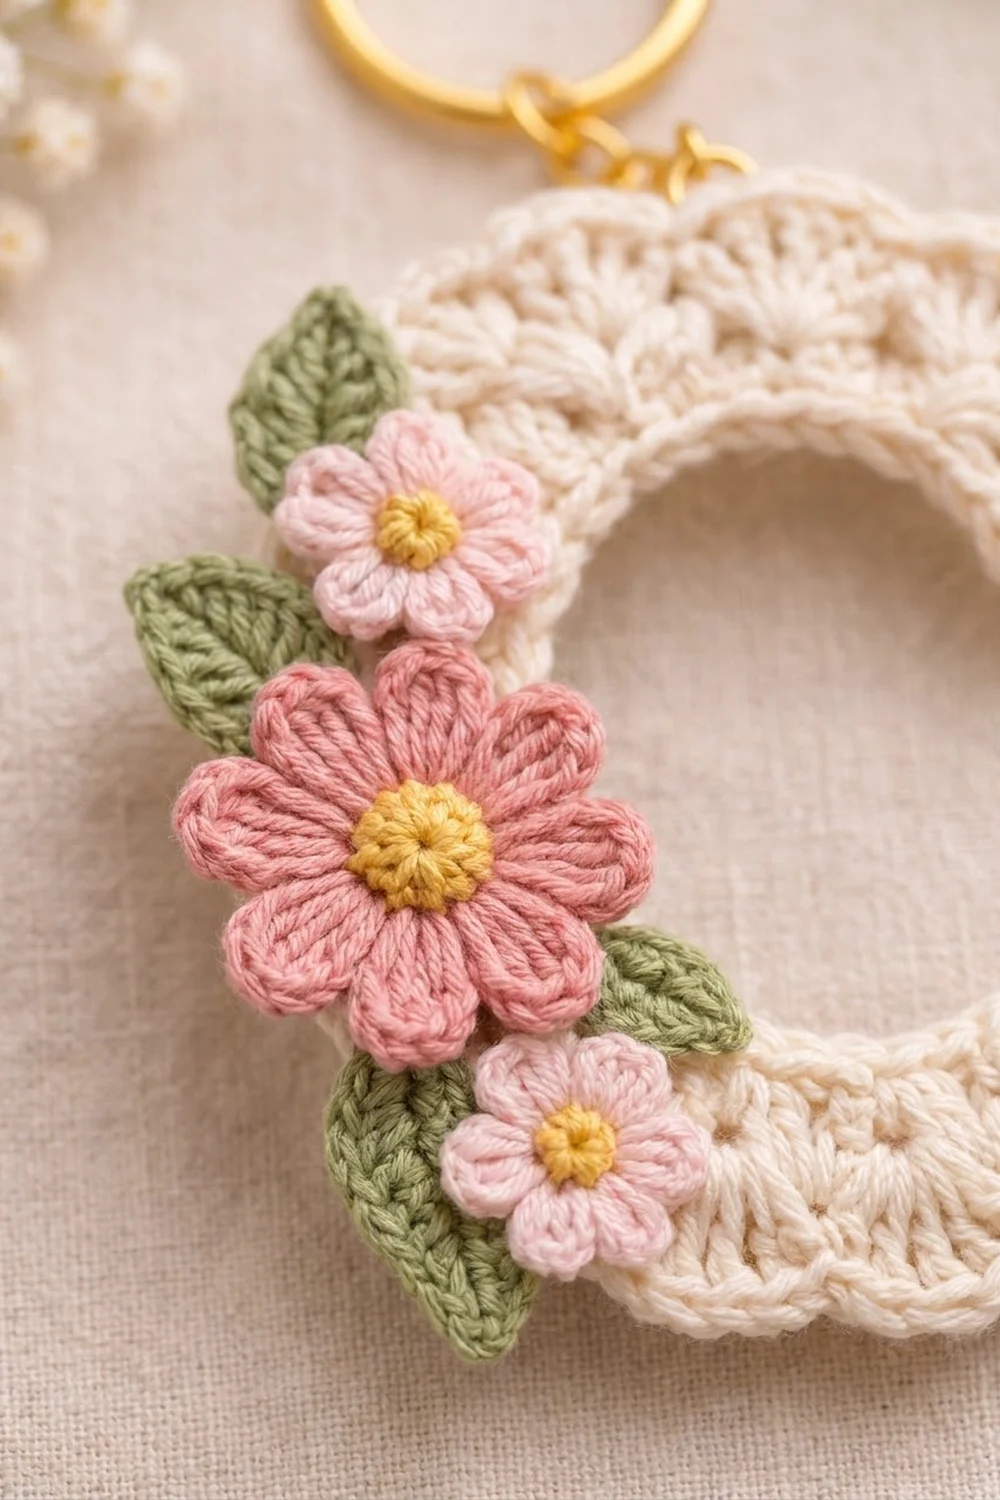
This Blossom Initial keychain is a soft, personal little accessory. It is a chunky capital letter C in creamy cotton, with a scalloped shell edge along the outer curve and a small spray of pink flowers and green leaves on its spine. A gold ring and short chain finish it, so you can clip it to a handbag, keys, or a zipper pull.
The colors are gentle and vintage-inspired: cream for the letter, rose pink and light pink for the flowers, warm yellow for the flower centers, and sage green for the leaves. The style is romantic but tidy. The edges are crisp, and the appliqués sit slightly raised for depth.
The finished letter measures about 3.5 in (8.9 cm) tall by 3 in (7.6 cm) wide. With the hardware attached, the charm hangs about 5.25 in (13.3 cm) long. This pattern uses US crochet terms throughout.
The construction is simple. You crochet a short single crochet strip in 3 rows, with increases on one side so it bends into a C. Then you work one shell-edging round around the whole letter. After that, you make 3 flowers and 4 leaves separately, block everything, sew on the appliqués, and add the hardware.
Finished Size and Construction
- Finished size: 3.5 in (8.9 cm) tall x 3 in (7.6 cm) wide
- Skill level: Easy-intermediate
- Terminology: US crochet terms
- Yarn weight: DK (#3, light)
- Hook: 3.5 mm (E-4)
- Number of pieces: 1 letter piece, plus 7 small appliqués (3 flowers, 4 leaves) sewn on
- Layout: A single C shape; the appliqués are clustered on the left curve
- Band width: 7/8 in (2.2 cm) finished
- Size before border: 2.75 in (7.0 cm) tall x 2.25 in (5.7 cm) wide, with a band width of 0.5 in (1.3 cm)
- Border depth: 3/8 in (1.0 cm) of shell edging
Materials
Yarn: Use a smooth, mercerized or combed DK cotton. Cotton keeps the shells crisp, holds its shape on a bag that gets handled every day, and blocks neatly. Avoid fuzzy or very stretchy yarns, because they blur the scallops. The amounts below assume about 2.2 m per gram, which is typical for DK cotton.
- Cream (letter): 6 g / 13 m
- Rose pink (large flower): 2 g / 4 m
- Light pink (2 small flowers): 2 g / 4 m
- Yellow (flower centers): 1 g / 2 m
- Sage green (4 leaves): 2 g / 4 m
These quantities include a margin for your gauge swatch, sewing tails, and small tension differences.
Tools:
– 3.5 mm (E-4) crochet hook
– Tapestry needle
– Sharp sewing needle and cream sewing thread (optional, for a firmer hold on the appliqués)
– 1 in (2.5 cm) gold split key ring
– About 0.75 in (1.9 cm) of gold chain, plus 2 gold jump rings (6 mm)
– 2 pairs of flat-nose pliers
– Rustproof pins, a blocking mat, and a spray bottle
– Scissors and stitch markers
Abbreviations (US Terms)
- ch – chain
- sl st – slip stitch
- sc – single crochet
- hdc – half double crochet
- dc – double crochet
- sk – skip
- st(s) – stitch(es)
- MR – magic ring
- RS – right side
Special stitch – Shell: Work 5 dc in the same stitch or space.
Petal (large): Work (sl st, ch 2, 3 dc, ch 2, sl st) in the same stitch.
Petal (small): Work (sl st, ch 2, 2 dc, ch 2, sl st) in the same stitch.
Gauge and Checkpoints
Gauge: 20 sc x 22 rows = 4 in (10.2 cm) in sc worked in rows.
The letter is small, so the letter itself works as your test piece. Make it first and check it at each stage before you start the appliqués.
- Checkpoint 1 (after Row 1): The strip measures 4 in (10.2 cm) long, unstretched.
- Checkpoint 2 (after Row 3): The strip has curved into a C that is 2.75 in (7.0 cm) tall x 2.25 in (5.7 cm) wide. The band is 0.5 in (1.3 cm) wide, and the gap between the two tips is about 1 in (2.5 cm).
- Checkpoint 3 (after the edging): The letter measures 3.5 in (8.9 cm) tall x 3 in (7.6 cm) wide.
If your piece is too big: Go down to a 3.25 mm (D-3) hook, or use a slightly finer cotton.
If your piece is too small: Go up to a 3.75 mm (F-5) hook.
If the shape is wrong: Check the curve, not just the size. If the C closes into an almost-full ring, your sc are too tight compared with your chain. Make the foundation chain with a hook one size larger, then switch back.
The Letter C
The letter is worked in rows along its length. Row 1 forms the inner curve. Rows 2 and 3 add increases only to the outer side, and this is what bends the strip into a C.
With cream yarn, ch 21.
Row 1 (RS): Sc in the 2nd ch from the hook and in each ch across. Turn. (20 sc)
Row 2: Ch 1 (does not count as a st). Sc in the next 2 sts, 2 sc in the next st; repeat from * 6 times. Sc in the last 2 sts. Turn. (26 sc)
This row works 20 stitches as (18 sts in 6 repeats) + (last 2 sts) and adds 6 stitches.
Row 3: Ch 1. Sc in the first 2 sts. 2 sc in the next st, sc in the next 2 sts; repeat from * 7 times. Sc in the last 3 sts. Do not fasten off. (33 sc)
This row works 26 stitches as (2 + 21 + 3) and adds 7 stitches.
Lay the piece flat. It should curve naturally into a C, with Row 3 on the outside. Check it against Checkpoint 2 before you continue.
Border: Shell Edging Round
The shell edging is the border of the letter. It forms the scalloped outer curve and the rounded tips, and it adds a neat sc finish to the inner curve.
Border gauge: Each shell repeat (sk 1, shell, sk 1, sc) covers 4 stitches. At gauge that is 0.8 in (2.0 cm) per scallop. The shells stand 3/8 in (1.0 cm) tall.
Edging round: Continue from Row 3. Ch 1, turn, and work along the outer edge of Row 3 (33 sts) like this:
- Outer edge: Sc in the first st. Sk 1 st, shell in the next st, sk 1 st, sc in the next st; repeat from * 8 times. (8 shells, 9 sc; all 33 sts used)
- First tip: Rotate the piece to work into the row ends. Shell in the end of Row 2, then sc in the end of Row 1. (1 shell, 1 sc)
- Inner edge: Work across the underside of the foundation chain. Sc in each of the 20 foundation loops. (20 sc)
- Second tip: Sc in the end of Row 1, then shell in the end of Row 2. (1 shell, 1 sc)
- Sl st in the first sc of the round to join. Fasten off, leaving a 6 in (15.2 cm) tail to weave in.
Round total: 10 shells (50 dc) + 31 sc = 81 sts.
Why the math works: A shell repeat uses exactly 4 stitches. The outer edge must therefore be a multiple of 4 plus 1, so the first sc and the last sc both land in real stitches: 1 + (8 x 4) = 33. That is exactly the Row 3 count. The ends of Row 3 are the first and last outer stitches, so they are not counted again at the tips.
Each tip has only the Row 2 and Row 1 ends left. That gives room for one centered shell and one anchoring sc on each tip. The inner edge has 20 sc in 20 foundation loops, one per chain, so it matches Row 1 and stays flat without ruffling.
Large Flower (Make 1)
Round 1: With yellow, make a MR. Ch 1, then work 8 sc in the ring. Pull the ring closed and sl st to the first sc. Fasten off. (8 sc)
Round 2: Join rose pink in any sc. Work a Large Petal in each sc around, 8 times in total. Sl st to the base of the first petal and fasten off. (8 petals, 24 dc)
The flower measures 1.5 in (3.8 cm) across, and its center is 0.5 in (1.3 cm) across.
Small Flowers (Make 2)
Round 1: With yellow, make a MR. Ch 1, then work 5 sc in the ring. Pull the ring closed and sl st to the first sc. Fasten off. (5 sc)
Round 2: Join light pink in any sc. Work a Small Petal in each sc around, 5 times in total. Sl st to the base of the first petal and fasten off. (5 petals, 10 dc)
Each small flower measures 1 in (2.5 cm) across, and its center is 3/8 in (1.0 cm) across.
Leaves (Make 4)
With sage green, ch 6.
Side 1: Sc in the 2nd ch from the hook. Hdc in the next ch, dc in the next ch, hdc in the next ch, and sc in the last ch. (5 sts)
Tip: Ch 1.
Side 2: Rotate the piece and work into the underside of the foundation chain. Sc in the first ch, hdc in the next, dc in the next, hdc in the next, and sc in the last. (5 sts)
Sl st to the first sc. Fasten off, leaving a 10 in (25.4 cm) tail for sewing. Each leaf is 10 sts plus a ch-1 tip and measures 1 in (2.5 cm) long x 0.5 in (1.3 cm) wide.
Attaching the Appliqués
Leave long tails on each flower for sewing. Weave in all yellow tails now, because they are hard to reach later.
Lay the letter RS up with the opening of the C facing right. Arrange the appliqués on the left curve:
- Large flower: Place it at the middle of the left curve, at about 9 o’clock. Let it overlap the outer shell edge by about 1/4 in (0.6 cm).
- First small flower: Place it above the large flower, at about 10–11 o’clock.
- Second small flower: Place it below the large flower, at about 7–8 o’clock, so it slightly overlaps the large flower’s lower petals.
- Leaves: Tuck one leaf behind the upper small flower, pointing up and out. Tuck one behind the left side of the large flower, pointing left. Tuck one at the lower right of the large flower, pointing toward the inner curve. Tuck one under the lower small flower, pointing down.
Pin everything in place. Sew the leaves first, using small stitches through their centers only so the tips stay free. Then sew each flower around the edge of its yellow center, so the petals stay slightly lifted.
Keep your stitches on the back of the letter shallow, so they do not show through the cream band.
Final Blocking
- Weave in all remaining tails before blocking, and trim them to about 1/4 in (0.6 cm).
- Pin the letter RS up on your mat to 3.5 in (8.9 cm) tall x 3 in (7.6 cm) wide. Keep the band evenly 7/8 in (2.2 cm) wide.
- Pin the center of each outer shell so the scallops open evenly. Put one pin in each tip shell and a few along the inner curve.
- Mist the piece until it is damp but not soaked. Gently press the flowers so the petals spread.
- Let it dry completely for at least 4 hours before you unpin it.
- Attach the hardware. Open a jump ring and pass it through the band at the highest point of the curve, catching both Row 2 and Row 3. Add the chain, then a second jump ring, then the split ring. Close all rings fully with two pliers.
Final Quality-Control Checklist
- The letter measures 3.5 in (8.9 cm) x 3 in (7.6 cm) and lies flat.
- There are 8 even shells on the outer curve, and each tip ends in 1 shell.
- The inner curve is smooth, with 20 sc and no puckering.
- The large flower has 8 petals and each small flower has 5. All 3 have yellow centers.
- All 4 leaves are secure, and their tips stay free.
- No sewing stitches show between the stitches on the front.
- All tails are woven in and trimmed.
- The jump rings are fully closed with no gaps, and the hardware hangs straight.
Troubleshooting
The C curls into a near-complete circle. Your foundation chain is too tight. Remake it with a hook one size larger.
The C is too open or almost straight. Your increases are being worked too loosely. Check your gauge, and make sure Row 2 ends with 26 sts and Row 3 ends with 33.
The outer shells ruffle. Check that you skip 1 st on each side of every shell. Too many stitches between the shells makes the edge flare.
The outer shells cup or pull. Your dc are tight. Loosen your yarn-overs slightly, or work the edging round only with a hook one size larger.
A tip looks lopsided. Make sure the shell is in the Row 2 end. Row 2 is the center row, so a shell there sits centered on the tip.
The flowers droop forward. Add 2–3 extra tacking stitches under the petals with sewing thread.
The jump ring stretches the stitches. Move it lower so it catches more of the band, or slip it through the Row 1–2 area as well.
Care
Hand wash in cool water with mild soap, press out the water in a towel, and dry flat. Remove the metal hardware before washing to prevent tarnish marks.

Final Notes
Here is the full measurement chain at a glance. Row 1 has 20 sc and measures 4 in (10.2 cm). After Rows 2 and 3 (26 and then 33 sc), the C is 2.75 in (7.0 cm) x 2.25 in (5.7 cm). The 81-stitch shell edging adds 3/8 in (1.0 cm) all around, bringing the letter to 3.5 in (8.9 cm) x 3 in (7.6 cm), with a 7/8 in (2.2 cm) band. Finally, the 1.5 in (3.8 cm) flower, two 1 in (2.5 cm) flowers, and four 1 in (2.5 cm) leaves finish the design.
Once you know this method, you can use it for other curved letters too.
Happy crocheting!