

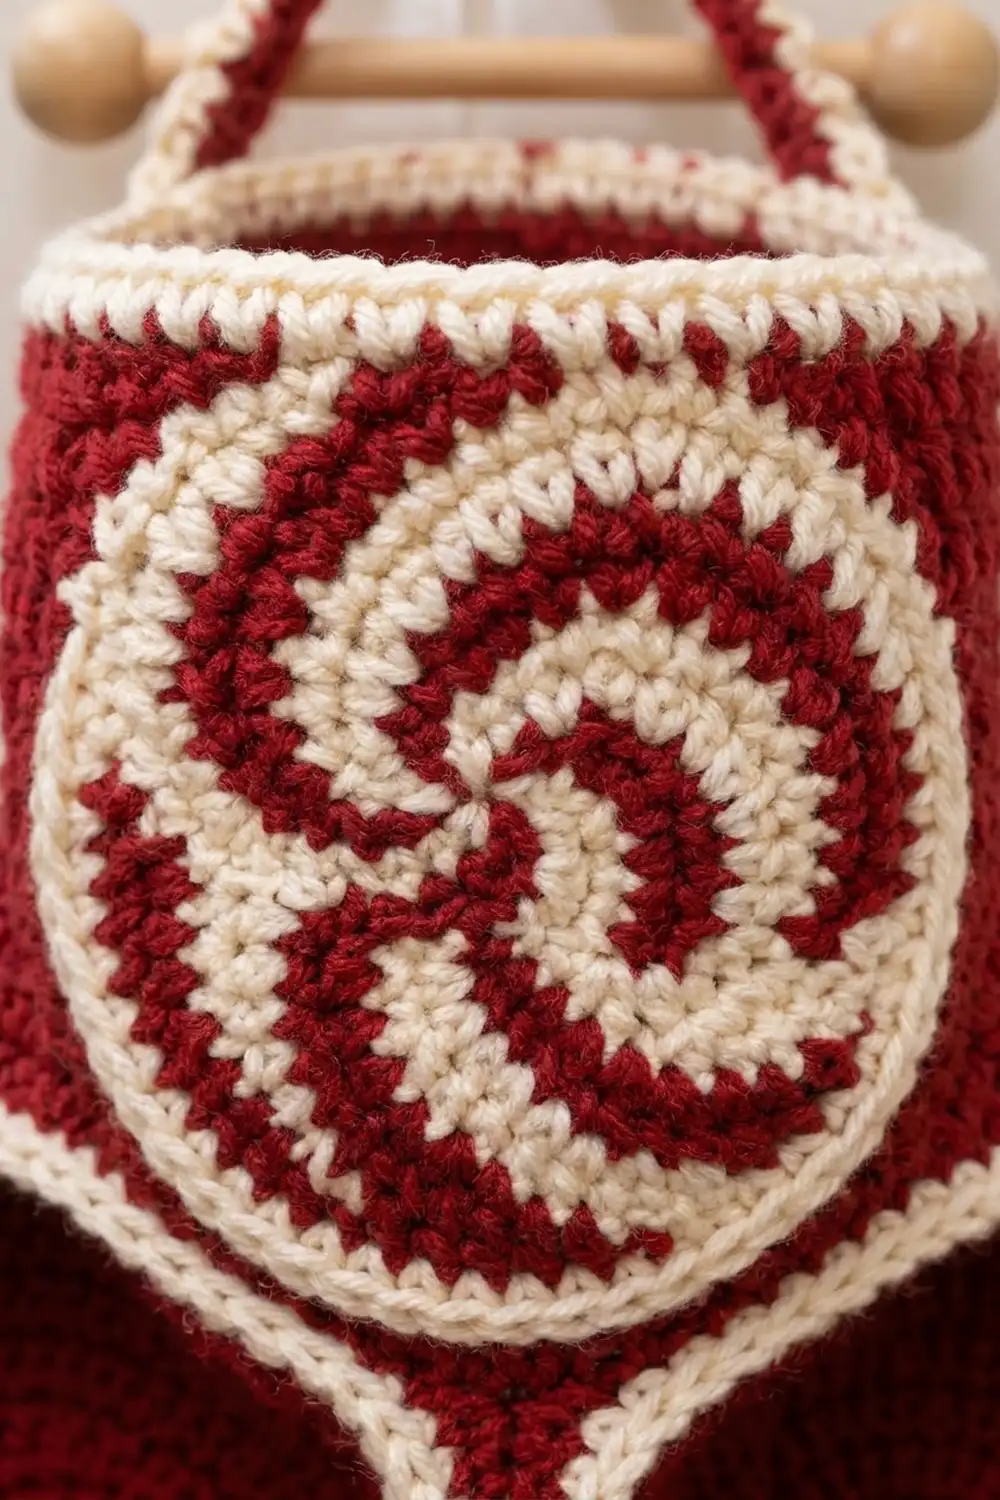
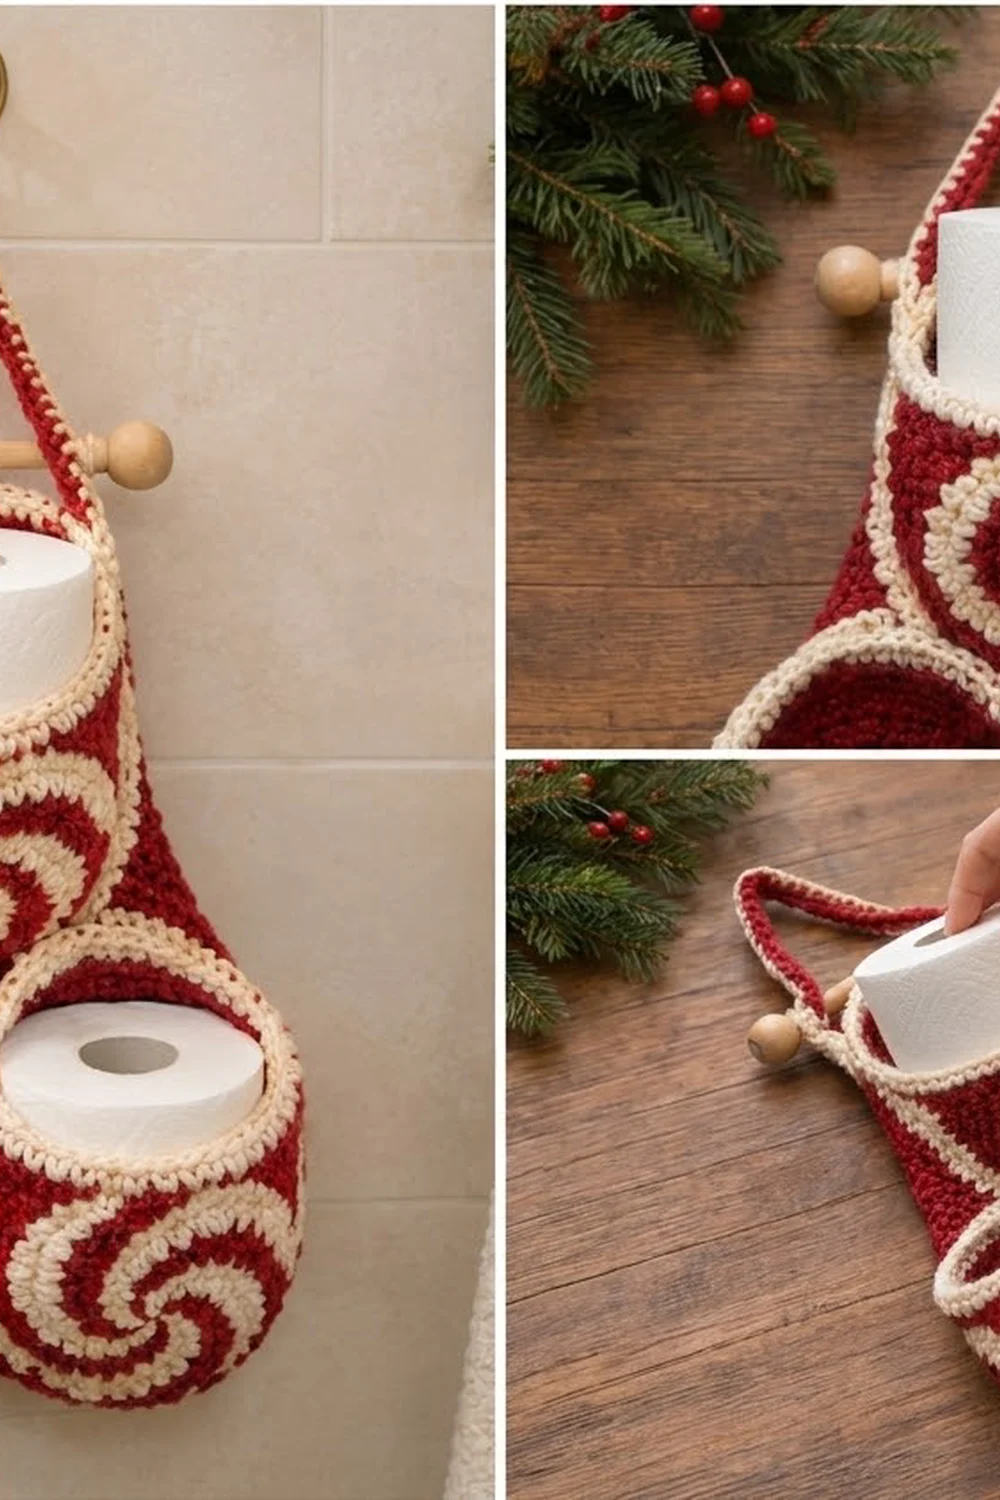
This hanging holder stores three spare rolls in a candy-cane look. Three round pockets sit in a triangle: one on top and two side by side below it. Each pocket has a peppermint swirl disc sewn to the front, and a red backing panel narrows into a strap with a loop for hanging.
The colors are cranberry red and cream. Red makes the bases, walls, backing and strap. Cream is used for the pocket rims, every second segment of each swirl and the outer ring of each swirl. A small wooden dowel with ball ends sits across the strap just above the top pocket.
The pattern uses US crochet terms. The finished holder measures about 10.5 in (26.7 cm) wide and 12.75 in (32.4 cm) tall from the bottom of the lower pockets to the top of the loop. Each pocket is about 5 in (12.7 cm) across and 4.5 in (11.4 cm) tall.
Here is the order of work. You crochet three pockets in joined rounds and three swirl discs in spiral rounds. Then you work the backing panel and strap flat in rows, add a red edging and sew everything together.
Finished Size and Construction
- Finished size: 10.5 in (26.7 cm) wide x 12.75 in (32.4 cm) tall, hung
- Skill level: Intermediate (the swirl uses tapestry colorwork)
- Terminology: US
- Yarn weight: Worsted (#4)
- Hook: 5.0 mm (H-8) for all pieces, plus 4.5 mm (7) for the panel edging
- Number of pieces: 8 (3 pockets, 3 swirl discs, 1 backing panel with strap, 1 dowel tab)
- Layout: Pockets in a triangle, 1 on top and 2 below
- Pocket size: 5 in (12.7 cm) across x 4.5 in (11.4 cm) tall
- Pocket size before rim: 5 in (12.7 cm) across x 4 in (10.2 cm) tall
- Rim depth: 0.5 in (1.3 cm)
- Swirl disc: 4 in (10.2 cm) across
- Backing panel: 10.25 in (26.0 cm) wide x 8.75 in (22.2 cm) tall, plus a strap 6 in (15.2 cm) long and 1.75 in (4.4 cm) wide
Materials
Use a smooth worsted yarn in acrylic or a cotton blend. Tight single crochet in a firm yarn helps the pockets keep their round shape when they are empty. Avoid fuzzy yarns, because they hide the edges of the swirl.
- Cranberry red: 280 g, about 520 m
- Cream: 120 g, about 225 m
These quantities include a margin of about 15%.
Tools:
– 5.0 mm (H-8) and 4.5 mm (7) crochet hooks
– Tapestry needle
– 4 locking stitch markers
– Wooden dowel, 0.5 in (1.3 cm) thick and 8 in (20.3 cm) long, with 2 wooden ball ends
– Wood glue
– Scissors and a measuring tape
– Blocking pins and a spray bottle
Abbreviations (US Terms)
- ch: chain
- sc: single crochet
- sc2tog: single crochet 2 together
- sl st: slip stitch
- st(s): stitch(es)
- BLO: back loop only
- MR: magic ring
- rev sc: reverse single crochet (crab stitch)
- rep: repeat
Special stitch: Reverse single crochet (rev sc). Work from left to right (left-handed crocheters work from right to left). Insert the hook into the next stitch to the right, yarn over, pull up a loop, then yarn over and pull through both loops on the hook. This makes the corded edge on the rims.
Tapestry colorwork: Carry the color you are not using along the top of the previous round and work over it. To change color, use the new color for the final yarn over of the last stitch before the change.
Gauge and Checkpoints
Gauge: 14 sc x 16 rows = 4 in (10.2 cm) with the 5.0 mm hook.
Make one complete pocket before you start the rest. Every other measurement in this pattern depends on that first pocket.
Checkpoints:
– Pocket base after Round 9: 4.75 in (12.1 cm) across, lying flat
– Pocket walls after Round 25: 4 in (10.2 cm) tall
– Swirl disc after Round 7: 3.5 in (8.9 cm) across. After Round 8: 4 in (10.2 cm)
– Panel after Row 20: 10.25 in (26.0 cm) wide x 5 in (12.7 cm) tall
– Panel after Row 35: 8.75 in (22.2 cm) tall
If your piece is too big: go down 0.5 mm in hook size. A loose pocket will slump.
If your piece is too small: go up 0.5 mm in hook size, then check that a roll still fits easily.
Colorwork usually comes out tighter than plain sc. If your swirl disc is under 3.5 in (8.9 cm) after Round 7, use a hook 0.5 mm larger for the discs only.
Pocket (Make 3)
Work in joined rounds. At the end of each round, sl st into the first sc. Start each round with ch 1, which does not count as a stitch. The joins line up in one column, which becomes the center back of the pocket.
Base (red, 5.0 mm hook):
- Round 1: MR, 6 sc in ring. Join. (6)
- Round 2: 2 sc in each st. (12)
- Round 3: Sc 1, 2 sc in next; rep 6 times. (18)
- Round 4: Sc 2, 2 sc in next; rep 6 times. (24)
- Round 5: Sc 3, 2 sc in next; rep 6 times. (30)
- Round 6: Sc 4, 2 sc in next; rep 6 times. (36)
- Round 7: Sc 5, 2 sc in next; rep 6 times. (42)
- Round 8: Sc 6, 2 sc in next; rep 6 times. (48)
- Round 9: Sc 7, 2 sc in next; rep 6 times. (54)
Checkpoint: the base is 4.75 in (12.1 cm) across.
Walls (red):
- Round 10: Sc in the BLO of each st. (54) This creates a sharp fold between the base and the wall.
- Rounds 11–25: Sc in each st. (54)
Checkpoint: the walls measure 4 in (10.2 cm) from the fold to the top edge. That is 16 wall rounds at 4 rounds per inch. The circumference is 15.4 in (39.1 cm), so the pocket is about 5 in (12.7 cm) across.
Fasten off red. The rim (Rounds 26–27) is worked in the Border section so that all edge finishes are together.
Put a marker in stitch 28 of Round 18. It sits directly opposite the join seam and marks the center front, where the swirl disc goes.
Swirl Disc (Make 3)
Work in continuous spiral rounds and move a marker up at the start of each round. Each round has six color segments: red, cream, red, cream, red, cream. On every round, each segment moves one stitch forward, so the color edges curve into a swirl.
- Round 1 (5.0 mm hook): MR with red. Work 6 sc into the ring, switching colors on every stitch: red, cream, red, cream, red, cream. (6) Each segment is 1 st.
Rounds 2–7: Call the round number “n”. Each segment will have n sts.
For each segment, starting with the first red segment:
1. Use that segment’s color.
2. Sc in the 2nd through last st of the same-color segment below. This is n − 2 sts.
3. Work 2 sc in the first st of the next segment below, still in the same color.
4. Switch colors and work the next segment the same way.
Do this for all 6 segments. The last segment finishes with 2 sc in the first stitch of Round n − 1, which nothing else has used yet.
- Round 2: 6 segments of 2 sts. (12)
- Round 3: 6 segments of 3 sts. (18)
- Round 4: 6 segments of 4 sts. (24)
- Round 5: 6 segments of 5 sts. (30)
- Round 6: 6 segments of 6 sts. (36)
- Round 7: 6 segments of 7 sts. (42)
Checkpoint: 3.5 in (8.9 cm) across. Cut red.
- Round 8 (cream, trim round): Sc 6, 2 sc in next; rep 6 times. That is 42 sc worked one into each existing stitch, plus 6 extra sc, for 48 sts total. Sl st to the next st to finish.
Checkpoint: 4 in (10.2 cm) across. Fasten off and leave a 24 in (61.0 cm) tail for sewing.
Backing Panel and Strap (Make 1)
Work flat in rows with red and the 5.0 mm hook. At the start of each row, ch 1 and turn. The ch 1 does not count as a stitch.
- Row 1: Ch 37. Sc in the 2nd ch from the hook and in each ch across. (36)
- Rows 2–20: Sc in each st. (36)
Checkpoint: 10.25 in (26.0 cm) wide x 5 in (12.7 cm) tall.
- Rows 21–35: Sc2tog, sc in each st to the last 2 sts, sc2tog. Each row has 2 fewer stitches than the row before: Row 21 has 34, Row 25 has 26, Row 30 has 16 and Row 35 has 6. (6)
Checkpoint: 8.75 in (22.2 cm) tall.
- Rows 36–59: Sc in each st. (6)
The strap is 24 rows, or 6 in (15.2 cm). Do not fasten off. Go straight on to the panel edging in the Border section.
Dowel Tab (Make 1)
- Row 1: With red and the 5.0 mm hook, ch 7. Sc in the 2nd ch from the hook and across. (6)
- Rows 2–12: Ch 1, turn, sc across. (6)
The tab measures 1.75 in (4.4 cm) x 3 in (7.6 cm). Fasten off and leave a long tail.
Make All Pieces
Red: 3 pocket bases and walls, the red segments of 3 swirl discs, 1 backing panel with strap, 1 dowel tab.
Cream: 3 pocket rims, the cream segments and Round 8 of 3 swirl discs.
Layout (front view; panel stitches are numbered 1–36 from the left):
              [  loop  ]        strap rows 52-59 folded back
              [ strap  ]
           ===[dowel tab]===    strap rows 39-42
          [  TOP POCKET  ]      panel rows 19-36, center sts 18-19
 [ BOTTOM LEFT ][ BOTTOM RIGHT ] panel rows 1-18
   center 9-10    center 27-28
Joining
Finish the rims and the panel edging (see Border) before you join anything. Use whipstitch and the matching yarn.
1. Swirl discs to pockets. Center each disc over the front marker. The disc’s 4 in (10.2 cm) height matches the 4 in (10.2 cm) wall, from the base fold up to the rim. Whipstitch through the back loops of the disc’s Round 8, one stitch into each wall stitch or row it covers. Keep your stitches loose enough that the disc lies flat on the curve.
2. Bottom pockets to panel. Place the panel face up. Set the bottom left pocket on it with its join seam against the panel, centered over stitches 9–10, with the base fold level with Row 1.
Pick out the two wall stitch columns that sit 5 stitches to each side of the seam. Sew one column to panel column 5 and the other to panel column 14. Wall Rounds 10–25 match panel Rows 1–16 one to one, because both have 16 rows in 4 in (10.2 cm). Leave the rim free.
Attach the bottom right pocket the same way at panel columns 23 and 32.
3. Top pocket. Center it over panel stitches 18–19, with the base fold at Row 19. Sew its two wall columns to panel columns 16 and 21, from Row 19 to Row 32 (wall Rounds 10–23). The rim reaches Row 36.
4. Pocket to pocket. Where the two bottom pockets touch, sew about 6 rounds of their walls together. Then sew the top pocket’s base edge to both bottom rims at the points where they meet.
5. Dowel tab. Center the tab crosswise on the back of the strap at Rows 39–42. Sew its two short edges to the strap, 1 in (2.5 cm) apart, so the extra 2 in (5.1 cm) bows out and forms a channel. Slide the dowel through, then glue on the second ball end.
6. Loop. Fold Rows 52–59 of the strap, which is 2 in (5.1 cm), to the back and sew the end down across all 6 stitches.
Tension: Pull every sewing stitch just until the pieces touch. Tight seams pucker the panel.
Size check: 10.5 in (26.7 cm) wide x 12.75 in (32.4 cm) tall.
Border
Border gauge: Along row ends, work 16 sc per 4 in (10.2 cm). This matches the row gauge, so one sc goes into each row end. Use the 4.5 mm hook so the extra stitches lie flat instead of rippling.
Panel edging (red, worked before joining):
- Round 1: Carry on from Row 59 and work around the whole panel:
- 6 sc across the top of the strap, then ch 1 at the corner
- 59 sc down the left side, one in each row end, then ch 1
- 36 sc across the underside of the foundation chain, then ch 1
- 59 sc up the right side, then ch 1
- Join to the first sc. (160 sc; the 4 corner chains are not counted)
Why the math works: The top count matches Row 59 (6 sts). The bottom count matches the 37-chain foundation (36 sc). The side counts match the 59 rows one to one. The corner ch-1s turn the corners without adding stitches to any side.
Pocket rims (cream, 5.0 mm hook): Join cream at the seam on Round 25 of each pocket.
- Round 26: Sc in each st. Join. (54)
- Round 27: Rev sc in each st. Join. (54) Fasten off.
Why the math works: The rim keeps exactly 54 stitches, so the opening stays 5 in (12.7 cm) across and does not flare. The two rounds add 0.5 in (1.3 cm) of height, which brings each pocket to 4.5 in (11.4 cm).
Final Blocking
- Put a toilet roll in each pocket to hold the cylinder shape.
- Lay the holder face up on a blocking board.
- Pin the panel to 10.25 in (26.0 cm) at Row 1 and the strap to 1.75 in (4.4 cm) wide.
- Mist the whole piece lightly, paying most attention to the swirl discs.
- Press each disc flat with your palm so its outer cream ring sits evenly.
- Let it dry fully, at least 12 hours, before taking out the pins and rolls.
- Hang the holder and check that the overall height is 12.75 in (32.4 cm).
Final Quality-Control Checklist
- Each pocket base has 54 sts and the walls have 16 rounds.
- Each rim has 54 sts and a smooth corded edge.
- Each disc has 6 even segments and 48 sts in Round 8.
- Each disc is centered on its pocket front, opposite the seam.
- The panel edging has 160 sc and 4 corner chains.
- Pockets sit level: the two lower pockets are even and the top one is centered.
- The dowel slides easily and both ball ends are glued firmly.
- All tails are woven in on the back.
Troubleshooting
The base cups instead of lying flat. Your gauge is tight. Go up a hook size for the base rounds.
The base ruffles. Your gauge is loose. Go down a hook size.
The swirl looks straight instead of curved. You didn’t move each segment forward one stitch. Check that every segment begins in the 2nd stitch of the segment below.
Carried strands show through. Hold the unused color tighter along the top of the stitches and keep your tension even.
A pocket leans forward. Sew the wall columns all the way down to Row 1 (Row 19 for the top pocket).
The panel edge ripples. Work the edging with a 4.5 mm hook, or use a 4.0 mm hook on the side row ends.
The roll is too tight. Add 6 sts by working one more base round, Round 10, as sc 8, 2 sc in next for 60 sts. The walls then have 60 sts too: work the BLO fold round as Round 11, then Rounds 12–26, and the rim on Rounds 27–28. Move the front marker to stitch 31.
Care
Hand wash in cool water, press out the water in a towel and dry flat with rolls inside the pockets. Take the dowel out before washing.
Final Notes
Everything depends on the gauge of 14 sc x 16 rows = 4 in (10.2 cm). That gauge gives a 54-stitch pocket 5 in (12.7 cm) across, 16 wall rounds of 4 in (10.2 cm), a 2-round rim of 0.5 in (1.3 cm) and a 4 in (10.2 cm) swirl disc that covers the wall exactly. The 36-stitch panel is 10.25 in (26.0 cm) wide, so the two lower pockets fit side by side. The panel’s 59 rows give 160 edging stitches, and the finished holder hangs at 12.75 in (32.4 cm). Check each measurement at its checkpoint and the parts will line up.
Happy crocheting!