

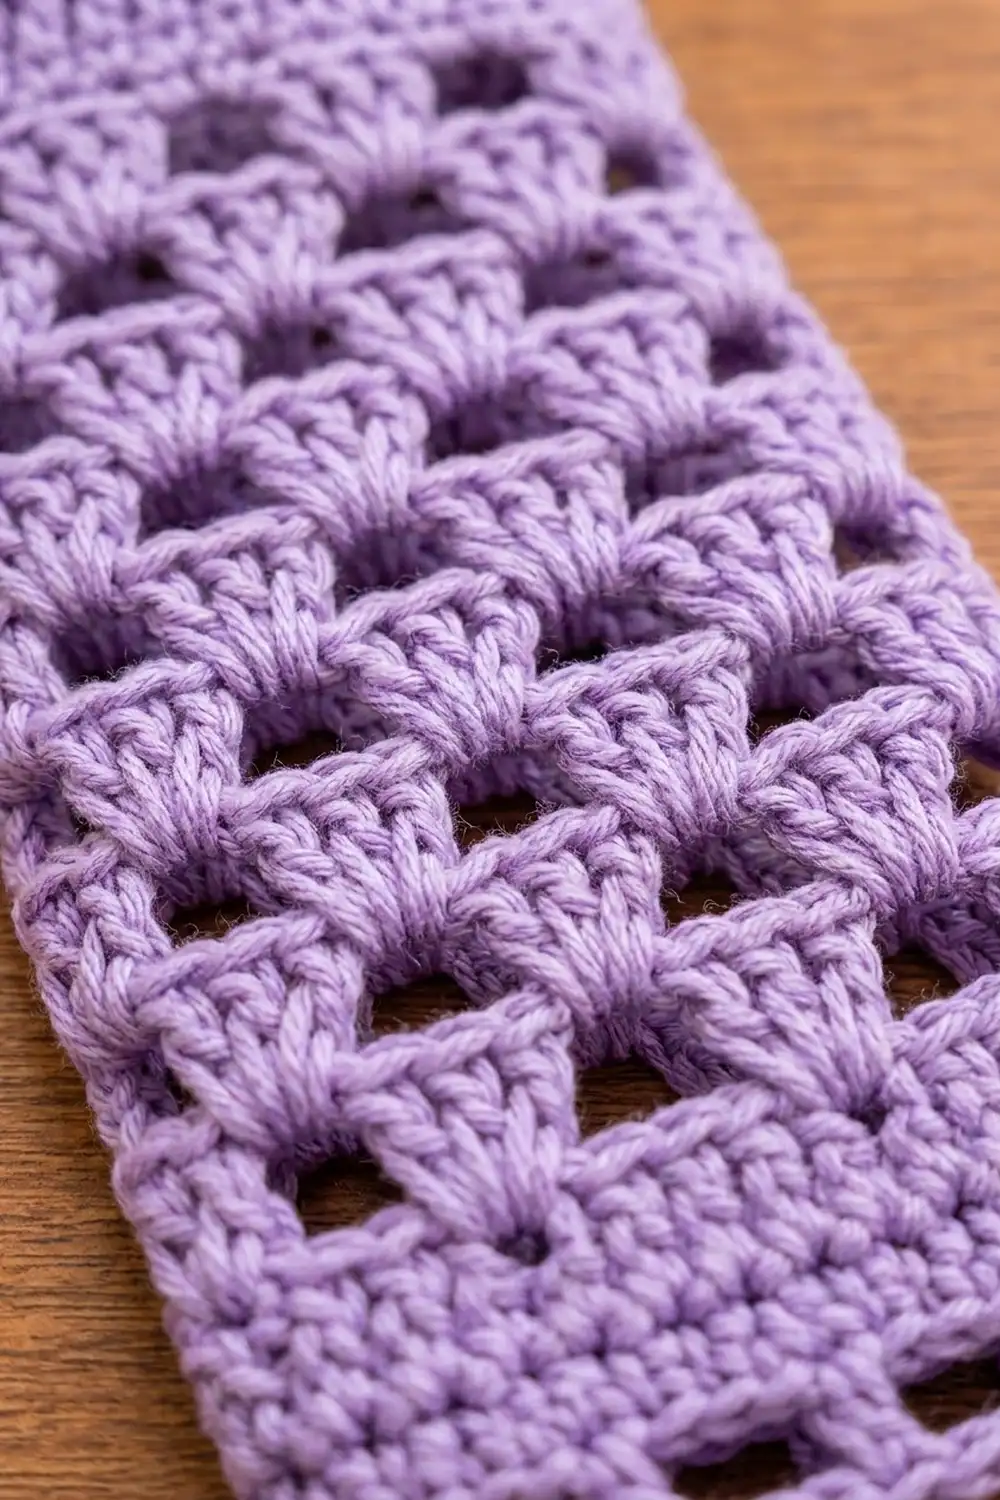
The Lilac Lattice Bag Holder is a tall, lacy tube that keeps grocery bags tidy and in easy reach. You push bags in at the top and pull them out one at a time through the cinched opening at the bottom. Solid single crochet bands at the top and bottom hold the shape, and an open fan-stitch lattice runs down the middle so you can see what’s inside.
The sample is shown in two colorways: soft lavender and deep plum. Each holder uses just one color, so this is a good pattern for leftover cotton. The style is clean and simple. The fans stack in offset rows, which leaves neat triangular windows between them.
This pattern uses US crochet terms. The finished holder is 6 in (15.2 cm) wide when flattened, 12 in (30.5 cm) around and about 15.25 in (38.7 cm) tall, not counting the hanging loop.
The construction is simple. You crochet the body bottom-up as one seamless tube. Then you add a two-round rim, make two slip stitch cords, sew one on as the hanging loop and thread the other through the eyelets as a drawstring.
Finished Size and Construction
- Finished size: 6 in (15.2 cm) wide flat x 15.25 in (38.7 cm) tall; 12 in (30.5 cm) circumference
- Skill level: Easy
- Terminology: US crochet terms
- Yarn weight: Worsted (#4), cotton or cotton blend
- Hook: 5.0 mm (US H-8)
- Number of pieces: 1 body tube + 2 cords (hanging loop and drawstring)
- Layout: Single vertical tube, hung from the top loop
- Body size before border: 6 in (15.2 cm) wide flat x 14.75 in (37.5 cm) tall
- Border depth: 0.5 in (1.3 cm), worked on the top edge only
Materials
Yarn: Use a smooth worsted-weight cotton or cotton blend. Cotton holds its shape when stuffed with bags and doesn’t stretch out over time. Avoid fuzzy or very stretchy acrylic, which can sag.
- Color A, Lavender (sample 1): 55 g / 105 m
- Color B, Plum (sample 2): 55 g / 105 m
One holder takes one color. Buy one amount for each holder you plan to make. Quantities include a margin of roughly 25% for your gauge swatch and tails.
Tools:
- 5.0 mm (US H-8) crochet hook
- Locking stitch markers (at least 3)
- Tapestry needle
- Scissors
- Measuring tape
- Rust-proof pins and a rolled towel or a tall bottle for blocking
Abbreviations (US Terms)
- ch – chain
- sl st – slip stitch
- sc – single crochet
- dc – double crochet
- sk – skip
- sp – space
- st(s) – stitch(es)
- rnd(s) – round(s)
- rev sc – reverse single crochet (crab stitch)
- bo – bobble
- rep – repeat
Fan: 4 dc worked into the same stitch or space.
Reverse single crochet (rev sc): Work from left to right (right to left if you’re left-handed). Insert the hook into the next stitch to the right, yarn over, pull up a loop, yarn over and pull through both loops. This makes the rounded, corded rim.
Bobble (bo): (Yarn over, insert hook in the stitch, yarn over and pull up a loop, yarn over and pull through 2 loops) 5 times in the same stitch, then yarn over and pull through all 6 loops on the hook.
Gauge and Checkpoints
Gauge: 16 sc and 18 sc rnds = 4 in (10.2 cm). In lace, 4 rnds = 2 in (5.1 cm), and one fan repeat (fan + ch-2) = 1.5 in (3.8 cm) wide.
Test first: Treat Rnds 1–8 as your gauge test. Flatten the tube without stretching it and measure.
Checkpoints:
- After Rnd 1: The flattened width is 6 in (15.2 cm).
- After Rnd 8: The tube is about 2 in (5.1 cm) tall.
- After Rnd 12: The tube is about 4 in (10.2 cm) tall.
- After Rnd 30: The tube is about 13 in (33.0 cm) tall.
- After Rnd 38: The tube is about 14.75 in (37.5 cm) tall.
- After the border: The tube is about 15.25 in (38.7 cm) tall.
If your piece is too big: Change to a 4.5 mm (US 7) hook and start again. Don’t remove stitches, because the 48-stitch count is what makes the 8 fans fit.
If your piece is too small: Change to a 5.5 mm (US I-9) hook.
If the width is right but the height runs long or short, adjust the number of lace rounds instead. Each pair of lace rounds is 1 in (2.5 cm).
Body
You work the body in joined rounds with the right side facing. Don’t turn.
Bottom Band and Eyelets
Foundation: Ch 48 and join with a sl st to the first ch. Don’t twist the chain.
Rnd 1: Ch 1, sc in each ch around, join with a sl st to the first sc. (48 sc)
Rnd 2 (eyelet round): Ch 4 (counts as dc + ch 1), sk next st, *dc in next st, ch 1, sk next st; rep from * around, join with a sl st to the 3rd ch of beginning ch-4. (24 dc + 24 ch-1 sps = 48 sts; 24 eyelets)
Rnd 3 (conversion round): Ch 1, sc in each dc and in each ch-1 sp around, join. (24 sc worked 1-per-dc + 24 sc worked into ch-1 sps = 48 sc)
Rnds 4–8: Ch 1, sc in each st around, join. (48 sc)
Checkpoint: about 2 in (5.1 cm) tall, 6 in (15.2 cm) wide flat.
Lattice Section
Rnd 9 (first lace round): Ch 3 (counts as dc), 3 dc in same st (first fan made), ch 2, sk next 5 sts, *4 dc in next st, ch 2, sk next 5 sts; rep from * 6 more times, join with a sl st to the top of ch-3. (8 fans + 8 ch-2 sps; 32 dc + 16 ch = 48 sts)
Check the math: each repeat uses 1 stitch for the fan and skips 5, so 8 repeats x 6 sts = 48.
Rnd 10: Sl st in each of next 3 dc, sl st in next ch-2 sp, ch 3 (counts as dc), 3 dc in same sp, ch 2, *4 dc in next ch-2 sp, ch 2; rep from * 6 more times, join to the top of ch-3. (8 fans + 8 ch-2 sps)
Each new fan sits in the gap between two fans below it. The ch-2 passes over the top of the fan below, which leaves the triangular windows.
Rnds 11–30: Rep Rnd 10. (8 fans + 8 ch-2 sps in each round; 22 lace rounds total)
The joins move half a repeat each round, so they drift around the tube. That’s normal, and the joins don’t show in the lace.
Checkpoint after Rnd 12: about 4 in (10.2 cm) tall. After Rnd 30: about 13 in (33.0 cm) tall.
Top Band
Rnd 31 (conversion round): Ch 1, sc in each dc and work 2 sc in each ch-2 sp around, join. (32 sc worked 1-per-dc + 16 sc worked into 8 ch-2 sps = 48 sc)
Rnds 32–38: Ch 1, sc in each st around, join. (48 sc)
Checkpoint: about 14.75 in (37.5 cm) tall. Don’t fasten off. Go straight to the border.
Hanging Loop and Drawstring
Hanging Loop
Ch 46. Sl st in the back bump of the 2nd ch from the hook and in each ch to the end. (45 sl sts) Fasten off and leave a 10 in (25.4 cm) tail.
The cord measures about 11.25 in (28.6 cm). Set it aside until the border is done.
Drawstring
Ch 103. Work a bo in the 4th ch from the hook. Sl st in the back bump of each remaining ch to the end. (99 sl sts) Ch 3, bo in the 3rd ch from the hook, sl st in the last sl st and fasten off. Weave in the ends.
The cord measures about 24.75 in (62.9 cm) between the bobbles.
Border
The border is worked on the top edge only. It firms up the opening so that bags slide in easily and the rim doesn’t roll.
Border gauge: Same as the body, 16 sc = 4 in (10.2 cm). The rev sc round is worked 1 to 1, so it neither ruffles nor pulls in.
Border Rnd 1: Ch 1, sc in each st around, join. (48 sc; 24 sc on the front flat side and 24 sc on the back flat side)
Border Rnd 2: Ch 1, rev sc in each st around, join. (48 rev sc; 24 per flat side) Fasten off.
Why the math works: The tube has no corners. Flattened, the 48 stitches split evenly into two sides of 24. At 4 sts per inch, 24 sts = 6 in (15.2 cm), which matches the body width exactly. Because no stitches are added or removed, the rim stays the same width as the body.
Attach the hanging loop: Flatten the tube with the fan columns centered on the front. Mark the two side folds on Border Rnd 1. These are 24 sts apart.
Lay 1.25 in (3.2 cm) of one cord end against the inside of the top band at one fold. Whipstitch it in place through the inside loops of the sc so that the stitching doesn’t show on the outside. Repeat with the other end at the opposite fold.
The free cord is 8.75 in (22.2 cm) long, which makes a loop about 4.25 in (10.8 cm) tall above the rim.
Thread the drawstring: Start at the center front. Weave the drawstring in and out of the 24 eyelets of Rnd 2 so that both bobble ends come out of neighboring eyelets at the front.
Final Blocking
- Weave in all remaining tails along the inside of the solid bands.
- Wet the holder in cool water, then gently squeeze it. Don’t wring.
- Roll it in a towel to remove excess water.
- Slide it over a tall bottle or a tightly rolled towel that is 12 in (30.5 cm) around.
- Ease the fans into straight columns and open the triangular windows evenly.
- Pat the top rim and bottom band to 6 in (15.2 cm) flat width. Check the height is 15.25 in (38.7 cm).
- Let it dry completely before cinching the drawstring.
- Pull the drawstring until the bottom opening is about 1.25 in (3.2 cm) across. Tie a bow with loops about 2 in (5.1 cm) long.
Final Quality-Control Checklist
- Each solid band has 48 sc and no twist.
- There are 24 evenly spaced eyelets.
- Every lace round has 8 fans of 4 dc.
- The fans line up in offset columns with clean triangular windows.
- The rev sc rim lies flat and rounded with no ruffling.
- The hanging loop is centered over the side folds and stitched securely.
- Both drawstring bobbles are firm and the bow holds.
- The holder measures 6 in (15.2 cm) wide flat and 15.25 in (38.7 cm) tall.
Troubleshooting
Foundation twisted: Rip it out and rejoin. You can’t fix a twist later.
Lace flares wider than the bands: Your dc are loose. Go down half a hook size for the lace only, or work the ch-2 sps as ch 1.
Lace pulls narrower than the bands: Loosen your chains, or make each ch-2 slightly longer.
Fan count is off: Count the ch-2 sps, not the dc. There should be 8 per round.
Rim ruffles: Your rev sc tension is loose. Rework the round with a smaller hook.
Bottom won’t close: Check that the drawstring passes through every eyelet, then pull from both ends at once.
Loop stretches: Sew the ends in deeper, up to 1.5 in (3.8 cm) inside the band.
Care
Hand wash or machine wash on a gentle cycle in cool water, then reshape and lay flat to dry. Untie the drawstring before washing so that the bottom can dry fully.

Final Notes
The measurements build on each other. Your 48 stitches set the 12 in (30.5 cm) circumference and the 6 in (15.2 cm) flat width. The bottom band adds 2 in (5.1 cm) and 22 lace rounds add 11 in (27.9 cm). The top band brings the body to 14.75 in (37.5 cm), and the two-round border finishes it at 15.25 in (38.7 cm).
Check the width at Rnd 1 and the height at each checkpoint, and the holder will come out the right size. Fill it with bags, hang it on a peg and pull them out from the bottom as you need them.
Happy crocheting!