

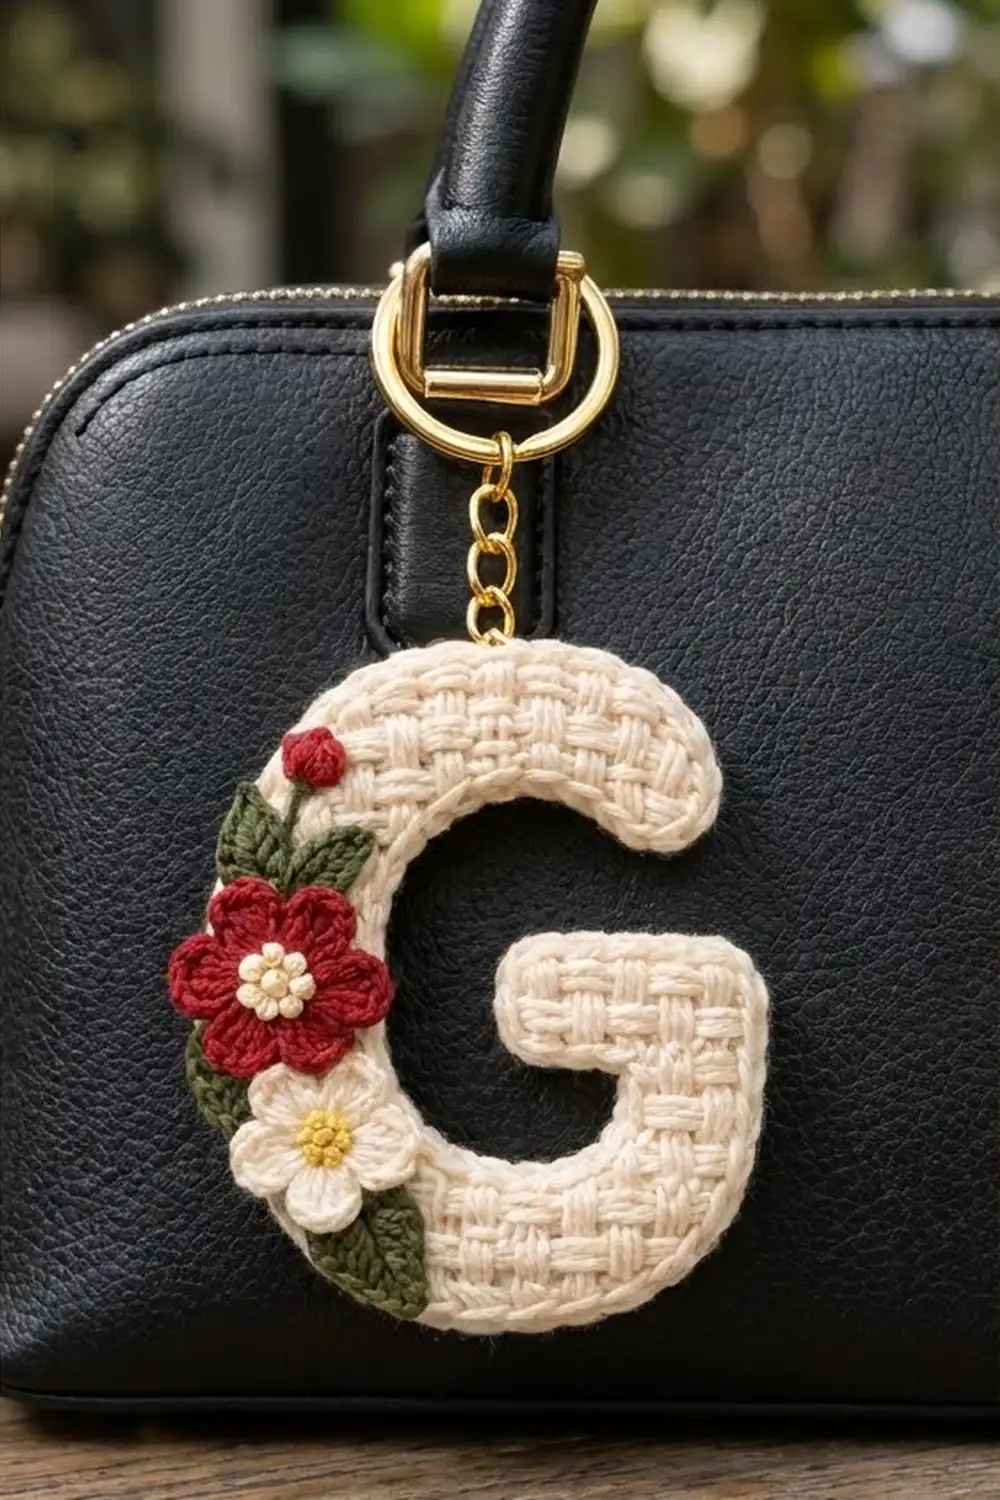
This little letter G is a soft, textured monogram charm for a handbag, backpack, or set of keys. The cream letter is worked in a compact basketweave of raised and recessed blocks. A rolled, cord-like edge frames it so it looks neat from every side.
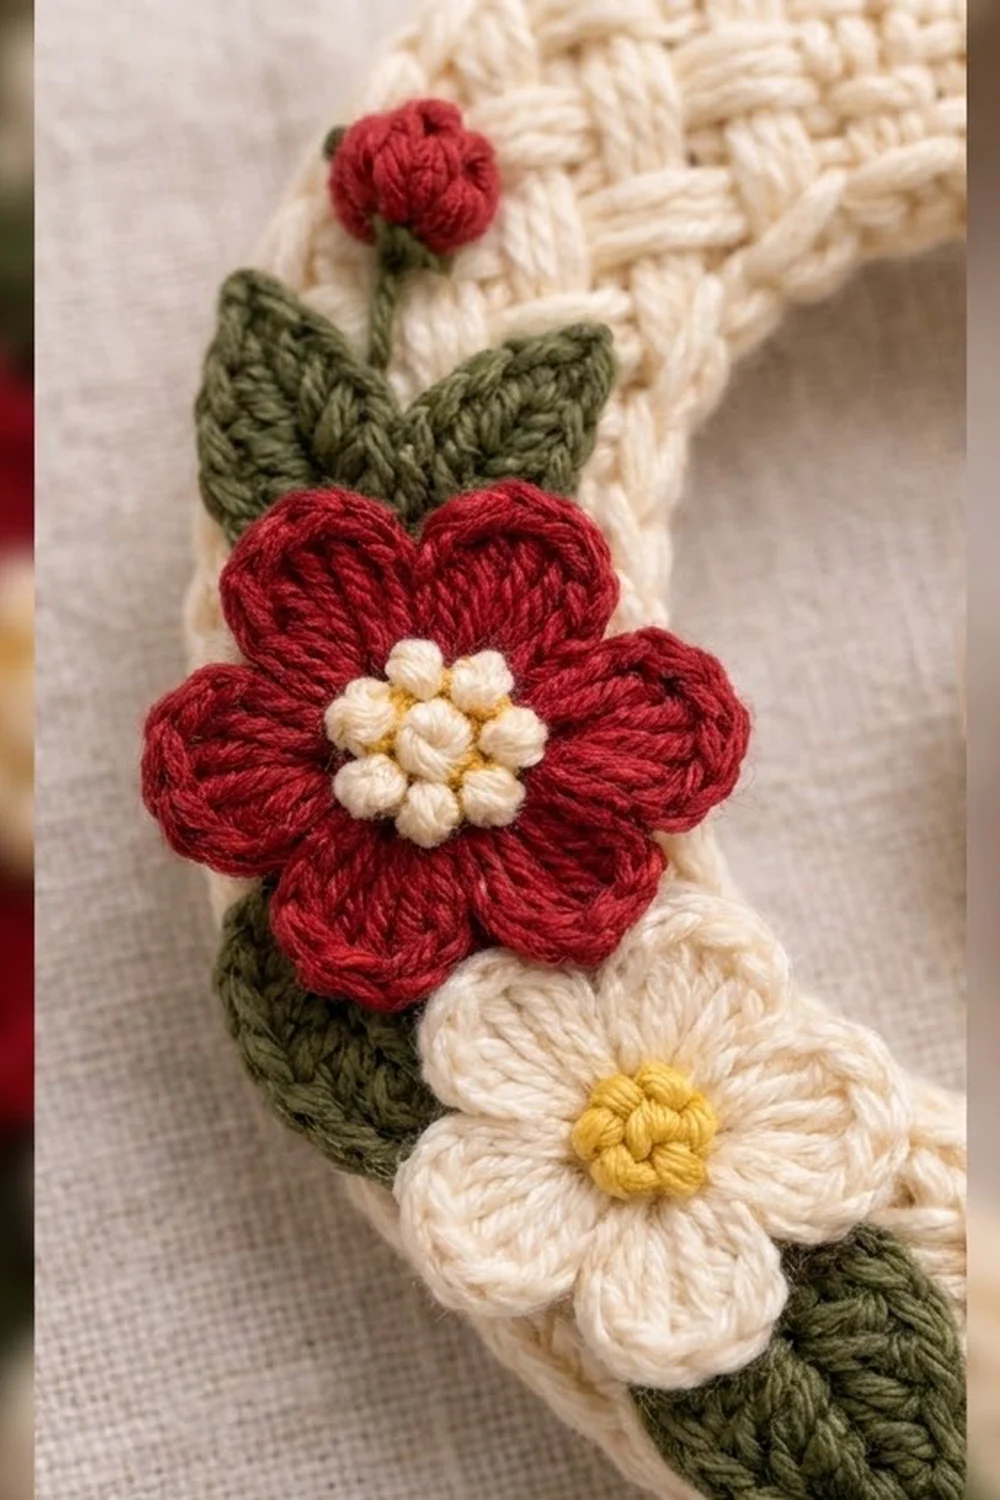
A small floral cluster sits on the lower-left curve: a deep red five-petal flower, a smaller cream flower with a yellow center, a round red bud, and three olive-green leaves. The colors are cream, deep red, olive green, and a touch of mustard yellow, with gold hardware.
The pattern uses US crochet terms. The finished charm measures 4 in (10.2 cm) wide by 4.5 in (11.4 cm) tall, not counting the key ring and chain.
The letter is one flat piece worked in rows on a 14-stitch by 10-row grid. You make the bottom bar first, then the right stroke and crossbar, then the left stroke, which grows into the top bar. One single crochet round and one reverse single crochet round go around the whole outline. The flowers and leaves are made separately and sewn on.
Finished Size and Construction
- Finished size: 4 in (10.2 cm) wide x 4.5 in (11.4 cm) tall
- Skill level: Intermediate (post stitches, simple shaping, embroidery)
- Terminology: US crochet terms
- Yarn weight: DK / light worsted (weight 3) cotton
- Hook: 4.0 mm (G-6) for the letter; 3.5 mm (E-4) for appliqués
- Number of pieces: 1 letter + 6 small appliqués (1 large flower, 1 small flower, 1 bud, 3 leaves)
- Layout: single letter, no joining
- Letter size before border: 3.5 in (8.9 cm) wide x 4 in (10.2 cm) tall
- Stroke width: 1 in (2.5 cm) for the vertical strokes; 0.8 in (2.0 cm) for the horizontal bars
- Border depth: 0.25 in (0.6 cm) per side
Materials
Choose a smooth combed or mercerized cotton in DK / light worsted weight. Cotton shows the basketweave crisply and holds its shape on a bag. A typical yarn of this kind runs about 2.4 m per gram.
- Cream (main color): 12 g / 29 m
- Deep red: 4 g / 10 m
- Olive green: 3 g / 7 m
- Mustard yellow: 1 g / 3 m
These quantities include a margin of about 20 percent for the gauge swatch and sewing tails.
Tools:
- 4.0 mm (G-6) and 3.5 mm (E-4) crochet hooks
- Tapestry needle
- Gold split key ring, 1 in (2.5 cm)
- Gold chain, about 1 in (2.5 cm) long
- Two 6 mm gold jump rings and two pairs of flat-nose pliers
- Stitch markers
- Blocking mat, rust-proof pins, and a spray bottle
Abbreviations (US Terms)
- ch – chain
- sl st – slip stitch
- sc – single crochet
- sc2tog – single crochet 2 together
- hdc – half double crochet
- dc – double crochet
- FPdc / BPdc – front / back post double crochet
- fdc – foundation double crochet
- rsc – reverse single crochet (crab stitch)
- st(s) – stitch(es)
- RS / WS – right side / wrong side
Raised and recessed: These words always describe how a stitch looks from the RS. On RS rows, raised = FPdc and recessed = BPdc. On WS rows, raised = BPdc and recessed = FPdc.
Fdc off the end of a row: Yo, insert the hook under the 2 strands at the base of the last st made, yo and pull up a loop, yo and pull through 1 loop (this makes the base chain), [yo, pull through 2 loops] twice. For each following fdc, insert the hook into the base chain of the fdc you just made.
Stitch positions: With the RS facing, the grid positions are numbered 1 to 14 from left to right. RS rows are worked from right to left; WS rows are worked from left to right.
Basketweave blocks:
- Block A = positions 1–2, 5–6, 9–10, 13–14
- Block B = positions 3–4, 7–8, 11–12
- Rows 2, 3, 6, 7, and 10: Block A raised, Block B recessed.
- Rows 4, 5, 8, and 9: Block B raised, Block A recessed.
The ch 2 at the start of each row does not count as a stitch.
Gauge and Checkpoints
Gauge: 16 sts and 10 rows = 4 in (10.2 cm) in basketweave with a 4.0 mm hook, after light blocking. That is 4 sts and 2.5 rows per inch.
Test first: Ch 14. Dc in the 3rd ch from the hook and in each ch across (12 dc). Work 5 more rows in 2-stitch blocks, switching raised and recessed every 2 rows. The swatch should measure 3 in (7.6 cm) wide and 2.4 in (6.1 cm) tall.
- Too big: go down one hook size.
- Too small: go up one hook size.
Checkpoints:
- After Row 2: 3.5 in (8.9 cm) wide, 0.8 in (2.0 cm) tall
- After Row 6 (right section): crossbar 1.75 in (4.4 cm) long; right edge 2.4 in (6.1 cm) tall
- After Row 10: 3.5 x 4 in (8.9 x 10.2 cm)
- After the border: 4 x 4.5 in (10.2 x 11.4 cm)
The Letter G
Use cream and the 4.0 mm hook.
Bottom Bar
Foundation: Ch 16.
Row 1 (RS): Dc in the 3rd ch from the hook and in each ch across, turn. (14 dc, positions 14 to 1)
Row 2 (WS): Ch 2, work positions 1–14 in pattern (Block A raised, Block B recessed), turn. Do not fasten off. (14 sts)
Right Stroke and Crossbar
Now work only over positions 11–14.
Row 3 (RS): Ch 2, work positions 14–11 (14 and 13 raised, 12 and 11 recessed), turn. (4 sts)
Row 4 (WS): Ch 2, work positions 11–14 (11 and 12 raised, 13 and 14 recessed), turn. (4 sts)
Row 5 (RS): Ch 2, work positions 14–11 (14 and 13 recessed, 12 and 11 raised). Then work 3 fdc off the end of the row for positions 10, 9, and 8, turn. (4 post sts + 3 fdc = 7 sts)
Row 6 (WS): Ch 2, work positions 8–14: 8 recessed, 9 and 10 raised, 11 and 12 recessed, 13 and 14 raised. Fasten off. (7 sts)
On Row 5 the 3 plain fdc read as a recessed block, and the post stitches on Row 6 carry the texture into the crossbar. The gap at positions 5–10 below the crossbar is the inner space (counter) of the G.
Left Stroke and Top Bar
Row 3 (RS): With the RS facing, join cream with a sl st in position 4 of Row 2. Ch 2, work positions 4–1 (4 and 3 recessed, 2 and 1 raised), turn. (4 sts)
Row 4 (WS): Ch 2, work positions 1–4 (1 and 2 recessed, 3 and 4 raised), turn. (4 sts)
Row 5 (RS): Ch 2, work positions 4–1 (4 and 3 raised, 2 and 1 recessed), turn. (4 sts)
Row 6 (WS): Ch 2, work positions 1–4 (1 and 2 raised, 3 and 4 recessed), turn. (4 sts)
Row 7 (RS): Ch 2, work positions 4–1 (4 and 3 recessed, 2 and 1 raised), turn. (4 sts)
Row 8 (WS): Ch 2, work positions 1–4 (1 and 2 recessed, 3 and 4 raised). Ch 12, turn.
Row 9 (RS): Dc in the 3rd ch from the hook and in each of the next 9 ch (10 plain dc for positions 14–5). Then work positions 4–1 (4 and 3 raised, 2 and 1 recessed), turn. (10 dc + 4 post sts = 14 sts)
Row 10 (WS): Ch 2, work positions 1–14 with Block A raised and Block B recessed. Fasten off. (14 sts)
The open area at positions 5–14 on Rows 7 and 8 is the mouth of the G. Check that the piece measures 3.5 x 4 in (8.9 x 10.2 cm).
Appliqués
Use the 3.5 mm hook. Leave a 6 in (15.2 cm) tail on each piece for sewing.
Large Red Flower (make 1)
Rnd 1: With red, make a magic ring, ch 1, work 10 sc in the ring, sl st to the first sc. (10 sc)
Rnd 2: [(Hdc, dc, dc, hdc) in the next st, sl st in the next st] 5 times. Fasten off. (5 petals: 20 petal sts + 5 sl st = 25 sts)
The flower is 1.25 in (3.2 cm) across. For the center, embroider 1 yellow French knot surrounded by a ring of 6 cream French knots.
Small Cream Flower (make 1)
Rnd 1: With cream, make a magic ring, ch 1, work 10 sc in the ring, sl st to the first sc. (10 sc)
Rnd 2: [(Hdc, dc, hdc) in the next st, sl st in the next st] 5 times. Fasten off. (5 petals: 15 petal sts + 5 sl st = 20 sts)
The flower is 0.9 in (2.3 cm) across. Embroider 1 yellow French knot (3 wraps) in the center.
Red Bud (make 1)
With red, ch 3. Work a 4-dc cluster in the 3rd ch from the hook, then ch 1 to close. Fasten off and use the tails to pull it into a ball 0.4 in (1.0 cm) across.
Leaves (make 3)
With green, ch 7. Sl st in the 2nd ch from the hook, sc in the next ch, hdc in the next ch, dc in the next ch, hdc in the next ch. In the last ch, work (sc, ch 2, sl st in the 2nd ch from the hook, sc) to make the pointed tip. Working along the other side of the chain: hdc, dc, hdc, sc, sl st in the last ch. Fasten off. (12 sts + picot tip)
Each leaf is 1 in (2.5 cm) long and 0.5 in (1.3 cm) wide.
Border
Border gauge: Work 1 sc in each stitch top or foundation chain, and 2 sc in the end of each dc row. Two sc match the height of one dc row, so the edges stay flat.
Rnd 1: With the RS facing, join cream with a sl st at the top-left corner (position 1 of Row 10). Ch 1, then sc around the outline in this order:
- Left edge, Rows 10 to 1: 20 sc
- Bottom edge, foundation positions 1 to 14: 14 sc
- Right edge, Rows 1 to 6: 12 sc
- Top of the crossbar, positions 14 to 8: 7 sc
- Left end of the crossbar, Rows 6 to 5: 4 sc
- Under the 3 fdc, positions 8 to 10: 3 sc
- Inner side of the right stroke, Rows 4 to 3: 4 sc
- Top of Row 2 inside the counter, positions 10 to 5: 6 sc
- Inner side of the left stroke, Rows 3 to 8: 12 sc
- Underside of the top bar (free chain loops), positions 5 to 14: 10 sc
- Right end of the top bar, Rows 9 to 10: 4 sc
- Top edge, positions 14 to 1: 14 sc
These segments add up to 110 sc.
Outer corners (8): top-left, bottom-left, bottom-right, both top corners of the crossbar, the lower-left corner of the crossbar, and both right corners of the top bar. Work 1 extra sc into each corner stitch. (+8)
Inner corners (4): where the fdc meet the right stroke, both bottom corners of the counter, and where the left stroke meets the top bar. Work the last sc of one segment and the first sc of the next together as sc2tog. (–4)
Sl st to the first sc. (110 + 8 – 4 = 114 sc)
Rnd 2: Ch 1, rsc in each st around, sl st to the first rsc. Fasten off. (114 rsc, 1 in each existing st)
Why the math works: A closed outline always has 4 more outer corners than inner ones (8 – 4 = 4). The 8 extra stitches let the border turn outward at the outer corners, and the 4 decreases keep it from rippling at the inner corners. The rsc round adds no stitches; it only rolls the edge into a cord. Together the two rounds add 0.25 in (0.6 cm) on every side, so the letter grows from 3.5 x 4 in (8.9 x 10.2 cm) to 4 x 4.5 in (10.2 x 11.4 cm).
Final Blocking
- Spray the letter until it is evenly damp but not soaked.
- Lay it RS up on the blocking mat, lined up with the grid.
- Pin it to 4 x 4.5 in (10.2 x 11.4 cm).
- Pin the ends of the crossbar and top bar so the mouth is level.
- Ease the outer corners into smooth curves and pin them.
- Let it dry completely, then remove the pins.
- Sew on the appliqués, back layer first. Place one leaf near Row 8 pointing up and left, one near Row 5 angled over the left edge, and one at the bottom-left corner pointing down. Center the red flower on the left stroke at Rows 4–6, overlapping the border by 0.25 in (0.6 cm). Tuck the cream flower below and to the right of it at Rows 2–3, overlapping one red petal. Sew the bud over the base of the upper leaf.
- Attach a jump ring through both border rounds at the middle of the top edge, between positions 7 and 8, and hook on the chain. Use the second jump ring to connect the chain to the key ring.
Final Quality-Control Checklist
- Before the border, the letter measured 3.5 x 4 in (8.9 x 10.2 cm)
- Row counts are 14, 4, 7, and 14 sts as given
- Raised blocks switch cleanly every 2 rows
- Border: 114 sc, then 114 rsc
- Finished size: 4 x 4.5 in (10.2 x 11.4 cm)
- The mouth and counter are open and clearly shaped
- Appliqués are layered in order: leaves, red flower, cream flower, bud
- No sewing stitches show on the back
- Jump rings are fully closed and all ends are woven in
Troubleshooting
The letter curls. Post stitches pull tighter than the border. Re-block it damp and pin it until dry.
The crossbar droops. The fdc are loose. Work them more firmly.
The border ripples. There are too many sc. Recount the segments and check every inner-corner sc2tog.
The border pulls in. Use a hook one size larger for the rsc round.
The texture looks flat. Push each FPdc toward you as you work it.
The charm feels floppy. Crochet a little tighter, or sew a cream felt backing cut 0.1 in (0.3 cm) inside the border.
Care
Remove the metal hardware first. Hand wash in cool water with mild soap and dry flat.
Final Notes
At a gauge of 4 sts and 2.5 rows per inch, the 14 x 10 grid measures 3.5 x 4 in (8.9 x 10.2 cm). The 114-stitch sc round and the rsc round add 0.25 in (0.6 cm) on each side, for a finished size of 4 x 4.5 in (10.2 x 11.4 cm). The flower cluster sits on the left stroke and the gold ring hangs from the top center.
Happy crocheting!