

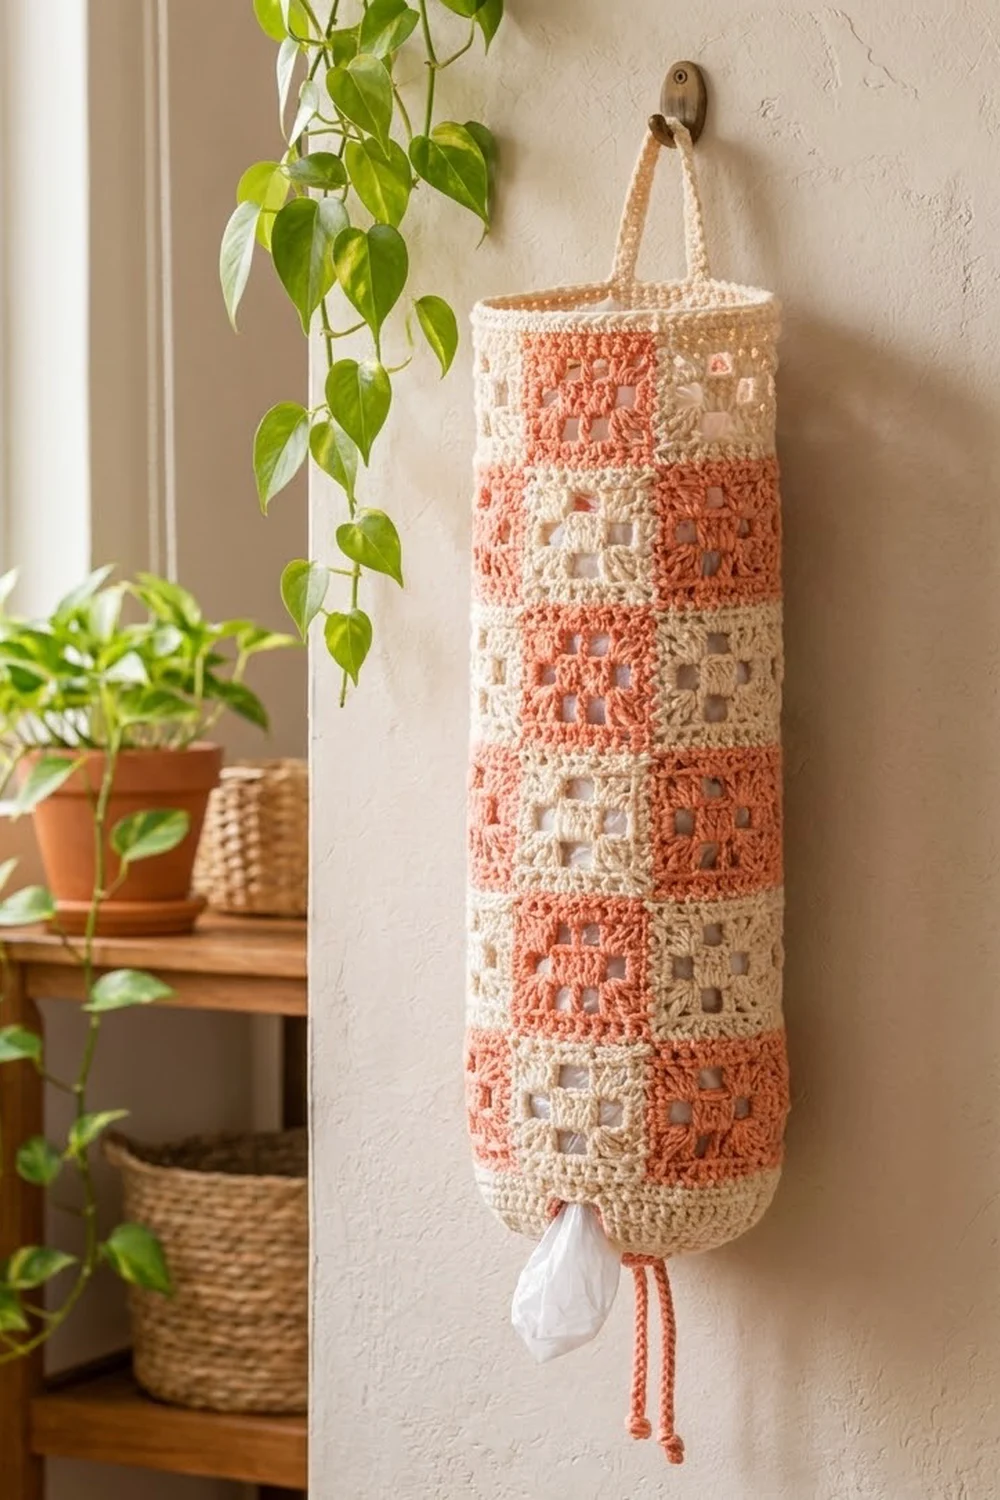
This bag holder is a soft, open tube made from small square motifs in two alternating colors: warm coral-peach and creamy off-white. The squares form a checkerboard all the way around. A plain cream band finishes the top edge, a slim cream loop hangs it from a hook, and a coral drawstring gathers the bottom into a small opening so you can pull bags out one at a time.
Each square is a compact granny-style motif with a ring of small open “windows” around a solid center, framed by a round of single crochet. The holes keep the fabric light and let you see how many bags are left. The style is cottage or farmhouse, and it suits a kitchen, laundry room, or pantry.
This pattern uses US crochet terms. The finished holder is 7.5 in (19.1 cm) wide laid flat, 15 in (38.1 cm) around, and 21.75 in (55.2 cm) tall before the bottom is gathered, not counting the hanging loop.
Construction is simple. You make 48 squares (24 coral, 24 cream), join them into a grid 6 squares around and 8 squares tall, and close the grid into a tube. Then you work a cream border around the top and bottom edges. Last, you add a cream hanging loop and a coral drawstring.
Finished Size and Construction
- Finished size: 7.5 in (19.1 cm) wide flat, 15 in (38.1 cm) around, 21.75 in (55.2 cm) tall
- Skill level: Easy / advanced beginner
- Terminology: US crochet terms
- Yarn weight: DK (#3) cotton
- Hook: 4.0 mm (G-6)
- Number of pieces: 48 squares, 1 hanging loop, 1 drawstring
- Layout: 6 squares around x 8 squares tall, checkerboard
- Square size: 2.5 in (6.4 cm)
- Size before border: 15 in (38.1 cm) around x 20 in (50.8 cm) tall (7.5 in / 19.1 cm wide flat)
- Border depth: top 0.75 in (1.9 cm), bottom 1 in (2.5 cm)
Materials
Use a smooth mercerized or combed DK cotton. Cotton holds its shape when the tube is packed with bags, and its stitch definition shows off the open windows. Acrylic works too, but it stretches more, so the holder may get longer over time.
- Color A, coral/peach: 120 g, about 276 m (302 yd)
- Color B, cream: 140 g, about 322 m (352 yd)
These amounts assume about 230 m per 100 g. They include a margin of about 15 percent for swatching and weaving in ends.
Tools:
- 4.0 mm (G-6) crochet hook
- Tapestry needle
- Stitch markers (4 to 6)
- Scissors
- Measuring tape
- Blocking mats and rust-proof pins
- Spray bottle
Abbreviations (US Terms)
- ch: chain
- sl st: slip stitch
- sc: single crochet
- hdc: half double crochet
- dc: double crochet
- sp: space
- st(s): stitch(es)
- rep: repeat
Magic ring: Wrap the yarn around your fingers to form a loop. Insert the hook, pull up a loop, and ch 1 to secure. Work the first round into the ring, then pull the tail to close the center.
Gauge and Checkpoints
Before anything else, make one complete square and block it lightly. The square is your gauge.
Square gauge: One square measures 2.5 in (6.4 cm) per side after Round 4, with 13 sc per side.
Checkpoints:
- After Round 2: about 1.5 in (3.8 cm) across
- After Round 3: about 2 in (5.1 cm) across
- After Round 4: 2.5 in (6.4 cm) across
- Six squares joined in a ring: 15 in (38.1 cm) around
- Eight squares joined in a column: 20 in (50.8 cm) tall
If your square is too big, go down a hook size (3.75 mm). If it is too small, go up a hook size (4.5 mm). Being off by just 0.125 in (0.3 cm) per square adds up to 0.75 in (1.9 cm) around the tube and 1 in (2.5 cm) in height.
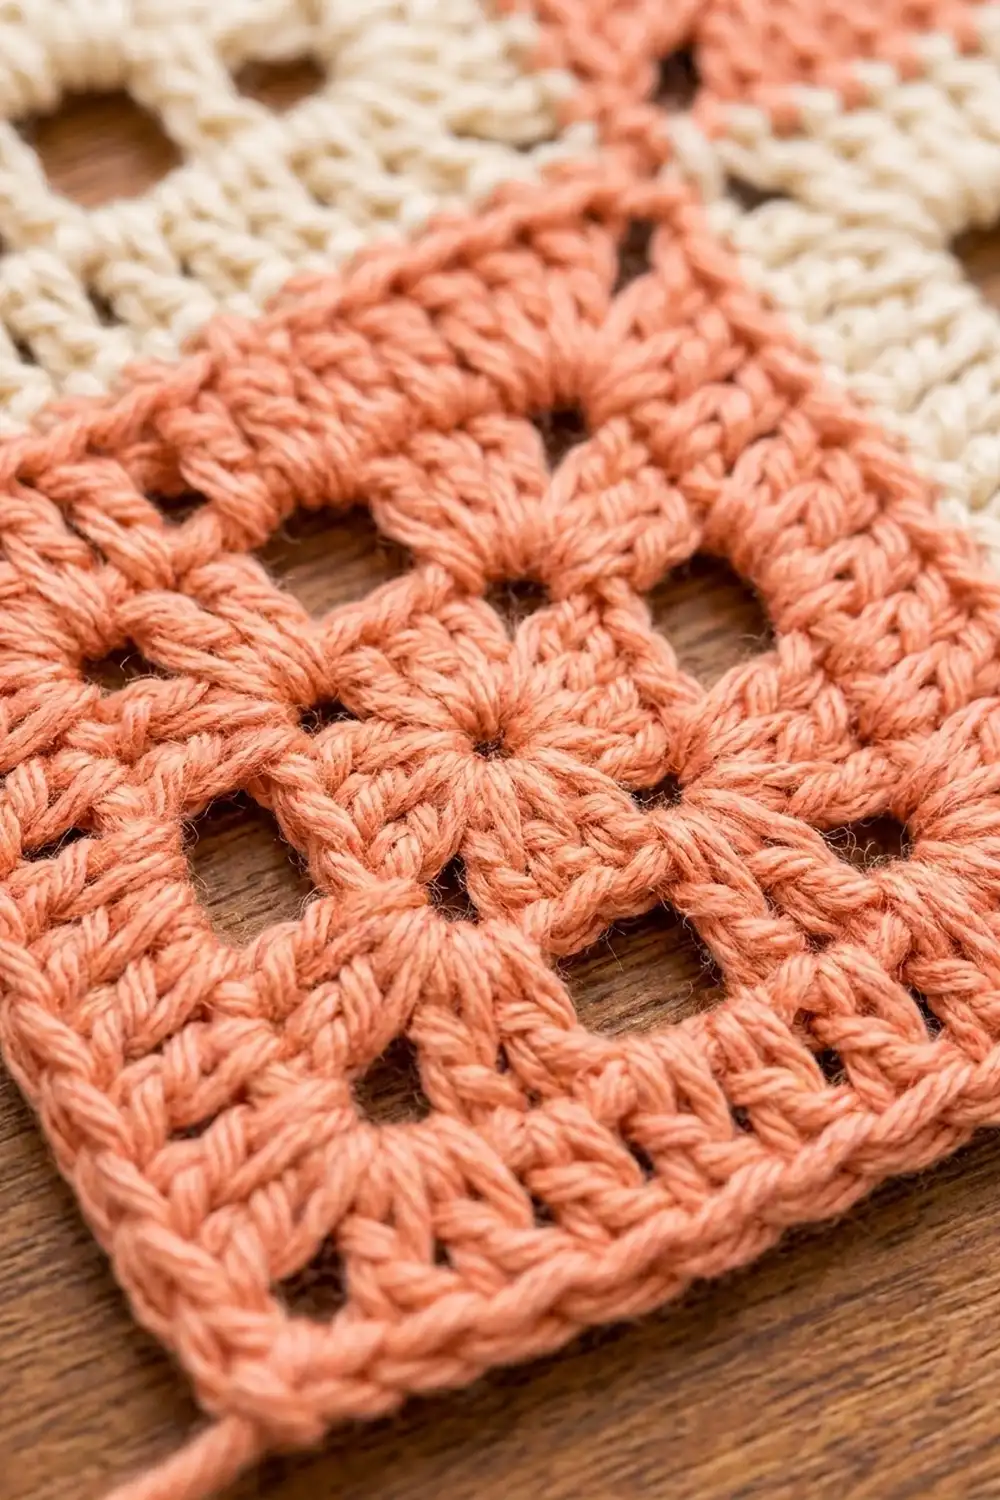
Square (Make 48)
Work each square in one color only. Don’t turn between rounds; keep the right side facing you.
Round 1: Make a magic ring. Ch 3 (counts as first dc), 2 dc in ring, ch 2, 3 dc in ring, ch 2; rep from * 2 more times. Join with sl st to top of beginning ch-3. Pull the ring closed. (12 dc, 4 ch-2 corner sps)*
Round 2: Sl st in next 2 dc and into the ch-2 corner sp. Ch 3 (counts as dc), (2 dc, ch 2, 3 dc) in same corner sp, ch 1, (3 dc, ch 2, 3 dc) in next corner sp, ch 1; rep from * 2 more times. Join to top of beginning ch-3. (24 dc, 4 ch-2 corner sps, 4 ch-1 side sps)*
Round 3: Sl st in next 2 dc and into the ch-2 corner sp. Ch 3, (2 dc, ch 2, 3 dc) in same corner sp, ch 1, 3 dc in next ch-1 sp, ch 1, (3 dc, ch 2, 3 dc) in next corner sp, ch 1, 3 dc in next ch-1 sp, ch 1; rep from * 2 more times. Join to top of beginning ch-3. (36 dc, 4 ch-2 corner sps, 8 ch-1 sps)*
The ch-1 spaces from Rounds 2 and 3 make the small open windows around the center of each square.
Round 4 (trim round): Sl st in next 2 dc and into the ch-2 corner sp. Ch 1, *(sc, ch 2, sc) in corner sp, sc in each of next 3 dc, sc in ch-1 sp, sc in each of next 3 dc, sc in ch-1 sp, sc in each of next 3 dc; rep from * 3 more times. On the final repeat, work the last 3 sc into the 3 sts you slipped over at the start. Join with sl st to first sc.
Round 4 count: 36 sc (1 in each existing dc) + 8 sc in the ch-1 sps + 8 corner sc = 52 sc, plus 4 ch-2 corner sps.
That gives 13 sc per side: 1 corner sc + 11 sc along the side + 1 corner sc. The 13 sts already include both corner sc. The ch-2 corner sps don’t count as sts.
Fasten off, leaving a 4 in (10.2 cm) tail. Weave in ends now so they don’t pile up later.
Make All Pieces
- Color A (coral): 24 squares
- Color B (cream): 24 squares
Layout grid (6 columns around x 8 rows tall; A = coral, B = cream). When the tube is flattened, Columns 1 to 3 are the front and Columns 4 to 6 are the back.
Row 1 (top):    B  A  B  A  B  A
Row 2:          A  B  A  B  A  B
Row 3:          B  A  B  A  B  A
Row 4:          A  B  A  B  A  B
Row 5:          B  A  B  A  B  A
Row 6:          A  B  A  B  A  B
Row 7:          B  A  B  A  B  A
Row 8 (bottom): A  B  A  B  A  B
There are 6 columns, an even number, so Column 6 and Column 1 are always opposite colors. That keeps the checkerboard unbroken all the way around the tube.
Joining
Use cream yarn for all seams. It disappears next to the cream squares and makes a thin outline on the coral ones.
Method: Whipstitch through the back loops. Hold two squares right side up with their edges side by side. Start in the corner ch-2 sps and pass the needle through the back loop of each matching pair of sts, ending in the opposite corner ch-2 sps.
Stitch-to-stitch logic: Each side has 13 sc, so every seam matches 13 sts to 13 sts. Catch the ch-2 corner sps at each end of the seam. Don’t add or skip any sts.
Order:
- Following the grid, join the 6 squares of each row into a strip. Make 8 strips.
- Join the strips along their long edges, lining up the seams at the corners. You now have a flat panel 6 squares wide and 8 squares tall.
- Fold the panel right side out and join Column 6 to Column 1 along all 8 squares to close the tube.
Tension advice: Pull each whipstitch just snug enough for the edges to meet. Tight seams pucker and shrink the tube; loose seams leave gaps that bags can poke through. Weave tails along the seam lines.
Size checkpoint: The tube should measure 15 in (38.1 cm) around and 20 in (50.8 cm) tall. Laid flat, it should be 7.5 in (19.1 cm) wide.
Border
Border gauge: 13 sc = 2.5 in (6.4 cm), the same as a square’s edge. At this gauge the border lies flat without ruffling or pulling in.
Starting count: 6 squares around x 13 sts per square = 78 sts. The ch-2 corner sps at each seam are already closed into the seam, so you don’t work into them and they add no sts.
Top Border (Cream)
Round 1: Join cream with sl st in the first sc of any square along the top edge. Ch 1, sc in each sc around (13 sc per square). Join to first sc. (78 sc)
Round 2: Ch 2 (does not count as a st), hdc in each st around. Join to first hdc. (78 hdc)
Round 3: Ch 1, sc in each st around. Join to first sc. (78 sc)
Fasten off and weave in. Top border depth: 0.75 in (1.9 cm).
Bottom Border (Cream)
Round 1: Join cream along the bottom edge. Ch 1, sc in each sc around (13 sc per square). Join. (78 sc)
Round 2 (eyelet round): Ch 4 (counts as dc + ch 1), skip next st, dc in next st, ch 1, skip next st; rep from * around. Join to 3rd ch of beginning ch-4. (39 dc + 39 ch-1 sps = 78 sts)*
Round 3: Ch 1, sc in each dc and each ch-1 sp around. Join. (39 + 39 = 78 sc)
Round 4: Ch 1, sc in each st around. Join. (78 sc)
Fasten off and weave in. Bottom border depth: 1 in (2.5 cm).
Why the math works: Every border round has 78 sts, the same as the edge it’s worked into. At 5.2 sc per inch, 78 sts measure 15 in (38.1 cm), which is exactly the circumference of the joined tube. The eyelet round alternates 1 dc and 1 ch-1 sp, so 39 pairs use all 78 sts with none left over.
Finished height: 0.75 in + 20 in + 1 in = 21.75 in (55.2 cm).
Hanging Loop (Cream)
Row 1: Ch 41. Sc in 2nd ch from hook and in each ch across. Turn. (40 sc)
Row 2: Ch 1, sc in each st across. (40 sc)
The strip measures about 8 in (20.3 cm). Fold it in half and sew both ends side by side to the inside of the top border, directly above one side fold of the flattened tube. The finished loop stands about 3.5 in (8.9 cm) above the top edge.
Drawstring (Coral)
Ch 120, or until the chain measures 27 in (68.6 cm). Sl st in the back bump of each ch across. Fasten off and tie an overhand knot at each end.
Starting at the center front, weave the drawstring in and out of the 39 ch-1 eyelets in Round 2 of the bottom border. Pull until the opening is about 2 in (5.1 cm) across, tie a bow, and either tuck the ends inside or let them hang.
Final Blocking
- Take out the drawstring.
- Flatten the tube on a blocking mat so the seam between Columns 3 and 4 runs down one side fold and the closing seam runs down the other.
- Mist evenly until damp but not soaked.
- Pin to 7.5 in (19.1 cm) wide and 21.75 in (55.2 cm) tall.
- Line up the seams so every square sits straight and every row is level.
- Gently open the windows with a fingertip.
- Let it dry completely. Flip it over, mist the back, and let it dry again.
- Thread the drawstring back in.
Final Quality-Control Checklist
- 48 squares: 24 coral, 24 cream
- Each square has 13 sc per side and measures 2.5 in (6.4 cm)
- Checkerboard is unbroken, including across the closing seam
- Top and bottom borders have 78 sts in every round
- Bottom eyelet round has 39 eyelets
- Width flat: 7.5 in (19.1 cm); height: 21.75 in (55.2 cm)
- Hanging loop is sewn on securely
- Drawstring gathers to a 2 in (5.1 cm) opening
- All ends woven in and trimmed
Troubleshooting
Squares are different sizes. Your tension changed between colors or sessions. Block all squares to 2.5 in (6.4 cm) before joining, and remake any that are off by more than 0.125 in (0.3 cm).
A side has 12 or 14 sts. Check Round 4. You skipped or doubled a ch-1 sp, or missed a corner sc. Recount: 1 + 11 + 1 = 13.
The checkerboard breaks at the back seam. A strip got rotated or put in the wrong place. Check the grid: every odd row starts with cream and ends with coral.
The border ruffles. Your border tension is looser than your squares. Go down a hook size for the border only.
The border pulls in. Go up a hook size, and make sure you worked 13 sc into every square.
Bags fall out of the bottom. Pull the drawstring tighter, to about 1.5 in (3.8 cm).
The holder stretches longer over time. Use a firmer cotton, or go down a hook size for the squares.
Care
Hand wash, or machine wash cool on a gentle cycle in a mesh bag with the drawstring removed. Reshape while damp and lay flat to dry.
Final Notes
The whole holder follows one chain of measurements. Each square is 2.5 in (6.4 cm) with 13 sc per side. Six squares make 78 sts and 15 in (38.1 cm) around, which is 7.5 in (19.1 cm) laid flat. Eight squares make 20 in (50.8 cm) of height. The borders keep the same 78 sts and add 0.75 in (1.9 cm) at the top and 1 in (2.5 cm) at the bottom, for a total of 21.75 in (55.2 cm). Get your first square right, and everything else falls into place.
Happy crocheting!