

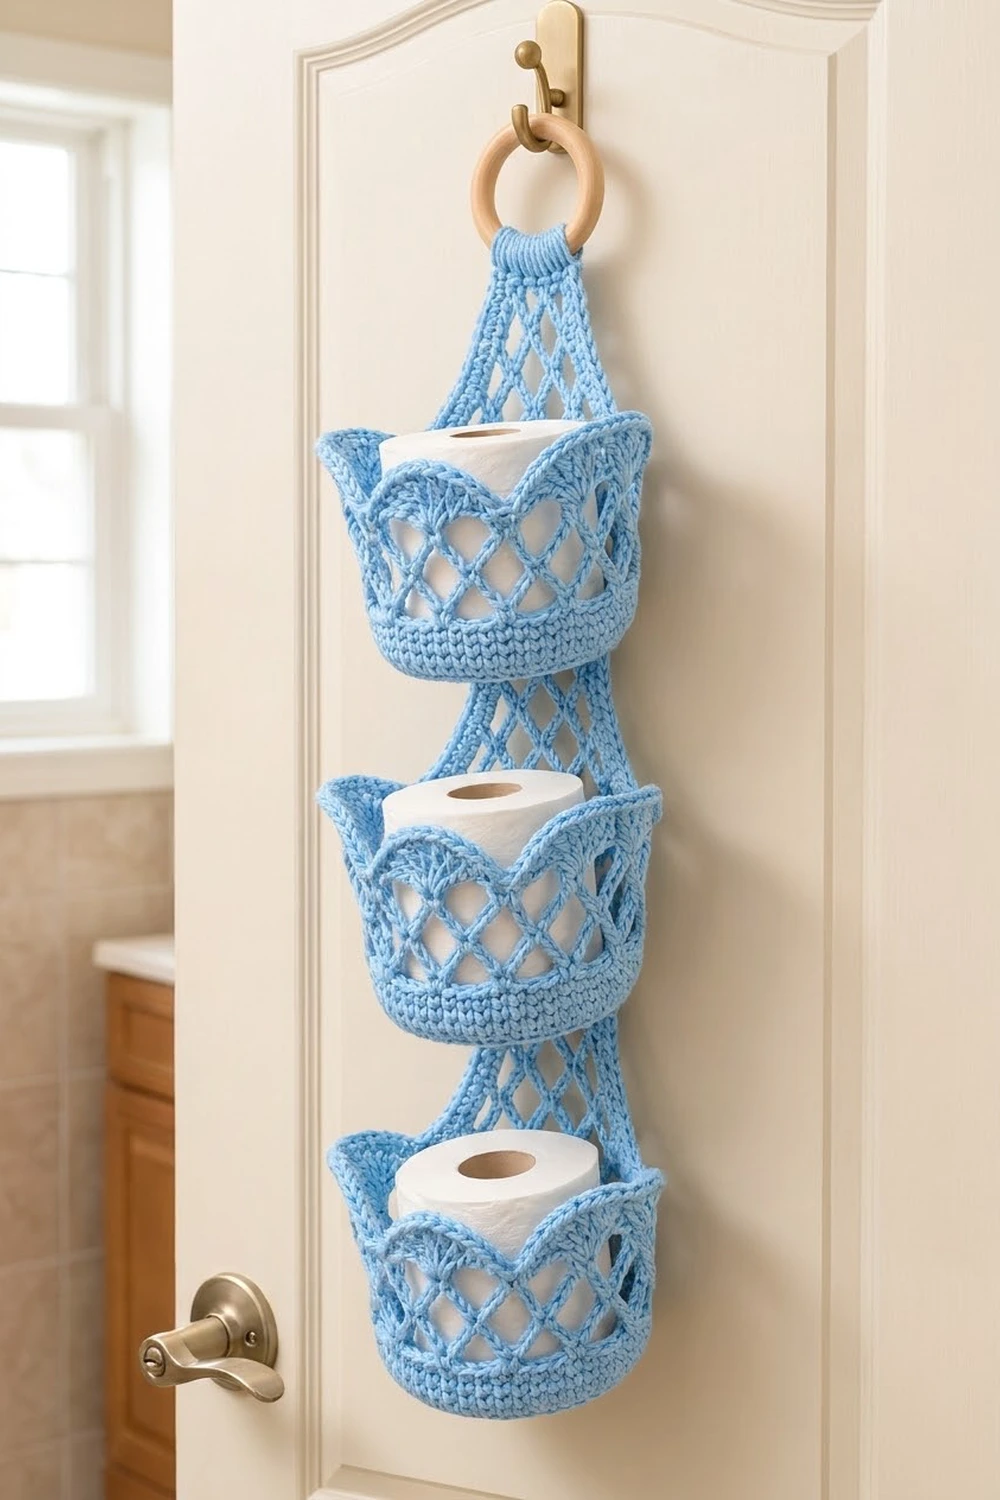
This hanging organizer has three small tulip-shaped baskets stacked down a long, tapered lattice panel. It hangs from a wooden ring over a door hook. Each basket holds one standard toilet paper roll, and the baskets also work well for hair ties or craft supplies.
The whole piece is made in one sky blue cotton. Each basket has a flat, solid base, a short knit-look band, an open diamond lattice, and six tall fan scallops with a corded reverse single crochet rim. The back panel uses the same diamond mesh and is framed with the same corded edge.
The pattern uses US crochet terms. The organizer hangs 22 in (55.9 cm) below the ring, or about 25 in (63.5 cm) including the ring. Each basket is 5¼ in (13.3 cm) across the base and 4¼ in (10.8 cm) tall.
To make it, you crochet three identical baskets in joined rounds and one panel in rows, from the narrow top down to the wide bottom. Then you border the panel, fold its strap over the ring, and sew the baskets to the front.
Finished Size and Construction
- Finished size: 6½ in (16.5 cm) wide at the basket rims × 22 in (55.9 cm) below the ring
- Skill level: Intermediate
- Terminology: US
- Yarn weight: Worsted (#4) cotton
- Hook: 4.0 mm (US G-6)
- Number of pieces: 4 crocheted (3 baskets, 1 panel), plus 1 wooden ring
- Layout: 1 vertical column of 3 baskets on the panel
- Basket size: 5¼ in (13.3 cm) base, 4¼ in (10.8 cm) tall, about 6½ in (16.5 cm) across the scallop tips
- Panel before border: 5¼ in (13.3 cm) wide at the bottom × 23¼ in (59.1 cm) long
- Border depth: ⅜ in (1.0 cm)
- Panel after border: 6 in (15.2 cm) × 24 in (61.0 cm), before the 2 in (5.1 cm) fold over the ring
Materials
Use a smooth, combed or mercerized worsted cotton. Cotton keeps the walls firm and the scallops upright. Acrylic will give you softer, floppier baskets.
- Sky Blue: 200 g / 380 m (about 415 yd)
Each basket takes about 40 g / 76 m and the panel takes about 45 g / 86 m, for a total of 165 g / 314 m. The amount above includes a margin for your swatch and for differences in tension.
Tools:
- 4.0 mm (US G-6) hook
- Wooden ring, 3 in (7.6 cm) diameter
- Tapestry needle
- 4 locking stitch markers
- Rust-proof pins and a blocking mat
- Spray bottle; fabric stiffener (optional)
Abbreviations (US Terms)
- ch – chain
- sl st – slip stitch
- sc – single crochet
- dc – double crochet
- tr – treble crochet
- BLO – back loop only
- sk – skip
- st(s) – stitch(es)
- inc – 2 sc in the same st
- WCS – waistcoat stitch
- rev sc – reverse single crochet
Waistcoat stitch (WCS): Insert the hook through the center of the “V” of the stitch below, between its two vertical legs. Pull up a loop, then yarn over and pull through both loops. The result is dense and looks like knitting.
Reverse single crochet (rev sc): Work from left to right. Insert the hook into the next stitch to the right, pull up a loop, then yarn over and pull through both loops. This makes the corded rim.
Gauge and Checkpoints
Gauge: 16 sc × 18 rnds = 4 in (10.2 cm). Mesh: each ch-5 loop is about 1 in (2.5 cm) wide, and 2 mesh rows are about 1 in (2.5 cm) tall.
Make one complete basket first and check it at these points:
- After Rnd 6: base is 2⅝ in (6.7 cm) across
- After Rnd 12: base is 5¼ in (13.3 cm) across
- After Rnd 17: wall is 1 in (2.5 cm) tall
- After Rnd 21: wall is 3 in (7.6 cm) tall
- After Rnd 22: wall is 3¼ in (8.3 cm) tall
- After Rnd 24: wall is 4¼ in (10.8 cm) tall
If the base comes out too big, go down one hook size. If it’s too small, go up one size. If Rnds 14–17 pull inward, pull up taller loops rather than changing the stitch count. A toilet paper roll should drop in without stretching the walls.
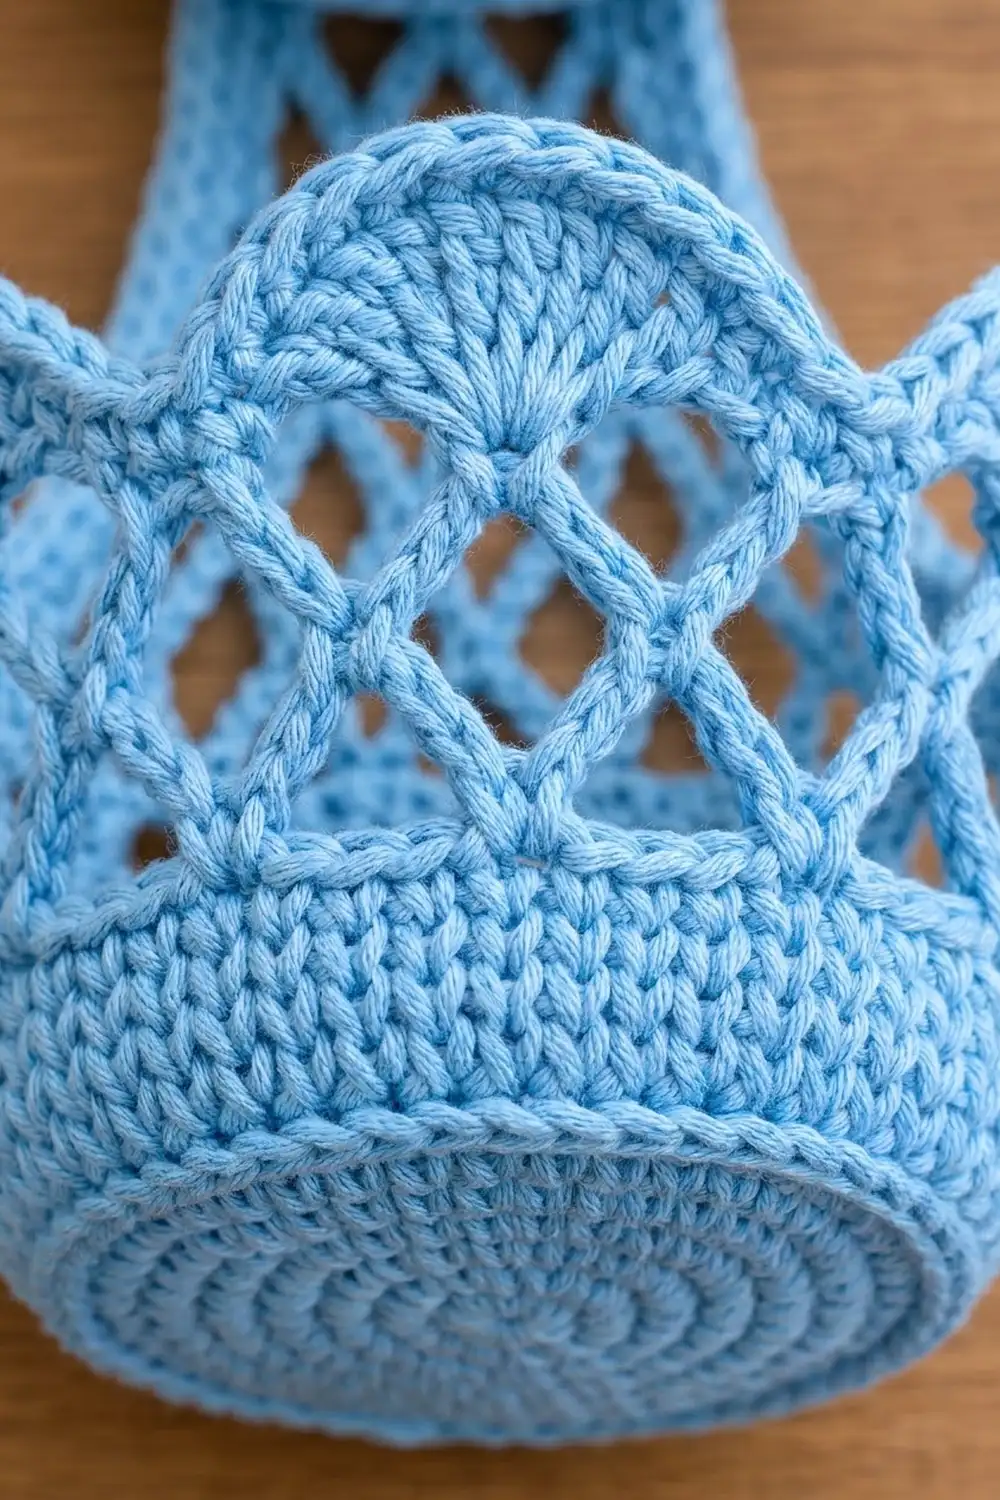
Basket (make 3)
Base
The base is worked in joined rounds. The ch 1 at the start of each round doesn’t count as a stitch. Join each round with a sl st to the first sc.
Rnd 1: Make a magic ring. Ch 1, 6 sc in ring, join. (6)
Rnd 2: Inc in each st. (12)
Rnd 3: Sc in next st, inc 6 times. (18)
Rnd 4: Sc in next 2 sts, inc 6 times. (24)
Rnd 5: Sc in next 3 sts, inc 6 times. (30)
Rnd 6: Sc in next 4 sts, inc 6 times. (36)
Rnd 7: Sc in next 5 sts, inc 6 times. (42)
Rnd 8: Sc in next 6 sts, inc 6 times. (48)
Rnd 9: Sc in next 7 sts, inc 6 times. (54)
Rnd 10: Sc in next 8 sts, inc 6 times. (60)
Rnd 11: Sc in next 9 sts, inc 6 times. (66)
Rnd 12: Sc in next 10 sts, inc 6 times. (72)
From Rnd 7 onward, place the increases a few stitches later in each round than in the round before. This keeps the base round instead of hexagonal.
Wall
Rnd 13 (turning round): Ch 1, sc in BLO of each st, join. (72) The unworked front loops of Rnd 12 form the braided ridge around the base edge.
Rnds 14–17: Ch 1, WCS in each st, join. (72 each round)
Lattice
Rnd 18: Ch 1, sc in next st, ch 5, sk next 2 sts 24 times, join to first sc. (24 loops; 24 × 3 sts = 72 ✓)
Rnd 19: Sl st in each of the next 3 ch to reach the center of the first loop. Ch 1, sc in the same loop, ch 5, sc in next loop 23 times, ch 5, join. (24 loops)
Rnds 20–21: Repeat Rnd 19. (24 loops each round)
Each sc lands in the center of a loop from the round below, and that offset creates the diamonds.
Scallop Top
Rnd 22 (conversion round): Sl st in next ch, ch 1, 3 sc in each loop, join. (24 loops × 3 sc = 72 sc)
Rnd 23 (scallops): Ch 1, sc in next st, sk next 5 sts, 13 tr in next st, sk next 5 sts 6 times, join. (6 sc + 78 tr = 84 sts; 6 repeats × 12 sts = 72 ✓)
Rnd 24 (rim): Ch 1, rev sc in each st, join. (84) Fasten off and weave in the ends.
The sc stitches form the dips between the petals, and each 13-tr fan opens into a rounded petal.
Back Panel
The panel is worked in rows from the top down.
Strap
Row 1: Ch 8, sc in 2nd ch from hook and in each ch across. (7)
Rows 2–14: Ch 1, turn, sc in each st. (7)
The strap is about 3 in (7.6 cm) long and 1¾ in (4.4 cm) wide.
Mesh Row Types
- F row (full): Ch 1, turn, sc in first st, ch 5, sc in next loop across, ch 5, sc in last st (last sc, or the 3rd ch of the turning ch).
- H row (half): Ch 5 (counts as dc + ch 2), turn, sc in first loop, ch 5, sc in next loop across, ch 2, dc in last sc.
An H + F pair keeps the width the same. Working an F row directly into an F row adds 1 loop; this is an increase row.
Row 15 (F): Ch 1, turn, sc in first st, ch 5, sk 2, sc in next st, ch 5, sk 2, sc in last st. (2 loops)
Rows 16–25: Work (H, F) 5 times. (H rows: 1 full loop + 2 half loops; F rows: 2 loops)
Row 26: Increase row. (3 loops)
Rows 27–36: Work (H, F) 5 times. (3 loops)
Row 37: Increase row. (4 loops)
Rows 38–47: Work (H, F) 5 times. (4 loops)
Row 48: Increase row. (5 loops)
Rows 49–54: Work (H, F) 3 times. (5 loops)
Checkpoints: after Row 25 the mesh measures 5½ in (14.0 cm). After Row 54 the 40 mesh rows measure 20 in (50.8 cm).
Row 55 (conversion row): Ch 1, turn, sc in first sc, 3 sc in next loop, sc in next sc 5 times. (1 + 5 × 4 = 21 sc)
The panel now measures 5¼ in (13.3 cm) wide at the bottom and 23¼ in (59.1 cm) long. Don’t fasten off.
Make All Pieces
All pieces are Sky Blue:
- Baskets × 3: 40 g / 76 m each = 120 g / 228 m
- Panel × 1: 45 g / 86 m
Layout (front view):
       [ ring ]
       [strap ]
      [  mesh  ]
    [ BASKET 1 ]   bottom at 14 in (35.6 cm)
     [  mesh  ]
    [ BASKET 2 ]   bottom at 7 in (17.8 cm)
     [  mesh  ]
    [ BASKET 3 ]   bottom at Row 55
Border (Back Panel)
Border gauge: 4 sc = 1 in (2.5 cm). Work 1 sc per strap row end, 2 sc per mesh row end, and 3 sc at each corner.
Rnd 1: Continuing from Row 55, ch 1 and work around the panel:
- Bottom: 3 sc in first st, sc in next 19 sts, 3 sc in last st = 25
- Side 1: 1 sc in the end of Row 55, 2 sc in each mesh row end (40 rows = 80), 1 sc in each strap row end (14) = 95
- Top: working in the foundation ch, 3 sc in first ch, sc in next 5 ch, 3 sc in last ch = 11
- Side 2: 14 + 80 + 1 = 95
Join. (25 + 95 + 11 + 95 = 226)
Rnd 2: Ch 1, rev sc in each st, join. (226) Fasten off.
Why the math works: each mesh row is ½ in (1.3 cm) tall, and 2 sc at border gauge also cover ½ in (1.3 cm), so the sides lie flat. The corner stitches are counted only once, inside the top and bottom totals. The border adds ⅜ in (1.0 cm) on every edge, so the bottom grows from 5¼ in (13.3 cm) to 6 in (15.2 cm) and the length from 23¼ in (59.1 cm) to 24 in (61.0 cm).
Joining
Ring: Pass the strap through the ring from front to back. Fold 2 in (5.1 cm) down behind the strap and whipstitch the top edge in place. The panel now hangs 22 in (55.9 cm) below the ring.
Baskets: Pick one fan on each basket to be the back. The 12 stitches under that fan (one 12-st repeat, 3 in / 7.6 cm of wall) are the ones you sew to the panel.
- Bottom basket: Whipstitch the 12 back stitches of Rnd 13 to sts 5–16 of Row 55, one stitch to one stitch. Then sew the 12 back stitches of Rnd 22 to the mesh anchors and chains 3¼ in (8.3 cm) above.
- Middle basket: Sew Rnds 13 and 22 the same way, with the basket bottom 7 in (17.8 cm) above the panel bottom.
- Top basket: Sew it the same way with its bottom at 14 in (35.6 cm). The rim lands at 18¼ in (46.4 cm), leaving 3¾ in (9.5 cm) of mesh above it.
Tension: Sew snugly but don’t gather; the panel should stay flat. Check that each gap between baskets measures 2¾ in (7.0 cm).
Final Blocking
- Mist the panel and pin it to 6 in (15.2 cm) at the bottom × 24 in (61.0 cm) long, before the fold.
- Open the diamonds evenly so the lattice lines run straight.
- Fill each basket with a towel or a roll so the walls stand upright.
- Pin the scallop tips out until each basket measures 6½ in (16.5 cm) across.
- Brush diluted stiffener on the scallops if you like.
- Let everything dry for about 24 hours before assembling.
Final Quality-Control Checklist
- Each base is 5¼ in (13.3 cm) across and lies flat.
- Each basket has 6 even scallops and is 4¼ in (10.8 cm) tall.
- Each rim has 84 rev sc.
- The panel border has 226 sts and crisp corners.
- The basket bottoms sit at Row 55, 7 in (17.8 cm), and 14 in (35.6 cm).
- The ring seam is secure and all ends are woven in.
Troubleshooting
- Base cups: go up a hook size.
- Base ruffles: recount the increases or go down a hook size.
- Walls lean in: the WCS is too tight; pull up taller loops.
- Lattice is uneven: make sure every sc goes into the center ch of the loop below.
- Scallops droop: use stiffener.
- Panel edge waves: recount the 2 sc per mesh row end.
- Baskets tip forward: secure the Rnd 22 seam more firmly.
Care
Hand wash in cool water and reshape while damp. Dry flat with a roll inside each basket so it holds its shape.
Final Notes
Here’s the measurement chain: a gauge of 16 sc = 4 in (10.2 cm), a 72-st base 5¼ in (13.3 cm) across, baskets 4¼ in (10.8 cm) tall, 40 mesh rows totaling 20 in (50.8 cm), a 21-sc bottom 5¼ in (13.3 cm) wide, and a ⅜ in (1.0 cm) border that brings the panel to 6 in × 24 in (15.2 cm × 61.0 cm). The 2 in (5.1 cm) fold then gives a 22 in (55.9 cm) hanging length. If each step measures correctly, the finished organizer will too.
Happy crocheting!