

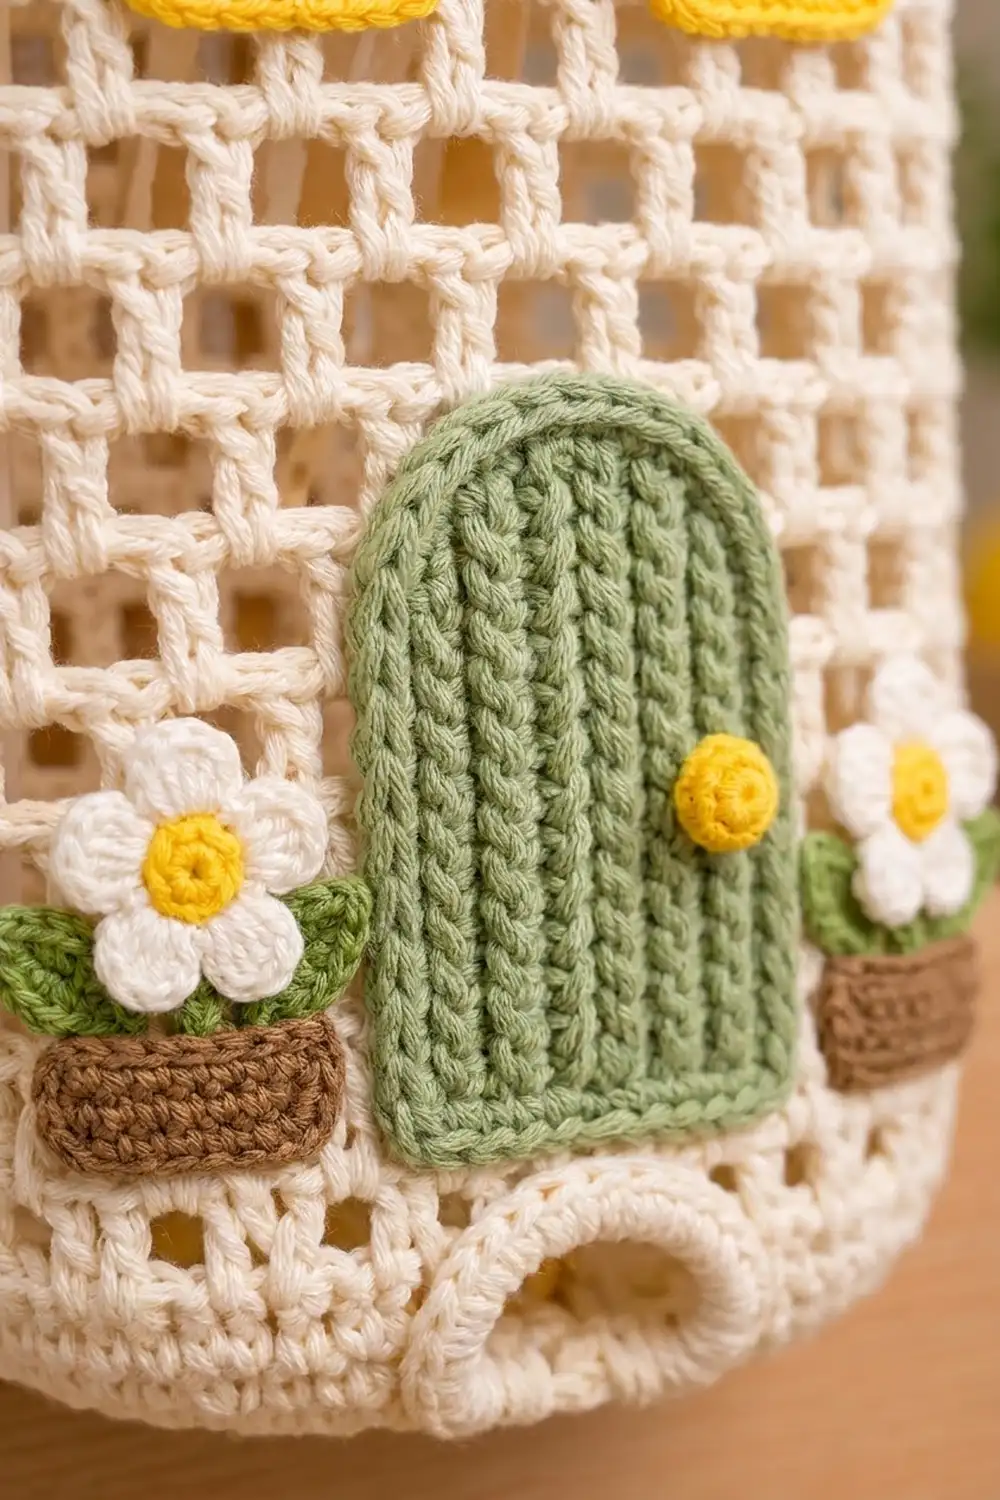
This little cottage holds your spare plastic grocery bags. Its body is an open mesh tube in cream. A blue roof with scalloped shingles sits on top, two yellow four-pane windows look out from the front, and a ribbed green arched door sits between two daisy flower boxes. You stuff bags in at the top and pull them out one at a time through a round opening in the base.
The palette is soft and cheerful: cream, cornflower blue, sunny yellow, sage green, a warm brown and white. It suits a farmhouse or cottage-style kitchen, and it is small enough to hang on a cabinet knob or a pantry hook.
The pattern uses US crochet terms. The body measures about 6 in (15.2 cm) wide and 14 in (35.6 cm) long when it hangs flat. With the roof on, the house stands about 17 in (43.2 cm) tall, not counting the strap.
Construction is simple. You work the body bottom-up in the round: a flat sc ring around the dispensing hole, a short solid wall, a dc mesh tube, and a solid sc top edge. Then you make the roof, strap, windows, door and flower boxes as separate small pieces and sew them onto the front of the body.
Finished Size and Construction
- Finished size: body 6 in (15.2 cm) wide x 14 in (35.6 cm) long, flat; whole house about 17 in (43.2 cm) tall
- Skill level: Intermediate
- Terminology: US
- Yarn weight: Worsted (#4) cotton
- Hook: 5.0 mm (H-8)
- Number of pieces: 1 finished bag holder (a body plus sewn-on appliqués)
- Layout: roof at the top, windows below it, door at bottom center with a flower box on each side
- Body piece size: 48 stitches around, 24 stitches per flattened side
- Size before border: body mesh section 12.5 in (31.8 cm) tall; roof 8 in (20.3 cm) wide x 4.25 in (10.8 cm) tall
- Border depth: 0.5 in (1.3 cm) solid top edge on the body; 0.25 in (0.6 cm) edging on the roof
Materials
Use a smooth worsted-weight cotton or cotton blend. Cotton holds its shape when the holder is full of bags, and it doesn’t stretch out over time. The amounts below assume about 1.55 m per gram, which is typical for worsted kitchen cotton.
- Cream: 80 g (124 m), for the body
- Blue: 30 g (47 m), for the roof, shingles and strap
- Yellow: 10 g (16 m), for the windows, door knob and daisy centers
- Green: 10 g (16 m), for the door and leaves
- Brown: 5 g (8 m), for the planters
- White: 5 g (8 m), for the daisy petals
Tools:
- 5.0 mm (H-8) crochet hook
- Tapestry needle
- 2 wooden buttons, 0.75 in (1.9 cm)
- Stitch markers
- Pins and a tape measure
All quantities include a margin of about 15 percent.
Abbreviations (US Terms)
- ch – chain
- sl st – slip stitch
- sc – single crochet
- hdc – half double crochet
- dc – double crochet
- sc2tog – single crochet 2 together
- BLO – back loop only
- FL – front loop
- sk – skip
- sp – space
- st(s) – stitch(es)
- RS / WS – right side / wrong side
Special stitch – Shingle Scallop: sk 1 FL, 5 dc in next FL, sk 1 FL, sl st in next FL. Each scallop uses 4 front loops.
Gauge and Checkpoints
- Sc gauge: 16 sts x 16 rows = 4 in (10.2 cm)
- Mesh gauge: 4 mesh squares (12 sts) = 3 in (7.6 cm); 8 mesh rounds = 5 in (12.7 cm)
Make the roof first and use it as your test piece. It is worked in plain sc, and Row 1 has to measure 8 in (20.3 cm) across. If it comes out wider, go down a hook size. If it comes out narrower, go up a size.
Checkpoints:
- After base Rnd 5, the flat ring measures about 3.8 in (9.7 cm) across.
- After Rnd 8, the body is 6 in (15.2 cm) wide when flattened.
- After 8 mesh rounds, the mesh section is 5 in (12.7 cm) tall.
- After Rnd 30, the side wall is 13.75 in (34.9 cm) tall.
If the mesh rounds come out short, make your dc a little looser rather than adding rounds. That way the body width stays the same.
Body
Use cream throughout. Work in joined rounds with the RS facing. Don’t turn.
Base
Foundation: Ch 24. Join with a sl st to the first ch to make a ring, taking care not to twist. This ring is the dispensing opening. Flattened, it makes a 3 in (7.6 cm) slot.
Rnd 1: Ch 1, sc in each ch around, sl st to first sc. (24 sts)
Rnd 2: Ch 1, sc in next 3, 2 sc in next; rep from * 6 times, join. (30 sts)
Rnd 3: Ch 1, sc in next 4, 2 sc in next; rep 6 times, join. (36 sts)
Rnd 4: Ch 1, sc in next 5, 2 sc in next; rep 6 times, join. (42 sts)
Rnd 5: Ch 1, sc in next 6, 2 sc in next; rep 6 times, join. (48 sts)
These are 4 flat rounds of 0.25 in (0.6 cm) each. Adding 6 stitches per round keeps the ring flat.
Wall
Rnd 6: Ch 1, sc in BLO of each st around, join. (48 sts) The unworked front loops make a ridge, and the work turns upward to form a shallow bowl.
Rnds 7–8: Ch 1, sc in each st around, join. (48 sts)
Mesh
Rnd 9: Ch 5 (counts as dc + ch 2), sk next 2 sts, dc in next st, ch 2, sk next 2 sts; rep from * 15 times, sl st in 3rd ch of beg ch-5. (16 dc + 16 ch-2 sps = 48 sts)
Rnds 10–28: Ch 5 (counts as dc + ch 2), dc in next dc, ch 2; rep from * 15 times, sl st in 3rd ch of beg ch-5. (48 sts)
That gives 20 mesh rounds in total, about 12.5 in (31.8 cm). The dc posts stack straight up, so you get square open holes, 8 across each flattened side. The top edge (Rnds 29–30) is in the Border section.
Roof
Use blue. Work in rows. Row 1 is a WS row, so all even-numbered rows are RS rows.
Row 1 (WS): Ch 33, sc in 2nd ch from hook and in each ch across, turn. (32 sts)
Row 2 (RS): Working in BLO, ch 1, sc2tog, sc across to last 2 sts, sc2tog, turn. (30 sts)
Rows 3–5: Ch 1, sc2tog, sc across to last 2 sts, sc2tog, turn. (28, 26, 24 sts)
Row 6 (RS): Repeat Row 2 in BLO. (22 sts)
Rows 7–9: Repeat Row 3. (20, 18, 16 sts)
Row 10 (RS): Repeat Row 2 in BLO. (14 sts)
Rows 11–13: Repeat Row 3. (12, 10, 8 sts)
Row 14 (RS): Repeat Row 2 in BLO. (6 sts)
Rows 15–16: Repeat Row 3. (4, 2 sts)
Row 17: Ch 1, sc2tog. (1 st) Don’t fasten off. Continue with the roof edging in the Border section.
The general rule is that Row n has (34 − 2n) stitches. The roof measures 8 in (20.3 cm) at the base and 4.25 in (10.8 cm) tall.
Shingles: With the RS facing and the bottom edge toward you, join blue in the first FL of Row 2. Sl st in that loop, work 7 Shingle Scallops, then sl st in the last FL. (1 + 28 + 1 = 30 loops used.) Fasten off.
Repeat on the front loops of Row 6 (22 loops: 1 + 5 scallops + 1), Row 10 (14 loops: 1 + 3 scallops + 1) and Row 14 (6 loops: 1 + 1 scallop + 1).
You get rows of 7, 5, 3 and 1 scallops. The ridges are 1 in (2.5 cm) apart, so each row of shingles hangs down over the top of the row below it.
Strap
Use blue.
Row 1: Ch 61, sc in 2nd ch from hook and in each ch across, turn. (60 sts)
Row 2: Ch 1, sc in each st across. (60 sts) Don’t turn.
Edging: Sl st loosely along the foundation side so both long edges match. Fasten off.
The strap measures 15 in (38.1 cm) long x 0.5 in (1.3 cm) wide.
Windows (make 2)
Use yellow.
Row 1: Ch 8, sc in 2nd ch from hook and across, turn. (7 sts)
Row 2: Ch 2 (doesn’t count as a st), hdc in first st, ch 2, sk 2, hdc in next, ch 2, sk 2, hdc in last st, turn. (3 hdc + 2 ch-2 sps = 7 sts)
Row 3: Ch 1, sc in first hdc, 2 sc in ch-2 sp, sc in next hdc, 2 sc in ch-2 sp, sc in last hdc, turn. (3 worked 1-per-hdc + 4 in sps = 7 sts)
Rows 4–5: Repeat Rows 2–3. Fasten off.
This makes a frame with 4 panes. Each window is 1.75 in (4.4 cm) wide x 1.5 in (3.8 cm) tall.
Door
Use green. The rows run vertically, so working in the BLO gives you vertical ribs. All increases and decreases happen at the top end, which shapes the arch. Odd rows start at the bottom of the door and even rows start at the top.
Row 1: Ch 12, sc in 2nd ch from hook and across, turn. (11 sts)
Row 2 (BLO): Ch 1, 2 sc in first st, sc across, turn. (12 sts)
Row 3 (BLO): Ch 1, sc in each st to last st, 2 sc in last st, turn. (13 sts)
Row 4 (BLO): Repeat Row 2. (14 sts)
Rows 5–7 (BLO): Ch 1, sc in each st across, turn. (14 sts)
Row 8 (BLO): Ch 1, sc2tog, sc across, turn. (13 sts)
Row 9 (BLO): Ch 1, sc across to last 2 sts, sc2tog, turn. (12 sts)
Row 10 (BLO): Repeat Row 8. (11 sts) Fasten off.
The door measures 2.5 in (6.4 cm) wide x 3.5 in (8.9 cm) tall at the center. The sides are 2.75 in (7.0 cm) tall.
Knob: With yellow, make a magic ring and work 6 sc into it. Pull the ring closed and fasten off, then sew it near the right edge of the door.
Flower Boxes (make 2)
Planter (brown): Ch 9, sc in 2nd ch from hook and across. (8 sts) Work 2 more rows of 8 sc. Fasten off. The planter measures 2 in (5.1 cm) x 0.75 in (1.9 cm).
Daisy: With yellow, make a magic ring and work 5 sc into it. Join and fasten off. Join white in any sc. Ch 2, 2 dc in same st, ch 2, sl st in same st, sl st in next st; rep from * 5 times. (5 petals) Fasten off.
Leaves (green, make 2 per box): Ch 5. Starting in the 2nd ch from hook, work sl st, sc, hdc, sc. Fasten off.
Border
The border gauge is the same as the sc gauge: 4 sts per inch (2.5 cm).
Body top edge (cream):
Rnd 29 (conversion): Ch 1, sc in dc, 2 sc in ch-2 sp; rep from * around, join. (16 worked 1-per-dc + 32 in sps = 48 sts)
Rnd 30: Ch 1, sc in each st around, join. (48 sts) Fasten off.
Flattened, each side has 24 sts, which at 4 sts per inch gives exactly 6 in (15.2 cm). The math works because the mesh never changed the count: each 3-st repeat (1 dc + 2 ch) becomes 3 sc, so the top edge matches the 48-st base wall.
Roof edging (blue): The loop from Row 17 is still on your hook. In this round, the side counts don’t include the 3-sc corner groups.
- Tip: 3 sc in the Row 17 st.
- First slanted side: Work along row ends 16 down to 2: 2 sc in next row end, sc in next row end; rep 7 times, then sc in the last row end. (22 sc)
- Bottom corner: 3 sc in the first foundation ch.
- Bottom side: sc in the next 30 chs. (30 sc)
- Bottom corner: 3 sc in the last foundation ch.
- Second slanted side: Work as for the first slanted side. (22 sc)
- Join: Sl st to the first sc. (Total 3 + 22 + 3 + 30 + 3 + 22 = 83 sts) Fasten off.
The bottom side has 30 sc plus 2 corner centers. That makes 32 sts, or 8 in (20.3 cm). Each slanted row end runs on a diagonal of about 0.35 in (0.9 cm), so working 3 sc per 2 row ends keeps the slant flat. Working 1 sc per row end would make it pucker. After the edging, the roof measures 8.5 in (21.6 cm) x 4.5 in (11.4 cm).
Assembly
- Flatten the body so the opening in the base sits along the bottom front fold.
- Pin the roof to the front so its bottom edge overlaps the top of the body by 1.5 in (3.8 cm). It should overhang by 1.25 in (3.2 cm) on each side. Whipstitch along the bottom edge of the roof, sewing through the front layer only so the top stays open.
- Tuck each end of the strap 1 in (2.5 cm) inside the back at the side folds, just below the roof corners. Sew a wooden button through the roof corner, the body and the strap end to hold everything together.
- Sew the windows 1 in (2.5 cm) below the roof, centered over the left and right halves of the front.
- Sew the door centered, 0.5 in (1.3 cm) above the bottom edge of the base.
- Sew the leaves to the back of each daisy and the daisy to the top of a planter. Sew one finished box on each side of the door.
Final Blocking
- Weave in all ends on the WS.
- Lightly mist the body with water, or steam it with the iron held above the yarn.
- Lay it flat and pin it to 6 in (15.2 cm) wide x 14 in (35.6 cm) long.
- Straighten the mesh so the dc posts run vertically.
- Pin the scallops so they lie downward, and pin the door’s arch into a smooth curve.
- Let everything dry completely before unpinning.
Final Quality-Control Checklist
- 48 sts in every body round
- 8 mesh squares across each flattened side
- Roof base 8 in (20.3 cm) before edging
- Shingle rows of 7, 5, 3 and 1 scallops
- Windows square, with 4 open panes
- Door ribs vertical, arch symmetrical
- Strap held securely under both buttons
- Opening clear for pulling bags out
Troubleshooting
- Base cups or ruffles: Check that each increase round adds exactly 6 sts.
- Mesh leans: Make sure each dc goes into the top of the dc below, not into the space.
- Roof edges pucker: Use 3 sc per 2 row ends along the slants.
- Scallops lie flat instead of overlapping: Tighten the sl sts between scallops.
- Door arch lopsided: Check that every increase and decrease is at the top end.
Care
Hand wash in cool water and lay flat to dry. Reshape the mesh while it is still damp.

Final Notes
Here is the measurement chain. A gauge of 16 sts to 4 in (10.2 cm) makes a 48-st body that is 6 in (15.2 cm) wide flat. At 8 rounds per 5 in (12.7 cm), twenty mesh rounds make a 12.5 in (31.8 cm) mesh section. The base, wall and top edge bring the body to 14 in (35.6 cm). The 32-st roof measures 8 in (20.3 cm) and grows to 8.5 in (21.6 cm) after edging. With the roof set 1.5 in (3.8 cm) down, the house stands 17 in (43.2 cm) tall.
Happy crocheting!