

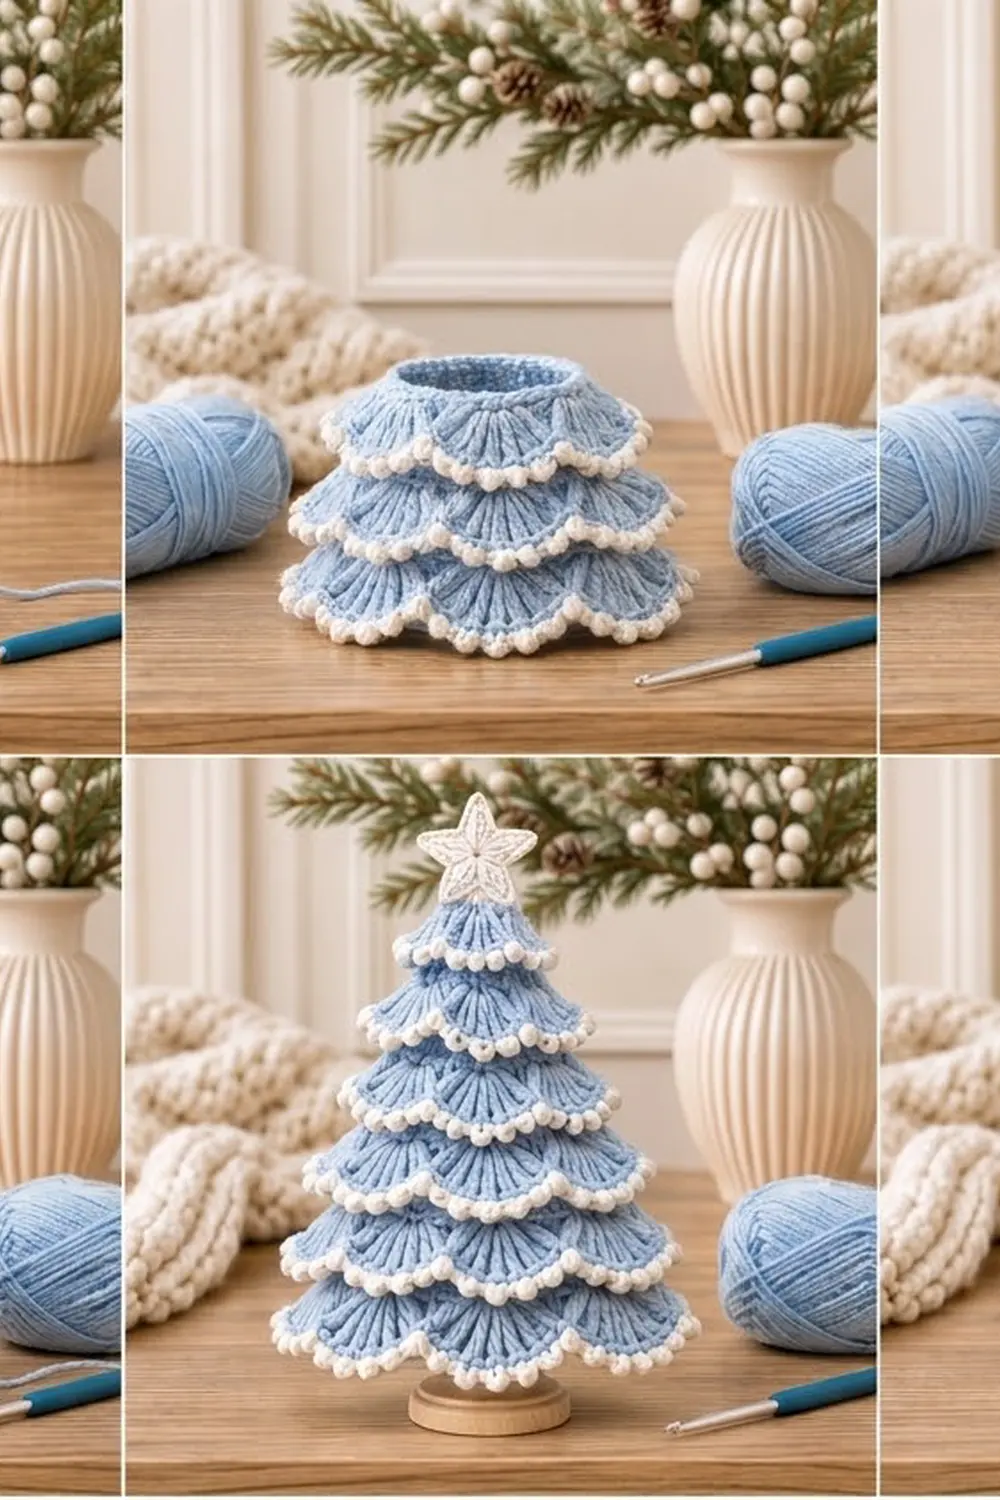
This little tree is built from soft blue scallops, stacked tier on tier like snow-dusted branches. Each tier is a ring of shell fans with a crisp white picot edge, and a puffy white star sits on top. It looks delicate, but it is a firm, simple cone with no frame inside.
The palette is quiet and wintry: powder blue for the tree and bright white for the edging and star. It fits a Scandinavian-style mantel, a neutral holiday table, or a windowsill next to pine sprigs and pinecones.
The finished tree measures about 8 in (20.3 cm) tall including the star, and the bottom tier is about 6 in (15.2 cm) across. The pattern uses US crochet terms throughout.
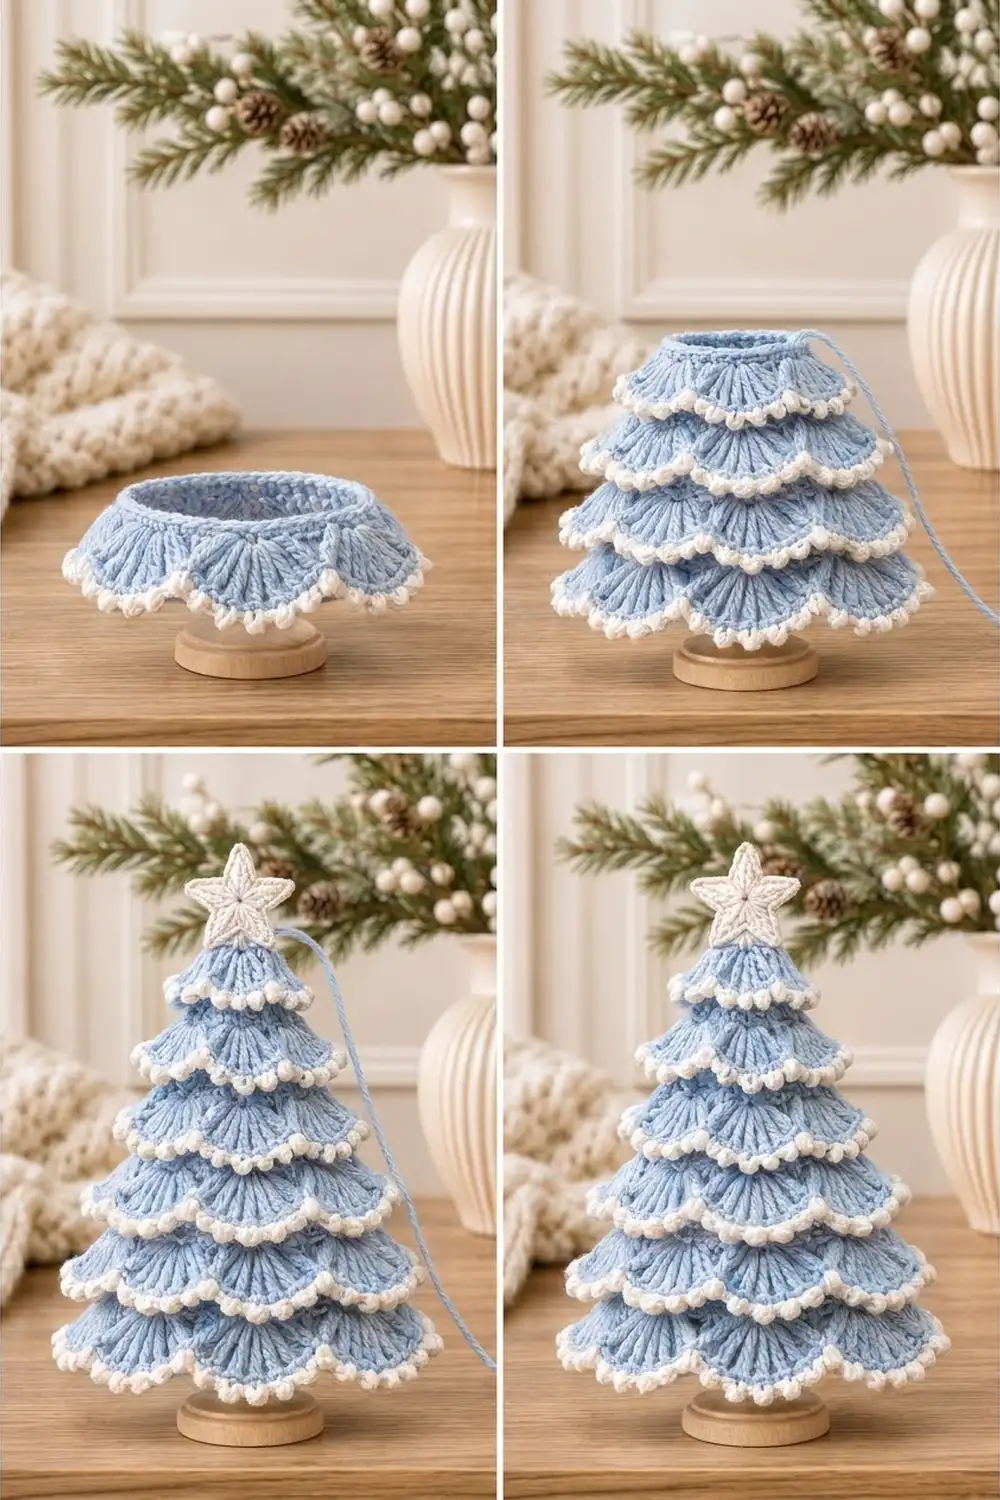
The body is worked from the bottom up in single crochet rounds. Every fifth round, a ruffle of shells is worked into the front loops, and the body continues upward in the back loops. Right after each ruffle you add a white picot edge to it. You stuff the cone as you go, close the top, and sew on the star.
Finished Size and Construction
- Finished size: about 8 in (20.3 cm) tall with star; body cone 6.6 in (16.8 cm) tall
- Widest tier: about 6 in (15.2 cm) across
- Skill level: Intermediate (front- and back-loop work, shells, picots, working in rounds)
- Terminology: US
- Yarn weight: Worsted (#4)
- Hook: 4.0 mm (G-6)
- Number of pieces: 1 tree body plus 1 star topper (made from 2 small star layers)
- Layout: one cone with 6 scalloped tiers
- Body base circumference: 13.3 in (33.8 cm), 60 sts
- Size before edging: each shell hangs about 0.75 in (1.9 cm) from the body
- Edging depth: white picot edge adds about 0.25 in (0.6 cm) to each shell
Materials
Use a smooth worsted cotton or cotton blend for clear shell definition. Acrylic works too, but it gives slightly softer scallops. Choose a white that is clearly brighter than the blue so the picot edge stands out.
- Color A, powder blue: 40 g / 80 m (87 yd)
- Color B, bright white: 20 g / 40 m (44 yd)
Tools:
- 4.0 mm (G-6) crochet hook
- 4 stitch markers
- Tapestry needle
- Scissors
- Polyester fiberfill, about 15 g
- Cardstock circle, 4.25 in (10.8 cm) diameter, for the base
- Wooden round stand, about 2.5 in (6.4 cm) across (optional)
- Craft glue (optional)
The yarn quantities include a margin of roughly 25% for a gauge swatch and tails.
Abbreviations (US Terms)
- ch: chain
- sl st: slip stitch
- sc: single crochet
- hdc: half double crochet
- dc: double crochet
- sc2tog: single crochet 2 together
- FLO / BLO: front loop only / back loop only
- st(s): stitch(es)
- MR: magic ring
- rep: repeat
Special stitches
- Shell: 7 dc in the same stitch.
- Picot: ch 3, sl st in the 3rd ch from the hook. This makes a small round dot.
Gauge and Checkpoints
Gauge: 18 sc and 20 rounds = 4 in (10.2 cm) worked in the round. That works out to 4.5 sts and 5 rounds per inch (2.5 cm).
Test the first tier before committing to the full tree. Work Rounds 1–2 and Tier 1, then check:
- After Round 2: lay the ring flat. It should measure 6.7 in (17.0 cm) across the fold, which is a 13.3 in (33.8 cm) circumference.
- After Tier 1: each shell should hang about 0.75 in (1.9 cm) below its base round.
- After Round 7: the body is 1.4 in (3.6 cm) tall, and the circumference is 12 in (30.5 cm).
- After Round 33: the body cone is 6.6 in (16.8 cm) tall.
If your ring is too big, go down 0.5 mm in hook size. If it is too small, go up 0.5 mm. Do not change the stitch counts, because the shell repeats need multiples of 6.
Tree Body
Work with Color A. Join each round with a sl st to the first sc, and ch 1 at the start of each round (the ch 1 does not count as a stitch). Mark the first stitch of every round.
Foundation: Ch 60 and join with a sl st to the first ch to form a ring without twisting.
Round 1: Sc in each ch around. (60)
Round 2: Sc in each st around. (60)
How Every Tier Works
Each tier follows the same three steps:
- Ruffle round: worked in the FLO of the round you just finished.
- White edging: worked on the shells of that ruffle (see the Picot Edging section).
- Next body round: worked in the BLO of the same round as the ruffle.
The free back loops give the body a clean base to keep growing from, and the shells sit just below it.
Ruffle round (general): Ch 1. Working in the FLO only, sc in the next st, sk 2 sts, shell in the next st, sk 2 sts. Rep from * around, then sl st to the first sc. Each repeat uses 6 sts, so the round must be a multiple of 6.
After joining the ruffle, pull up a long loop of Color A and put it on a stitch marker. Work the white edging, then put the blue loop back on your hook.
Tier 1
Tier 1 ruffle (in the FLO of Round 2): 10 repeats. (10 sc + 10 shells = 80 sts; 70 dc total)
Add the white edging to Tier 1.
Round 3 (BLO of Round 2): Sc in each st around. (60)
Round 4: Sc around. (60)
Round 5: Sc around. (60)
Round 6: [Sc in the next 8 sts, sc2tog] 6 times. (54)
Round 7: Sc around. (54)
Tier 2
Tier 2 ruffle (in the FLO of Round 7): 9 repeats. (72 sts)
Add the edging.
Round 8 (BLO of Round 7): Sc around. (54)
Rounds 9–10: Sc around. (54)
Round 11: [Sc in the next 7 sts, sc2tog] 6 times. (48)
Round 12: Sc around. (48)
Tier 3
Tier 3 ruffle (in the FLO of Round 12): 8 repeats. (64 sts)
Add the edging.
Round 13 (BLO of Round 12): Sc around. (48)
Rounds 14–15: Sc around. (48)
Round 16: [Sc in the next 6 sts, sc2tog] 6 times. (42)
Round 17: Sc around. (42)
Tier 4
Tier 4 ruffle (in the FLO of Round 17): 7 repeats. (56 sts)
Add the edging.
Round 18 (BLO of Round 17): Sc around. (42)
Rounds 19–20: Sc around. (42)
Round 21: [Sc in the next 5 sts, sc2tog] 6 times. (36)
Round 22: Sc around. (36)
Tier 5
Tier 5 ruffle (in the FLO of Round 22): 6 repeats. (48 sts)
Add the edging.
Round 23 (BLO of Round 22): Sc around. (36)
Rounds 24–25: Sc around. (36)
Round 26: [Sc in the next 4 sts, sc2tog] 6 times. (30)
Round 27: Sc around. (30)
Tier 6
Tier 6 ruffle (in the FLO of Round 27): 5 repeats. (40 sts)
Add the edging.
Round 28 (BLO of Round 27): Sc around. (30)
Top Cone
Round 29: [Sc in the next 3 sts, sc2tog] 6 times. (24)
Round 30: Sc around. (24)
Stuff the cone firmly from the top, pushing the fiberfill down evenly.
Round 31: [Sc in the next 2 sts, sc2tog] 6 times. (18)
Round 32: [Sc in the next st, sc2tog] 6 times. (12)
Add a little more stuffing.
Round 33: [Sc2tog] 6 times. (6)
Fasten off, leaving a 6 in (15.2 cm) tail. Weave the tail through the front loops of the last 6 sts, pull it tight, and secure it.
Checkpoint: the body is 33 rounds, which is 6.6 in (16.8 cm) tall at 5 rounds per inch.
Star Topper
Make 2 layers with Color B.
Round 1: MR, ch 1, 10 sc in the ring. Pull the ring closed and sl st to the first sc. (10)
Round 2: Ch 4, sl st in the 2nd ch from the hook, sc in the next ch, hdc in the next ch, sk the next st of Round 1, sl st in the next st. Rep from * 4 more times. (5 points)
Each point uses 2 sts of Round 1, so 5 points × 2 = 10 sts and the last sl st lands on the starting stitch. Fasten off one layer. Leave a 12 in (30.5 cm) tail on the other.
Place the two layers wrong sides together. Whipstitch around the edge with the long tail, adding a pinch of fiberfill before you close the last point. The whipstitch gives the star its raised outline. The star is about 1.75 in (4.4 cm) from tip to tip. If you like, add 5 short tonal straight stitches from the center toward the points.
Assembly
- Sew the bottom point of the star upright to the tip of the cone, stitching through Round 33 and the star’s back layer.
- Push the cardstock circle into the open base so it rests against Round 1 and the stuffing stays inside.
- If you are using the wooden stand, glue the base circle to the center of the stand.
Picot Edging (Border)
The white picot edge is this tree’s border. It is worked on every tier right after its ruffle round, with the blue loop held on a marker.
Edging gauge: 1 sc per dc. Over a shell arc of about 1.6 in (4.1 cm), the 5 picots fall about 0.25 in (0.6 cm) apart.
Edging round: Join Color B with a sl st in any sc between two shells (a valley). Sc in the 1st dc of the shell, [sc in the next dc, picot] 5 times, sc in the 7th dc, sl st in the next valley sc. Rep from * around, then fasten off and weave in the ends on the wrong side.
Per shell: 7 sc, 5 picots, 1 sl st.
Counts per tier:
| Tier | Shells | Sc | Picots | Sl st |
|---|---|---|---|---|
| 1 | 10 | 70 | 50 | 10 |
| 2 | 9 | 63 | 45 | 9 |
| 3 | 8 | 56 | 40 | 8 |
| 4 | 7 | 49 | 35 | 7 |
| 5 | 6 | 42 | 30 | 6 |
| 6 | 5 | 35 | 25 | 5 |
Why the math works: working exactly 1 sc into each of the 7 dc keeps the shell’s curve, so the edge neither ruffles nor pulls. The picots sit only on the middle 5 dc, which leaves the valleys clean and makes each scallop read as a separate fan. The sl st in the valley sc anchors every shell to the round below. Because each tier’s shell count is that round’s stitch count divided by 6, the edging counts shrink evenly as the tree narrows.
Final Blocking
- Lightly mist the whole tree with water, or hover a steam iron 1 in (2.5 cm) above it. Never press.
- Use your fingertips to gently flare each shell outward and down so it overlaps the band below.
- Pinch each picot so it stands as a round dot.
- Reshape the cone so it stands straight, rolling it gently between your palms.
- Flatten the star between two fingers and point its tips outward.
- Let the tree dry fully, standing upright, before gluing it to the stand.
Final Quality-Control Checklist
- 6 tiers, with 10, 9, 8, 7, 6, and 5 shells from the bottom up
- Every shell has 7 dc and 5 white picots
- About 1 in (2.5 cm) of blue body between each tier (5 rounds)
- Base circumference 13.3 in (33.8 cm); widest tier about 6 in (15.2 cm) across
- Body height 6.6 in (16.8 cm); overall height about 8 in (20.3 cm)
- Firm, even stuffing with no lumps showing through
- Star centered and upright
- All tails woven in on the inside or the wrong side
Troubleshooting
- Shells stand straight out instead of drooping: you worked the ruffle through both loops. Rework it in the FLO only.
- Wrong number of shells: recount the base round. It must be the exact multiple of 6 listed for that tier.
- Edging ripples: you added extra sc. Use exactly 7 sc per shell.
- Edging cups the shell: your tension is too tight. Loosen up or use a 4.5 mm (7) hook for the edging only.
- Cone leans: your stuffing is uneven. Pull some out and repack it in small pieces.
- Holes at the decreases: use the invisible sc2tog, inserting through the front loops only.
- Visible color jog: join the white in a valley sc, where the next shell hides it.
Care
Spot clean with cool water and mild soap, then reshape and air dry upright. Because the tree is stuffed, do not machine wash or tumble dry it.
Final Notes
The measurement chain is simple. At 18 sc per 4 in (10.2 cm), the 60-stitch base gives a 13.3 in (33.8 cm) circumference. Five rounds per tier, at 5 rounds per inch, stack six tiers into a 6.6 in (16.8 cm) cone. Each tier loses 6 stitches, which is exactly one shell, so the scallops shrink evenly from 10 shells to 5. The white picot edge matches each dc one to one. The star adds the final height for about 8 in (20.3 cm) in all. If you check your gauge on the first tier, everything above it will follow.
Happy crocheting!