

The Seashell Cascade organizer is three lacy cotton baskets stacked vertically and hung from a natural wooden ring. Each basket has a sturdy flat base, a solid lower band, two tiers of open fans and a rim of rounded shell scallops finished with a corded edge. It is sized to hold a standard toilet paper roll, and it also works for washcloths, soaps or small plants.
Everything is worked in one cream cotton, so the texture does the decorating. The style is soft, classic and a little vintage, and it fits a bathroom, nursery or entryway. This pattern uses US crochet terms throughout.
The finished organizer measures about 28 in (71.1 cm) from the top of the ring to the bottom basket. Each basket is 6.5 in (16.5 cm) in diameter and 4.25 in (10.8 cm) tall. The visible gap between baskets is 3 in (7.6 cm).
Construction overview: Each basket is worked in one piece. You crochet a flat base in rounds, turn the work upward with a back-loop round, build the lace wall in joined rounds, and finish with a two-round rim border. The three straps are worked lengthwise in three rows. You then sew the straps to the outside walls and fold one strap over the wooden ring to form the hanging triangle.
Finished Size and Construction
- Finished size: about 28 in (71.1 cm) long overall; the basket stack is 18.75 in (47.6 cm) tall
- Skill level: Intermediate
- Terminology: US
- Yarn weight: worsted (#4) cotton
- Hook: 4.5 mm (US 7)
- Number of pieces: 6 crocheted (3 baskets, 3 straps) plus 1 wooden ring
- Layout: 1 column × 3 baskets, stacked vertically
- Piece size: each basket is 6.5 in (16.5 cm) across × 4.25 in (10.8 cm) tall; each strap is 18.25 in × 1 in (46.4 cm × 2.5 cm)
- Basket height before border: 3.85 in (9.8 cm)
- Border depth: 0.4 in (1.0 cm)
Materials
Yarn: Use a smooth, firmly plied worsted-weight 100% cotton. Cotton holds the basket shape and shows the fan stitches clearly. Acrylic will make floppy walls.
- Cream/ivory: 200 g, about 340 m (372 yd)
Approximate use: 35 g per basket and 8 g per strap, about 129 g in total. The quantity above includes a generous margin for gauge swatches, a test basket and differences between dye lots.
Tools:
– 4.5 mm (US 7) crochet hook
– Wooden ring, 2.5 in (6.4 cm) outer diameter
– 4 locking stitch markers
– Tapestry needle
– Scissors
– Measuring tape
– Optional: spray starch or fabric stiffener
Abbreviations (US Terms)
- ch – chain
- sl st – slip stitch
- sc – single crochet
- dc – double crochet
- BLO – back loop only
- rev sc – reverse single crochet (crab stitch)
- sp(s) – space(s)
- st(s) – stitch(es)
- Rnd – round
Special stitches:
– Fan: [(dc, ch 1) 4 times, dc] in the same stitch. That is 5 dc and 4 ch-1 spaces.
– Scallop: [(dc, ch 1) 5 times, dc] in the same stitch. That is 6 dc and 5 ch-1 spaces.
– Reverse sc: Work sc from left to right (right-handed): insert the hook into the next stitch to the right, yarn over, pull through, yarn over, and pull through both loops.
Gauge and Checkpoints
Base gauge: 15 dc and 8 rounds = 4 in (10.2 cm). Each dc round adds 0.5 in (1.3 cm) to the diameter.
Strap gauge: 16 sc = 4 in (10.2 cm).
Make one complete basket before starting the others. It is your real gauge swatch.
Checkpoints:
– After base Rnd 3: diameter 3 in (7.6 cm)
– After base Rnd 6: diameter 6 in (15.2 cm)
– After base Rnd 7: diameter 6.5 in (16.5 cm)
– After Wall Rnd 2: wall height 0.75 in (1.9 cm)
– After Wall Rnd 4: wall height 1.85 in (4.7 cm)
– After Wall Rnd 7: wall height 3.85 in (9.8 cm)
– After the border: wall height 4.25 in (10.8 cm)
If your base is too big (over 6.75 in / 17.1 cm after Rnd 7), or it ruffles, go down to a 4 mm hook. If it is too small (under 6.25 in / 15.9 cm), or it cups, go up to a 5 mm hook. Check that a toilet paper roll sits inside the wall without forcing it.
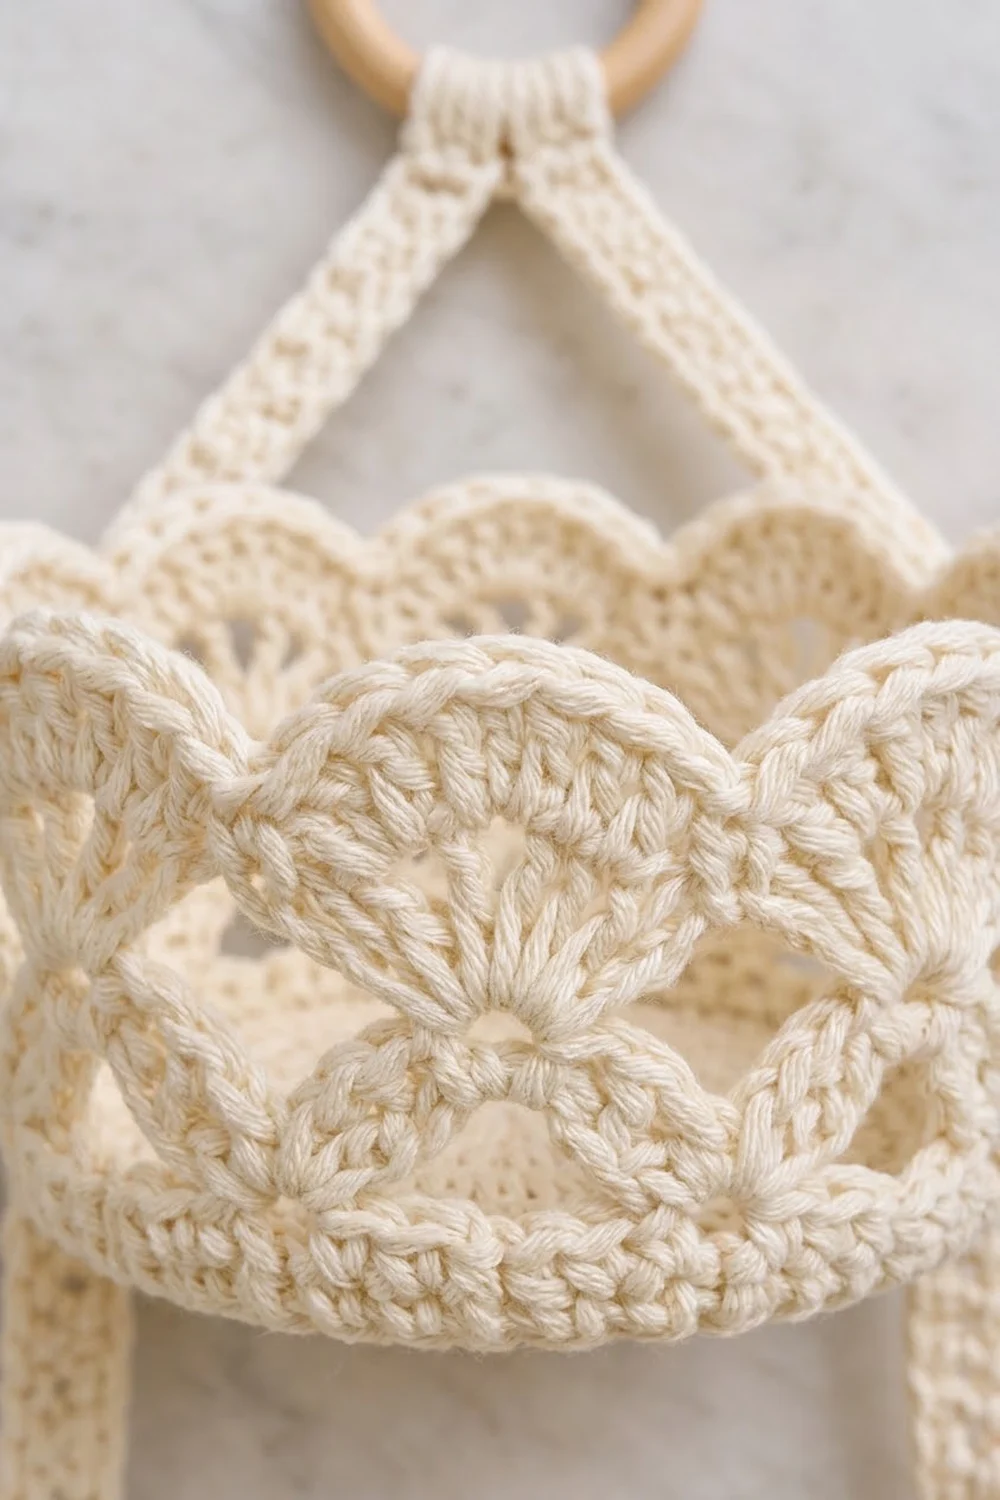
Basket (Make 3)
Base
Rnd 1: Make a magic ring. Ch 3 (counts as dc), 11 dc in ring, sl st to top of beg ch-3. (12 dc)
Rnd 2: Ch 3, dc in same st, 2 dc in each st around, sl st to join. (24 dc)
Rnd 3: Ch 3, 2 dc in next st, dc in next st, 2 dc in next st; repeat from * around, sl st to join. (36 dc)
Rnd 4: Ch 3, dc in next st, 2 dc in next st, dc in next 2 sts, 2 dc in next st; repeat around, join. (48 dc)
Rnd 5: Ch 3, dc in next 2 sts, 2 dc in next st, dc in next 3 sts, 2 dc in next st; repeat around, join. (60 dc)
Rnd 6: Ch 3, dc in next 3 sts, 2 dc in next st, dc in next 4 sts, 2 dc in next st; repeat around, join. (72 dc)
Rnd 7 (edge round): Ch 1, sc in each st around, sl st to first sc. (72 sc)
This round gives the base its firm, ridged outer edge. The base should lie flat and measure 6.5 in (16.5 cm) across.
Wall
Wall Rnd 1 (turning round): Ch 1, sc in BLO of each st around, sl st to first sc. (72 sc)
The unused front loops form a fold line, so the wall rises straight up.
Wall Rnd 2 (solid band): Ch 3 (counts as dc), dc in each st around, sl st to top of ch-3. (72 dc)
Wall Rnd 3 (shells): Ch 1, sc in first st, skip 3 sts, 7 dc in next st, skip 3 sts, sc in next st; repeat from * 8 more times, but end the last repeat after the 7-dc shell (skip the final 3 sts) and sl st to first sc. (9 shells; 63 dc + 9 sc = 72 sts)
The shells use an 8-stitch repeat, and 72 ÷ 8 = 9 repeats exactly.
Wall Rnd 4 (frame): Ch 3 (counts as dc), ch 3, sc in 4th (center) dc of next shell, ch 3, dc in next sc, ch 3; repeat from * around. End with: sc in center dc of the last shell, ch 3, sl st to top of beg ch-3. (9 dc, 9 sc, 18 ch-3 sps)
Wall Rnd 5 (offset fans): Ch 4 (counts as dc + ch 1), (dc, ch 1) 3 times in same st, dc in same st (first fan made). Sc in next sc, fan in next dc; repeat from * 7 more times. Sc in last sc, sl st to 3rd ch of beg ch-4. (9 fans: 45 dc and 36 ch-1 sps, plus 9 sc)
The ch-3 spaces are skipped. Each fan sits between two Rnd 3 shells, which staggers the lace.
Wall Rnd 6 (frame): Sl st in next ch-1 sp, sl st in next dc, sl st in next ch-1 sp, sl st in next dc. You are now at the center (3rd) dc of the first fan. Ch 1, sc in same dc, ch 4, dc in next sc, ch 4, sc in center dc of next fan; repeat from * 7 more times. Ch 4, dc in last sc, ch 4, sl st to first sc. (9 sc, 9 dc, 18 ch-4 sps)
Wall Rnd 7 (scallops): Ch 1, sc in first sc, scallop in next dc, sc in next sc; repeat from * around, ending with a scallop in the last dc. Sl st to first sc. (9 scallops: 54 dc and 45 ch-1 sps, plus 9 sc)
Each scallop sits directly above a Rnd 3 shell. Do not fasten off; continue with the Border after joining, or now if you prefer.
Straps (Make 3)
Each strap is worked lengthwise.
Foundation: Ch 74.
Row 1: Sc in 2nd ch from hook and in each ch across, turn. (73 sc)
Row 2 (eyelet and mesh): Ch 3 (counts as dc), ch 3, skip next 3 sts, dc in next st (eyelet made). Ch 1, skip next st, dc in next st; repeat from * to the end, turn. (36 dc, 34 ch-1 sps, 1 ch-3 eyelet)
Check: 1 + 3 + 1 + (34 × 2) = 73 stitches covered.
Row 3: Ch 1, sc in each dc and each ch-1 sp, and 3 sc in the eyelet sp. (36 + 34 + 3 = 73 sc) Fasten off, leaving a 20 in (50.8 cm) tail.
Each strap should measure 18.25 in × 1 in (46.4 cm × 2.5 cm), with a line of small openings down the center and a larger eyelet at one end.
Make All Pieces
All pieces are cream:
– 3 baskets
– 3 straps
– 1 wooden ring
Layout (front view):
        ( RING )
         /    \        <- Strap 1, folded over ring
        /      \
  S2 [ BASKET 1 ] S3
  S2              S3   <- 3 in (7.6 cm) gap
  S2 [ BASKET 2 ] S3
  S2              S3   <- 3 in (7.6 cm) gap
  S2 [ BASKET 3 ] S3
Joining
Method: Whipstitch with the strap tails, working through the outer edge stitches of each strap and the outside of the basket walls.
Placement: On each basket, place a marker in Wall Rnd 2 stitch 1 and another in stitch 37. These are exactly 36 stitches apart, which puts them on opposite sides. Because there are 9 scallops (an odd number), one strap falls over a valley and the other over a scallop center. This is expected.
Strap measurement plan (Straps 2 and 3): Each strap runs 18.25 in (46.4 cm):
– Basket 1, top of Wall Rnd 7 down to the base: 3.85 in (9.8 cm)
– Gap: 3.4 in (8.6 cm), measured from the base of Basket 1 to the top of Basket 2’s Wall Rnd 7
– Basket 2: 3.85 in (9.8 cm)
– Gap: 3.4 in (8.6 cm)
– Basket 3: 3.75 in (9.5 cm), so the end sits 0.1 in (0.3 cm) above the base
Total: 3.85 + 3.4 + 3.85 + 3.4 + 3.75 = 18.25 in. When the rim border is added (0.4 in / 1.0 cm), the visible gap becomes exactly 3 in (7.6 cm).
Stitch-to-stitch logic:
1. Center each strap over its marker, with the eyelet end at the top of Basket 1.
2. Sew both long edges, making one whipstitch per strap edge stitch. Catch the nearest wall stitch each time.
3. At 4 strap stitches per inch, each 0.5 in dc round takes about 2 whipstitches.
4. Stop sewing at the top of Wall Rnd 7 so the rim border stays free.
5. Lash the eyelet to the Rnd 7 stitch beneath it with 3 firm wraps.
Strap 1 (hanger): Pass Strap 1 through the wooden ring and fold it in half so each leg is about 9.1 in (23.1 cm). Lay each leg over the top 1.5 in (3.8 cm) of Strap 2 or Strap 3 on Basket 1, and sew it through all layers. Lash the eyelet end the same way. Optionally, wrap and sew the strap snugly just below the ring. The legs form a triangle about 7 in (17.8 cm) tall.
Tension: Pull each whipstitch just snug. If it is too tight, the walls pucker. If it is too loose, the baskets tilt when loaded.
Size checkpoint: Hang the organizer. The basket stack should be 18.75 in (47.6 cm) tall with level gaps.
Border (Rim Edging, Each Basket)
Border gauge: The 2 rounds add 0.4 in (1.0 cm) of height.
Border Rnd 1: Join yarn (or continue) in the valley sc of Wall Rnd 7. Ch 1, then sl st in valley sc, sc in next dc, sc in next sp, sc in next dc, sc in next sp, sc in next dc, 3 sc in next (center) sp, sc in next dc, sc in next sp, sc in next dc, sc in next sp, sc in next dc. Repeat from * 8 more times, sl st to first sl st.
(13 sc + 1 sl st per scallop; 9 × 14 = 126 sts: 117 sc + 9 sl st)
Border Rnd 2: Ch 1. Rev sc in each sc around, skipping each valley sl st. Sl st to first rev sc and fasten off.
(13 rev sc per scallop; 117 rev sc)
Why the math works: Each scallop has 6 dc and 5 spaces, which is 11 working points. Working 1 sc in each point and 3 sc in the center space gives 13. The 3 center sc round the tip of each scallop. Skipping the valley sl st in Rnd 2 keeps the dips sharp, so the scallops stay distinct. Because there are no extra increases, the rim does not ruffle.
Final Blocking
- Weave in all ends, running them along strap edges or inside the solid band.
- Lightly mist each basket with water or spray starch.
- Stuff each basket with a toilet paper roll wrapped in a towel to round out the wall.
- Pinch each scallop into an even arch and press the base flat.
- Pin the straps straight and flat.
- Let everything dry completely, at least 24 hours.
- Hang the organizer and recheck the gaps and the level.
Final Quality-Control Checklist
- Every base lies flat at 6.5 in (16.5 cm).
- Each basket has 9 shells, 9 fans and 9 scallops.
- The rim border has 117 rev sc and clear valleys.
- Each wall is 4.25 in (10.8 cm) tall.
- Each strap is 18.25 in (46.4 cm) and has its eyelet at the top.
- Straps are centered and sewn on both edges.
- Gaps are an even 3 in (7.6 cm), and the baskets hang level.
- The ring sits centered at the top of the triangle.
Troubleshooting
- Base cups: Your tension is too tight. Go up a hook size or loosen your dc.
- Base ruffles: Your tension is too loose, or you added extra increases. Recount to 72 stitches.
- Shells don’t fit evenly: Wall Rnd 2 must have exactly 72 stitches.
- Fans lean: Make sure each fan is worked into a Rnd 4 dc, not into a ch-3 space.
- Scallops floppy: Starch the rim, or use a 4 mm hook for Wall Rnd 7 and the border.
- Baskets tilt: Resew the strap edges more firmly and check that the markers are 36 stitches apart.
- Strap twists: Block it flat before sewing.
Care
Hand wash in cool water with mild soap, reshape, and dry flat. Re-starch the rims if they soften over time.
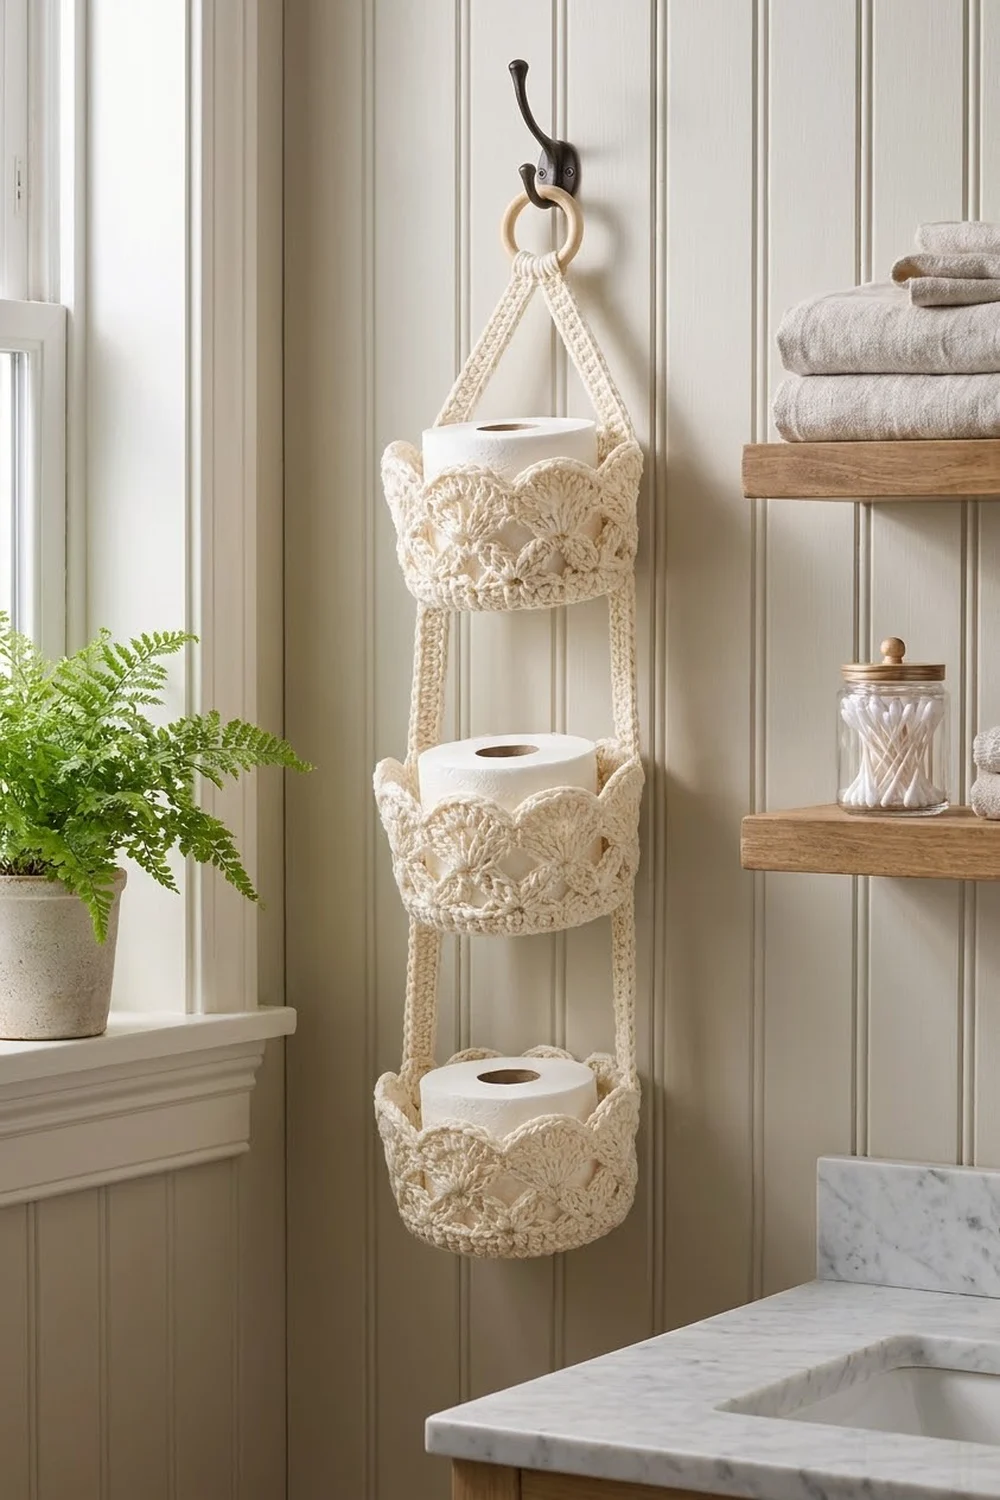
Final Notes
The measurement chain is:
– 15 dc = 4 in (10.2 cm) gives a 72-stitch base that is 6.5 in (16.5 cm) across.
– 72 stitches divide into 9 shell repeats, which carry up through the fans and scallops.
– The wall reaches 3.85 in (9.8 cm), and the 0.4 in (1.0 cm) border brings each basket to 4.25 in (10.8 cm).
– 73-stitch straps at 18.25 in (46.4 cm) hold three baskets with 3 in (7.6 cm) gaps, for a stack 18.75 in (47.6 cm) tall.
Check each link in the chain and the organizer will hang straight and hold its shape.
Happy crocheting!