

This little tree is built from three green tiers of puff stitches, each edged in a cream “snow” border with soft scallops. The tiers overlap like real branches, a short green trunk peeks out at the bottom, and a sturdy cream loop at the peak lets it hang on the tree.
It uses just two colors, kelly green and cream, which gives it a classic, cozy holiday look. The puffs are plump and textured, and the cream outlines keep each tier crisp and easy to read from across the room.
The pattern uses US crochet terms. The finished ornament is about 5 in (12.7 cm) wide and 5.9 in (15.0 cm) tall without the loop, or about 7.6 in (19.3 cm) tall with it.
You will crochet three tiers flat in rows, from the bottom edge upward. Each tier gets a two-round cream border, then the tiers are stacked and sewn together from the back. Last, you add the trunk and the hanging loop.
Finished Size and Construction
- Finished size: 5 in (12.7 cm) wide x 5.9 in (15.0 cm) tall, plus a 1.75 in (4.4 cm) loop
- Skill level: Easy-intermediate (puff stitches, decreases, simple sewing)
- Terminology: US
- Yarn weight: Worsted (#4), cotton or cotton blend
- Hook: 4.0 mm (G-6)
- Number of pieces: 4 (bottom tier, middle tier, top tier, trunk), plus a loop worked onto the top tier
- Layout: Tiers stacked vertically and overlapping by about 1 in (2.5 cm), trunk centered behind the bottom tier
- Tier sizes after border: bottom 5.0 x 2.3 in (12.7 x 5.8 cm); middle 4.2 x 2.3 in (10.7 x 5.8 cm); top 3.4 x 2.9 in (8.6 x 7.4 cm)
- Tier sizes before border: bottom 4.2 x 1.7 in (10.7 x 4.3 cm); middle 3.4 x 1.7 in (8.6 x 4.3 cm); top 2.6 x 2.1 in (6.6 x 5.3 cm)
- Border depth: about 0.4 in (1.0 cm) for two rounds
Materials
Pick a smooth, mercerized or matte cotton in worsted weight. Cotton shows off the puffs clearly and holds its shape on the tree. Acrylic works too, but the puffs will look softer and slightly fuzzier.
- Green (main color): 15 g, about 25 m
- Cream (border and loop): 8 g, about 13 m
These quantities include a margin of roughly 20 percent for your swatch and tails. One standard 50 g ball of each color will make several ornaments.
Tools:
- 4.0 mm (G-6) crochet hook
- Tapestry needle
- Scissors
- Stitch markers (2 or 3)
- Ruler or tape measure
- Pins and a blocking mat or folded towel
- Spray bottle with water
Abbreviations (US Terms)
- ch – chain
- sl st – slip stitch
- sc – single crochet
- hdc – half double crochet
- sc2tog – single crochet 2 together
- sc3tog – single crochet 3 together
- st(s) – stitch(es)
- sk – skip
- sp – space
- yo – yarn over
- RS – right side
Puff stitch (puff): (Yo, insert hook in st, yo and pull up a loop to about 0.5 in / 1.3 cm tall) 4 times, then yo and pull through all 9 loops on the hook. Ch 1 to close. The puff and its closing ch 1 count as 1 st together. That closing ch is the “top of puff” you work into on the next row.
Scallop: 3 hdc in the same stitch.
Gauge and Checkpoints
Gauge: 10 sc x 10 rows = 2 in (5.1 cm) in green sc, worked flat. This is a firm fabric, which is what you want for an ornament.
Make the bottom tier first and check it before making the rest:
- After Row 1: 21 sc measure 4.2 in (10.7 cm) wide.
- After Row 3: the tier is about 0.9 in (2.3 cm) tall. The puff row is about 0.5 in (1.3 cm) of that.
- After Row 7: the tier is 1.7 in (4.3 cm) tall, and the top edge is 2.6 in (6.6 cm) wide.
- After the border: 5.0 in (12.7 cm) wide across the scallop tips.
If Row 1 is wider than 4.4 in (11.2 cm), go down to a 3.75 mm hook. If it is narrower than 4.0 in (10.2 cm), go up to a 4.5 mm hook. If only the height is off, keep your hook. Check that each puff loop is pulled up to the same 0.5 in (1.3 cm) height.
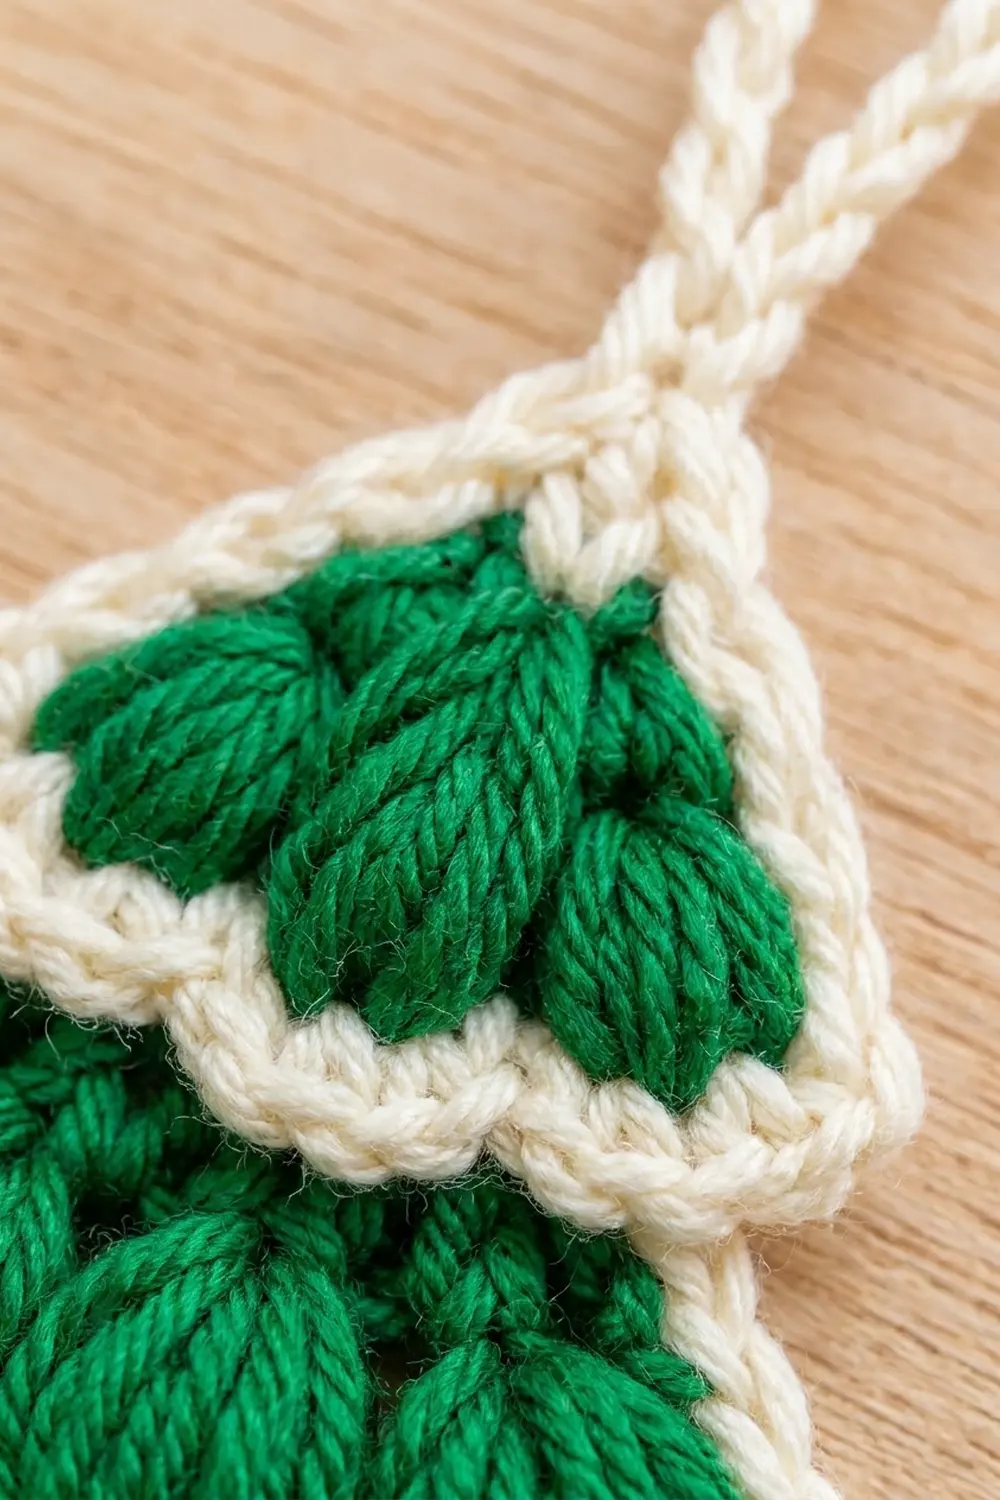
Bottom Tier (Green, 5 Puffs)
Row 1 (RS): Ch 22. Sc in 2nd ch from hook and in each ch across. Turn. (21 sc)
Row 2 (puff row): Ch 1. Sc in first st. Ch 1, sk next st, puff in next st, ch 1, sk next st, sc in next st. Repeat from * 4 more times. Turn. (5 puffs, 6 sc, 10 ch-1 sps = 21 sts)
Row 3: Ch 1. Sc in first sc. Sc in ch-1 sp, sc in top of puff, sc in ch-1 sp, sc in next sc. Repeat from * 4 more times. Turn. (21 sc)
Row 4: Ch 1. Sc2tog, sc in next 17 sts, sc2tog. Turn. (19 sc)
Row 5: Ch 1. Sc2tog, sc in next 15 sts, sc2tog. Turn. (17 sc)
Row 6: Ch 1. Sc2tog, sc in next 13 sts, sc2tog. Turn. (15 sc)
Row 7: Ch 1. Sc2tog, sc in next 11 sts, sc2tog. (13 sc) Fasten off.
The puffs should sit on the RS. Rows 4–7 form the sloped top that gets covered by the middle tier.
Middle Tier (Green, 4 Puffs)
Row 1 (RS): Ch 18. Sc in 2nd ch from hook and in each ch across. Turn. (17 sc)
Row 2: Ch 1. Sc in first st. Ch 1, sk next st, puff in next st, ch 1, sk next st, sc in next st. Repeat from * 3 more times. Turn. (4 puffs, 5 sc, 8 ch-1 sps = 17 sts)
Row 3: Ch 1. Sc in first sc. Sc in ch-1 sp, sc in top of puff, sc in ch-1 sp, sc in next sc. Repeat from * 3 more times. Turn. (17 sc)
Row 4: Ch 1. Sc2tog, sc in next 13 sts, sc2tog. Turn. (15 sc)
Row 5: Ch 1. Sc2tog, sc in next 11 sts, sc2tog. Turn. (13 sc)
Row 6: Ch 1. Sc2tog, sc in next 9 sts, sc2tog. Turn. (11 sc)
Row 7: Ch 1. Sc2tog, sc in next 7 sts, sc2tog. (9 sc) Fasten off.
Top Tier (Green, 3 Puffs and Peak)
Row 1 (RS): Ch 14. Sc in 2nd ch from hook and in each ch across. Turn. (13 sc)
Row 2: Ch 1. Sc in first st. Ch 1, sk next st, puff in next st, ch 1, sk next st, sc in next st. Repeat from * 2 more times. Turn. (3 puffs, 4 sc, 6 ch-1 sps = 13 sts)
Row 3: Ch 1. Sc in first sc. Sc in ch-1 sp, sc in top of puff, sc in ch-1 sp, sc in next sc. Repeat from * 2 more times. Turn. (13 sc)
Row 4: Ch 1. Sc2tog, sc in next 9 sts, sc2tog. Turn. (11 sc)
Row 5: Ch 1. Sc2tog, sc in next 7 sts, sc2tog. Turn. (9 sc)
Row 6: Ch 1. Sc2tog, sc in next 5 sts, sc2tog. Turn. (7 sc)
Row 7: Ch 1. Sc2tog, sc in next 3 sts, sc2tog. Turn. (5 sc)
Row 8: Ch 1. Sc2tog, sc in next st, sc2tog. Turn. (3 sc)
Row 9: Ch 1. Sc3tog. (1 st) Fasten off.
Trunk (Green)
Row 1: Ch 6. Sc in 2nd ch from hook and in each ch across. Turn. (5 sc)
Rows 2–8: Ch 1, sc in each st across. Turn. (5 sc)
Fasten off and leave a 10 in (25.4 cm) tail for sewing. The trunk measures 1.0 x 1.6 in (2.5 x 4.1 cm).
Make All Pieces
For one ornament you need:
- Green: 1 bottom tier, 1 middle tier, 1 top tier, 1 trunk
- Cream: 2-round border on each of the three tiers, plus the hanging loop
Layout from top to bottom (front view):
        [ loop ]
          peak
      [ TOP: 3 puffs ]
    [ MIDDLE: 4 puffs ]
  [  BOTTOM: 5 puffs   ]
        [trunk]
Each tier sits in front of the one below it.
Border
Border gauge: In Rnd 1, work 1 sc in each stitch, 1 sc in each sc row end and 2 sc in the puff row end. Rnd 2 makes 1 scallop every 2 stitches, so there is about 1 scallop every 0.4 in (1.0 cm).
Rnd 1 (all tiers, cream sc outline)
Hold the tier RS facing, with the foundation edge at the bottom. Join cream in the first foundation ch at one bottom corner.
Bottom tier: 3 sc in corner ch, sc in next 19 ch, 3 sc in last ch (bottom edge: 25 sts including both 3-sc corners). Work 8 sc evenly up the side row ends (1 per sc row, 2 in the puff row). Sc in each of the 13 top sts, then 8 sc down the other side. Sl st to first sc. (54 sts) Fasten off.
Middle tier: 3 sc in corner, sc in next 15 ch, 3 sc in last ch (bottom edge: 21 sts). Work 8 sc up the side, sc in the 9 top sts and 8 sc down the other side. Sl st to join. (46 sts) Fasten off.
Top tier: 3 sc in corner, sc in next 11 ch, 3 sc in last ch (bottom edge: 17 sts). Work 10 sc up the side (Rows 1–9; the puff row gets 2). Then 3 sc in the Row 9 st for the peak, 10 sc down the other side, and sl st to join. (40 sts) Fasten off.
Rnd 2 (scallops)
Bottom tier (worked as a row): Join cream in the side sc just below the top edge. Sl st in that st. Scallop in next st, sl st in next st. Repeat from * 19 more times, ending in the last side sc on the other side. (20 scallops over 41 sts: 8 side + 25 bottom + 8 side) Fasten off.
Middle tier (worked as a row): Work the same way over 8 side + 21 bottom + 8 side = 37 sts. (18 scallops) Fasten off.
Top tier (full round): Join cream with a sl st in the peak center sc. Scallop in next st, sl st in next st. Repeat around, ending with a scallop in the last st. Sl st to the first sl st. (20 scallops, 20 sl sts = 40 sts) Do not fasten off.
Why the math works: A row of scallops needs an odd stitch count (1 + 2 per scallop). The bottom tier has 41 and the middle tier 37, so both start and end with a sl st. The top tier’s closed round needs an even count, and it has 40. On every tier, the bottom corner centers land on scallop positions, so the corners flare neatly. The bare top edges of the bottom and middle tiers stay flat, because they are covered by the tier above.
Hanging Loop
At the peak sl st: Ch 24, then sl st in the same st to form a ring. Ch 1 and work 30 sc over the ring. Sl st at the base and fasten off. The loop stands about 1.75 in (4.4 cm) tall.
Joining
Method: Whipstitch from the back with green yarn, so no seams show from the front.
- Lay the middle tier RS up on top of the bottom tier. Center it so the middle tier’s scallop tips just touch the tops of the bottom tier’s puffs.
- Turn the stack over. Line up the 13 top-edge sc of the bottom tier with the back loops of the middle tier’s Row 3 (17 sts). Skip 2 middle-tier sts at each end, then sew 1 st to 1 st across the 13 stitches.
- Repeat with the top tier over the middle tier. Sew the middle tier’s 9 top-edge sc to the center 9 of the top tier’s Row 3 (13 sts), skipping 2 at each end.
- Center the trunk behind the bottom tier. Whipstitch the 5 sts of trunk Row 8 to the back of sts 9–13 of the bottom tier’s Row 1. Leave 8 sts free on each side.
- Add 2 tacking stitches at each side so the tier edges don’t flip forward.
Tension: Snug the stitches enough to close any gaps, but don’t pull so hard that the tier above puckers. The tiers should lie flat with no waves.
Size checkpoint: The stack should measure 5.9 in (15.0 cm) from the trunk bottom to the peak. Each tier overlaps the one below by about 1 in (2.5 cm), and 1.0 in (2.5 cm) of trunk shows.
Final Blocking
- Weave in all ends on the back, hiding each one under its own color.
- Mist the ornament lightly until damp, not soaked.
- Pin it to a mat at 5 in (12.7 cm) wide and 5.9 in (15.0 cm) tall.
- Pin each bottom corner scallop slightly outward so the tiers flare.
- Use your fingertip to puff up each puff stitch from the front.
- Pin the loop straight up and let everything dry completely.
Final Quality-Control Checklist
- The tiers have 5, 4 and 3 puffs, all on the RS.
- Stitch counts match: 54/46/40 sts in Rnd 1, and 20/18/20 scallops in Rnd 2.
- No sewing is visible from the front.
- The trunk is centered, with 1.0 in (2.5 cm) showing.
- The loop is firm and centered at the peak.
- The finished size is 5 x 5.9 in (12.7 x 15.0 cm).
Troubleshooting
- Puffs are flat or uneven: Pull every loop up to the same 0.5 in (1.3 cm) height, and always close with ch 1.
- Tier edges curl: Your sc is too tight. Go up a hook size for the border only.
- Scallops ruffle: Check your Rnd 1 count. Extra sts along the sides make the edge wavy.
- Row 3 count is off: Make sure you work into both ch-1 sps around each puff.
- Tiers tilt: Re-center the seam, skipping exactly 2 sts at each end.
Care
Hand wash in cool water, roll in a towel and dry flat. Store flat in tissue between seasons so the puffs keep their shape.

Final Notes
Here is the measurement chain. A 2 in (5.1 cm) gauge swatch of 10 sc x 10 rows gives a 4.2 in (10.7 cm) bottom tier. The border brings it to 5.0 in (12.7 cm). Each tier overlaps the one below by 1 in (2.5 cm), and the trunk adds 1.0 in (2.5 cm) at the bottom. The result is a 5 x 5.9 in (12.7 x 15.0 cm) tree with a 1.75 in (4.4 cm) loop. Check Row 1 first, and every measurement after it will fall into place.
Happy crocheting!