

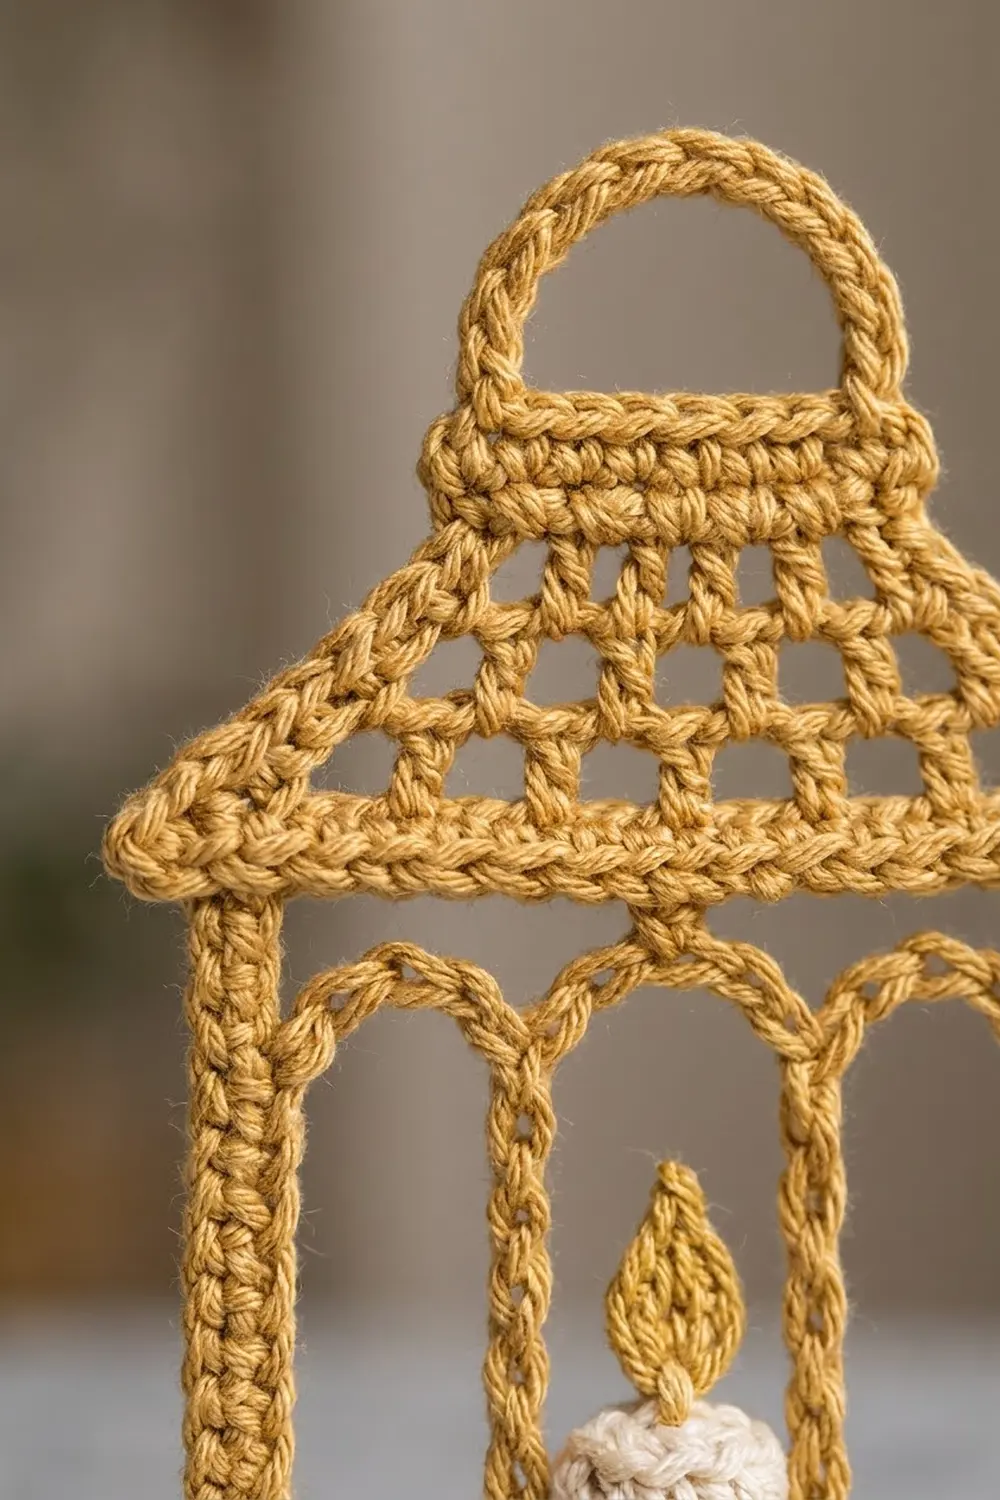
This little lantern is a flat, openwork Christmas ornament worked in a warm mustard-gold cotton. It has a solid base bar, three arched windows separated by twisted tall-stitch bars, an overhanging eave, a mesh roof, a solid top band, and a rounded carrying handle. A small cream candle with a gold flame sits in the middle window.
The style is simple and graphic. The gold outline stands out against green branches, and the cream candle adds one soft point of contrast. Only two colors are used: gold for the lantern and flame, and cream for the candle and the flame highlight.
The pattern uses US crochet terms. The finished ornament measures about 4.8 in (12.2 cm) wide at the eaves and 5 in (12.7 cm) tall, not counting the hanging loop. The twisted cord loop adds about 2.5 in (6.4 cm).
The lantern is one piece worked from the bottom up in rows: base bar, window row, arch row, two short side posts, eave, mesh roof, top band, and handle. One round of single crochet outlines the whole shape. The candle and flame are small appliqués sewn on afterward.
Finished Size and Construction
- Finished size: 4.8 in (12.2 cm) wide at the eaves x 5 in (12.7 cm) tall, plus a 2.5 in (6.4 cm) hanging loop
- Skill level: Intermediate (tall stitches, partial rows, mesh shaping)
- Terminology: US
- Yarn weight: Sport (#2 fine) cotton
- Hook: 2.75 mm (US C-2)
- Number of pieces: 1 lantern frame, plus 1 candle and 1 flame appliqué
- Layout: single ornament, no joining
- Piece size: body 3.5 in (8.9 cm) wide; eave 4.5 in (11.4 cm) wide
- Size before border: 4.5 in (11.4 cm) wide x 4.75 in (12.1 cm) tall
- Border depth: 1 round of sc, about 0.17 in (0.4 cm)
Materials
Choose a smooth, slightly twisted cotton or cotton blend in sport weight. Mercerized cotton gives crisp stitches and holds the window shapes well after blocking. Avoid fuzzy yarns, which blur the mesh and the arches.
- Gold (main color): 10 g, about 31 m (34 yd), for the lantern, border, flame, and hanging cord
- Cream (contrast color): 3 g, about 9 m (10 yd), for the candle and flame highlight
These quantities include a comfortable margin. The ornament itself uses about 8 g of gold and 2 g of cream.
Tools:
– 2.75 mm (US C-2) crochet hook
– Tapestry needle
– Scissors
– Stitch markers (2)
– Ruler or tape measure
– Blocking mat and rust-proof pins
– Spray bottle with water
– Optional: fabric stiffener
Abbreviations (US Terms)
- ch – chain
- sl st – slip stitch
- sc – single crochet
- hdc – half double crochet
- dc – double crochet
- sk – skip
- sp(s) – space(s)
- st(s) – stitch(es)
- RS / WS – right side / wrong side
Special stitch – quadruple treble (quadtr): Yarn over 5 times, insert hook in stitch, yarn over and pull up a loop (7 loops on hook). [Yarn over, pull through 2 loops] 6 times. One quadtr stands about 1 in (2.5 cm) tall at this gauge. Its long wrapped post gives the inner window bars their twisted look.
Gauge and Checkpoints
Gauge: 12 sc and 12 rows = 2 in (5.1 cm), or 6 sc and 6 rows per 1 in (2.5 cm).
Since this is one small piece, the base bar doubles as your gauge swatch. Work Rows 1–3 and measure before going on.
Checkpoints:
– After Row 3: 3.5 in (8.9 cm) wide, 0.5 in (1.3 cm) tall
– After Row 5: about 1.7 in (4.3 cm) tall at the side edges, with the arches bowing about 0.25 in (0.6 cm) higher
– After Row 9: posts reach 2.3 in (5.8 cm) from the bottom edge
– After Row 11: eave 4.5 in (11.4 cm) wide, total height 2.7 in (6.9 cm)
– After Row 14: total height 3.7 in (9.4 cm); top of the mesh 2.5 in (6.4 cm) wide
– After Row 18: total height 4.75 in (12.1 cm)
If your base bar is too wide, switch to a 2.5 mm hook. If it is too narrow, switch to a 3.0 mm hook. Restart rather than changing stitch counts, because every later count depends on the 21-stitch base.
Lantern Frame
Work in gold throughout. The turning ch-1 does not count as a stitch.
Base Bar
Ch 22.
Row 1 (RS): Sc in 2nd ch from hook and in each ch across. (21 sc)
Rows 2–3: Ch 1, turn, sc in each sc across. (21 sc)
Window Row
Row 4: Ch 7 (counts as first quadtr), turn. Quadtr in next sc. [Ch 5, sk 5 sc, quadtr in next sc] twice. Ch 5, sk 5 sc, quadtr in each of last 2 sc. (6 quadtr and 3 ch-5 sps = 21 sts)
You now have a double-thick post at each edge (2 quadtr each), two single inner bars, and three open windows, each 5 stitches wide.
Arch Row
Row 5: Ch 1, turn. Sc in first 2 quadtr, 7 sc in next ch-5 sp, sc in next quadtr, 7 sc in next ch-5 sp, sc in next quadtr, 7 sc in last ch-5 sp, sc in last quadtr, sc in top of turning ch. (27 sc)
Each ch-5 sp holds 7 sc, so the bar above each window crowds and bows upward into a soft arch. This is intentional. Push each arch up with your fingers before moving on.
Side Posts
The posts rise above the arches on the outer 2 stitches only.
Post A, Rows 6–9: Ch 1, turn. Sc in first 2 sc and leave the remaining sts unworked. Work 4 rows on these 2 sts, turning each time. (2 sc each row) Fasten off.
Post B: Join gold in the last sc of Row 5, at the outer edge. Rows 6–9: Ch 1, sc in the last 2 sc of Row 5. Work 4 rows on these 2 sts, turning each time. (2 sc each row) Do not fasten off. Your yarn should now be at the outer edge of Post B.
Eave
Row 10: Ch 4. Sc in 2nd ch from hook and in next 2 ch (3 sc overhang). Sc in 2 sts at top of Post B. Ch 17. Sc in 2 sts at top of Post A. Ch 3. (3 sc + 2 sc + 17 ch + 2 sc + 3 ch = 27 sts)
The ch-17 spans the 2.83 in (7.2 cm) gap between the posts. Keep it straight, not slack.
Row 11: Ch 1, turn. Sc in each of 3 ch, sc in next 2 sc, sc in each of 17 ch, sc in next 2 sc, sc in each of last 3 sc. (27 sc)
Mesh Roof
Row 12: Turn. Sl st in first 3 sc, ch 4 (counts as dc + ch 1), sk next sc, dc in next sc. [Ch 1, sk 1 sc, dc in next sc] 10 times. Leave last 2 sc unworked. (12 dc and 11 ch-1 sps = 23 sts)
Row 13: Turn. Sl st in first dc, sl st in next ch-1 sp, sl st in next dc. Ch 4 (counts as dc + ch 1), dc in next dc. [Ch 1, dc in next dc] 8 times. Leave last ch-1 sp and last dc unworked. (10 dc and 9 ch-1 sps = 19 sts)
Row 14: Turn. Sl st in first dc, sl st in next ch-1 sp, sl st in next dc. Ch 4 (counts as dc + ch 1), dc in next dc. [Ch 1, dc in next dc] 6 times. Leave last ch-1 sp and last dc unworked. (8 dc and 7 ch-1 sps = 15 sts)
Each row steps in 2 stitches on each side, which gives a 45-degree roof slope with small square openings.
Top Band
Row 15: Ch 1, turn. Sc in each dc and each ch-1 sp across, ending with a sc in the 3rd ch of the turning ch. (8 + 7 = 15 sc)
Row 16: Ch 1, turn, sc in each sc across. (15 sc)
Handle
Row 17: Ch 1, turn. Sc in first 3 sc, ch 15, sk 9 sc, sc in last 3 sc. (6 sc and 1 ch-15 loop)
Row 18: Ch 1, turn. Sc in first 3 sc, 21 sc in ch-15 loop, sc in last 3 sc. (27 sc)
The 21 sc crowd the 15-chain loop into a rounded semicircle about 1.5 in (3.8 cm) across. Fasten off.
Border
Border gauge: 6 sc per 1 in (2.5 cm) along every edge, the same as the body.
The border is one round of gold sc around the outside edge only. Do not edge the windows or the inside of the handle. Work with RS facing.
Join gold in one bottom corner of Row 1 (a corner foundation ch). Mark it.
Bottom (25 sc): 3 sc in corner ch, 1 sc in each of next 19 foundation ch, 3 sc in the other corner ch.
First body side (13 sc): 1 sc in end of Row 2, 1 sc in end of Row 3, 6 sc around the Row 4 end post (quadtr or turning ch), 1 sc in end of Row 5, 1 sc in end of each of Rows 6–9.
First eave (6 sc): Turn outward along the underside of the overhang, with no extra stitch at the inner corner. 1 sc in each of the 2 chs nearest the post, 3 sc in the outermost ch (corner), 1 sc in end of Row 11.
First roof slope (13 sc): 2 sc in the outermost Row 11 st, 1 sc in the next Row 11 st, 2 sc around the Row 12 end post, 1 sc in each of the 2 stepped-over Row 12 sts, 2 sc around the Row 13 end post, 1 sc in each of the 2 stepped-over Row 13 sts, 2 sc around the Row 14 end post.
First top band side (3 sc): 1 sc in end of each of Rows 15, 16, and 17.
Top (31 sc): 3 sc in first Row 18 st (corner), 1 sc in each of next 2 sts, 1 sc in each of the 21 handle sts, 1 sc in each of next 2 sts, 3 sc in last st (corner).
Second side: Work the second top band side (3 sc), roof slope (13 sc), eave (6 sc), and body side (13 sc) as mirror images of the first. Sl st to the first sc.
Total: 25 + 13 + 6 + 13 + 3 + 31 + 3 + 13 + 6 + 13 = 126 sc. Fasten off.
Why the math works: Each straight edge gets 1 sc per stitch or per sc row, and 2 sc per dc row, because a dc row is as tall as 2 sc rows. The quadtr row is 1 in (2.5 cm) tall, so it takes 6 sc. Outer 90-degree corners get 3 sc so they turn flat. Inner corners get none so they stay sharp. The bottom is 21 + 2 + 2 = 25, and the top is 27 + 2 + 2 = 31.
Candle and Flame
Candle
With cream, ch 6.
Row 1: Sc in 2nd ch from hook and in each ch across. (5 sc)
Rows 2–7: Ch 1, turn, sc in each sc across. (5 sc)
Fasten off, leaving a 10 in (25.4 cm) tail. The candle measures 0.83 in (2.1 cm) wide x 1.17 in (3.0 cm) tall, the same width as one window.
Flame
With gold, ch 4.
Rnd 1: Sc in 2nd ch from hook, hdc in next ch, 5 dc in last ch. Working along the other side of the chain, hdc in next ch, sc in next ch, sl st in the skipped turning ch. (9 sts plus 1 sl st)
The 5-dc fan forms the rounded base, and the sl st forms the pointed tip. The flame is about 0.6 in (1.5 cm) tall. With cream, work 2 short straight stitches up the center as a highlight. Leave a 6 in (15.2 cm) gold tail.
Assembly
Center the candle in the middle window, with its bottom edge overlapping the top of the base bar. Its side edges rest on the two inner quadtr bars. Whipstitch the bottom edge to Row 3, then tack each side to its bar in 3 places. Sew the rounded base of the flame to the center top of the candle and leave the tip free.
Hanging Loop
Cut a 20 in (50.8 cm) strand of gold. Twist it until it kinks, fold it in half, and let it twist back on itself. Thread the cord through the top of the handle and knot the ends so the loop stands 2.5 in (6.4 cm) above the handle. Wrap the base of the loop tightly 3 times with a short strand and hide the ends.
Final Blocking
- Weave in all ends along the frame bars so they don’t show in the openings.
- Spray the ornament until it is damp but not dripping.
- Lay it RS up on the blocking mat.
- Pin the bottom edge straight at 3.8 in (9.7 cm) wide.
- Pin the eave level at 4.8 in (12.2 cm) wide.
- Pin the top of the handle so the total height is 5 in (12.7 cm).
- Shape each arch with a pin underneath, pushing it up evenly.
- Straighten the inner bars and square up each mesh opening.
- Optional: brush on diluted fabric stiffener for a firmer ornament.
- Let it dry completely before you remove the pins.
Final Quality-Control Checklist
- The border has 126 sc in total: 25 at the bottom and 31 at the top.
- Both sides of the lantern are mirror images.
- All three windows are the same width and height.
- The three arches bow to the same height.
- The roof slopes match and the mesh squares are open.
- The handle is a smooth semicircle, centered on the top band.
- The candle is centered and the flame stands upright.
- No ends show through the openings.
- The hanging loop is secure and the ornament hangs straight.
Troubleshooting
The quadtr bars lean or look uneven. Pull up each first loop to the same height and work the “yarn over, pull through 2” steps at an even pace.
The arches stay flat. Check that each ch-5 sp holds exactly 7 sc, and push the arches up again during blocking.
The roof slopes don’t match. Recount the sl sts at the start of Rows 12–14 and the unworked stitches at the ends.
The ch-17 sags. Redo Row 10 with a slightly tighter chain, or make that chain with a hook one size smaller.
The border ruffles. Work fewer stitches around the quadtr posts, or use a hook one size smaller for the border.
The border pulls in. Make sure every outer corner has 3 sc.
The ornament hangs crooked. Move the hanging loop to the exact center of the handle.
Care
Hand wash in cool water with mild soap, press out the water in a towel, and reshape flat to dry. Store flat, away from heavy items, so the handle and arches keep their shape.

Final Notes
The measurements build on each other. A 21-stitch base gives a 3.5 in (8.9 cm) body. The eave grows to 27 stitches and 4.5 in (11.4 cm). The roof steps in 2 stitches per side per row to a 15-stitch top band of 2.5 in (6.4 cm). The handle brings the height to 4.75 in (12.1 cm). Finally, one 126-stitch border brings the lantern to 4.8 in (12.2 cm) x 5 in (12.7 cm). Check your gauge at the base bar, and every later number falls into place.
Happy crocheting!