

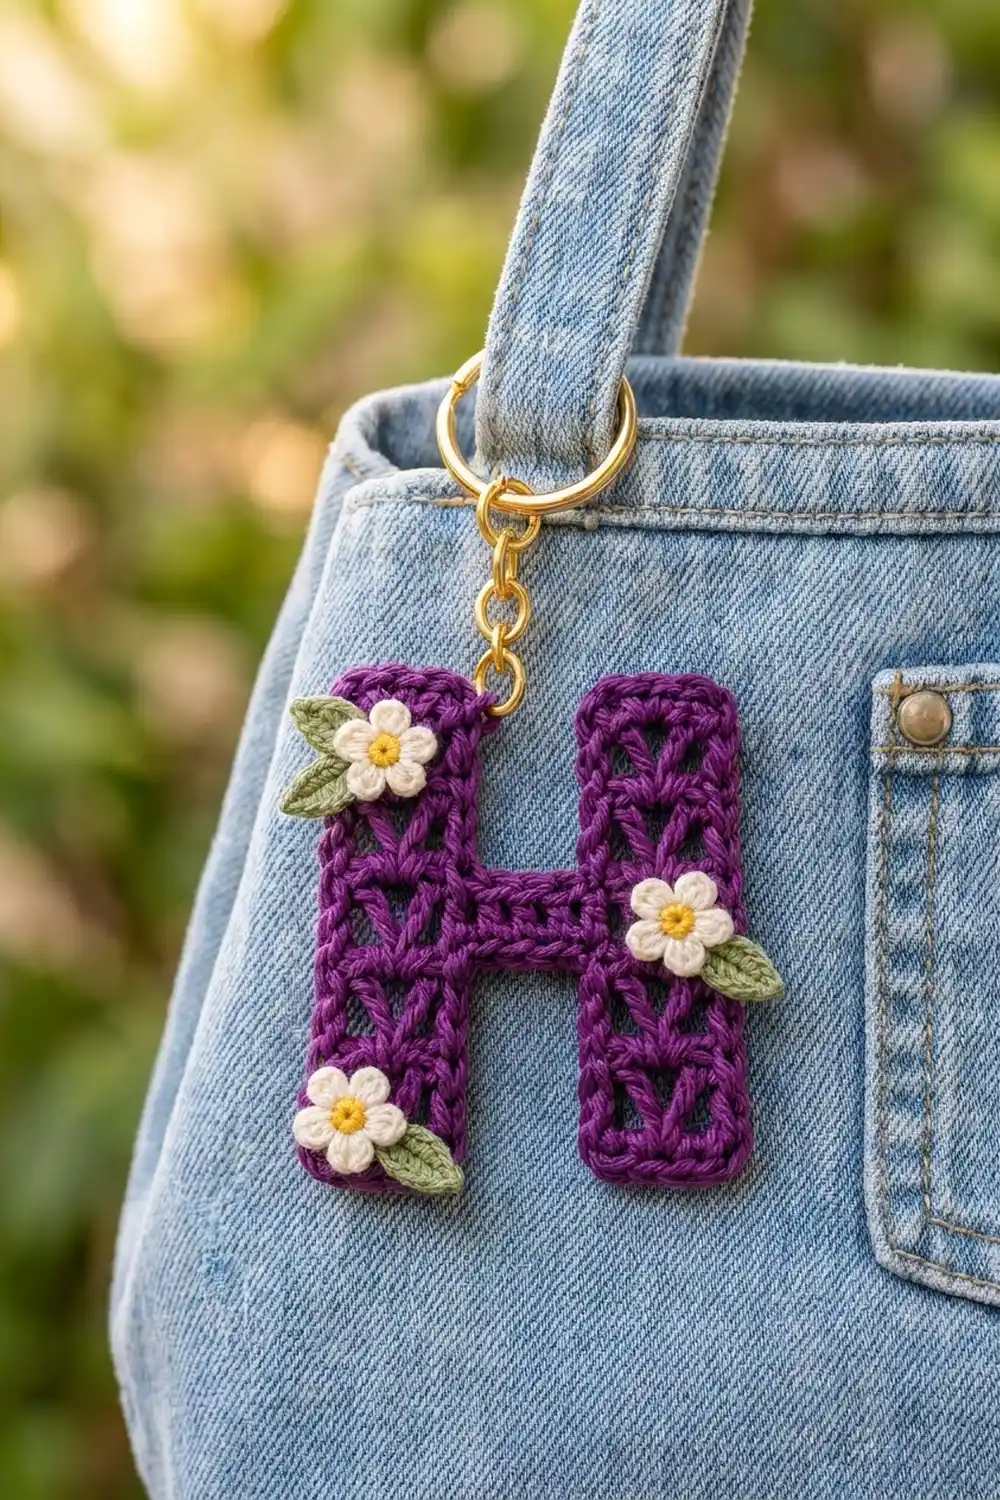
This little letter H is a quick, personal accessory. You can clip it to a tote bag, a backpack zipper, or your keys. The two upright legs are worked in an airy V-stitch pattern, so the letter looks light and lacy. A solid single crochet crossbar and a neat border make it sturdy enough to hang.
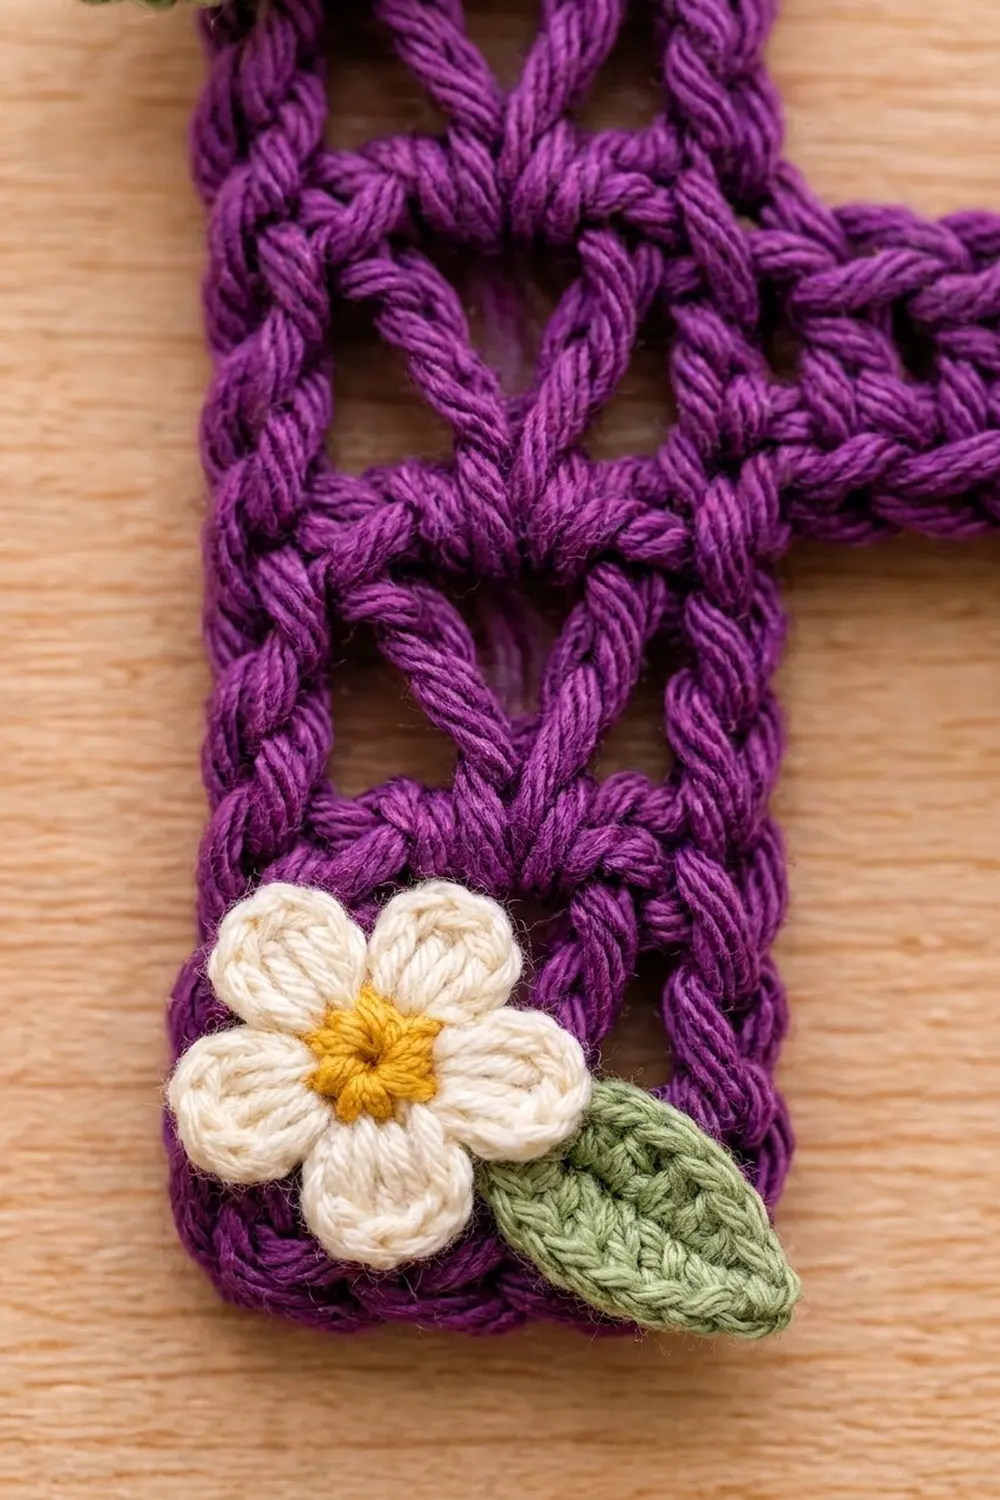
The color scheme is a rich violet purple with three cream flowers. Each flower has a sunny yellow center and sage-green leaves. A gold split ring and short chain finish it off. The style is sweet and cottage-inspired, and it still looks tidy for everyday use.
This pattern uses US crochet terms. The finished letter measures about 3.75 in (9.5 cm) tall and 3.75 in (9.5 cm) wide, not counting the keyring hardware.
You will make the letter in four steps. First, crochet two identical leg strips. Next, work a crossbar back and forth between the legs, anchoring each row with slip stitches. That turns the three sections into one solid letter. Then work one round of single crochet around the whole outline. Finally, sew on the flowers and leaves and attach the keyring.
Finished Size and Construction
- Finished size: 3.75 in × 3.75 in (9.5 cm × 9.5 cm)
- Skill level: Easy / advanced beginner
- Terminology: US crochet terms
- Yarn weight: DK (weight 3) cotton or cotton blend
- Hook: 3.5 mm (E-4) for the letter; 3.0 mm for the appliqués
- Number of pieces: 1 finished letter, plus 3 flowers and 4 leaves sewn on as appliqués
- Layout: two vertical legs joined by a central horizontal crossbar
- Leg size before border: 1.25 in × 3.5 in (3.2 cm × 8.9 cm)
- Letter size before border: 3.5 in × 3.5 in (8.9 cm × 8.9 cm)
- Border depth: 0.125 in (0.3 cm) on every edge
Materials
Choose a smooth, mercerized DK cotton. It shows the V-stitch texture clearly and holds its shape on a keychain. Avoid fuzzy or very stretchy yarns, because the openwork will blur and the letter may sag over time.
- Violet purple (MC): 10 g / 25 m
- Cream (petals): 2 g / 5 m
- Mustard yellow (centers): 1 g / 2 m
- Sage green (leaves): 2 g / 5 m
These quantities include a margin for your gauge swatch and for weaving in ends.
Tools:
– 3.5 mm (E-4) crochet hook
– 3.0 mm (C-2/D-3) crochet hook
– Tapestry needle
– Scissors
– Stitch markers (2–3)
– 1 gold split ring, 1 in (2.5 cm) diameter
– 1 gold chain, about 1.5 in (3.8 cm) long, with 2 jump rings
– Flat-nose pliers
– Pins and a blocking mat
Abbreviations (US Terms)
- ch – chain
- sl st – slip stitch
- sc – single crochet
- hdc – half double crochet
- dc – double crochet
- sk – skip
- sp – space
- st(s) – stitch(es)
- tch – turning chain
- RS – right side
Special stitch: V-stitch (V-st). Work (dc, ch 1, dc) into the same stitch.
Gauge and Checkpoints
Gauge: 22 sc × 20 sc rows = 4 in (10.2 cm) on a 3.5 mm hook.
Your first leg strip works as your gauge swatch. Make Leg 1 and measure it before you continue.
- Row 1 (7 sc): 1.25 in (3.2 cm) wide
- After Row 3: 0.85 in (2.2 cm) tall. A sc row is about 0.2 in (0.5 cm) and a V-st row is about 0.45 in (1.1 cm).
- One repeat (V-st row + sc row): 0.65 in (1.7 cm)
- Finished leg (11 rows): 1.25 in × 3.5 in (3.2 cm × 8.9 cm)
If your leg is too big, go down a half size, to 3.25 mm. If it’s too small, go up to 3.75 mm. If only the height is off, check your dc tension. Tall, loose dc are the usual cause. The stitch counts stay the same at any hook size, so only the size changes.
Leg Strip (Make 2)
Use MC and the 3.5 mm hook.
Foundation: Ch 8.
Row 1 (RS): Sc in 2nd ch from hook and in each ch across, turn. (7 sc)
Row 2 (V-st row): Ch 3 (counts as dc), sk next 2 sc, V-st in next sc (the 4th st), sk next 2 sc, dc in last sc, turn. (4 dc + 1 ch-1 sp)
The skipped stitches leave a small open gap on each side of the V. These gaps make the lacy look.
Row 3 (sc row): Ch 1. Work 1 sc in each of the following: the first dc, the gap before the V-st, the next dc, the ch-1 sp, the next dc, the gap after the V-st, and the top of the tch. Turn. (7 sc)
Rows 2 and 3 form the pattern.
Rows 4–11: Repeat Rows 2 and 3 four more times. Do not turn at the end of Row 11. (7 sc in Row 11)
Leg row summary: 11 rows in total.
– Sc rows: 1, 3, 5, 7, 9, 11 (6 rows)
– V-st rows: 2, 4, 6, 8, 10 (5 rows)
– The leg has 5 V motifs stacked in one column.
Checkpoint: 1.25 in × 3.5 in (3.2 cm × 8.9 cm).
Fasten off with a 6 in (15.2 cm) tail. Make a second leg the same way.
Place a stitch marker in the row-end of Row 5 and of Row 7 on one long edge of each leg. Lay the legs side by side with the RS up and the marked edges facing each other. These are the inner edges. Leave a 1 in (2.5 cm) gap between the legs.
Crossbar
Use MC and the 3.5 mm hook. The crossbar spans Rows 5–7 of each leg. Each crossbar row starts or ends with a slip stitch into a leg. When you’re done, the letter is one connected piece.
Row 1: Join MC with a sl st in the Row 5 row-end on the inner edge of Leg 1. Ch 6. Sl st in the Row 5 row-end on the inner edge of Leg 2, turn. (6 ch)
Row 2: Sc in each of the 6 ch. Sl st into the lower half of the Row 6 row-end on Leg 1, turn. (6 sc)
Row 3: Sk the sl st, sc in each of the 6 sc. Sl st into the lower half of the Row 6 row-end on Leg 2, turn. (6 sc)
Row 4: Sk the sl st, sc in each of the 6 sc. Sl st in the Row 7 row-end on Leg 1. (6 sc)
Fasten off with an 8 in (20.3 cm) tail. Thread the tail onto a needle. Pass it under the crossbar to the Leg 2 side and make one whipstitch from the last sc of Row 4 into the Row 7 row-end of Leg 2. This squares the top of the crossbar. Weave in the end.
Checkpoint: The crossbar should be 1 in (2.5 cm) long and about 0.65 in (1.7 cm) tall. The whole letter should now measure 3.5 in × 3.5 in (8.9 cm × 8.9 cm). If the crossbar pulls the legs inward, your chain was too tight. Redo Row 1 with a looser chain.
Flowers (Make 3)
Use the 3.0 mm hook.
Round 1 (yellow): Make a magic ring and work 5 sc into it. Pull the ring closed and join with a sl st to the first sc. (5 sc) Fasten off.
Round 2 (cream): Join cream with a sl st in any sc. Work (ch 2, 2 dc, ch 2, sl st) in the same sc, then sl st in the next sc. Repeat from * 4 more times. On the last repeat, end with a sl st in the first sl st instead of the next sc. (5 petals)
Fasten off with an 8 in (20.3 cm) tail for sewing. Each flower is about 0.75 in (1.9 cm) across.
Leaves (Make 4)
Use sage green and the 3.0 mm hook.
Ch 6. Work the leaf in two halves:
1. First side: Starting in the 2nd ch from the hook, work sc, hdc, dc, hdc. (4 sts)
2. Tip: Work (sc, ch 2, sc) in the last ch.
3. Second side: Working along the other side of the foundation chain, work hdc, dc, hdc, sc. (4 sts)
4. Sl st in the first sc to close.
Fasten off with a 6 in (15.2 cm) tail. Each leaf is about 0.8 in (2.0 cm) long.
Border
Use MC and the 3.5 mm hook, with the RS facing.
Border gauge:
– 1 sc in each stitch along top and bottom edges
– 1 sc in each sc row-end
– 2 sc in each V-st row-end
– 3 sc in each outer corner stitch
Because a dc row is about twice as tall as a sc row, this ratio keeps the long sides flat.
Round 1: Join MC with a sl st in the last sc of Row 11 on Leg 1, at its top-right corner. Ch 1. Work around the outline in this order:
- Leg 1 top: 3 sc in the corner st, 1 sc in each of the next 5 sts, 3 sc in the last st. (11 sc)
- Leg 1 outer side: Work down the row-ends of Rows 11–1. (6 sc rows × 1 + 5 V-st rows × 2 = 16 sc)
- Leg 1 bottom: Work into the foundation ch: 3 sc in the first ch, 1 sc in each of the next 5 ch, 3 sc in the last ch. (11 sc)
- Leg 1 inner side, lower: Work up the row-ends of Rows 1–4. (1 + 2 + 1 + 2 = 6 sc)
- Crossbar bottom: 1 sc in each foundation ch of crossbar Row 1. (6 sc)
- Leg 2 inner side, lower: Work down the row-ends of Rows 4–1. (6 sc)
- Leg 2 bottom: Same as Leg 1 bottom. (11 sc)
- Leg 2 outer side: Work up the row-ends of Rows 1–11. (16 sc)
- Leg 2 top: Same as Leg 1 top. (11 sc)
- Leg 2 inner side, upper: Work down the row-ends of Rows 11–8. (2 + 1 + 2 + 1 = 6 sc)
- Crossbar top: 1 sc in each sc of crossbar Row 4. (6 sc)
- Leg 1 inner side, upper: Work up the row-ends of Rows 8–11. (6 sc)
Join with a sl st to the first sc. Fasten off and weave in the end.
Round total: 112 sc.
– Top and bottom edges: 4 × 11 = 44
– Outer sides: 2 × 16 = 32
– Inner sides: 4 × 6 = 24
– Crossbar top and bottom: 2 × 6 = 12
– Total: 44 + 32 + 24 + 12 = 112
Why the math works: Each top and bottom edge has 7 stitches. The 2 corner stitches each get 3 sc and the 5 middle stitches get 1 sc, so 5 + 3 + 3 = 11. The corner sc are counted only once, inside those edge counts. The side counts start after the corner groups.
Each leg has 11 rows: 6 sc rows (6 sc) and 5 V-st rows (10 sc), for 16 sc per outer side. The crossbar covers leg Rows 5–7, so each inner edge is split:
– Rows 1–4 below the crossbar: 6 sc
– Rows 8–11 above the crossbar: 6 sc
The crossbar’s 6 stitches match its 6-chain length.
Checkpoint: The letter now measures 3.75 in × 3.75 in (9.5 cm × 9.5 cm). The border adds 0.125 in (0.3 cm) to each edge. The gap between the legs closes to about 0.75 in (1.9 cm).
Final Blocking
- Lightly mist the letter with water until it is damp, not soaked.
- Pin it RS up on a blocking mat at 3.75 in × 3.75 in (9.5 cm × 9.5 cm).
- Square each leg so that it is 1.5 in (3.8 cm) wide including the border, with straight, parallel sides.
- Gently open each V-st so the openwork shows evenly.
- Make sure the crossbar sits level and centered.
- Pin the flowers and leaves separately. Shape each petal round and each leaf tip to a point.
- Let everything dry completely before you sew anything.
- Sew on the appliqués with matching tails, using small stitches through the back loops only. Placement:
- Flower 1: top-left corner of Leg 1, with 2 leaves fanning out to the left
- Flower 2: outer edge of Leg 2 at about mid-height, with 1 leaf pointing right
- Flower 3: bottom of Leg 1, with 1 leaf pointing right
- Open a jump ring with pliers. Pass it through 2 border sc at the center of Leg 1’s top edge, add the chain, and close the ring. Attach the split ring to the other end of the chain with the second jump ring.
Final Quality-Control Checklist
- Each leg shows 5 evenly spaced V motifs.
- Each leg has 11 rows and measures 3.5 in (8.9 cm) before the border.
- The crossbar is 6 stitches wide and centered on leg Rows 5–7.
- The border round has exactly 112 sc.
- The corners are rounded but flat, with no ruffling.
- The finished letter measures 3.75 in × 3.75 in (9.5 cm × 9.5 cm).
- All 3 flowers have 5 petals and the leaves have pointed tips.
- The appliqués are sewn flat, with no stitches showing on the back.
- The jump rings are fully closed and the hardware holds firmly.
- All ends are woven in securely.
Troubleshooting
- Leg ripples along the border: You worked too many sc into the V-st row-ends. Use exactly 2 per V-st row.
- Leg edge pulls in: You worked too few row-end stitches. Recount to 16 per outer side.
- Corners curl: Make sure you worked 3 sc into the corner stitch, not 2.
- V motifs look closed: Check that you skipped 2 sc on each side of the V-st.
- Crossbar sags: Tighten the Row 1 chain slightly, or block the crossbar level.
- Inner corners pucker: Work those sc with a slightly looser tension.
- Petals look uneven: Make all 5 petals with the same chain-2 height and block them well.
- Keyring tears the border: Pass the jump ring through 2 sc, not 1.
Care
Hand wash in cool water with mild soap and press out the water in a towel. Reshape it and dry it flat, keeping the metal hardware away from bleach.
Final Notes
The measurement chain is:
– 7 sc = 1.25 in (3.2 cm)
– 11 rows = 3.5 in (8.9 cm) per leg
– 2 legs + a 6-stitch crossbar = 3.5 in × 3.5 in (8.9 cm × 8.9 cm)
– 112-stitch border = 3.75 in × 3.75 in (9.5 cm × 9.5 cm)
If you hit each checkpoint, the letter will finish flat and square. Then it’s ready for its flowers and keyring.
Happy crocheting!