

Plastic bags tend to multiply in a kitchen drawer. This hanging holder keeps them in one place: you stuff bags in through the top and pull them out one at a time through a slot near the bottom.
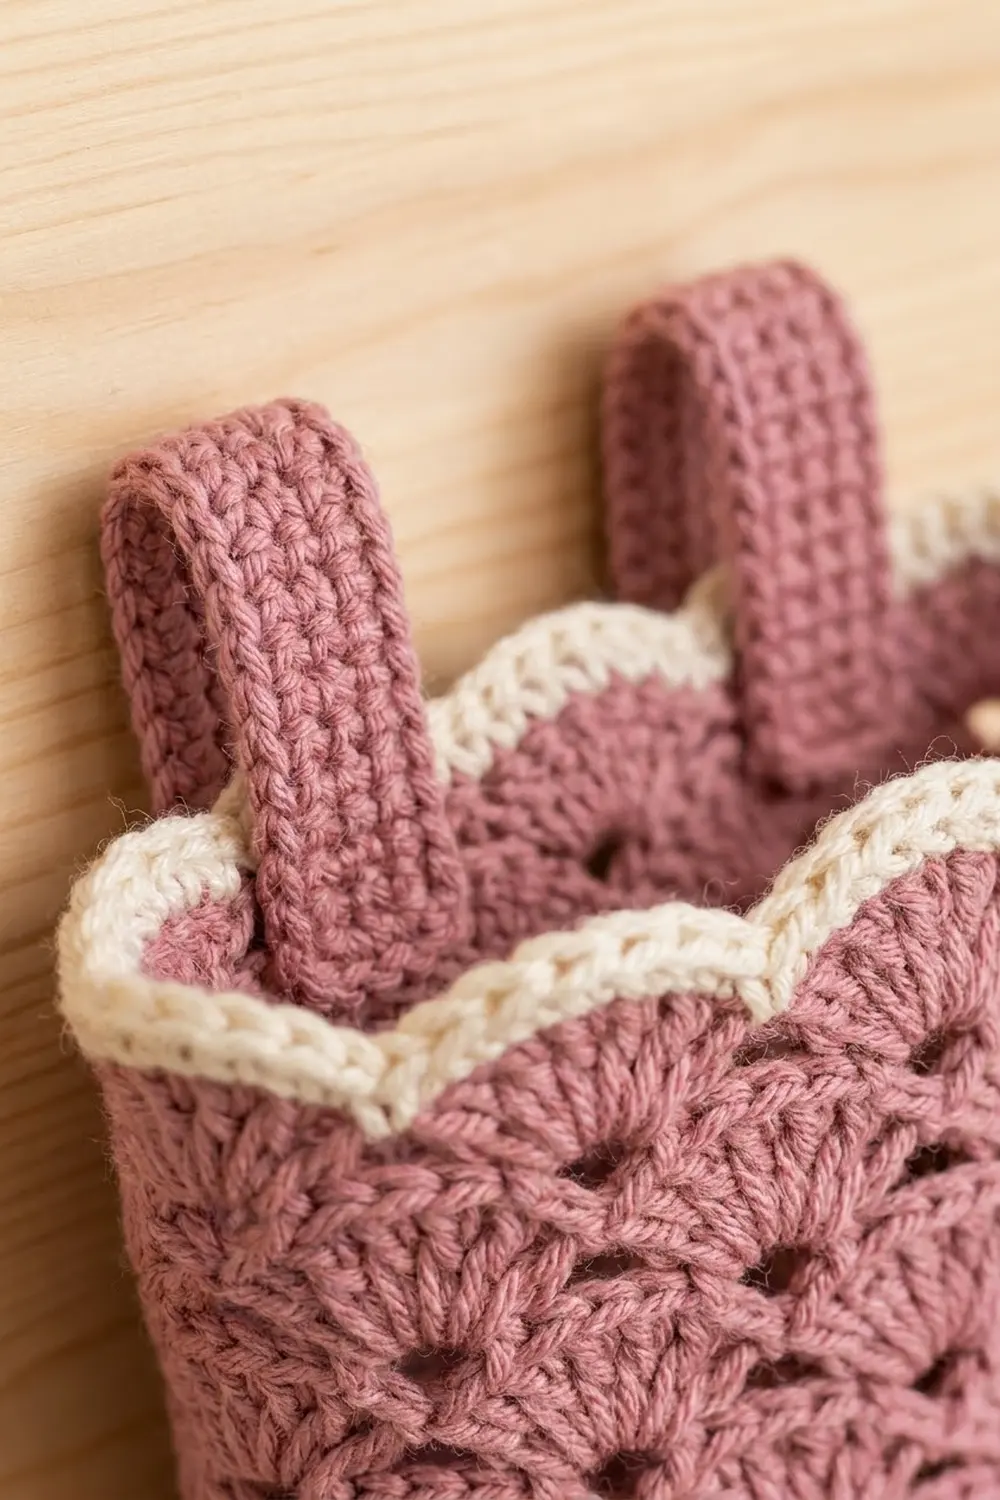
The Rosy Scallop holder is worked in dusty rose cotton in staggered fan shells. A cream scalloped edge finishes the rim, and two sturdy tabs hang it up. It looks soft and vintage but holds up to daily use in a kitchen or laundry room.
The pattern uses US crochet terms. Laid flat, the finished body is about 7.5 in (19.1 cm) wide at the bottom, 10 in (25.4 cm) wide at the top, and 9 in (22.9 cm) tall. With the tabs it hangs about 12 in (30.5 cm) long.
Construction is simple. You start with a small flat oval base, then work four single crochet rounds with a built-in slot, then twelve shell rounds. The shells get bigger in three stages, so the body tapers without any decreases. A two-round cream border finishes the rim, and the two tabs are made separately and sewn inside the back wall.
Finished Size and Construction
- Finished size: 7.5 in (19.1 cm) wide at the bottom, 10 in (25.4 cm) wide at the top, 9 in (22.9 cm) tall, laid flat
- Hanging length with tabs: about 12 in (30.5 cm)
- Skill level: Easy-intermediate
- Terminology: US crochet terms
- Yarn weight: Worsted (category 4) cotton
- Hook: 4.5 mm (US 7)
- Number of pieces: 3 (1 body, 2 tabs)
- Layout: Body worked in joined rounds from the bottom up; tabs worked flat in rows and sewn on
- Tab size: 1.5 in (3.8 cm) wide, about 4.25 in (10.8 cm) long
- Size before border: 10 in (25.4 cm) wide, 8.5 in (21.6 cm) tall
- Border depth: 0.5 in (1.3 cm)
Materials
Use a smooth worsted-weight cotton or cotton blend. Cotton holds its shape, stands up to handling, and shows the shell texture clearly. Acrylic also works but makes a softer, floppier holder.
- Dusty rose (main color): 150 g, about 255 m
- Cream (border): 20 g, about 34 m
These amounts include about 15 percent extra for your swatch and for small differences in tension.
Tools:
- 4.5 mm (US 7) crochet hook
- Tapestry needle
- 2 locking stitch markers
- Scissors and measuring tape
- Blocking pins and a spray bottle
- 2 wall hooks or a hook rail
Abbreviations (US Terms)
- ch – chain
- sl st – slip stitch
- sc – single crochet
- dc – double crochet
- sc2tog – single crochet 2 together
- BLO – back loop only
- sp – space
- st(s) – stitch(es)
- rev sc – reverse single crochet (crab stitch): working from left to right, insert the hook into the next stitch to the right, yarn over, pull up a loop, yarn over, and pull through both loops
Special stitches:
- Small shell: 5 dc in the same stitch.
- Medium shell: 6 dc in the same stitch.
- Large shell: (3 dc, ch 1, 3 dc) in the same stitch.
Gauge and Checkpoints
Single crochet gauge: 16 sc and 18 rows = 4 in (10.2 cm).
Shell gauge: One small shell repeat (1 sc + 5 dc = 6 sts) = 1.5 in (3.8 cm) wide. Four shell rounds = 2.5 in (6.4 cm) tall.
Make one tab first. It’s quick and checks your single crochet gauge. After Row 18 it should measure 1.5 in (3.8 cm) wide and 4 in (10.2 cm) long.
Checkpoints (body flattened, measured straight across):
- After Rnd 6: 7.5 in (19.1 cm) wide, about 1 in (2.5 cm) tall above the base
- After Rnd 10: 7.5 in (19.1 cm) wide, 3.5 in (8.9 cm) tall
- After Rnd 14: 8.75 in (22.2 cm) wide, 6 in (15.2 cm) tall
- After Rnd 18: 10 in (25.4 cm) wide, 8.5 in (21.6 cm) tall
If your work is too big, go down a hook size. If it’s too small, go up a hook size. Small differences in height don’t matter much, but keep the width within about 0.25 in (0.6 cm) of the target so the shells stack evenly.
Body
Work the body in joined rounds with the right side facing, and don’t turn. The ch 1 at the start of a round never counts as a stitch.
Base
With dusty rose, ch 27.
Rnd 1: Sc in 2nd ch from hook and in the next 24 ch, then 3 sc in the last ch. Working along the opposite side of the foundation chain, sc in the next 24 ch, then 2 sc in the last ch (the one that already holds the first sc). Join with a sl st to the first sc. (54 sts)
You now have 24 sts on each long side and 3 sts at each end.
Rnd 2: Ch 1, 2 sc in the first st, sc in the next 24 sts, 2 sc in each of the next 3 sts, sc in the next 24 sts, 2 sc in each of the last 2 sts. Join. (60 sts)
The base is now a flat oval about 7 in (17.8 cm) long and 1 in (2.5 cm) across.
Wall Band and Slot
Rnd 3: Ch 1, sc in BLO of each st around. Join. (60 sts)
The unworked front loops make a crisp fold, so the wall rises straight up from the base.
Rnd 4 (slot round): Ch 1, sc in the next 9 sts, ch 10, skip the next 10 sts, sc in the next 41 sts. Join. (50 sc + 10 ch = 60 sts)
The skipped stitches are in the middle of one long side. That side is now the front.
Rnd 5: Ch 1, sc in the next 9 sts, sc in each of the next 10 ch, sc in the next 41 sts. Join. (60 sts)
Rnd 6: Ch 1, sc in each st around. Join. (60 sts)
The slot is 2.5 in (6.4 cm) wide and sits about 0.5 in (1.3 cm) above the bottom fold. The band should measure 7.5 in (19.1 cm) wide when flattened.
Shell Section, Stage 1: Small Shells
Rnd 7: Ch 1, sc in the first st, skip 2 sts, small shell in the next st, skip 2 sts, sc in the next st; repeat from * 8 more times, skip 2 sts, small shell in the next st, skip 2 sts. Join to the first sc. (10 shells, 10 sc = 60 sts)*
Rnd 8: Sl st in the next 3 dc, which puts you in the center dc of the first shell. Ch 1, sc in the same st, small shell in the next sc, sc in the center dc of the next shell; repeat from * 8 more times, small shell in the next sc (the joining sc). Join to the first sc. (60 sts)*
Rnds 9–10: Repeat Rnd 8. (60 sts)
Each new shell sits on top of an sc, and each sc anchors the center of the shell below it. This staggers the fans like fish scales.
Stage 2: Medium Shells
Rnd 11: Sl st in the next 3 dc, ch 1, sc in the same st, medium shell in the next sc, sc in the center dc of the next shell; repeat from * 8 more times, medium shell in the next sc. Join. (10 shells of 6 dc + 10 sc = 70 sts)*
Rnd 12: Sl st in the next 3 dc, ch 1, sc in the gap between the 3rd and 4th dc of the same shell, medium shell in the next sc, sc in the gap between the 3rd and 4th dc of the next shell; repeat from * 8 more times, medium shell in the next sc. Join. (70 sts)*
Rnds 13–14: Repeat Rnd 12. (70 sts)
Stage 3: Large Shells
Rnd 15: Sl st in the next 3 dc, ch 1, sc in the gap between the 3rd and 4th dc, large shell in the next sc, sc in the gap between the 3rd and 4th dc of the next shell; repeat from * 8 more times, large shell in the next sc. Join. (10 shells of 7 sts + 10 sc = 80 sts)*
Rnd 16: Sl st in the next 3 dc and the next ch-1 sp, ch 1, sc in the same sp, large shell in the next sc, sc in the ch-1 sp of the next shell; repeat from * 8 more times, large shell in the next sc. Join. (80 sts)*
Rnds 17–18: Repeat Rnd 16. (80 sts)
Fasten off the dusty rose. Flatten the body with the slot centered on the front, and you should see 5 shells across each face. The body should now be 10 in (25.4 cm) wide and 8.5 in (21.6 cm) tall.
Hanging Tabs
Make 2 in dusty rose, worked flat in rows.
Ch 7.
Row 1: Sc in 2nd ch from hook and in each ch across. Turn. (6 sts)
Rows 2–14: Ch 1, sc in each st across. Turn. (6 sts)
Row 15 (eyelet): Ch 1, sc in the next 2 sts, ch 2, skip 2 sts, sc in the next 2 sts. Turn. (4 sc + 2 ch = 6 sts)
Row 16: Ch 1, sc in the next 2 sts, 2 sc in the ch-2 sp, sc in the next 2 sts. Turn. (6 sts)
Rows 17–18: Ch 1, sc in each st across. Turn. (6 sts)
Row 19: Ch 1, sc2tog, sc in the next 2 sts, sc2tog. (4 sts)
Fasten off, leaving a 12 in (30.5 cm) tail for sewing. The decrease row rounds off the top. Each tab is 1.5 in (3.8 cm) wide and about 4.25 in (10.8 cm) long, with a 0.5 in (1.3 cm) eyelet.
Make All Pieces
- Dusty rose: 1 body, 2 tabs
- Cream: border only, worked directly on the body
Layout (back face, seen from inside, rim at top):
   [TAB]               [TAB]
 |  S1  |  S2  |  S3  |  S4  |  S5  |
 |      back wall shells           |
Center one tab on shell S2 and the other on shell S4 of the back face. Each tab ends up about 2 in (5.1 cm) in from its side fold.
Joining
Work the border first (see below), then sew on the tabs so they sit behind the cream edge.
- Place a tab inside the back wall so its bottom 1.25 in (3.2 cm), about 5 rows, overlaps the body below the border. The eyelet end points up.
- Check that the tab is straight up and down.
- Using the tail, whipstitch around all three overlapping edges (both long sides and the bottom edge). Catch only the back wall, and don’t let the needle come through to the front.
- Stitch once more through the tab and the base of the border at the rim. This is where the weight pulls.
Keep your stitches snug but not tight, because pulling hard puckers the shells on the front. When both tabs are on, 3 in (7.6 cm) of each tab stands above the rim and the holder hangs about 12 in (30.5 cm) long.
Border
Border gauge: 16 sc = 4 in (10.2 cm). Two border rounds = 0.5 in (1.3 cm) deep.
Border Rnd 1 (trim round): Join cream with a sl st in any sc between shells on Rnd 18. Ch 1, sc in the sc, sc in the next 3 dc, 2 sc in the ch-1 sp, sc in the next 3 dc; repeat from * 9 more times. Join. (80 sts worked 1 per existing st + 10 extra sts = 90 sts)*
That gives 40 + 5 = 45 sts on the front face and 45 sts on the back face.
Border Rnd 2: Ch 1, rev sc in each st around. Join and fasten off. (90 sts, 45 per face)
Why the math works: Rnd 18 has 10 repeats of 8 sts (1 sc + 3 dc + ch-1 + 3 dc), which is 80 sts. Border Rnd 1 works into each of those stitches once and adds 1 extra sc at each shell tip, where the edge curves out the most. Those 10 extra stitches let the cream follow each scallop without cupping. They don’t make the holder wider, because they sit on the curve rather than along the straight line across the top. The 10 repeats split evenly into 5 per face, so each face gets 45 sts and the scallops stay symmetrical.
Final Blocking
- Weave in all ends through stitches of the same color.
- Mist the whole holder until it’s damp but not soaked.
- Lay the body flat on a blocking mat with the slot centered on the front.
- Pin the side folds straight so the bottom measures 7.5 in (19.1 cm) across and the top measures 10 in (25.4 cm).
- Pin the tip of each shell along the cream edge so the scallops are even.
- Pin each tab straight up at 1.5 in (3.8 cm) wide.
- Let it dry completely before unpinning.
Final Quality-Control Checklist
- The base is a flat oval with a clean back-loop fold
- The slot is 2.5 in (6.4 cm) wide and centered on the front
- Every shell round has 10 shells, 5 on each face
- Shell size changes only at Rnd 11 and Rnd 15
- Rnd 18 has 80 sts and the border has 90 sts
- The body is 7.5 in (19.1 cm) wide at the bottom, 10 in (25.4 cm) wide at the top, and 9 in (22.9 cm) tall
- The tabs are level, centered on shells 2 and 4 of the back, and stand 3 in (7.6 cm) above the rim
- No yarn ends show on the outside
Troubleshooting
The shells lean into a spiral. A round probably started in the wrong place. Always sl st to the center of the first shell before the ch 1.
The holder flares too fast. Your dc are loose. Go down half a hook size for Stages 2 and 3.
Bags fall out of the slot. The slot is too wide. Work Rnd 4 as: ch 1, sc in the next 10 sts, ch 8, skip 8 sts, sc in the next 42 sts. Work Rnd 5 to match. This keeps the count at 60 sts.
The cream border ruffles. Leave out the extra sc in some ch-1 sps on Border Rnd 1, skipping the same number on each face.
The tabs stretch. Sew through more rows, or use a smaller hook for the tabs only.
Care
Hand wash in cool water, or machine wash on a gentle cycle in a laundry bag. Reshape while damp and lay flat to dry.

Final Notes
The measurements build on each other in a short chain:
- The 60-stitch base gives a 7.5 in (19.1 cm) bottom.
- The shells grow from 60 to 70 to 80 stitches, widening the body to 10 in (25.4 cm).
- The 90-stitch cream border adds 0.5 in (1.3 cm), bringing the body to 9 in (22.9 cm) tall.
- The two tabs bring the hanging length to 12 in (30.5 cm).
If each checkpoint matches, the finished holder will too.
Happy crocheting!