

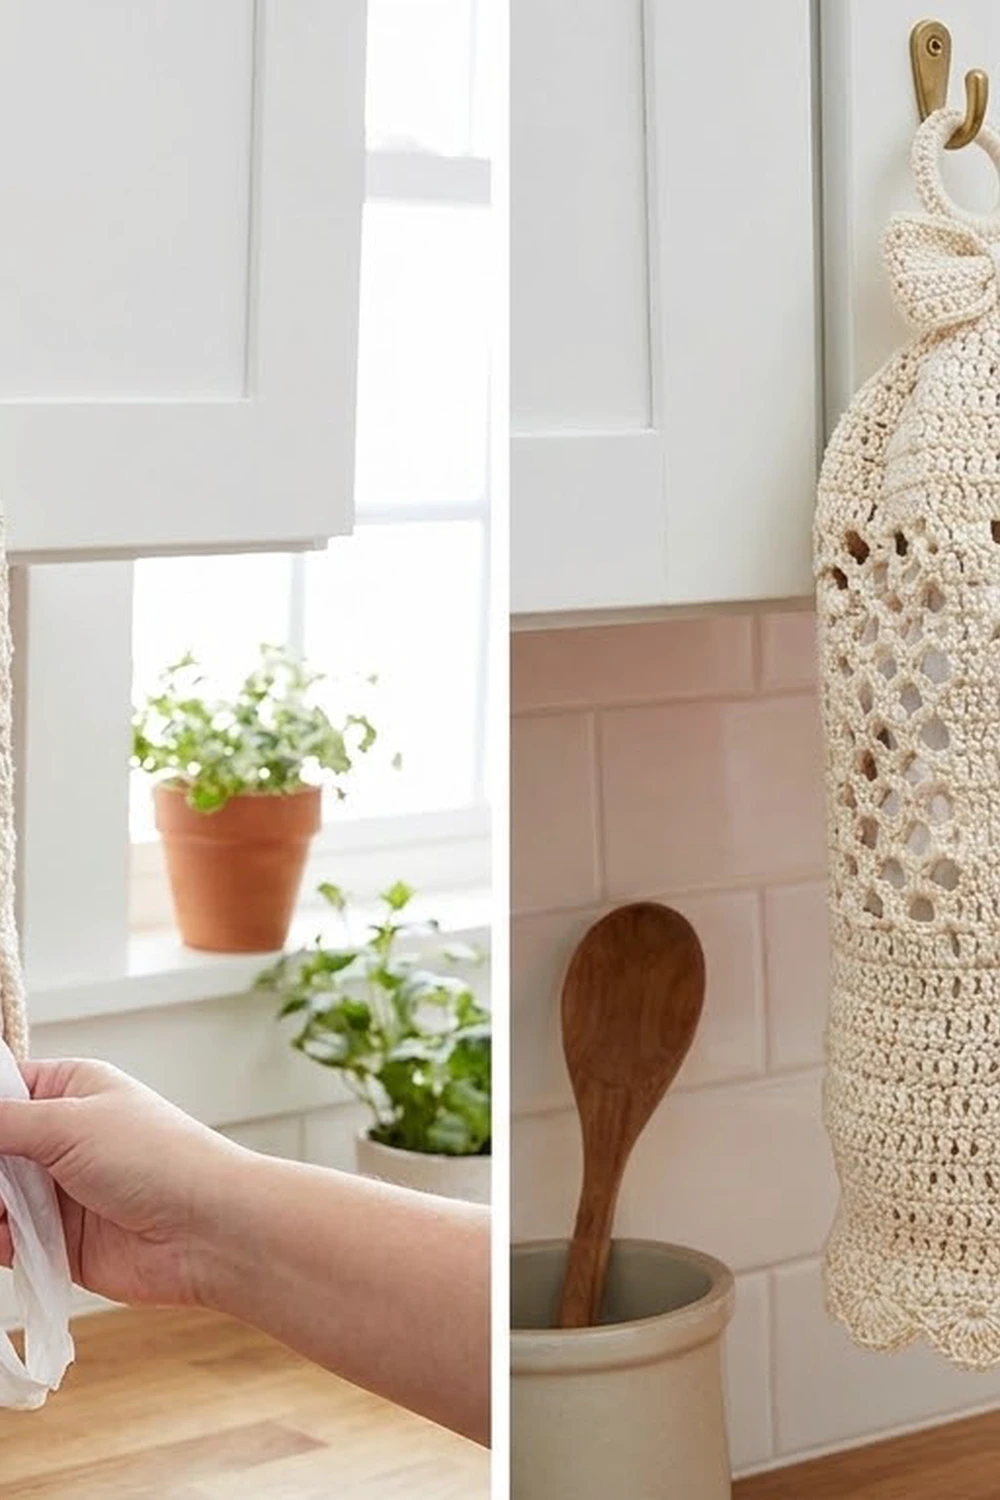
Plastic grocery bags tend to pile up in a drawer. This holder keeps them in one tidy place on a cabinet door. It is a tall bell-shaped dispenser with an open heart-shell lattice, a scalloped bottom edge, a small bow and a covered hanging ring. You push bags in at the top and pull them out one at a time through the oval opening in the base.
The sample is cream cotton, which gives a soft farmhouse look. It works just as well in a bold red for a cheerful kitchen or holiday look. Because the lattice is open, the bags inside show through as a light background, so solid colors look best.
This pattern uses US crochet terms. The finished body is 13 in (33.0 cm) tall, or 15.5 in (39.4 cm) including the ring. It measures 10.5 in (26.7 cm) wide at the bottom and 6 in (15.2 cm) wide at the top when laid flat.
You start at the bag opening with a chain ring, then work a flat single crochet base outward. One back-loop round turns the edge upward. The lattice walls are worked in joined rounds that get smaller in three sections to make the taper, and a single crochet band finishes the top. Last, you add the scallops, cover the ring, make the bow and sew everything in place.
Finished Size and Construction
- Finished size: 13 in (33.0 cm) tall body; 15.5 in (39.4 cm) with ring
- Width (laid flat): 10.5 in (26.7 cm) at the bottom, 6 in (15.2 cm) at the top
- Skill level: Easy–Intermediate
- Terminology: US
- Yarn weight: #4 worsted, cotton or cotton blend
- Hook: 5.0 mm (H-8)
- Number of pieces: 1 seamless body, plus a covered ring and a bow sewn on
- Layout: Single bell-shaped tube, worked in the round from the bottom up
- Base: flat sc ring 1 in (2.5 cm) wide around an oval opening about 5 × 2.5 in (12.7 × 6.4 cm)
- Size before edging: 13 in (33.0 cm) tall, bottom edge 18 in (45.7 cm) around
- Edging depth: scallops hang about 0.5 in (1.3 cm) below the base fold
Materials
Use a smooth, firm cotton or cotton blend. Cotton holds the bell shape, doesn’t stretch much when the holder is stuffed, and can be washed. Avoid soft acrylic, because the lattice will sag under the weight of the bags.
- Cream (main color): 170 g, about 320 m
- Optional alternate color (red, as in the second sample): 170 g, about 320 m. Use this in place of cream, not in addition to it.
These quantities include a margin of about 15%, so you won’t run short if your tension is a little loose.
Tools:
– 5.0 mm (H-8) crochet hook
– 1 plastic or wooden ring, 2.5 in (6.4 cm) outside diameter
– 4 stitch markers
– Tapestry needle
– Scissors
– Measuring tape
– Spray bottle and a tall bottle or rolled towel for blocking
Abbreviations (US Terms)
- ch – chain
- sl st – slip stitch
- sc – single crochet
- dc – double crochet
- sp – space
- BLO – back loop only
- FLO – front loop only
- st(s) – stitch(es)
- rep – repeat
- rnd(s) – round(s)
Special stitches
- Large Shell (LS): (2 dc, ch 2, 2 dc) all in the same stitch or space. Counts as 6 sts.
- Small Shell (SS): (2 dc, ch 1, 2 dc) all in the same space. Counts as 5 sts.
- Beginning shell: ch 3 (counts as the first dc), then work the rest of the shell in the same place.
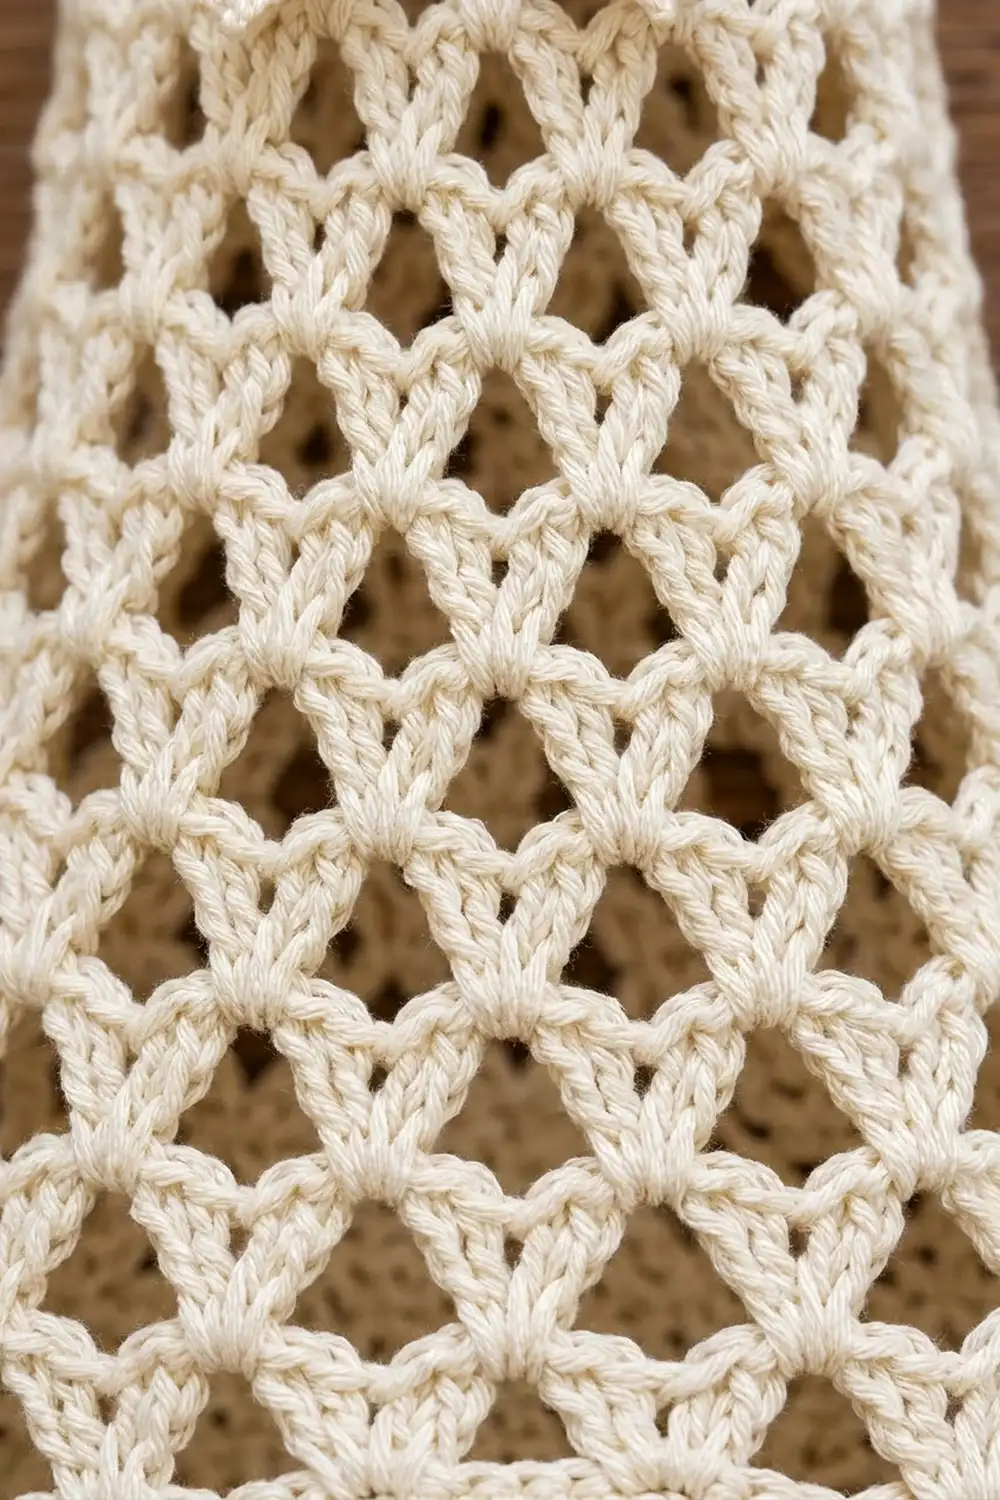
Move-over: Rounds 2–18 each start with sl sts that carry you to the first space between shells: sl st in next dc, sl st in the shell’s center ch sp, sl st in next 2 dc, sl st in the next ch sp. Each round’s shells sit in the spaces between the previous round’s shells. That half-step offset is what makes the diamond lattice.
Gauge and Checkpoints
- Single crochet gauge: 16 sc × 16 rnds = 4 in (10.2 cm)
- Lattice gauge: 1 Large Shell repeat (9 sts) = 1.75 in (4.4 cm) wide; 6 lattice rounds = 4 in (10.2 cm) tall
Test first. Work the base (Rnds 1–5) and the first 3 lattice rounds, then measure. That section shows both gauges.
Checkpoints:
– After Rnd 4: base lies flat; outer edge 18 in (45.7 cm) around; base ring 1 in (2.5 cm) wide
– After Lattice Rnd 6: 21 in (53.3 cm) around, 10.5 in (26.7 cm) flat; wall 4.25 in (10.8 cm) tall including Rnd 5
– After Lattice Rnd 12: 16.8 in (42.7 cm) around, 8.4 in (21.3 cm) flat
– After Lattice Rnd 18: 14.4 in (36.6 cm) around, 7.2 in (18.3 cm) flat; lattice 12 in (30.5 cm) tall
– After Top Band: 12 in (30.5 cm) around, 6 in (15.2 cm) flat; body 13 in (33.0 cm) tall
If your piece is too big (base ripples, lattice wider than listed), go down to a 4.5 mm hook. If it is too small (base cups upward, lattice narrower), go up to a 5.5 mm hook. Keep the stitch counts the same. A difference of 0.5 in (1.3 cm) in the lattice is fine, but the top band should stay close to 12 in (30.5 cm) around so it holds the bags snugly.
Base
The chain ring becomes the oval bag opening. Be careful not to twist the chain before you join it.
Foundation: Ch 48, sl st in first ch to form a ring.
Rnd 1: Ch 1, sc in each ch around, sl st in first sc to join. (48 sc)
Rnd 2: Ch 1, sc in next 5 sts, 2 sc in next st; rep from * 7 more times; join. (56 sc)*
Rnd 3: Ch 1, sc in next 6 sts, 2 sc in next st; rep from * 7 more times; join. (64 sc)*
Rnd 4: Ch 1, sc in next 7 sts, 2 sc in next st; rep from * 7 more times; join. (72 sc)*
Checkpoint: the base is a flat washer shape with an outer edge of 18 in (45.7 cm). When you pinch it into an oval, the opening measures about 5 × 2.5 in (12.7 × 6.4 cm).
Rnd 5 (turning round): Ch 1, working in BLO, sc in each st around; join. (72 sc)
This round turns the edge upward to start the walls. It also leaves 72 free front loops on Rnd 4, which you will use for the scallops later.
Lattice Walls
The wall is a staggered lattice of shells. There are always 12 shell repeats per round. The taper comes from making the shells and the chains between them smaller in three sections.
Section A – Large Shells (Rnds 1–6)
Lattice Rnd 1 (set-up): Sl st in next st, beginning shell (ch 3, dc, ch 2, 2 dc) in same st, ch 3, sk next 5 sts, LS in next st, ch 3, sk next 5 sts; rep from * 10 more times; join with sl st to top of beginning ch-3.
(12 LS + 12 ch-3 sps = 108 sts)*
Each repeat uses 6 stitches of Rnd 5 (1 for the shell, 5 skipped), and 12 × 6 = 72, so the round fits exactly.
Lattice Rnds 2–6: Move-over, beginning shell in the ch-3 sp you just reached, ch 3, LS in next ch-3 sp, ch 3; rep from * 10 more times; join.
(12 LS + 12 ch-3 sps = 108 sts each round)*
Checkpoint: 21 in (53.3 cm) around, 10.5 in (26.7 cm) flat.
Section B – Small Shells, Ch 2 (Rnds 7–12)
Lattice Rnd 7: Move-over, beginning shell (ch 3, dc, ch 1, 2 dc) in the ch-3 sp you just reached, ch 2, SS in next ch-3 sp, ch 2; rep from * 10 more times; join.
(12 SS + 12 ch-2 sps = 84 sts)*
Lattice Rnds 8–12: Move-over, beginning shell in the ch-2 sp you just reached, ch 2, SS in next ch-2 sp, ch 2; rep from * 10 more times; join.
(84 sts each round)*
Checkpoint: 16.8 in (42.7 cm) around, 8.4 in (21.3 cm) flat.
Section C – Small Shells, Ch 1 (Rnds 13–18)
Lattice Rnd 13: Move-over, beginning shell in the ch-2 sp you just reached, ch 1, SS in next ch-2 sp, ch 1; rep from * 10 more times; join.
(12 SS + 12 ch-1 sps = 72 sts)*
Lattice Rnds 14–18: Move-over, beginning shell in the ch-1 sp you just reached, ch 1, SS in next ch-1 sp, ch 1; rep from * 10 more times; join.
(72 sts each round)*
Checkpoint: 14.4 in (36.6 cm) around; lattice 12 in (30.5 cm) tall.
Top Band
Band Rnd 1 (conversion): Ch 1, sc in same st as join and in next dc, sk shell’s ch-1 sp, sc in next 2 dc, sk ch-1 sp between shells, sc in next 2 dc, sk ch-1 sp, sc in next 2 dc, sk ch-1 sp; rep from * 10 more times; join.
(48 sc worked 1 per dc + 0 extra = 48 sc; all 24 ch-1 sps skipped)*
Band Rnds 2–3: Ch 1, sc in each st around; join. (48 sc)
Fasten off and weave in the end. Checkpoint: the band is 12 in (30.5 cm) around (48 ÷ 4 sts per in) and 6 in (15.2 cm) flat. The body is 13 in (33.0 cm) tall: 0.25 in (0.6 cm) for Rnd 5, 12 in (30.5 cm) of lattice and 0.75 in (1.9 cm) of band.
Hanging Ring
Join yarn around the 2.5 in (6.4 cm) ring with a sl st. Ch 1, then work sc tightly around the ring until it is completely covered. This takes about 40 sc; the exact number doesn’t matter as long as no plastic shows. Sl st to the first sc and fasten off, leaving a 12 in (30.5 cm) tail.
Bow
Loop: Ch 26, sl st in first ch to form a ring, being careful not to twist.
Rnds 1–2: Ch 1, sc in each ch/st around; join. (26 sc)
Fasten off. Flatten the loop with the join at the center back. It now measures 3.25 × 0.5 in (8.3 × 1.3 cm).
Tails: Ch 21.
Row 1: Sc in 2nd ch from hook and in each ch across. (20 sc)
Row 2: Ch 1, turn, sc in each st across. (20 sc)
Fasten off. The strip is 5 × 0.5 in (12.7 × 1.3 cm). Fold it at its center into an upside-down V, so each tail is 2.5 in (6.4 cm) long.
Assemble: Lay the folded tails behind the flattened loop. Wrap a 20 in (50.8 cm) length of yarn tightly around all layers at the center 8–10 times to form the knot, and secure it at the back. Keep the tails for sewing.
Border (Scalloped Edging)
Edging gauge: The 72 free front loops of Base Rnd 4 measure 18 in (45.7 cm), which is 4 loops per inch. Each scallop uses 4 loops, so each scallop is 1 in (2.5 cm) wide.
Turn the holder upside down. Join yarn with a sl st in any free front loop of Rnd 4.
Scallop Rnd: Sk next loop, 5 dc in next loop, sk next loop, sl st in next loop; rep from * around, ending with the last sl st in the joining loop.
(18 scallops: 90 dc + 18 sl sts)*
Why the math works: 72 loops ÷ 4 loops per scallop = 18 scallops with nothing left over. Laid flat, each side of the holder shows 9 scallops (18 ÷ 2), which matches the 9 in (22.9 cm) flat width of the base edge. The 5 dc fan in only 1 loop, so the scallops stand out and frill gently without ruffling.
Fasten off and weave in the ends.
Attaching the Ring and Bow
Ring: Place the ring upright at the center back of the top band so that about 0.75 in (1.9 cm) of the ring overlaps the inside of the band. Whipstitch through the ring cover and both lower band rounds with 8–10 firm stitches. The front of the rim stays open so you can refill the holder.
Bow: Center the bow on the front, with its knot sitting on Band Rnd 1. Sew around the knot and tack down each loop end and each tail tip. Weave in all ends.
Final Blocking
- Wet the holder thoroughly with the spray bottle.
- Slide it over a tall bottle or a rolled towel shaped like a cone.
- Gently pull the lattice downward so the shells open into even diamonds.
- Flatten the base into an oval so the opening measures about 5 × 2.5 in (12.7 × 6.4 cm).
- Pin each scallop flat, so you have 9 scallops showing per side.
- Shape the bow loops with your fingers and lay the tails flat.
- Leave it to dry completely, for at least 24 hours, before you remove it from the form.
Final Quality-Control Checklist
- Base rounds: 48, 56, 64, 72, 72 sc
- Lattice: 108 sts per round in Rnds 1–6, 84 in Rnds 7–12, 72 in Rnds 13–18; always 12 shells
- Shells are offset by half a repeat in every round
- Top band: 48 sc, 12 in (30.5 cm) around
- 18 even scallops
- Height 13 in (33.0 cm); 15.5 in (39.4 cm) with ring
- Ring sewn firmly, bow centered, no loose ends
Troubleshooting
Base cups or ruffles: Check your counts against Rnds 2–4, then change hook size as described in Gauge.
Lattice slants in a spiral: You probably joined into the wrong stitch. Always join into the top of the beginning ch-3, then do the full move-over before starting the next round.
Shells stack in columns instead of diamonds: You worked into the shell centers. Work every shell into the space between the previous round’s shells.
Top too loose for the bags: Work Band Rnd 2 with a 4.5 mm hook.
Scallops uneven: Count the free loops. There must be exactly 72.
Holder tilts when hung: Move the ring so it is exactly at the center back.
Care
Machine wash cool in a mesh bag on a gentle cycle. Reshape while damp and lay flat or over a bottle to dry.
Final Notes
The measurements build on each other. The 48-chain opening grows to an 18 in (45.7 cm) base edge. The lattice flares to 21 in (53.3 cm) around, then tapers to 16.8 in (42.7 cm) and 14.4 in (36.6 cm). The 48-stitch top band closes it to 12 in (30.5 cm). If you check your size at each of these points, the finished holder will come out 13 in (33.0 cm) tall, with 18 neat scallops at the bottom.
Happy crocheting!