

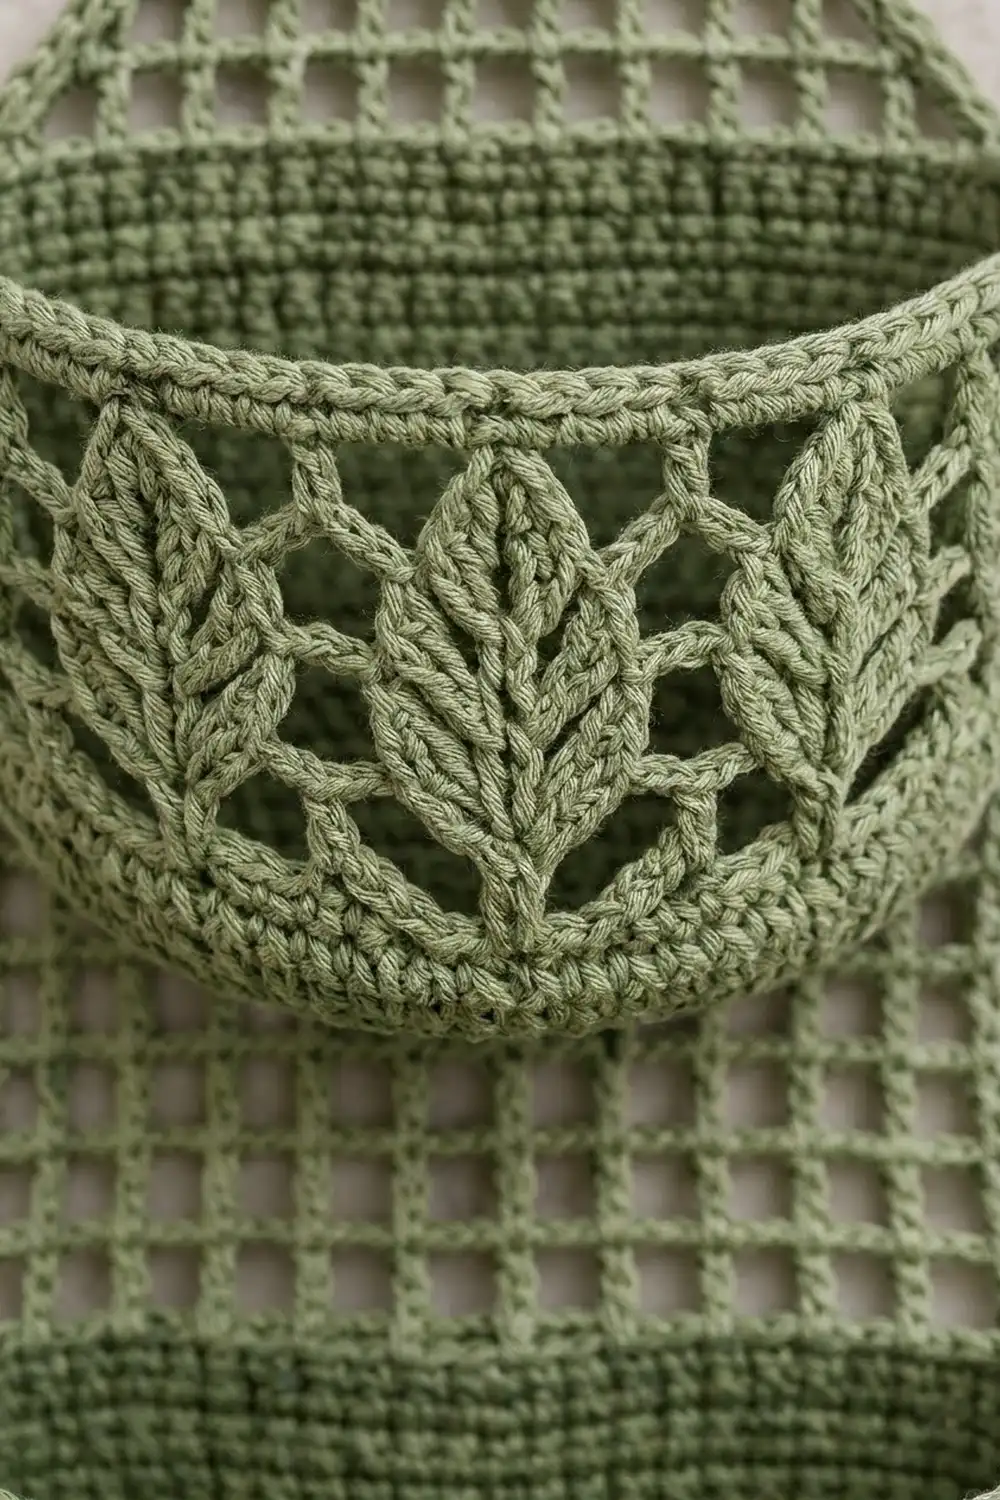
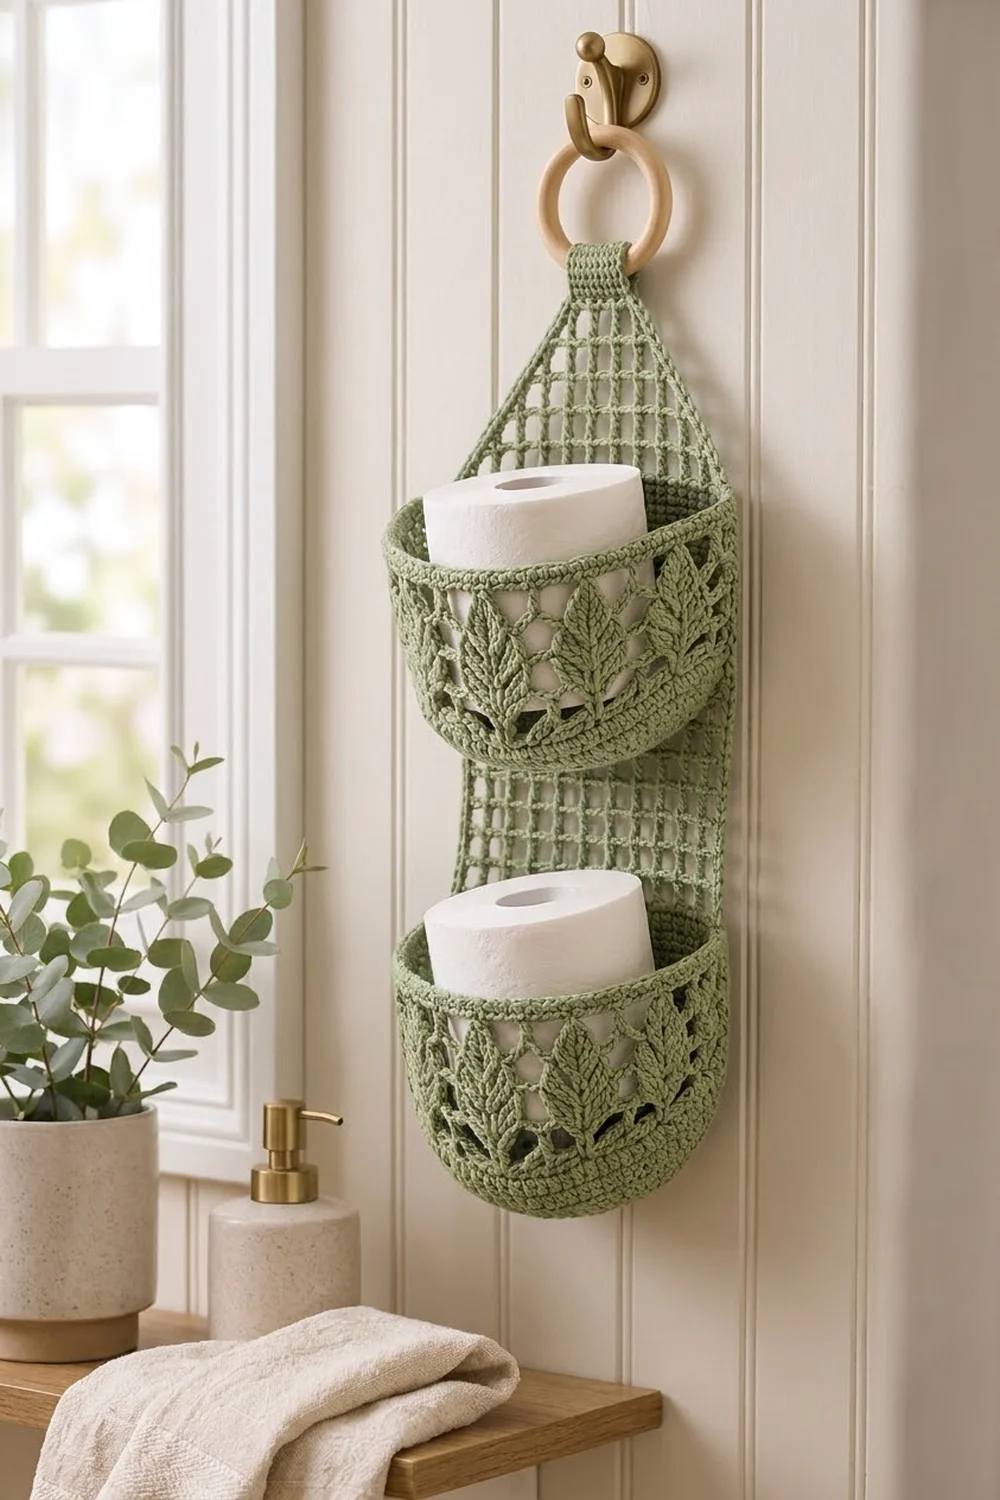
This hanging holder keeps two spare rolls within reach and looks like botanical lace on the wall. A filet mesh back panel narrows to a point at the top and wraps around a wooden ring. It carries two deep D-shaped pockets, each with a band of raised leaves across the front.
Everything is worked in one sage green cotton, so the texture does the work. You get solid single crochet bases, open ladder windows around each leaf, a raised front-post vein up every leaf, and a corded reverse single crochet rim.
The pattern uses US crochet terms. The bordered back panel measures 10 in (25.4 cm) wide by 19 in (48.3 cm) tall. The holder hangs about 23 in (58.4 cm) from the top of the ring. Each pocket is 9 in (22.9 cm) across the back, 4.5 in (11.4 cm) deep at the base and 5.25 in (13.3 cm) tall, which holds a standard roll.
To build it, crochet two pockets from the base up and the mesh panel from bottom to top. Make two support bars, border the panel, add the hanging tab, then sew everything together.
Finished Size and Construction
- Finished size: 10 in (25.4 cm) x 19 in (48.3 cm) panel; about 23 in (58.4 cm) total with tab and ring
- Skill level: Intermediate
- Terminology: US
- Yarn weight: worsted (#4) cotton
- Hook: 4.5 mm (US 7)
- Number of pieces: 5 crocheted pieces (2 pockets, 1 back panel, 2 support bars) plus 1 wooden ring
- Layout: two pockets stacked vertically on one panel, ring at the top
- Pocket size: 9 in (22.9 cm) back width, 4.5 in (11.4 cm) deep, 5.25 in (13.3 cm) tall
- Panel size before border: 9 in (22.9 cm) x 18 in (45.7 cm)
- Border depth: 0.5 in (1.3 cm), 2 rounds
Materials
Choose a smooth combed or mercerized worsted cotton. Cotton holds the pocket shape and keeps the mesh square better than acrylic, and it handles bathroom humidity well.
- Sage green: about 250 g / 425 m of worsted cotton
- 4.5 mm (US 7) crochet hook
- 3 in (7.6 cm) unfinished wooden ring
- Tapestry needle
- 4 stitch markers
- Rustproof pins and a blocking board or towel
- Measuring tape
Quantities include a margin of about 25% for your gauge swatch and differences in tension.
Abbreviations (US Terms)
- ch – chain
- sl st – slip stitch
- sc – single crochet
- dc – double crochet
- fpdc – front post double crochet
- BLO – back loop only
- rev sc – reverse single crochet (crab stitch)
- sk – skip
- sp – space
- st(s) – stitch(es)
- rep – repeat
- RS / WS – right side / wrong side
Special stitches
- fpdc: Yarn over, then insert the hook from front to back to front around the post of the stitch below. Yarn over and pull up a loop, then [yarn over, pull through 2 loops] twice. Skip the stitch behind the fpdc. The fpdc counts as 1 stitch.
- rev sc: If you crochet right-handed, work from left to right. Insert the hook into the next stitch to the right, pull up a loop, yarn over and pull through both loops.
Gauge and Checkpoints
- Single crochet: 16 sc and 16 rows = 4 in (10.2 cm)
- Double crochet: 16 dc and 8 rows = 4 in (10.2 cm)
- Filet mesh: 8 squares and 8 rows = 4 in (10.2 cm); each square is 0.5 in (1.3 cm)
Make one pocket base first and measure it before going further. It is your gauge swatch.
Checkpoints
- Base after Row 8: straight edge 4 in (10.2 cm), radius 2 in (5.1 cm)
- Base after Row 18: straight edge 9 in (22.9 cm), radius 4.5 in (11.4 cm)
- Pocket after Rnd 5: wall 1.25 in (3.2 cm) tall
- Pocket after Rnd 11: leaf band 3 in (7.6 cm) tall
- Finished pocket wall: 5.25 in (13.3 cm)
- Panel after Row 28: 9 in (22.9 cm) x 14 in (35.6 cm)
- Panel after Row 36: 9 in (22.9 cm) x 18 in (45.7 cm)
If your base is too big, go down 0.5 mm in hook size. If it is too small, go up 0.5 mm. Fix your gauge now, because the back of each pocket must match the 9 in (22.9 cm) panel width exactly.
Pocket (make 2)
Base
The base is a flat half circle worked in turned rows from a magic ring.
Row 1: Magic ring, ch 1, 3 sc in ring, turn. (3)
Row 2: Ch 1, 2 sc in each st, turn. (6)
Row 3: Ch 1, [sc in next st, 2 sc in next st] 3 times, turn. (9)
Row 4: Ch 1, [sc in next 2 sts, 2 sc in next st] 3 times, turn. (12)
Rows 5–17: Continue the same way, working 1 more sc before each increase in every row. Each row has 3 more sts than the one before: Row 5 has 15, Row 10 has 30 and Row 17 has 51.
Row 18: Ch 1, [sc in next 16 sts, 2 sc in next st] 3 times. (54) Do not turn.
Rnd 19 (edging): Ch 1, rotate the work and go along the straight edge, working 1 sc in each row end. That is 18 sc up to the center ring and 18 sc beyond it (36). Continue across the top of Row 18 with 1 sc in each st (54). Sl st to first sc. (90: 36 back + 54 front)
Mark the first and last back stitch. All following rounds begin at the first back stitch, so the joins stay hidden against the panel.
Walls
Work in joined rounds with RS facing; do not turn.
Rnd 1: Ch 1, sc BLO in each st, sl st to first sc. (90) This makes a crisp fold line at the base.
Rnd 2: Ch 1, sc in each st, join. (90)
Rnd 3 (flare): Ch 1, sc in next 36 back sts. On the front, [sc in next 8 sts, 2 sc in next st] 6 times. Join. (96: 36 back + 60 front)
Rnds 4–5: Ch 1, sc in each st, join. (96)
Leaf Band
The 60 front stitches hold 6 leaf repeats of 10 sts each. Position 1 of each repeat is a dc divider column, and positions 2–10 hold the leaf and its open windows. Chains count as stitches. The 36 back sts are plain dc, so the back stays solid and level.
Rnd 6: Ch 3 (counts as dc), dc in next 35 sts; [dc in next st, ch 3, sk 3, dc in next 3 sts, ch 3, sk 3] 6 times; sl st to top of ch-3. (96; leaf 3 dc)
Rnd 7: Ch 3, dc in next 35 sts; [dc in divider, ch 2, sk 2, dc in next ch, dc in next dc, fpdc around next dc, dc in next dc, dc in next ch, ch 2, sk 2] 6 times; join. (96; leaf 5 sts)
Rnd 8: Ch 3, dc in next 35 sts; [dc in divider, ch 1, sk 1, dc in next ch, dc in next 2 sts, fpdc around fpdc, dc in next 2 sts, dc in next ch, ch 1, sk 1] 6 times; join. (96; leaf 7 sts)
Rnd 9: Ch 3, dc in next 35 sts; [dc in divider, ch 2, sk 2, dc in next 2 sts, fpdc around fpdc, dc in next 2 sts, ch 2, sk 2] 6 times; join. (96; leaf 5 sts)
Rnd 10: Ch 3, dc in next 35 sts; [dc in divider, ch 3, sk 3, dc in next st, fpdc around fpdc, dc in next st, ch 3, sk 3] 6 times; join. (96; leaf 3 sts)
Rnd 11: Ch 3, dc in next 35 sts; [dc in divider, ch 4, sk 4, fpdc around fpdc, ch 4, sk 4] 6 times; join. (96; leaf tip)
Each leaf grows 3, 5, 7, 5, 3 and 1 stitches wide. A raised vein runs from Rnd 7 to the tip, and each leaf is framed by ladder windows and divider columns.
Top Edge
Rnd 12: Ch 1, sc in each st and in each ch, join. (96)
Rnds 13–14: Ch 1, sc in each st, join. (96)
Rnd 15: Ch 1, rev sc in each st, join. (96) Fasten off, leaving a 24 in (61.0 cm) tail for sewing.
The wall is now 5.25 in (13.3 cm) tall, and the front rim measures about 15 in (38.1 cm) around.
Back Panel (make 1)
Foundation: Ch 40.
Row 1: Dc in 6th ch from hook, [ch 1, sk 1, dc in next ch] across, turn. (18 squares; 37 sts)
Row 2: Ch 4 (counts as dc + ch 1), dc in next dc, [ch 1, dc in next dc] across. Work the last dc into the top of the turning chain, then turn. (18 squares; 37 sts)
Rows 3–28: Rep Row 2. The panel measures 9 in (22.9 cm) x 14 in (35.6 cm).
Triangle Top
Each row drops 1 square at each end.
Row 29: Sl st in first 3 sts (dc, ch-1 sp, dc), ch 4, work mesh across, leaving the last square unworked, turn. (16 squares; 33 sts)
Rows 30–36: Rep Row 29.
- Row 30: 14 squares (29 sts)
- Row 31: 12 squares (25 sts)
- Row 32: 10 squares (21 sts)
- Row 33: 8 squares (17 sts)
- Row 34: 6 squares (13 sts)
- Row 35: 4 squares (9 sts)
- Row 36: 2 squares (5 sts)
Do not fasten off. The triangle adds 4 in (10.2 cm), for a total height of 18 in (45.7 cm).
Support Bars (make 2)
Foundation: Ch 37.
Row 1: Sc in 2nd ch from hook and in each ch across, turn. (36)
Rows 2–3: Ch 1, sc in each st, turn. (36)
Fasten off, leaving a long tail. Each bar measures 9 in (22.9 cm) x 0.75 in (1.9 cm).
Make All Pieces
- Sage green: 2 pockets, 1 back panel, 2 support bars
Order of work:
- Pockets
- Panel
- Support bars
- Panel border and hanging tab (see the Border section)
- Joining
Layout, front view:
          ( RING )
           [TAB]
          /  mesh  )
         ( triangle )
        |   UPPER    |   <- base on top of Row 17
        |   POCKET   |
        |    mesh    |
        |   LOWER    |   <- base on top of Row 1
        |   POCKET   |
         ------------
The support bars sit on the WS of the panel, directly behind each pocket’s back rim.
Joining
Use the yarn tails, a tapestry needle and a firm whipstitch.
- Lower pocket base. Lay the bordered panel RS up. Wall Rnd 1 left 36 front loops unworked along the back of the pocket. Line these up with the top of Row 1. Row 1 has 18 squares, so sew 2 pocket stitches into each mesh square. The pocket’s corner stitches sit on the outer dc columns.
- Lower pocket rim. Lay a support bar on the WS of the panel, behind the pocket’s back rim. Sew the 36 back rim stitches through the panel and into the 36 bar stitches, 1 to 1. This is again 2 stitches per mesh square.
- Sides. Tack each back corner of the pocket wall to the outer dc column every 0.5 in (1.3 cm).
- Upper pocket. Repeat steps 1–3, with the base on top of Row 17.
Keep the tension firm but not puckered. Each sewn line should measure 9 in (22.9 cm), the same as the mesh.
Size checkpoint:
- Lower pocket: base 1 in (2.5 cm) above the bottom edge, rim at 6.25 in (15.9 cm).
- Upper pocket: base at 9 in (22.9 cm), rim at 14.25 in (36.2 cm).
- The triangle starts at 14.5 in (36.8 cm), just above the upper rim.
- The open mesh gap between the pockets is 2.75 in (7.0 cm).
Border
Work the border on the panel before joining, as noted above. Border gauge is 4 sc per 1 in (2.5 cm) along every edge, and 2 rounds = 0.5 in (1.3 cm).
Rnd 1: At the end of Row 36, ch 1. With RS facing, work down the left slant:
– Left slant: 3 sc in each row end of Rows 36–30, then 2 sc in the row end of Row 29 (23)
– Left side: 2 sc in each row end of Rows 28–1 (56)
– Bottom: 3 sc in the first foundation st (corner), 1 sc in each of the next 35 foundation sts, 3 sc in the last foundation st (corner) (41)
– Right side: 2 sc in each row end of Rows 1–28 (56)
– Right slant: 2 sc in the row end of Row 29, then 3 sc in each row end of Rows 30–36 (23)
– Top: 1 sc in each of the 5 sts of Row 36 (5)
– Sl st to first sc. (204)
Rnd 2: Ch 1, sc in each st, working 3 sc in the center st of each bottom corner, join. (208: 204 + 4) Do not fasten off.
Why the math works:
- Each dc row is 0.5 in (1.3 cm) tall, so 2 sc per row end gives 4 sc per inch.
- The 14 in (35.6 cm) sides therefore take 56 sc.
- Each slant is about 5.7 in (14.5 cm) long, so 23 sc lie flat.
- The bottom’s 37 foundation sts match Row 1, and the 3-sc corners keep it square.
Hanging Tab
Row 1: Sl st to the first of the 5 top sts of Rnd 2, ch 1, sc in each of the 5 top sts, turn. (5)
Rows 2–14: Ch 1, sc in each st, turn. (5)
The tab is 1.25 in (3.2 cm) wide and 3.5 in (8.9 cm) long. Pass it through the ring from front to back and fold it in half. Whipstitch Row 14 to the WS at the base of the tab.
Final Blocking
- Soak the finished holder in cool water for 10 minutes.
- Roll it in a towel and press out the water; do not wring.
- Fold the pockets flat and pin the panel to 10 in (25.4 cm) x 19 in (48.3 cm).
- Use a long ruler to pin each mesh column straight.
- Stand the holder upright and fill each pocket with a roll wrapped in a plastic bag.
- Shape each leaf with your fingers so the veins stand up.
- Let it dry completely, about 24 hours.
Final Quality-Control Checklist
- Each pocket wall has 96 sts and 6 leaves of equal width.
- Every leaf has a raised vein from Rnd 7 to the tip.
- The panel has 18 squares across and 36 rows.
- Border Rnd 2 has 208 sts.
- Both pockets measure 9 in (22.9 cm) across the back.
- The support bars are hidden on the WS.
- The tab is secure and the ring turns freely.
- All ends are woven in for at least 2 in (5.1 cm).
Troubleshooting
- Base cups or ruffles: Check that each row adds exactly 3 sts, then adjust your hook size.
- Leaves lean: Each fpdc must go around the vein stitch directly below it. Recount the 10-st repeat.
- Pocket sags forward: Re-sew the back rim through the support bar with smaller stitches.
- Mesh squares are rectangles: Your dc height is off. Change hook size or tighten the ch-1 spaces.
- Border waves: Work 1 fewer sc on each slant. If it pulls, add 1.
- Panel twists when hung: Re-block with the mesh columns pinned straight.
Care
Hand wash in cool water and lay flat to dry, reshaping the pockets around a roll. Do not tumble dry.
Final Notes
All the measurements come back to one number. A 9 in (22.9 cm) pocket base matches 18 mesh squares, and 18 squares make a 9 in (22.9 cm) panel. With the border, the panel finishes at 10 in (25.4 cm) x 19 in (48.3 cm). Get the base right, and everything after it will line up.
Happy crocheting!