

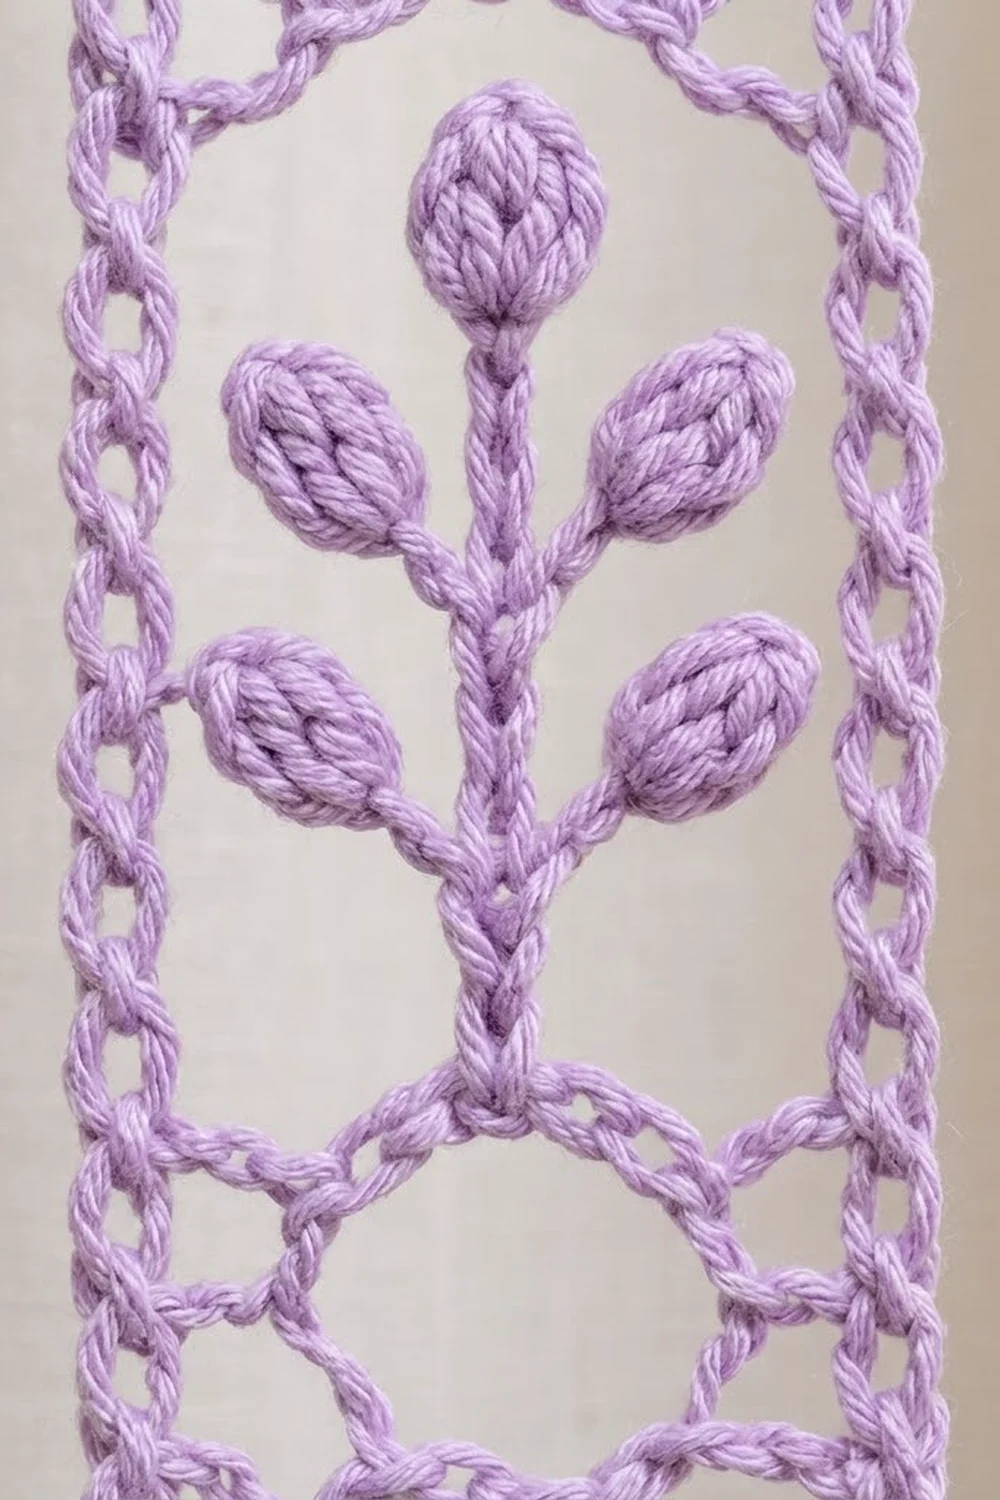
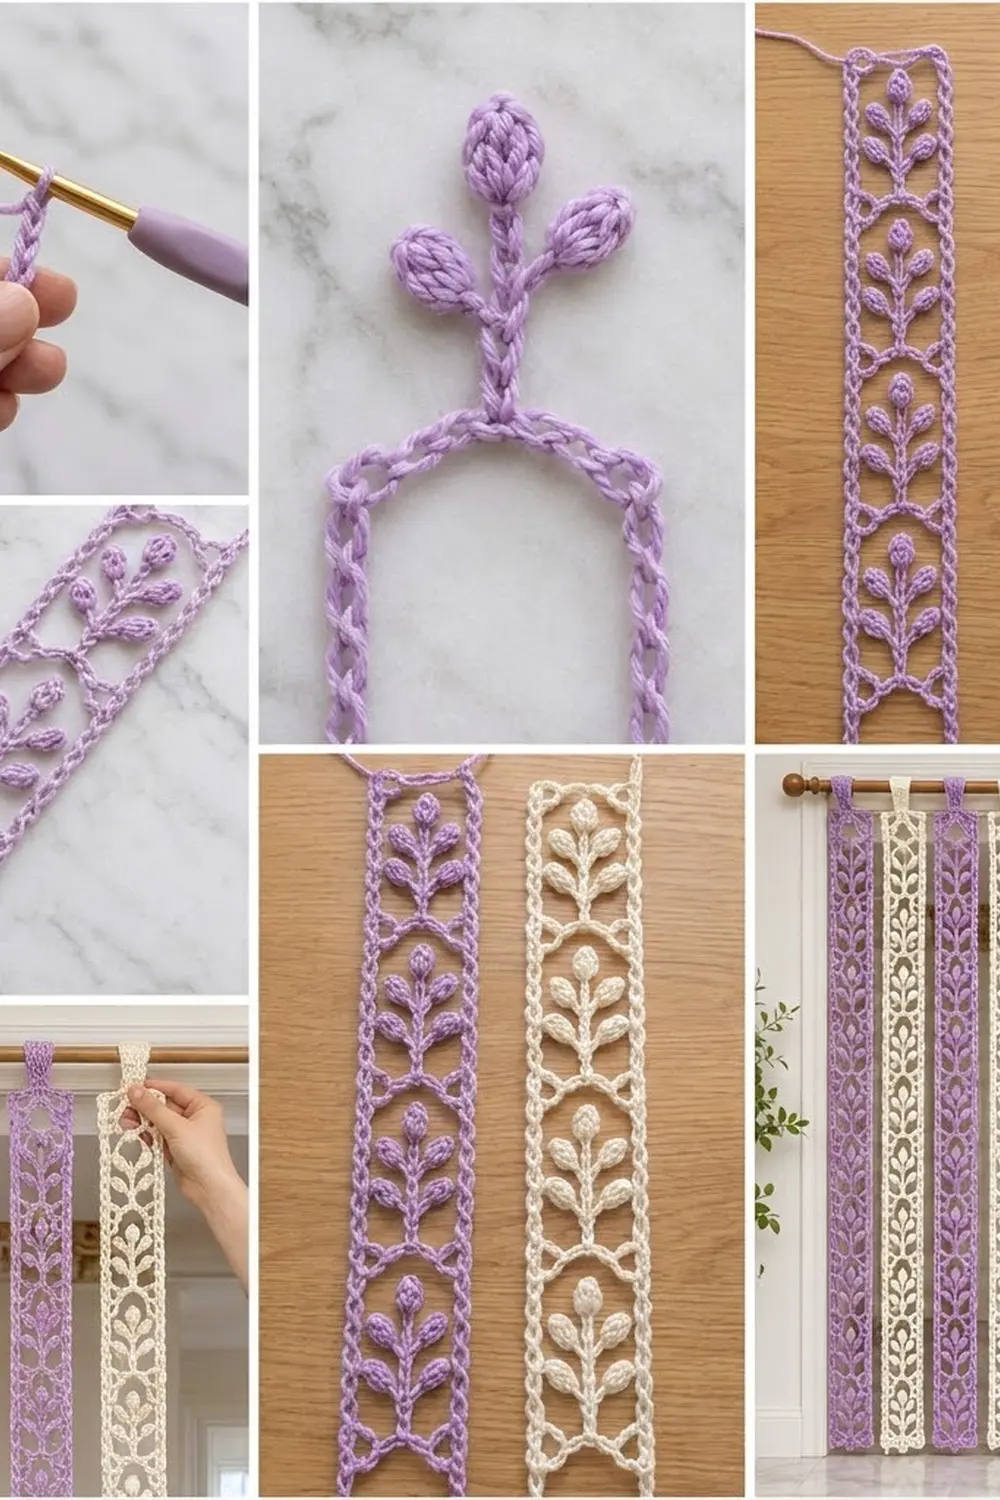
This curtain is made of seven slim lace strips that hang side by side in a doorway. Each strip has a column of little sprigs: a straight stem, two pairs of puffy leaves, and a round bud on top. Small open rings sit between the sprigs, and twisted cord-like edges frame each strip.
The colors alternate between soft lavender and warm cream. There are four lavender strips and three cream strips, hung lavender–cream–lavender across the rod. The look is light and airy, with a cottage feel. Light still comes through, but the doorway feels screened.
This pattern uses US crochet terms. Each finished strip measures 3.5 in (8.9 cm) wide by 78 in (198.1 cm) long, not counting the folded hanging tab. Seven strips with 1.5 in (3.8 cm) gaps between them cover 33.5 in (85.1 cm) of rod, which fits a standard interior doorway.
Each strip is worked flat in short rows across its width, from the bottom up. You work a 9-row sprig repeat 17 times. Then a two-round border of single crochet and reverse single crochet makes the twisted edges. Finally, a narrow tab is crocheted from the top edge, folded to the back, and sewn down. The strips are never sewn to each other.
Finished Size and Construction
- Finished strip size: 3.5 in x 78 in (8.9 cm x 198.1 cm), not counting the tab
- Total drop from top of rod: about 80 in (203.2 cm)
- Skill level: Intermediate
- Terminology: US crochet terms
- Yarn weight: Worsted (#4) cotton or cotton blend
- Hook: US H-8 (5 mm)
- Number of pieces: 7 separate strips (4 lavender, 3 cream)
- Layout: one row of 7 strips on the rod, colors alternating, 1.5 in (3.8 cm) gaps
- Strip size before border: 3 in x 77.5 in (7.6 cm x 196.9 cm)
- Border depth: 0.25 in (0.6 cm) on every side
- Tab: 5 stitches wide, 4.5 in (11.4 cm) long before folding
Materials
Choose a smooth worsted cotton, either mercerized or combed. Cotton keeps the puff stitches crisp, blocks well, and stretches less than acrylic over a long vertical drop. Avoid fuzzy or splitty yarns, because the lace and the reverse single crochet edges need clear stitch definition. The amounts below assume about 200 yd per 100 g (183 m per 100 g).
- Lavender: 500 g, about 1,000 yd (914 m), for 4 strips
- Cream: 375 g, about 750 yd (686 m), for 3 strips
Each strip uses about 200–230 yd (183–210 m). These amounts include a margin of about 10 percent for your gauge test and small tension differences.
Tools:
- US H-8 (5 mm) crochet hook
- Tapestry needle
- Stitch markers
- Measuring tape
- Rust-proof pins and a long blocking surface
- Curtain rod up to 1.25 in (3.2 cm) in diameter
- Scissors
Abbreviations (US Terms)
- ch: chain
- sc: single crochet
- dc: double crochet
- sl st: slip stitch
- sk: skip
- st(s): stitch(es)
- tch: turning chain
- rev sc: reverse single crochet, also called crab stitch. Work from left to right (right to left if you crochet left-handed). Insert the hook into the next st to the right, pull up a loop, yarn over, and pull through both loops.
Special stitch: Puff. (Yarn over, insert hook in the given st, yarn over, pull up a loop about 0.5 in / 1.3 cm tall) 4 times. Yarn over and pull through all 9 loops on the hook, then ch 1 to close. The closing ch does not count as a stitch. Each puff counts as 1 stitch.
Counting note: The ch 3 at the start of every row counts as the first dc. Every row of the strip body has exactly 9 positions (stitches plus chains).
Gauge and Checkpoints
Base gauge: 12 dc and 8 rows = 4 in (10.2 cm) in dc with a 5 mm hook.
Pattern gauge: 9 sts = 3 in (7.6 cm) wide. One 9-row repeat = 4.5 in (11.4 cm) long.
Test one strip first. Work Row 1 and two full repeats, which is 19 rows. After light blocking, the piece should measure 3 in x 9.5 in (7.6 cm x 24.1 cm). If it matches, keep going and turn the test piece into your first strip.
Checkpoints for each strip (unblocked, laid flat):
- After Row 1: 3 in (7.6 cm) wide
- After Row 10 (1 repeat): 5 in (12.7 cm) long
- After Row 46 (5 repeats): 23 in (58.4 cm) long
- After Row 91 (10 repeats): 45.5 in (115.6 cm) long
- After Row 155: 77.5 in (196.9 cm) long
- After border: 3.5 in x 78 in (8.9 cm x 198.1 cm)
If the strip is too big: Switch to a 4.5 mm hook. If only the length runs long, you can work 16 repeats instead of 17. Each repeat you leave out takes 4.5 in (11.4 cm) off the length.
If the strip is too small: Switch to a 5.5 mm hook, or add one repeat for every 4.5 in (11.4 cm) of missing length. Give all seven strips the same number of repeats so the bottoms line up.
Strip Pattern
Make 4 strips in lavender and 3 in cream. Work every strip the same way.
Foundation: Ch 11.
Row 1 (solid base): Dc in the 4th ch from the hook (the 3 skipped ch count as the first dc) and in each ch across, turn. (9 dc)
Sprig Repeat (Rows 2–10)
Row 2 (ring window): Ch 3, ch 7, sk the next 7 sts, dc in top of tch, turn. (2 dc + 7 ch = 9)
Row 3 (ring cinch): Ch 3, ch 3, sk 3 ch, sc in the 4th (center) ch of the ch-7, ch 3, sk 3 ch, dc in top of tch, turn. (2 dc + 1 sc + 6 ch = 9) The short sc pulls the center down while the edges stay tall, which closes the round ring.
Row 4 (stem): Ch 3, ch 3, sk 3 ch, dc in sc, ch 3, sk 3 ch, dc in top of tch, turn. (3 dc + 6 ch = 9) The center dc is the first stem segment.
Row 5 (leaf row): Ch 3, ch 1, sk 1 ch, puff in next ch, ch 1, sk 1 ch, dc in stem dc, ch 1, sk 1 ch, puff in next ch, ch 1, sk 1 ch, dc in top of tch, turn. (3 dc + 2 puffs + 4 ch = 9) The two puffs are the first pair of leaves.
Row 6 (stem): Ch 3, ch 3, sk (ch 1, puff, ch 1), dc in stem dc, ch 3, sk (ch 1, puff, ch 1), dc in top of tch, turn. (3 dc + 6 ch = 9)
Row 7 (leaf row): Repeat Row 5. (9) This is the second pair of leaves.
Row 8 (stem): Repeat Row 6. (9)
Row 9 (bud): Ch 3, ch 3, sk 3 ch, puff in stem dc, ch 3, sk 3 ch, dc in top of tch, turn. (2 dc + 1 puff + 6 ch = 9)
Row 10 (cap): Ch 3, ch 3, sk 3 ch, sc in top of puff, ch 3, sk 3 ch, dc in top of tch, turn. (2 dc + 1 sc + 6 ch = 9) The sc pulls the chains into a V, which becomes the lower half of the next ring.
Rows 11–154: Repeat Rows 2–10 sixteen more times, for 17 repeats in total. (9 positions in every row) Place a marker after every fifth repeat to keep count.
Row 155 (solid top): Ch 3, dc in each of the next 3 ch, dc in sc, dc in each of the next 3 ch, dc in top of tch. (9 dc) Do not fasten off.
Row check: 1 + (17 x 9) + 1 = 155 rows. At 2 rows per inch, that is 77.5 in (196.9 cm).
Make All Pieces
- Lavender: 4 strips
- Cream: 3 strips
- Total: 7 strips, each with 155 rows, a border, and a tab
Layout on the rod (left to right):
| L |  | C |  | L |  | C |  | L |  | C |  | L |
  1      2      3      4      5      6      7
L = lavender   C = cream   gaps = 1.5 in (3.8 cm)
Width check: 7 strips x 3.5 in (8.9 cm) = 24.5 in (62.2 cm). Six gaps x 1.5 in (3.8 cm) = 9 in (22.9 cm). The total is 33.5 in (85.1 cm).
Joining: Tabs and Hanging
The strips are not sewn or crocheted to each other. Here, joining means hanging each strip from the rod by its own folded tab. Work the tab after Border Round 2 is finished.
Tab placement: With the right side facing you, count the 13 top-edge sts of Border Round 2. Join yarn in st 5.
Tab Row 1: Ch 1, sc in sts 5 through 9, turn. (5 sc) This leaves 4 sts free on each side, so the tab is centered.
Tab Rows 2–18: Ch 1, sc in each st across, turn. (5 sc)
At 4 sc rows per inch, 18 rows = 4.5 in (11.4 cm). Fasten off and leave a 12 in (30.5 cm) tail.
Stitch-to-stitch logic: Fold the tab to the back of the strip. Line up the 5 sts of Tab Row 18 with the 5 sts of Row 155 that sit directly behind the base of the tab. Whipstitch them together one to one, 5 sts to 5 sts. The finished loop is about 2.25 in (5.7 cm) deep.
Tension: Pull each whipstitch snug but not tight. A tight seam puckers the top edge, and a loose seam lets the tab gap open and show from the front.
Size checkpoint: Slide the loop onto the rod before you weave in the ends. It should move freely on a rod up to 1.25 in (3.2 cm) across.
Border
The border makes the twisted, cord-like edges. Work it before the tab.
Border gauge: 4 sc = 1 in (2.5 cm). Each dc row-end is 0.5 in (1.3 cm) tall, so 2 sc per row-end matches the border gauge and keeps the long edges flat.
Round 1 (sc): Continuing from Row 155, ch 1 and turn the strip so you can work down the first long side.
- Long side 1: Work 2 sc in each of the 155 row-ends. (310 sc)
- Bottom edge: Working into the free loops of the foundation ch, work 3 sc in the first st, sc in each of the next 7 sts, and 3 sc in the last st. (13 sc, corners included)
- Long side 2: Work 2 sc in each of the 155 row-ends. (310 sc)
- Top edge: Working into Row 155, work 3 sc in the first st, sc in each of the next 7 sts, and 3 sc in the last st. (13 sc, corners included)
Sl st to the first sc. Round 1 total: 310 + 13 + 310 + 13 = 646 sc. The corner groups belong to the short sides only, so no stitch is counted twice.
Round 2 (rev sc): Ch 1, rev sc in each st around, one per existing st. (646 rev sc: 310 on each long side and 13 on each short side) Sl st to the first st and fasten off.
Why the math works: Each short side starts with 9 sts. The two corner groups add 2 extra sts each, so 9 + 4 = 13, which turns the corners without cupping. The long sides follow the 2-sc-per-row rule, which matches the row gauge. Round 2 adds no stitches, so it won’t ruffle. The border adds 0.25 in (0.6 cm) on each side, so the strip grows to 3.5 in (8.9 cm) wide and 78 in (198.1 cm) long.
Final Blocking
- Weave in all ends along the border so they stay hidden.
- Soak each strip in cool water for 15 minutes.
- Roll the strip in a towel and press out the water. Do not wring it.
- Lay the strip flat and pin the long edges straight at 3.5 in (8.9 cm) wide, with a pin every 6 in (15.2 cm).
- Ease the length to 78 in (198.1 cm). Don’t stretch it further, because cotton relaxes a little more when it hangs.
- Open each ring with a fingertip and tilt the leaf puffs outward.
- Let the strip dry completely. If your surface is too short, block one section at a time.
- Lay all seven strips side by side. Re-block any strip that differs by more than 0.5 in (1.3 cm).
Final Quality-Control Checklist
- Each strip has 155 rows and 17 sprig repeats.
- Every body row counts 9 positions.
- Each sprig has 1 stem, 2 pairs of leaves, and 1 bud.
- There is a round ring between every two sprigs.
- Border Rounds 1 and 2 each count 646 sts.
- Each blocked strip measures 3.5 in x 78 in (8.9 cm x 198.1 cm).
- Each tab is 5 sts wide, centered, and sewn 5 sts to 5 sts.
- The colors alternate and start and end with lavender.
Troubleshooting
The leaves look flat: Pull each puff loop up taller and keep all the loops even.
The rings look square: Work the Row 3 and Row 10 sc exactly in the center.
The edges wave: The border is too loose. Work it with a 4.5 mm hook.
The edges pull in: Loosen your rev sc, or work the border with a 5.5 mm hook.
The strips are different lengths: Re-block them damp to the same length.
The tab won’t slide on the rod: Add 2 tab rows, about 0.5 in (1.3 cm).
Care
Hand wash in cool water and dry flat, re-blocking lightly to 3.5 in x 78 in (8.9 cm x 198.1 cm). Rehang while the strips are slightly damp so they settle straight.
Final Notes
With a gauge of 12 dc and 8 rows to 4 in (10.2 cm), 9 sts make a body 3 in (7.6 cm) wide, and each 9-row repeat is 4.5 in (11.4 cm) long. Seventeen repeats plus two solid rows give 155 rows and 77.5 in (196.9 cm). The border adds 0.25 in (0.6 cm) all around, for a strip of 3.5 in x 78 in (8.9 cm x 198.1 cm). Seven strips with 1.5 in (3.8 cm) gaps fill 33.5 in (85.1 cm) of rod, and the tabs bring the drop to about 80 in (203.2 cm).
Check each stage, keep all seven strips matched, and your doorway will fill with soft lavender sprigs.
Happy crocheting!