

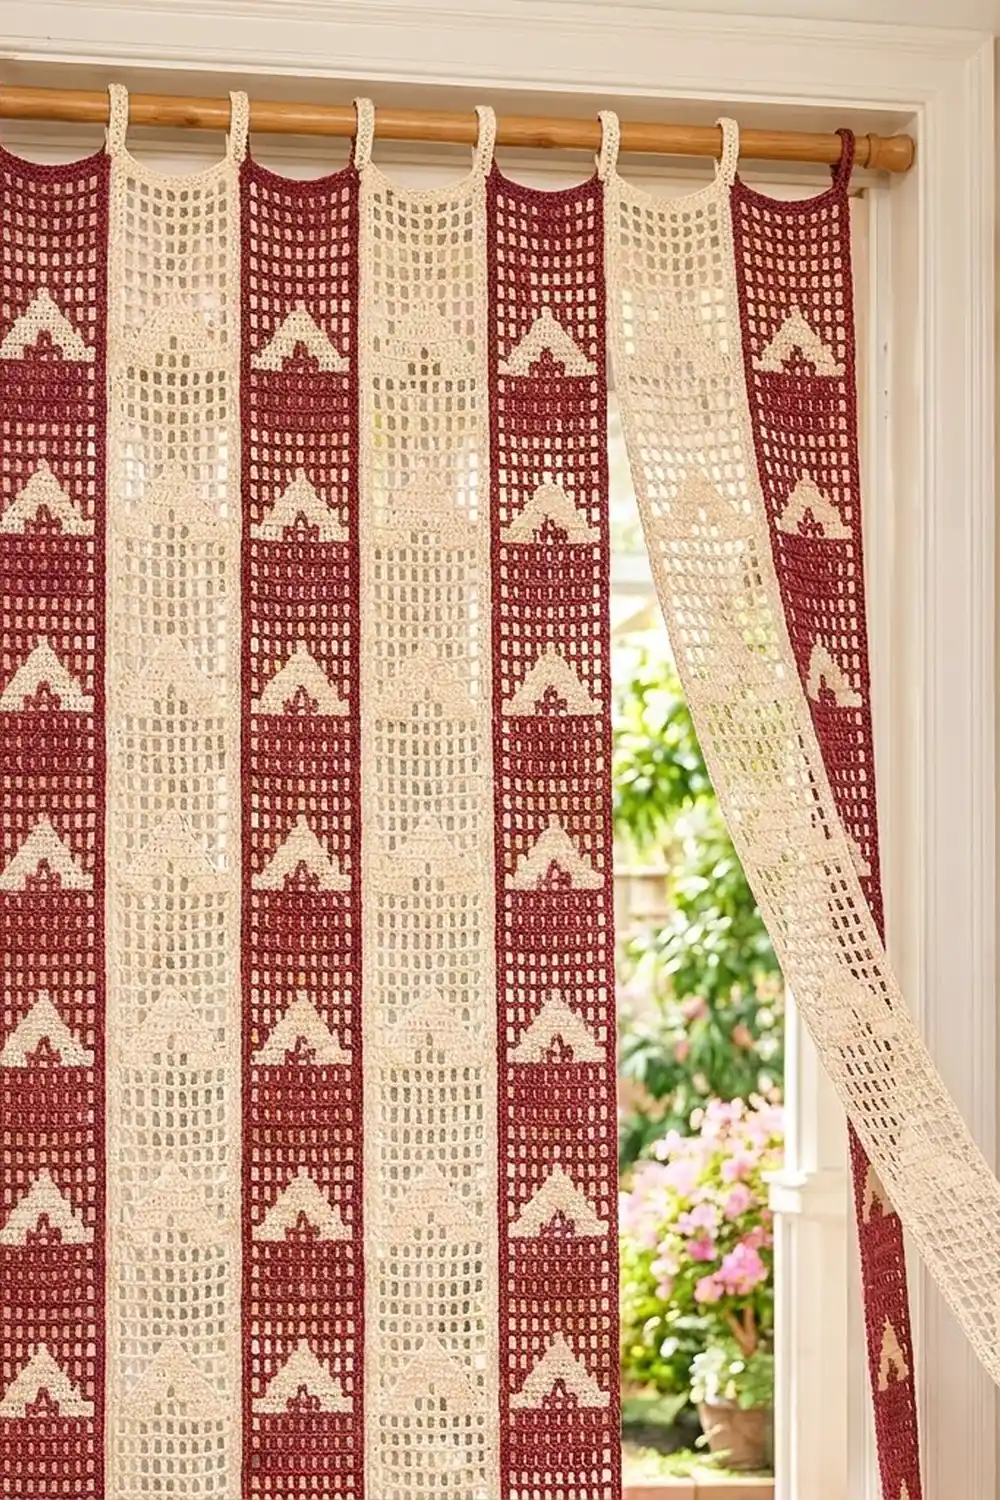
This door curtain is made of seven separate filet crochet strips that hang side by side from a rod. Each strip is a clean mesh grid with solid-block chevrons pointing upward along its length. The strips are not sewn together, so you can walk through the curtain and push the strips aside.
The palette is burgundy and cream. You make four burgundy strips and three cream strips and hang them in alternating order. Each strip is worked in a single color, so the chevrons show as solid blocks against the open mesh.
The pattern uses US crochet terms. Each finished strip measures 6.5 in (16.5 cm) wide by 70.5 in (179.1 cm) long, not counting the hanging loops. Each loop adds about 2 in (5.1 cm) above the top edge.
How it’s built: you work each strip from the bottom up in rows of filet mesh and follow a simple four-row chevron motif. Then you add one round of single crochet border and crochet two loops onto the top corners. You don’t join the strips. They simply hang next to each other on the rod.
Finished Size and Construction
- Finished strip size: 6.5 x 70.5 in (16.5 x 179.1 cm)
- Size before border: 6 x 70 in (15.2 x 177.8 cm)
- Border depth: 0.25 in (0.6 cm) on each edge
- Hanging loops: 2 in (5.1 cm) tall, two per strip
- Skill level: Easy-intermediate
- Terminology: US
- Yarn weight: DK (#3), cotton or cotton blend
- Hook: 4.0 mm (G-6)
- Number of pieces: 7 strips (4 burgundy, 3 cream)
- Layout: One row of 7 strips, hung side by side with no seams
- Hung width: about 48.5 in (123.2 cm), including six 0.5 in (1.3 cm) gaps
Materials
Use a smooth, mercerized or matte cotton DK. Cotton holds the square mesh crisply and doesn’t stretch much when it hangs. Avoid fuzzy or very stretchy yarn, because it blurs the chevron blocks and lets the strips get longer over time.
- Burgundy: 260 g / 600 m (4 strips)
- Cream: 200 g / 460 m (3 strips)
These quantities include a margin of about 10–15% for swatching and differences in tension. Each strip uses about 57 g.
Tools:
– 4.0 mm (G-6) crochet hook
– Tapestry needle
– Stitch markers
– Measuring tape
– Rust-proof pins and a long blocking surface (a clean floor with towels works well)
– Spray bottle
– Curtain rod at least 52 in (132.1 cm) long, no thicker than 1 in (2.5 cm)
Abbreviations (US Terms)
- ch – chain
- sl st – slip stitch
- sc – single crochet
- dc – double crochet
- sk – skip
- sp – space
- st(s) – stitch(es)
- RS – right side
Special stitches (filet):
– Open mesh: ch 2, sk next 2 sts (or the ch-2 sp), dc in next dc.
– Block over an open mesh: 2 dc in ch-2 sp, dc in next dc.
– Block over a block: dc in each of the next 3 dc.
– Edge post: the ch-5 at the start of a row counts as 1 dc plus ch 2.
Each mesh, open or block, is 3 stitches wide. The final post adds 1 stitch, so every row is 28 stitches: 9 meshes x 3 = 27, plus 1 = 28.
Gauge and Checkpoints
Gauge: 6 meshes and 8 rows = 4 in (10.2 cm) in filet mesh.
Don’t make a separate swatch. Your first strip is the test piece, and you check it as you go:
- Row 1: Lay it flat without stretching. It should measure 6 in (15.2 cm) wide.
- Row 12 (first chevron done): 6 in (15.2 cm) tall.
- Row 44: 22 in (55.9 cm).
- Row 76: 38 in (96.5 cm).
- Row 108: 54 in (137.2 cm).
- Row 140: 70 in (177.8 cm).
If the strip is too wide, or Row 12 is taller than 6.5 in (16.5 cm), go down to a 3.75 mm hook. If it’s too narrow or too short, go up to a 4.5 mm hook. A difference of more than 0.25 in (0.6 cm) in width is worth fixing. Across seven strips it adds up.
Rows that come out too tall are often caused by loose ch-2 spans. Keep the chains snug, the same height as the dc posts.
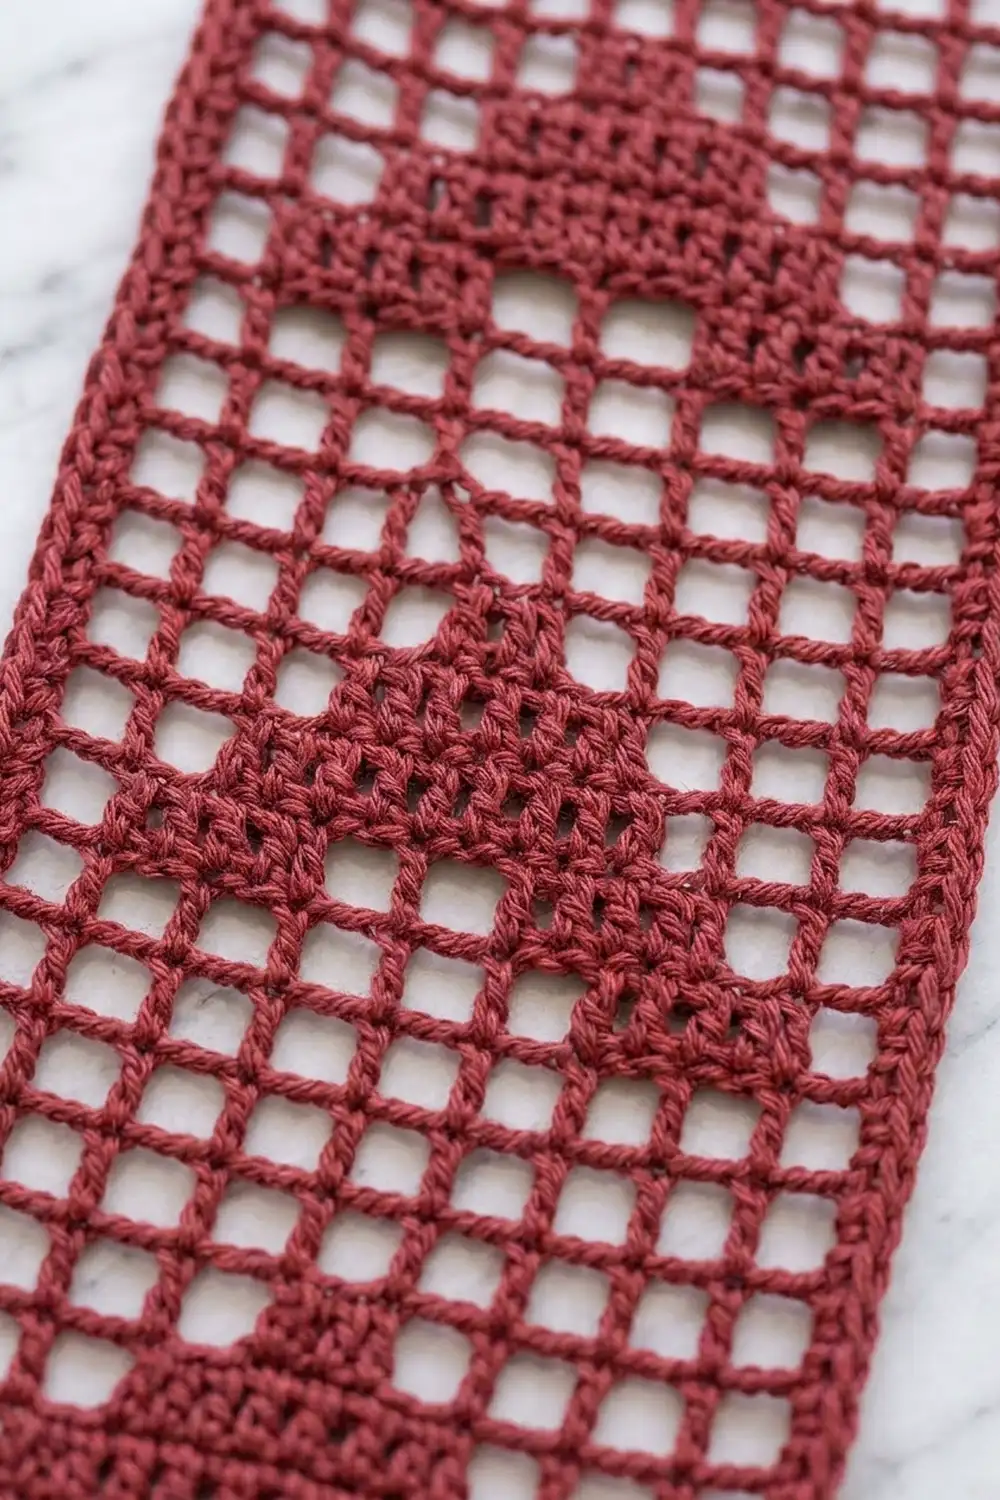
Strip Pattern (make 7)
The motif is symmetrical, so you read every row the same way on RS and WS rows.
Number the meshes 1 to 9 across.
Foundation: Ch 32.
Row 1 (open): Dc in 8th ch from hook. The skipped 7 ch count as the first open mesh. Ch 2, sk 2 ch, dc in next ch 8 times. Turn.
9 open meshes: 10 dc + 9 ch-2 sps = 28 sts.
Rows 2–4 (open): Ch 5 (edge post), sk 2, dc in next dc. Ch 2, dc in next dc across. In Row 2, the last dc goes in the 5th ch of the beginning ch-7. In later rows, it goes in the 3rd ch of the turning ch-5. Turn.
28 sts each row.
Chevron Motif (4 rows)
Row 5 (Motif Row 1): Pattern: open, block, block, open, open, open, block, block, open.
Ch 5, dc in next dc (mesh 1). Block over open twice (meshes 2–3). [Ch 2, dc in next dc] 3 times (meshes 4–6). Block over open twice (meshes 7–8). Ch 2, dc in 3rd ch of turning ch (mesh 9). Turn.
4 blocks: 18 dc + 5 ch-2 sps = 28 sts.
Row 6 (Motif Row 2): Pattern: open, open, block, block, open, block, block, open, open.
Ch 5, dc in next dc (mesh 1). Ch 2, sk 2 dc, dc in next dc (mesh 2). Block over block (mesh 3). Block over open (mesh 4). Ch 2, dc in next dc (mesh 5). Block over open (mesh 6). Block over block (mesh 7). Ch 2, sk 2 dc, dc in next dc (mesh 8). Ch 2, dc in 3rd ch of turning ch (mesh 9). Turn.
4 blocks: 18 dc + 5 ch-2 sps = 28 sts.
Row 7 (Motif Row 3): Pattern: open, open, open, block, block, block, open, open, open.
Ch 5, dc in next dc. Ch 2, dc in next dc. Ch 2, sk 2 dc, dc in next dc (mesh 3). Block over block (mesh 4). Block over open (mesh 5). Block over block (mesh 6). Ch 2, sk 2 dc, dc in next dc (mesh 7). [Ch 2, dc in next dc] twice, with the last dc in the turning ch. Turn.
3 blocks: 16 dc + 6 ch-2 sps = 28 sts.
Row 8 (Motif Row 4): Pattern: open, open, open, open, block, open, open, open, open.
Ch 5, dc in next dc. [Ch 2, dc in next dc] twice. Ch 2, sk 2 dc, dc in next dc (mesh 4). Block over block (mesh 5). Ch 2, sk 2 dc, dc in next dc (mesh 6). [Ch 2, dc in next dc] 3 times, with the last dc in the turning ch. Turn.
1 block: 12 dc + 8 ch-2 sps = 28 sts.
Rows 9–12 (open): Work as for Row 2. 28 sts each row.
Repeat
Rows 5–12 make one full repeat: 4 motif rows plus 4 open rows. Work Rows 5–12 another 16 times, for 17 chevrons in total. The motif rows of repeat k fall on Rows 8k+5 to 8k+8, with k running from 0 to 16. The last motif ends on Row 136.
Rows 137–140 (open): Work as for Row 2.
Don’t fasten off. Go straight on to the Border. Strip before border: 140 rows, 28 sts wide, 6 x 70 in (15.2 x 177.8 cm).
The bottom of the strip has 4 open rows and the top has 4 open rows, so the chevrons sit centered along the strip.
Make All Pieces
Make 7 strips:
- Burgundy: 4 strips (A)
- Cream: 3 strips (B)
Before hanging, give each strip its own border and two hanging loops (see Border) and block it.
Hanging layout, left to right:
| A | B | A | B | A | B | A |
 Bur Crm Bur Crm Bur Crm Bur
Each strip should measure 6.5 x 70.5 in (16.5 x 179.1 cm). Measure every strip against the first one before you add its border. If they differ by more than 0.5 in (1.3 cm) in length, add or remove one open row at the top (Rows 137–140) to match.
Joining (Hanging Assembly)
The strips are not stitched together. Leaving them free is what lets you walk through the curtain and push one strip aside, as shown in the photo.
Method: Slide each strip’s two loops onto the rod in layout order, A to A.
Spacing logic: Each strip is 6.5 in (16.5 cm) wide. With a 0.5 in (1.3 cm) gap between neighbors, the total hung width is 7 x 6.5 = 45.5 in (115.6 cm) of fabric plus 6 x 0.5 = 3 in (7.6 cm) of gaps, for 48.5 in (123.2 cm). If your doorway is narrower, close the gaps. If it’s wider, spread them evenly.
Tension advice: Hang the strips loosely, without pulling the loops tight. Let them hang for 24 hours before you trim the rod height. Cotton filet can settle and get up to 0.5 in (1.3 cm) longer.
Size checkpoint: Measure from the rod to the bottom edge of each strip. All seven should be within 0.25 in (0.6 cm) of each other.
Border
Border gauge: You work one round of sc at the strip’s own tension. Across the top and bottom you place 1 sc in each stitch. Down the long sides you place 2 sc in each row end. A corner is 3 sc in the corner stitch, and the middle sc of the three is the corner center.
Round 1 (RS): Continuing from the last dc of Row 140, ch 1.
- Top edge: Work 3 sc in the first st (corner). Sc in each of the next 26 sts, working 1 sc in each ch of the ch-2 sps. Work 3 sc in the last st (corner). Between corners: 26 sc.
- First long side: Work 2 sc in each row end, 140 rows x 2 = 280 sc between corners.
- Bottom edge: Working into the foundation ch loops, work 3 sc in the first position (corner), sc in the next 26 positions, and 3 sc in the last position (corner). 26 sc between corners.
- Second long side: 280 sc between corners.
- Sl st to the first sc.
Total: 26 + 280 + 26 + 280 + (4 corners x 3) = 624 sc.
If you count each side including its corner centers, the top and bottom have 28 each and the long sides have 282 each. The four shared corner centers are counted only once in the total.
Why the math works: The top and bottom edges have 28 stitch positions. One sc in each keeps those edges exactly 6 in (15.2 cm) wide before the border. Two sc per dc row end comes out slightly firmer than the row height. That’s intentional: the snug edge supports the strip’s weight when it hangs and keeps the long sides from rippling or stretching. The 3-sc corners give exactly the extra stitches needed to turn the corner flat. The border adds 0.25 in (0.6 cm) on every edge, so 6 x 70 in becomes 6.5 x 70.5 in (16.5 x 179.1 cm).
Because each strip gets its own border, no stitches are shared or added between strips.
Hanging loops (make 2 per strip): Join yarn in the center sc of a top corner. Ch 16, then sl st in the same sc to form a ring. Work 24 sc into the ring, then sl st in the same corner sc. Fasten off. Repeat at the other top corner.
Each loop: 24 sc, about 2 in (5.1 cm) tall.
Weave in all ends along solid blocks or the border, not across open mesh, where they would show.
Final Blocking
- Soak each strip in cool water for 10 minutes. Press the water out; don’t wring.
- Roll the strip in a towel to remove excess water.
- Lay it flat on the blocking surface. Measure and pin it to 6.5 x 70.5 in (16.5 x 179.1 cm).
- Pin the long edges every 4 in (10.2 cm) and keep them perfectly straight.
- Nudge each open mesh square with your fingertips so the vertical posts line up.
- Pin the two hanging loops upright and flat.
- Let it dry completely before you unpin it, usually 24 hours.
- Re-measure. Every strip should match the first strip within 0.25 in (0.6 cm).
Final Quality-Control Checklist
- Each strip has exactly 140 rows and 17 chevrons.
- Every row has 28 sts and 9 meshes.
- The chevrons point upward, toward the loops.
- The border has 624 sc with neat 3-sc corners.
- Two loops sit at the top corners, 24 sc each.
- The width is 6.5 in (16.5 cm) and the length is 70.5 in (179.1 cm).
- There are 4 burgundy and 3 cream strips, in alternating order.
- All ends are hidden in solid areas.
Troubleshooting
- Meshes look like tall rectangles: Your ch-2 spans are too loose or your dc are too tall. Tighten the chains, or pull up the dc loops less.
- Strip gets narrower as you go: You probably skipped the last dc into the turning ch. Count 10 vertical posts in every open row.
- Chevron is off-center: Count the meshes, not the stitches. Mark mesh 5 with a stitch marker during the motif rows.
- Long edges ripple: Too many border sc. Keep it to exactly 2 per row end.
- Long edges pucker: Your border tension is too tight. Go up 0.5 mm for the border round only.
- Strips hang at different lengths: Re-block them to one shared measurement, or adjust Rows 137–140 before adding the border.
- Loops stretch: Work the 24 sc tightly. If needed, add a second round of sl st around each loop.
Care
Hand wash cool with mild detergent and dry flat, re-pinning to 6.5 x 70.5 in (16.5 x 179.1 cm). Don’t tumble dry, and don’t hang the strips wet on the rod.
Final Notes
The measurement chain is simple. Each mesh is 3 stitches wide, and 9 meshes plus the final post make 28 stitches, or 6 in (15.2 cm). With 8 rows to 4 in (10.2 cm), 140 rows make 70 in (177.8 cm). One border round adds 0.25 in (0.6 cm) per edge, so each strip finishes at 6.5 x 70.5 in (16.5 x 179.1 cm). Seven strips with 0.5 in (1.3 cm) gaps fill 48.5 in (123.2 cm) of rod.
If you check your first strip at each checkpoint, the other six will match it, and the curtain will hang evenly.
Happy crocheting!