

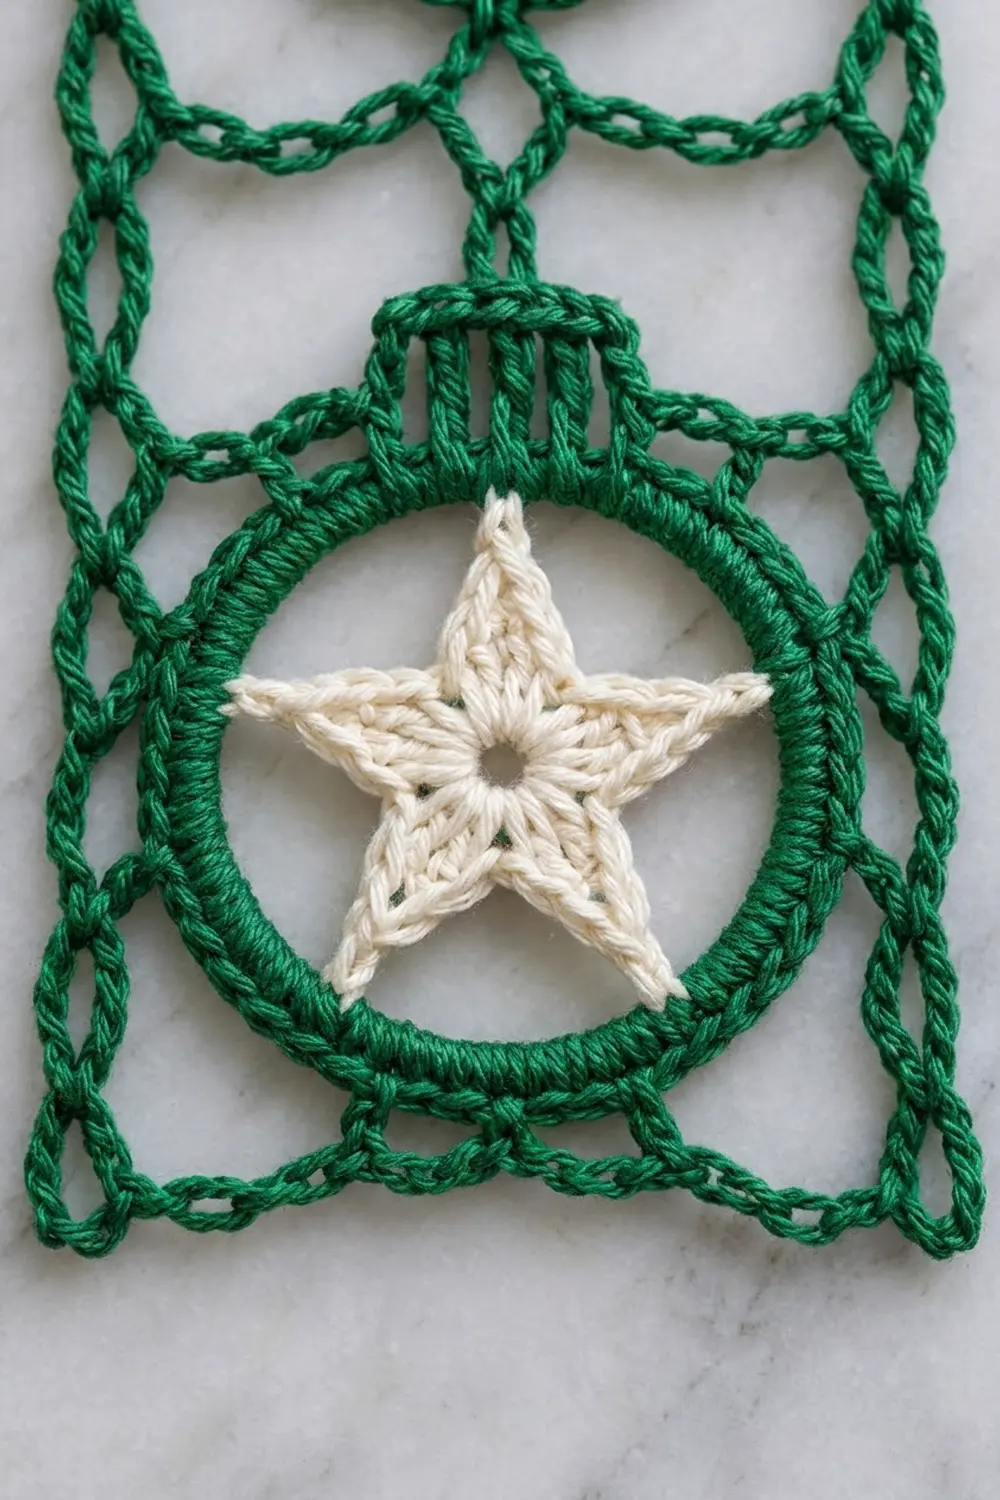
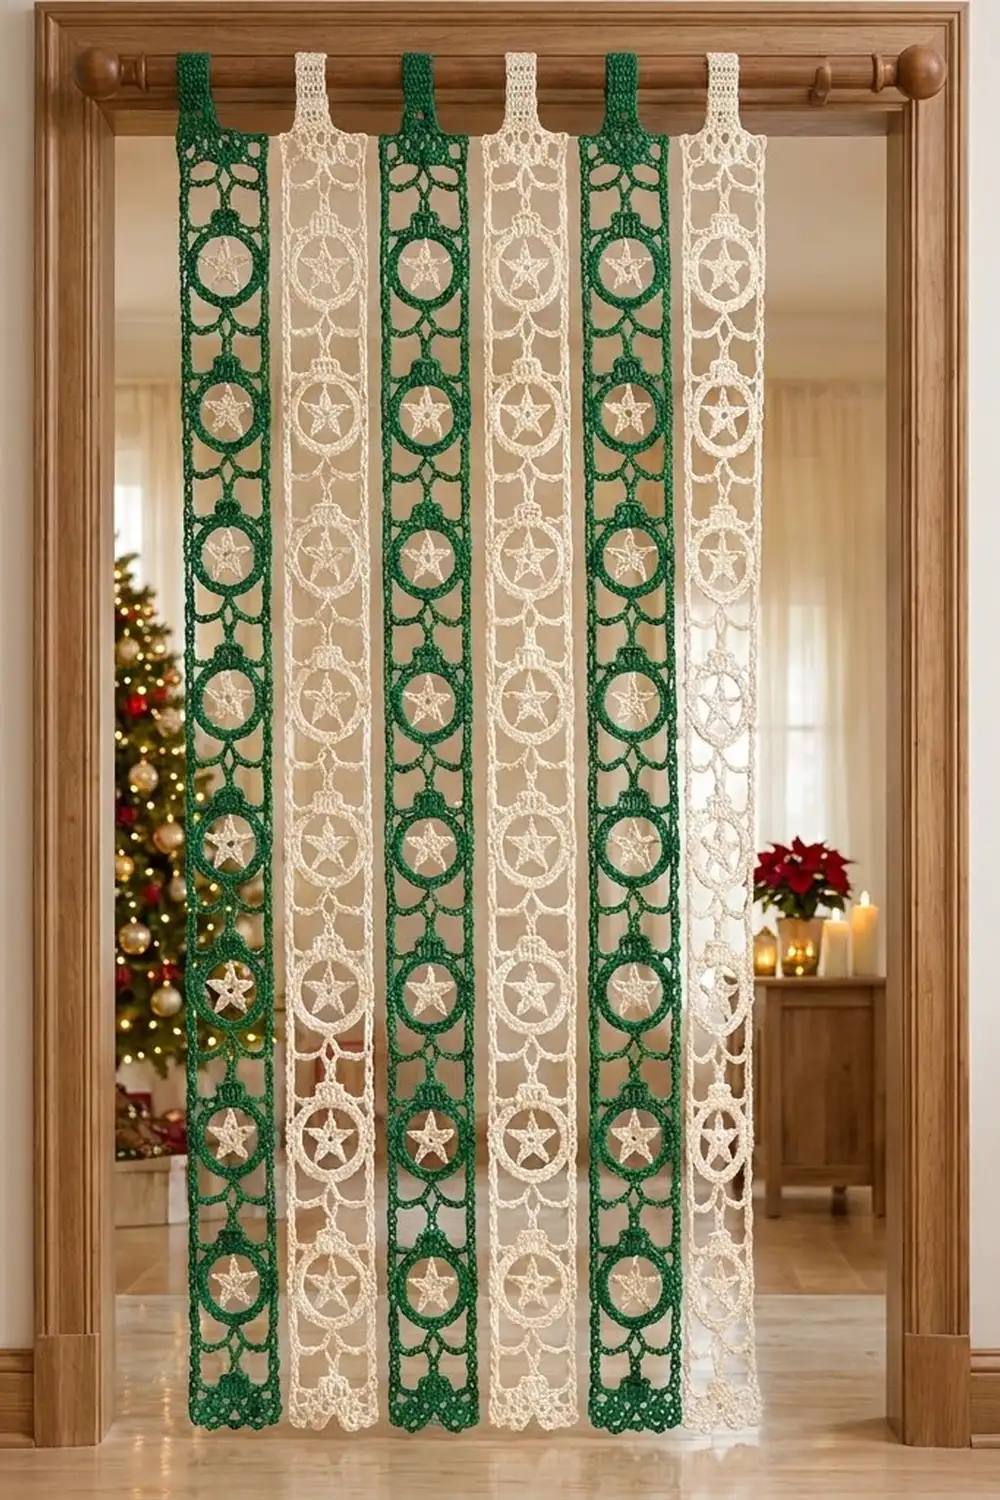
This doorway curtain is made of seven separate lace strips in pine green and soft cream. Each strip is a column of crocheted Christmas baubles: a round ring with a five-point star inside, a small ribbed cap on top, and an open chain lattice around it. The strips hang from a wooden rod and make a festive screen that still lets light through.
The colors alternate across the rod: green, cream, green, cream, green, cream, green. Green strips have green frames with cream stars. Cream strips are worked entirely in cream, so the star reads as texture instead of contrast.
This pattern uses US crochet terms. Each finished strip measures 6 in (15.2 cm) wide and 77 in (195.6 cm) long in the body. With the hanging tab and bottom loops, each strip hangs about 80 in (203.2 cm) from the rod. Seven strips with 0.5 in (1.3 cm) gaps fill a rod span of 45 in (114.3 cm).
The construction is simple and repetitive. You make one bauble unit at a time in rounds and join each new unit to the one above it as you go. Then you add a chain-loop border along both long sides of each strip. The top unit’s cap continues into a tab that wraps around the rod.
Finished Size and Construction
- Finished size (one strip): 6 in x 77 in (15.2 cm x 195.6 cm), plus tab and bottom loops
- Overall curtain: 45 in (114.3 cm) wide x about 80 in (203.2 cm) long
- Skill level: Intermediate
- Terminology: US
- Yarn weight: DK (3), cotton or cotton blend
- Hook: 3.5 mm (E-4)
- Number of pieces: 91 bauble units, joined into 7 strips of 13 units each
- Layout: 7 strips hung side by side, not joined to each other
- Piece size: one unit frame is 5 in (12.7 cm) square, not counting corner loops; units repeat every 6 in (15.2 cm)
- Size before border: 5 in x 77 in (12.7 cm x 195.6 cm) per strip
- Border depth: 0.5 in (1.3 cm) on each long side
Materials
Choose a smooth mercerized or combed cotton in DK weight. Cotton keeps the open lattice crisp and doesn’t stretch much when it hangs. Avoid fuzzy acrylics, because the chain loops lose definition.
- Green (MC): 400 g / 960 m (1050 yd), about 8 balls of 50 g / 120 m
- Cream (CC): 450 g / 1080 m (1181 yd), about 9 balls of 50 g / 120 m
These quantities include a margin of about 15 percent to cover gauge differences and swatching.
Tools:
- 3.5 mm (E-4) crochet hook
- Tapestry needle
- Stitch markers
- Rust-proof pins and blocking mats
- Measuring tape
- Curtain rod at least 48 in (121.9 cm) long and no more than 1.25 in (3.2 cm) in diameter
Abbreviations (US Terms)
- ch – chain
- sl st – slip stitch
- sc – single crochet
- hdc – half double crochet
- dc – double crochet
- tr – treble crochet
- sk – skip
- sp(s) – space(s)
- st(s) – stitch(es)
- RS – right side
Special stitch – Star Point: ch 6, sl st in 2nd ch from hook, sc in next ch, hdc in next ch, dc in next ch, tr in next ch. The chain you skipped at the start forms the tip of the point.
Gauge and Checkpoints
Sc gauge: 20 sc and 24 rows = 4 in (10.2 cm). The cap and tab are worked at this gauge.
Always make one complete test unit first. Measure it at each stage:
- After Round 2 (star): 2.5 in (6.4 cm) across, tip to tip.
- After Round 4 (ring): 3.5 in (8.9 cm) outer diameter.
- After Round 6 (frame): 5 in (12.7 cm) square, side to side, not counting corner loops.
- After cap: 1 in (2.5 cm) wide and 1 in (2.5 cm) tall.
If the unit is too big, go down 0.25 mm in hook size. If it’s too small, go up 0.25 mm. Don’t change any chain counts, because the joining and border math depends on them.
Bauble Unit
Work each unit in the round with the RS facing throughout. The star is always cream. For green strips, change to green at Round 3. For cream strips, use cream for every round.
Round 1 (CC): Make a magic ring, ch 1, 10 sc in ring, sl st to first sc. Pull the ring nearly closed, leaving a small hole in the center. (10 sc)
Round 2 (CC): Star Point, sk next sc, sl st in next sc; repeat from * 4 more times, working the final sl st in the first sc of the round. Fasten off. (5 points, 5 sts each)
Round 3 (MC or CC): Join with sc in the skipped tip ch of any point, ch 7, sc in tip ch of next point; repeat from * 3 more times, ch 7, sl st to first sc. (5 sc, 5 ch-7 sps)
Round 4: Ch 1, sc in next sc, 7 sc in next ch-7 sp; repeat from * 4 more times, sl st to first sc. (40 sc)
Place a marker in the Round 4 sc that sits directly above one star tip. That tip is the top of the bauble.
Round 5: Count back 4 sts from the marker and join with sc in that st (st 1). The marked st is now st 5. Ch 5, sk 3 sts, sc in next st, ch 5, sk 3 sts, sc in next st, ch 9, sk 1 st, sc in next st; repeat from * around. End the last repeat after “sk 1 st” with sl st to first sc. Each repeat uses 10 sts. (12 sc, 8 ch-5 sps, 4 ch-9 corner sps)
The sc in the marked st is the top center. The four ch-9 sps form the corners and turn the ring into a square.
Round 6: Sl st in next ch-5 sp, ch 1, sc in same sp, ch 6, sc in next ch-5 sp, ch 6, (sc, ch 12, sc) in next ch-9 corner sp, ch 6, sc in next ch-5 sp; repeat from * around. End the last repeat with sl st to first sc. (16 sc, 12 ch-6 sps, 4 ch-12 corner loops)
Each side now has 3 ch-6 sps between its 2 corner loops. The middle ch-6 sp of the top side is the top center, and the middle ch-6 sp of the bottom side is the bottom center.
Cap (same color as Round 6):
Row 1: Sl st into the top center ch-6 sp, ch 3 (counts as dc), 4 dc in same sp. (5 dc)
Row 2: Ch 3 (counts as dc), turn, dc in next 4 sts. (5 dc)
Row 3: Ch 1, turn, sc in each st across. (5 sc) Fasten off.
The two dc rows form the vertical ribbing of the bauble cap, and the sc row forms its top bar.
For Units 2 through 13, Round 6 and Cap Row 3 include joins instead; see Joining.
Make All Pieces
Each strip has 13 units. Make them in order from top to bottom, because each unit joins to the one above it.
- Green strips: 4 strips x 13 units = 52 units (cream Rounds 1–2; green Rounds 3–6 and cap)
- Cream strips: 3 strips x 13 units = 39 units (all cream)
- Total: 91 units
Rod layout, left to right:
| G | C | G | C | G | C | G |
  1   2   3   4   5   6   7
G = green strip   C = cream strip
Each column = 13 units stacked
Top unit and tab (Unit 1 of each strip): Work Rounds 1–6 and Cap Rows 1–3 with no joins. Don’t fasten off.
Rows 4–32: Ch 1, turn, sc in each st across. (5 sc) That makes 30 sc rows (Rows 3–32) measuring 5 in (12.7 cm).
Fold the tab toward the wrong side and whipstitch Row 32 to the back of Row 1. The finished loop is about 2.5 in (6.4 cm) deep and fits a rod up to 1.25 in (3.2 cm) in diameter.
Joining
Units are joined as you go, in Round 6 and Cap Row 3 of every unit from Unit 2 down. Hold the finished upper unit above your work, with the RS of both units facing you.
Round 6, joined version: Work Round 6 as written, except at the two top corners (the ch-9 sps at each end of the top side). At each of these, work (sc, ch 6, sl st in matching bottom corner ch-12 loop of the unit above, ch 6, sc). Join the top-right corner to the bottom-right loop above, and the top-left corner to the bottom-left loop. The bottom corners keep free ch-12 loops for the next unit.
How the stitches add up: 6 + 6 = 12 chains, so a joined loop is the same length as a free ch-12 loop. Round 6 still has 16 sc, 12 ch-6 sps and 4 corner loops.
Cap Row 3, joined version: Ch 1, turn, sc in first 2 sts, sl st in bottom center ch-6 sp of the unit above, sc in next 3 sts. (5 sc plus 1 joining sl st) Fasten off.
The cap now fills the 1 in (2.5 cm) gap between frames, and the corner loops hold the sides together. Each new unit adds 6 in (15.2 cm): 5 in (12.7 cm) of frame plus 1 in (2.5 cm) of cap.
Tension: Work the joining sl sts loosely, about the same size as your chains. A tight sl st pulls the corners together and makes the strip pucker.
Size checkpoint: After 3 joined units, the strip should measure 17 in (43.2 cm) from the top of the Unit 1 frame to the bottom of the Unit 3 frame (5 + 6 + 6). A full 13-unit strip is 5 + (12 x 6) = 77 in (195.6 cm).
Border
The border runs along both long sides of every strip and adds a row of ch-5 arches outside the frames.
Border gauge: Each ch-5 arch spans about 1.5 in (3.8 cm) of edge and stands out 0.5 in (1.3 cm).
Left side (RS facing, top to bottom): Using the strip’s color, join with sc in the free top-left corner loop of Unit 1. (Ch 5, sc in next ch-6 sp) 3 times, ch 5, sc in next corner loop; repeat from * 12 more times. Fasten off.
Where two units meet, the “next corner loop” is the joined pair, so insert the hook under both loops together. On Unit 13, it’s the free bottom-left loop.
Count per long side: 1 starting sc + (13 units x 4 sc) = 53 sc, and 13 x 4 = 52 ch-5 arches.
Right side: Turn the strip around and join with sc in the free bottom-right corner loop of Unit 13. Work the same repeat up to the top-right corner loop of Unit 1. (53 sc, 52 ch-5 arches)
Why the math works: Each unit side has exactly 3 ch-6 sps plus one lower corner, so each unit adds 4 anchors and 4 arches. Joined corners are shared, not counted twice, so the seams add no extra stitches. The 4 arches cover 5 in (12.7 cm) of frame plus 1 in (2.5 cm) of joined gap, about 1.5 in (3.8 cm) each, which 5 chains reach without pulling. The border widens the strip from 5 in (12.7 cm) to 6 in (15.2 cm).
The short ends get no border. The tab finishes the top, and the free bottom corner loops finish the bottom.
Final Blocking
- Weave in all ends along the chain lines, splitting the plies so they hold.
- Soak one strip in cool water for 10 minutes, then squeeze gently without wringing.
- Roll the strip in a towel to remove excess water.
- Lay it flat on the mats, working in sections of 3 or 4 units.
- Pin each frame to 5 in (12.7 cm) square and the strip to 6 in (15.2 cm) wide at the border arches.
- Pin every star point outward and center the ring around the star.
- Pin each ch-5 arch into an even curve.
- Let the section dry fully before moving to the next one.
- Repeat for all 7 strips, checking that each body measures 77 in (195.6 cm).
Final Quality-Control Checklist
- Every unit has 40 sc in Round 4 and 16 sc in Round 6.
- Every star has 5 even points, with the top point straight up.
- Each cap is 5 sts wide and centered on its frame.
- All corner joins lie flat with no twist.
- Each long side has 53 sc and 52 arches.
- All 7 strips match in length to within 0.5 in (1.3 cm).
- Tabs are sewn securely and slide freely on the rod.
- Colors alternate G, C, G, C, G, C, G.
Troubleshooting
Star cups or ruffles: Pull the magic ring tighter, and check that Round 2 skips 1 sc between points.
Ring ruffles: Work 7 sc per ch-7 sp, not more, or use a smaller hook for Round 4.
Frame looks round, not square: The ch-9 corners need room. Make sure you skip only 1 st under each corner.
Strip pulls in at the seams: The joining sl sts are too tight. Redo them more loosely.
Border flares: Your chains are loose. Use ch 4 instead of ch 5 and keep the same number of anchors.
Strips hang at different lengths: Compare them after blocking, then re-block the long one shorter. Cotton responds well to pinning.
Care
Hand wash in cool water and dry flat, reshaping as you did during blocking. For storage, take the strips off the rod and fold them loosely to keep the arches neat.
Final Notes
The measurement chain is short and exact. The star is 2.5 in (6.4 cm), the ring is 3.5 in (8.9 cm), and the frame is 5 in (12.7 cm) square. Each joined unit adds 6 in (15.2 cm), so 13 units make 77 in (195.6 cm). The border brings each strip to 6 in (15.2 cm) wide, and seven strips with gaps span 45 in (114.3 cm). If your test unit measures 5 in (12.7 cm), every other number follows from it.
Happy crocheting!