

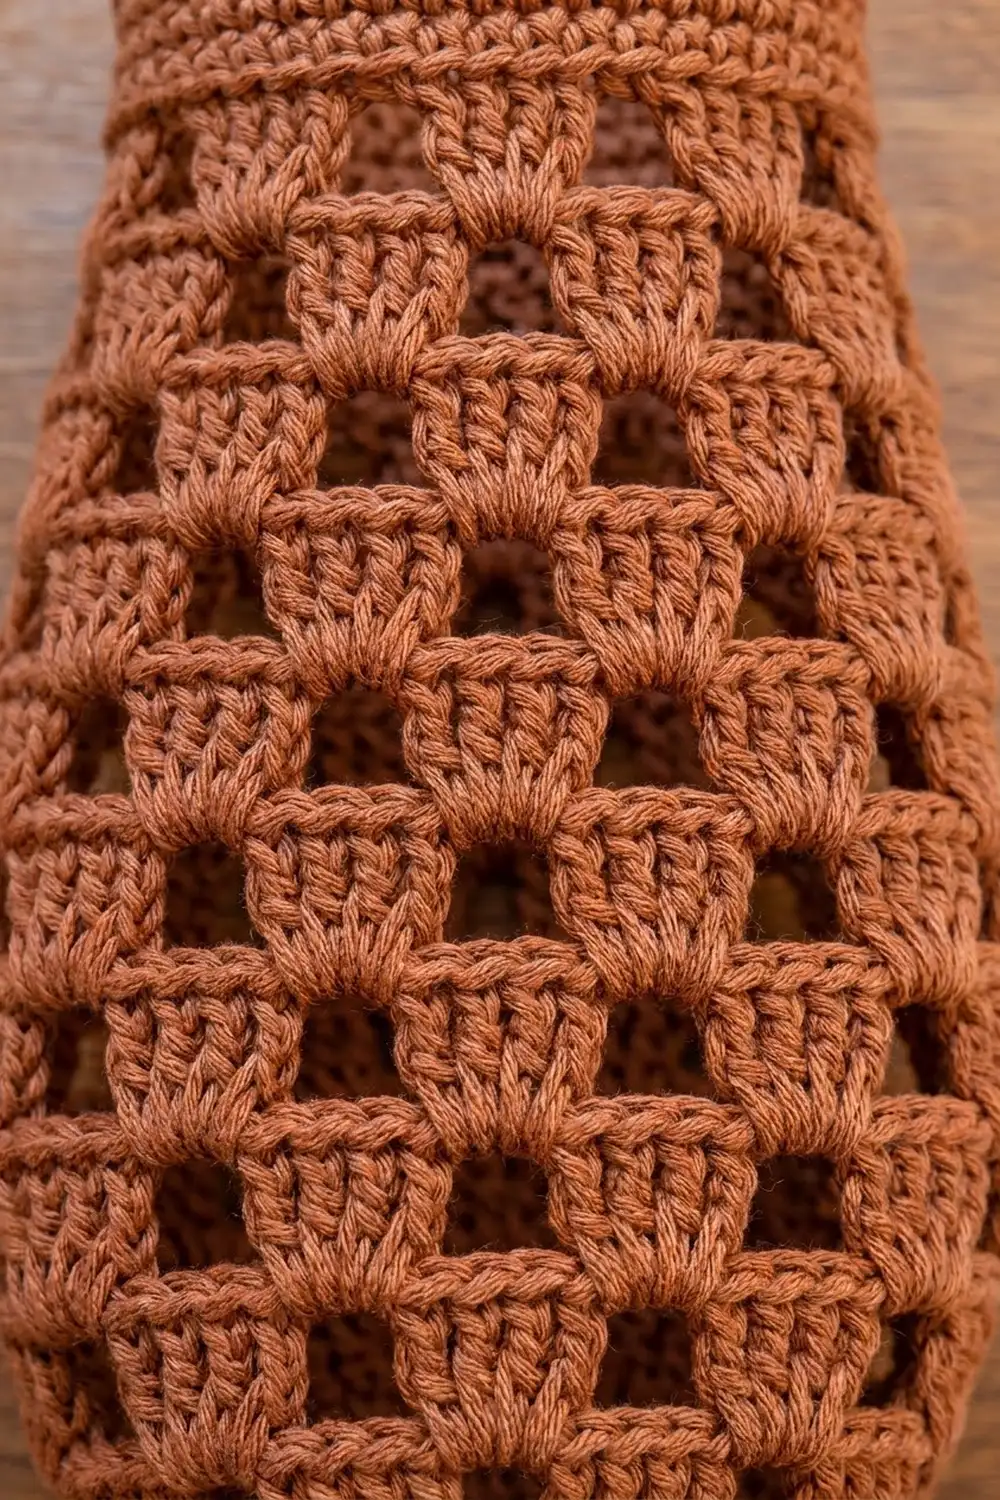
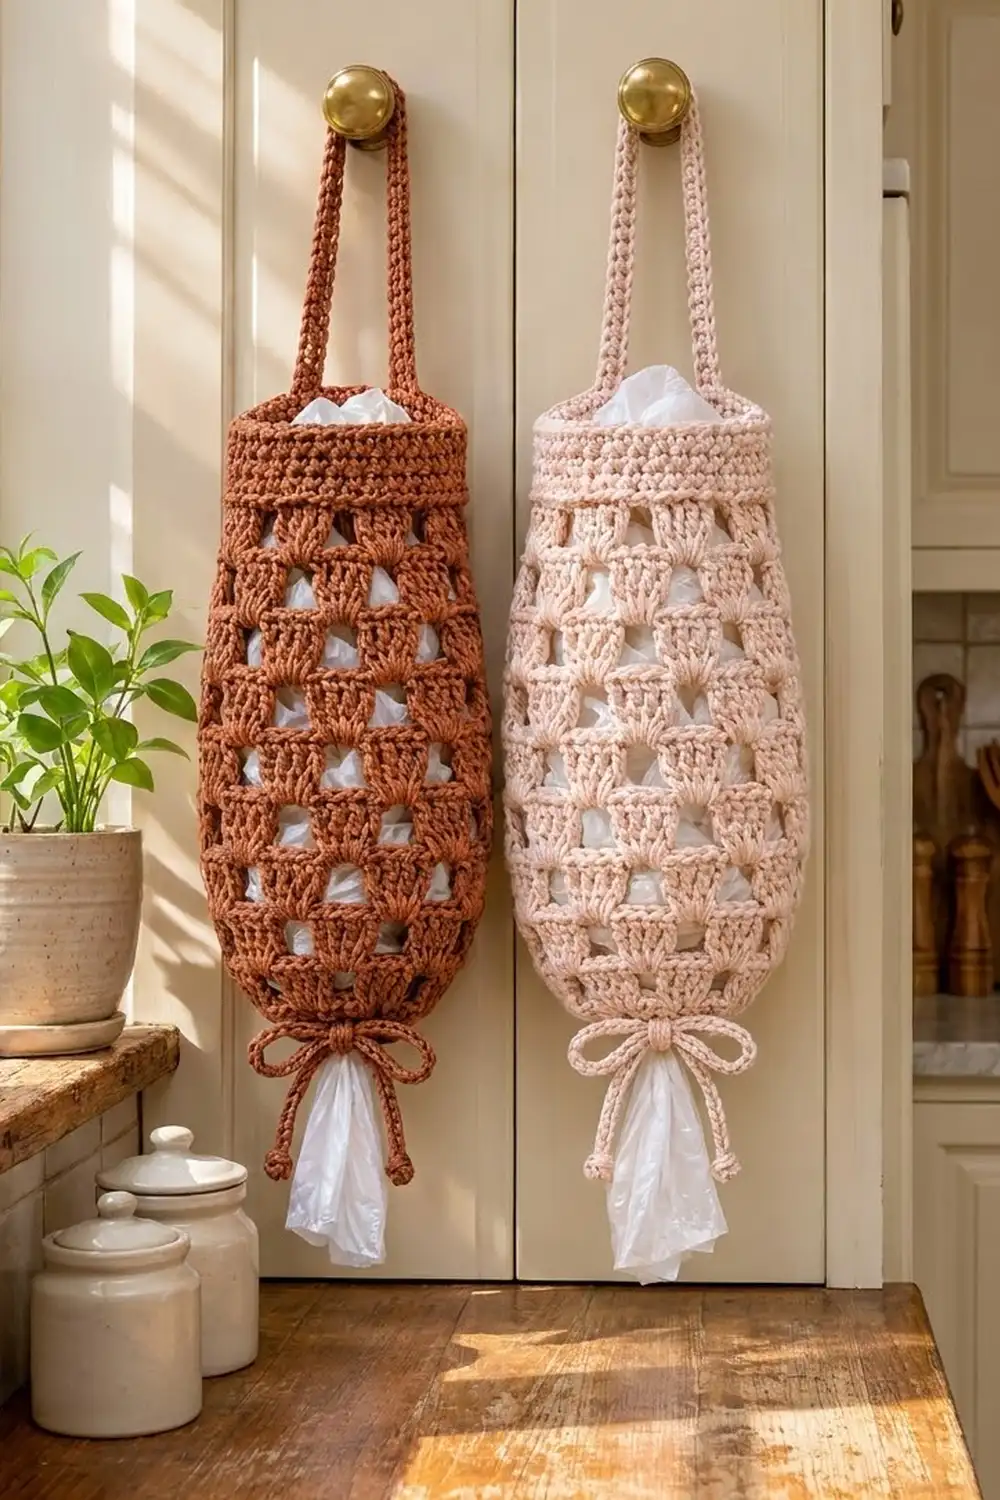
This plastic bag holder is long and egg-shaped, with an open lace of little double-crochet fans set in a brick pattern. The square windows between the fans show the bags inside. A solid band at the top, a drawstring at the bottom, and a narrow strap make it ready to hang on a cabinet knob or hook.
The sample is in warm rust/terracotta cotton. It also works well in pale blush pink, cream, sage, or any solid color that suits your kitchen. A firm cotton gives the fans a clear shape and helps the holder keep its form when it is full.
The pattern uses US crochet terms. The finished holder measures 8 in (20.3 cm) across at its widest when laid flat and 12.1 in (30.7 cm) tall, not counting the strap. The strap is 8 in (20.3 cm) long before it is sewn down.
The whole holder is one piece, worked from the bottom up in joined rounds. You start with a small solid band that has an eyelet round for the drawstring. Then you work the fan mesh, increase it to full width, decrease it again, and finish with a solid top band. The strap is worked in rows straight off the top band, and the drawstring is a separate chain cord.
Finished Size and Construction
- Finished size: 8 in (20.3 cm) wide at widest (flat) × 12.1 in (30.7 cm) tall
- Skill level: Easy–Intermediate
- Terminology: US
- Yarn weight: Worsted (#4), cotton or cotton blend
- Hook: 5.0 mm (H-8)
- Number of pieces: 1 body (with strap worked on) plus 1 drawstring cord
- Layout: One seamless tube, worked bottom up
- Bottom opening: 4 in (10.2 cm) flat, 36 stitches around
- Size before top band: 6 in (15.2 cm) flat × 10.1 in (25.7 cm) tall
- Top band depth: 2 in (5.1 cm), 10 rounds
Materials
Yarn: Use a smooth worsted-weight cotton with a firm twist. Fuzzy or very soft yarn blurs the fans and stretches when full of bags.
- Main color (rust/terracotta, or blush pink for the alternate version): 110 g, about 210 m (230 yd)
The amount includes a margin of about 15% for your gauge swatch, the drawstring, and weaving in ends.
Tools:
– 5.0 mm (H-8) crochet hook
– 2 stitch markers
– Tapestry needle
– Scissors
– Measuring tape
– Rust-proof pins and a spray bottle for blocking
Abbreviations (US Terms)
- ch – chain
- sl st – slip stitch
- sc – single crochet
- sc2tog – single crochet 2 together
- dc – double crochet
- sk – skip
- sp – space
- st(s) – stitch(es)
- rep – repeat
Special stitches
– Fan: 4 dc in the same ch-2 sp.
– Block: the 4 dc of a fan from the round below. You skip each block with a ch-2.
– Increase fan (inc fan): (4 dc, ch 2, 4 dc) in the same ch-2 sp. This adds one repeat.
– Decrease fan (dec fan): 2 dc in the next ch-2 sp, sk the next block, 2 dc in the following ch-2 sp. This takes away one repeat.
One repeat is one fan plus one ch-2 sp, which equals 6 stitches.
Gauge and Checkpoints
- Single crochet gauge: 18 sc × 20 rounds = 4 in (10.2 cm)
- Mesh gauge: 3 repeats = 4 in (10.2 cm) wide; 1 mesh round = 0.5 in (1.3 cm) tall
Test first. Work Rounds 1–6 as your gauge piece. Flatten the ring. It should measure 4 in (10.2 cm) across, and Rounds 5–6 together should be 1 in (2.5 cm) tall. If it measures right, keep going on the same piece.
Checkpoints (laid flat):
– After Rnd 4: 4 in (10.2 cm) wide, 1.1 in (2.8 cm) tall
– After Rnd 8: 6 in (15.2 cm) wide, 3.1 in (7.9 cm) tall
– After Rnd 19: 8 in (20.3 cm) wide, 8.6 in (21.8 cm) tall
– After Rnd 22: 6 in (15.2 cm) wide, 10.1 in (25.7 cm) tall
– After Rnd 32: 5.3 in (13.5 cm) wide, 12.1 in (30.7 cm) tall
Too big? Go down to a 4.5 mm (US 7) hook. Too small? Go up to a 5.5 mm (I-9) hook. If only the mesh is off, change hooks for the mesh and keep your original hook for the sc bands.
Bottom Band
Ch 36. Join with a sl st to the first ch to make a ring, making sure the chain isn’t twisted. Place a marker at the start of each round.
Rnd 1: Ch 1, sc in each ch around, join with sl st to the first sc. (36 sc)
Rnd 2 (eyelet round): Ch 4 (counts as dc + ch 1), sk next st, dc in next st, ch 1, sk next st; rep from * around. Join with sl st to the 3rd ch of the beginning ch-4. (18 dc + 18 ch-1 sps = 36 sts)
Rnd 3: Ch 1, sc in each dc and in each ch-1 sp around, join. (18 sc in dc + 18 sc in sps = 36 sc)
Rnd 4: Ch 1, sc in each st around, join. (36 sc)
Checkpoint: 4 in (10.2 cm) flat, 1.1 in (2.8 cm) tall.
Fan Mesh Body
Rnd 5 (set-up blocks): Ch 3 (counts as dc), dc in next 3 sts, ch 2, sk 2 sts, dc in next 4 sts, ch 2, sk 2 sts; rep from * around. Join to the top of the ch-3. (6 blocks + 6 ch-2 sps = 36 sts, 6 repeats)
Rnd 6 (fan round): Sl st in next 3 dc and into the next ch-2 sp. Ch 3 (counts as dc), 3 dc in the same sp, ch 2, sk next block, fan in next ch-2 sp, ch 2, sk next block; rep from * around. Join to the top of the ch-3. (6 fans + 6 ch-2 sps = 36 sts)
Each fan sits over a window and each window sits over a fan. This makes the brick-offset checkerboard. Every later round starts the same way: sl st in the next 3 dc and into the next ch-2 sp, then ch 3, which counts as the first dc of the first fan.
Rnd 7 (increase): Inc fan in next ch-2 sp, ch 2, sk next block, fan in next ch-2 sp, ch 2, sk next block; rep from * 3 times in total. Join. (9 fans + 9 ch-2 sps = 54 sts, 9 repeats)
Rnd 8: Work a fan round as in Rnd 6. (54 sts, 9 repeats)
Checkpoint: 6 in (15.2 cm) flat, 3.1 in (7.9 cm) tall.
Rnd 9 (increase): Inc fan in next ch-2 sp, ch 2, sk next block, (fan in next ch-2 sp, ch 2, sk next block) twice; rep from * 3 times in total. Join. (12 fans + 12 ch-2 sps = 72 sts, 12 repeats)
Rnds 10–19: Work a fan round as in Rnd 6. (72 sts, 12 repeats each round; 10 rounds)
Checkpoint: 8 in (20.3 cm) flat, 8.6 in (21.8 cm) tall. This is the widest part of the egg shape.
Rnd 20 (decrease): Dec fan, ch 2, sk next block, (fan in next ch-2 sp, ch 2, sk next block) twice; rep from * 3 times in total. Join. (9 fans + 9 ch-2 sps = 54 sts, 9 repeats)
Each section of this round uses 4 ch-2 sps, so 3 sections use all 12.
Rnds 21–22: Work a fan round as in Rnd 6. (54 sts, 9 repeats each round)
Checkpoint: 6 in (15.2 cm) flat, 10.1 in (25.7 cm) tall.
Border: Top Band and Strap
The top band is the border of this piece. It is worked at sc gauge: 18 sc = 4 in (10.2 cm), and 5 rounds = 1 in (2.5 cm).
Rnd 23 (conversion): Ch 1, sc in each dc around and 2 sc in each ch-2 sp. Join. (36 sc in dc + 18 sc in sps = 54 sc)
Rnd 24 (trim): Ch 1, sc in next 7 sts, sc2tog; rep from * 6 times in total. Join. (42 sc worked 1-per-stitch + 6 sc2tog = 48 sts)
Rnds 25–32: Ch 1, sc in each st around, join. (48 sc each round; 8 rounds)
Checkpoint: 5.3 in (13.5 cm) flat, 12.1 in (30.7 cm) tall. When the band is laid flat with the strap stitches centered, each side has 24 sts.
Why the math works: Rnd 22 has 9 fans of 4 dc (36 sts) and 9 ch-2 sps. Putting 1 sc in each dc and 2 sc in each space gives exactly 54 stitches, so the mesh closes without gaps or puckers. Rnd 24 takes away 6 stitches, which makes 48. That narrows the opening slightly, as in the photo, and divides into two even sides of 24.
Strap
Do not fasten off. Mark the first 5 sts of Rnd 32 as sts 1–5. Count around and mark sts 25–29 on the opposite side.
Row 1: Ch 1, sc in sts 1–5, turn. (5 sc)
Rows 2–40: Ch 1, sc in each st across, turn. (5 sc each row)
The strap is 8 in (20.3 cm) long and 1.1 in (2.8 cm) wide. Fasten off and leave a 12 in (30.5 cm) tail. Make sure the strap isn’t twisted, then whipstitch the last row to sts 25–29. That leaves 19 sts open between the strap ends on each side (sts 6–24 and sts 30–48).
Drawstring
Ch 72, about 18 in (45.7 cm). Sl st in the back bump of each ch back along the chain to make a firm cord. Fasten off. Weave the cord in and out through the ch-1 sps of Rnd 2, starting and ending at the same space. Tie a double overhand knot at each end so it forms a small round bead, and trim the tail to 0.25 in (0.6 cm). Pull the cord to gather the bottom opening to about 1.5 in (3.8 cm) across, then tie a bow.
Final Blocking
- Weave in all ends along stitches of the same color, avoiding the open windows.
- Spray the holder evenly until it is damp but not soaked.
- Stuff it loosely with plastic bags or a rolled towel to make the egg shape.
- Push each fan straight up and open each window into a square with your fingers.
- Pin the top band flat at 5.3 in (13.5 cm) wide, and pin the strap straight.
- Let it dry completely, at least 12 hours, before removing the pins.
Final Quality-Control Checklist
- The bottom band has 36 sts and 18 open eyelets.
- The widest point measures 8 in (20.3 cm) flat.
- Every fan sits centered over a window from the round below.
- No round has a doubled fan or a missing ch-2 next to the join.
- The top band has 48 sts and measures 5.3 in (13.5 cm) flat.
- The strap ends sit directly opposite each other, with 19 sts between them on each side.
- The drawstring moves easily, and both knots are tight.
Troubleshooting
Fans lean or spiral. Your ch-2 is too tight. Make the chains a little looser, and always work the fan into the space, not into the chain stitches.
Wrong stitch count after an increase or decrease round. Count the ch-2 sps, not the dc. Rnd 7 should have 9, Rnd 9 should have 12, and Rnd 20 should have 9.
Top band ruffles. Check that you worked the Rnd 24 decreases. If it still ruffles, go down one hook size for Rnds 25–32.
Strap stretches too much. Work the strap with a hook one size smaller, or add a row of sl sts along both long edges.
Bags fall out of the bottom. Pull the drawstring tighter, or work Rnd 2 with a hook one size smaller.
Care
Hand wash or machine wash on a cool gentle cycle inside a laundry bag. Reshape while damp and lay flat or hang to dry.
Final Notes
Each stage depends on the one before it. The 36-st bottom band measures 4 in (10.2 cm) flat. The mesh grows from 6 to 9 to 12 repeats at 3 repeats per 4 in (10.2 cm), which gives a widest point of 8 in (20.3 cm). It then shrinks back to 9 repeats, converts to exactly 54 sc, and trims to a 48-st top band 5.3 in (13.5 cm) wide. Check your gauge at each checkpoint and the holder will finish at 12.1 in (30.7 cm) tall, ready for the strap and drawstring.
Happy crocheting!