

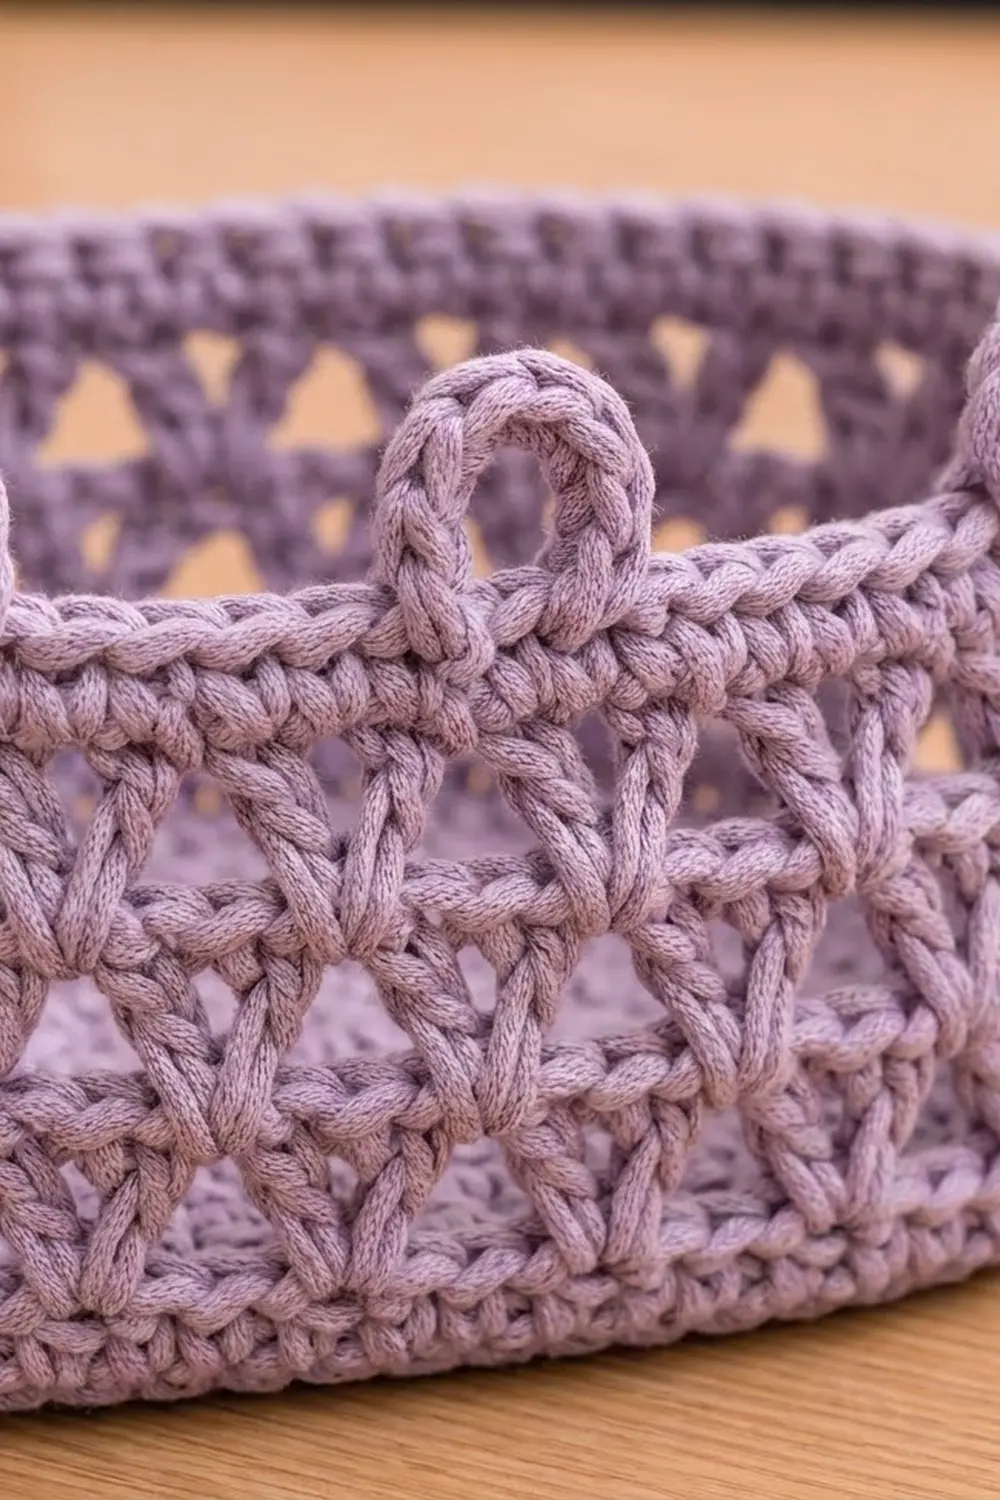
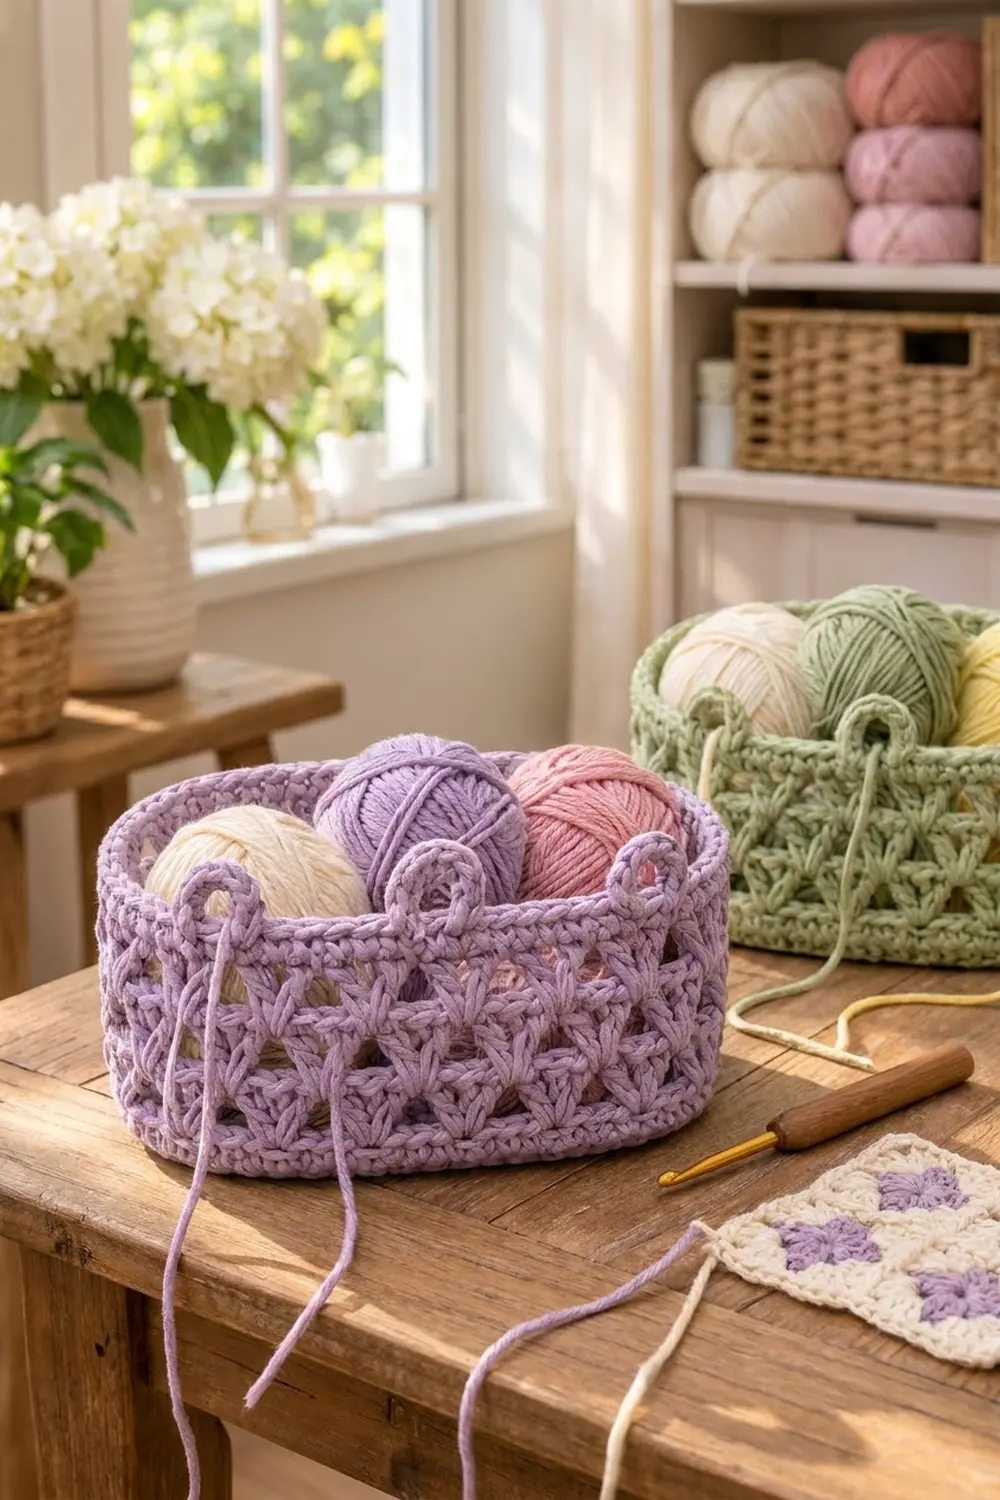
This oval yarn basket keeps your working balls of yarn tidy and stops them from rolling away. The base is solid, the wall has an open lattice of staggered V-stitches with rows of triangle-shaped windows, and the rim is firm with three round loops on top. You thread each working strand through a loop so the yarns don’t tangle while you crochet.
The sample is in soft lavender cotton, a calm color that suits a craft table. It works just as well in sage, cream or blush, and a sage version looks good next to the lavender one. The chunky cotton gives the basket a rope-like texture and enough body to stand up without a liner.
This pattern uses US crochet terms throughout. The finished basket measures about 9 in long × 5 in wide × 4 in tall (22.9 × 12.7 × 10.2 cm). The loops add about 1 in (2.5 cm) above the rim.
You work the basket as one continuous piece. First you crochet an oval base in rounds of single crochet. A back-loop round turns the base upward into the wall, and four V-stitch rounds make the lattice band. Three single crochet rim rounds close the top, and the yarn-guide loops are made during the last round. Nothing is sewn on.
Finished Size and Construction
- Finished size: 9 in × 5 in × 4 in (22.9 × 12.7 × 10.2 cm); loops add 1 in (2.5 cm)
- Skill level: Easy–Intermediate
- Terminology: US crochet terms
- Yarn weight: Chunky / bulky (#5) cotton or cotton blend
- Hook: 6.0 mm (US J-10)
- Number of pieces: 1 (worked in one piece)
- Layout: Oval base → wall turn → lattice band → rim with 3 loops
- Base size: 9 in × 5 in (22.9 × 12.7 cm) after Round 7
- Height before rim: 3 in (7.6 cm) after Round 13
- Rim depth: 1 in (2.5 cm), Rounds 14–16
Materials
Yarn: Use a smooth chunky (#5) cotton or a cotton-rich blend with good stitch definition, about 150 m (164 yd) per 100 g. Cotton holds its shape better than acrylic, so the wall won’t slump when the basket is full. Avoid fuzzy or very stretchy yarns because they hide the triangle openings.
- Lavender (main color): 200 g, about 300 m (328 yd)
Quantities include a comfortable margin. The sample used about 150 g, and the extra covers gauge differences and a swatch.
Tools:
- 6.0 mm (US J-10) crochet hook
- 4 locking stitch markers
- Yarn needle
- Scissors
- Measuring tape
- Spray bottle and a small box or a rolled towel for blocking
Abbreviations (US Terms)
- ch: chain
- sl st: slip stitch
- sc: single crochet
- dc: double crochet
- BLO: back loop only
- sp: space
- st(s): stitch(es)
- rep: repeat
- inc: 2 sc in the same stitch
Special stitch: V-stitch (V-st)
(dc, ch 2, dc) in the stitch or space indicated.
Gap: the space between two neighboring V-sts. You work into it in the offset lattice rounds.
Gauge and Checkpoints
Gauge: 11 sc and 12 rounds = 4 in (10.2 cm) in sc worked in rounds.
Your first test is the base itself. Make Rounds 1–7 and measure before you start the wall. If the base is right, the rest of the basket follows.
Checkpoints:
- After Round 1: about 5.5 in (14.0 cm) long
- After Round 7: 9 in × 5 in (22.9 × 12.7 cm), within ¼ in (0.6 cm)
- After Round 9: wall stands about ¾ in (1.9 cm) tall
- After Round 13: total height about 3 in (7.6 cm)
- After Round 16: total height about 4 in (10.2 cm)
If your base is too big, go down to a 5.5 mm (US I-9) hook and start again. If it’s too small, go up to a 6.5 mm (US K-10.5) hook. Don’t fix the size by adding or removing rounds. The wall stitch count has to stay at 68.
If the base cups or ruffles, check that you are making exactly 6 increases per round and only in the curved ends. A slight dome usually flattens with blocking.
Pattern
Oval Base
Work in joined rounds. Join each round with a sl st to the first sc. The ch 1 at the start of a round does not count as a stitch.
Round 1: Ch 16. Sc in 2nd ch from hook and in the next 13 ch (14 sc). Work 3 sc in the last ch. Rotate and work along the other side of the foundation chain: sc in the next 13 ch, then 2 sc in the last ch (the same ch as the first sc). Join. (32 sts)
That is 3 end sts, 13 straight sts, 3 end sts and 13 straight sts. The 13-st straight sections stay the same in every base round. All increases go into the curved ends.
Round 2: Ch 1, inc in the first st, sc in the next 13 sts, inc in each of the next 3 sts, sc in the next 13 sts, inc in each of the last 2 sts. Join. (38 sts)
Round 3: Ch 1, sc in the first st, inc in the next st, sc in the next 13 sts, [sc in next st, inc in next st] 3 times, sc in the next 13 sts, [sc in next st, inc in next st] 2 times. Join. (44 sts)
Round 4: Ch 1, sc in the next 2 sts, inc in the next st, sc in the next 13 sts, [sc in next 2 sts, inc in next st] 3 times, sc in the next 13 sts, [sc in next 2 sts, inc in next st] 2 times. Join. (50 sts)
Round 5: Ch 1, sc in the next 3 sts, inc in the next st, sc in the next 13 sts, [sc in next 3 sts, inc] 3 times, sc in the next 13 sts, [sc in next 3 sts, inc] 2 times. Join. (56 sts)
Round 6: Ch 1, sc in the next 4 sts, inc in the next st, sc in the next 13 sts, [sc in next 4 sts, inc] 3 times, sc in the next 13 sts, [sc in next 4 sts, inc] 2 times. Join. (62 sts)
Round 7: Ch 1, sc in the next 5 sts, inc in the next st, sc in the next 13 sts, [sc in next 5 sts, inc] 3 times, sc in the next 13 sts, [sc in next 5 sts, inc] 2 times. Join. (68 sts)
Round 7 breaks down as 7 + 13 + 21 + 13 + 14 = 68. The two curved ends hold 21 sts each (7 + 14 and 21), and the long sides hold 13 sts each.
Checkpoint: The base measures 9 in × 5 in (22.9 × 12.7 cm) and lies flat.
Turning the Wall
Round 8: Ch 1, sc in BLO of each st around. Join. (68 sc)
The unused front loops form a neat ridge around the base, and the work starts to rise.
Round 9: Ch 1, sc in both loops of each st around. Join. (68 sc)
Checkpoint: The solid wall is about ¾ in (1.9 cm) tall.
Lattice Band
Each V-st round has 17 V-sts. 68 ÷ 4 = 17, so the repeat fits the base exactly.
Round 10: Ch 5 (counts as dc + ch 2), dc in the same st as the join (first V-st). Skip 3 sts, V-st in the next st; rep from * 15 more times. Skip the last 3 sts and join with a sl st to the 3rd ch of the beginning ch-5. (17 V-sts)*
Stitch check: 17 repeats × 4 sts each = 68 sts used.
Round 11 (offset round): Sl st into the next 2 ch and the next dc, so you finish at the gap between the first and second V-sts. Ch 5 (counts as dc + ch 2), dc in the same gap. V-st in the next gap; rep from * 15 more times. Join to the 3rd ch of the beginning ch-5. (17 V-sts)*
Each new V-st sits centered between two V-sts of the round below. The diagonal posts cross over each other, which makes the triangle-shaped openings.
Round 12: Repeat Round 11. (17 V-sts)
Round 13: Repeat Round 11. (17 V-sts)
Checkpoint: The basket is about 3 in (7.6 cm) tall, and the lattice band is about 2¼ in (5.7 cm). The wall should rise straight up. If it flares out, work the V-sts more tightly and make the ch-2 spaces snug.
Border (Rim)
The rim works as the basket’s border. It closes the lattice, firms up the top edge, and carries the three loops.
Border gauge: The same as the base, 11 sc = 4 in (10.2 cm). Over the rim, the 13-st long sides measure about 4¾ in (12.1 cm) each, and each 21-st curved end measures about 7.6 in (19.4 cm) around its curve.
Round 14 (conversion round): Ch 1. Sc in the same st as the join, 2 sc in the next ch-2 sp, sc in the next dc. Sc in the next dc, 2 sc in the next ch-2 sp, sc in the next dc; rep from * 15 more times. Do not work into the gaps between V-sts. Join. (68 sc)*
Count: 34 sc worked 1 per dc (2 dc × 17 V-sts) + 34 sc added in the ch-2 sps (2 × 17) = 68 sc.
Round 15: Ch 1, sc in each st around. Join. (68 sc)
Before Round 16: Press the basket flat with one long side toward you. Place a marker in the stitch at the center of that long side. Count 5 sts to the right and mark that st, then count 5 sts to the left and mark that st. Each long side has 13 sts, so the outer two loops sit 1 st in from where the side starts curving into the end. That matches the photo.
Round 16 (loop round): Ch 1. Sc in each st around. When you reach a marked st, make a loop like this: sc in the marked st, ch 8, sl st in the same marked st to close a ring. Work 12 sc into the ch-8 ring, sl st again into the base of the ring, and continue with sc in the next st. Make all 3 loops this way. Join with an invisible join. (68 sc + 3 loops)
The loops are worked into the ring and do not count toward the 68. Each covered loop is about 1 in (2.5 cm) across and stands about 1 in (2.5 cm) above the rim.
Per-side summary for Rounds 14–16: long side 13 + curved end 21 + long side 13 + curved end 21 = 68 sts.
Why the math works: The rim has the same count as Round 7 (68 sts), so the top opening matches the base footprint and the wall stays vertical. The lattice band takes 68 sts and gives back 68 sts: 17 repeats × 4 sts in Round 10, and 34 + 34 in Round 14. No stitches are gained or lost from base to rim.
Checkpoint: The rim is 1 in (2.5 cm) deep, and the total height is 4 in (10.2 cm) to the rim.
Weave in all ends on the inside of the wall, hiding them in the solid sc rounds.
Final Blocking
- Mist the whole basket lightly with water until it is damp but not soaked.
- Fit a small box about 9 in × 5 in (22.9 × 12.7 cm) inside, or a tightly rolled towel shaped into an oval.
- Press the base flat against the table and nudge the curved ends into smooth, even arcs.
- Pull the lattice band gently upward so each triangle opening sits evenly and the V-sts point straight up.
- Shape each loop into a round ring, standing upright. A pencil through each loop helps hold the shape.
- Leave it to dry completely, usually 24 hours, before taking out the form.
Final Quality-Control Checklist
- Base measures 9 in × 5 in (22.9 × 12.7 cm) and sits flat without rocking
- BLO ridge from Round 8 runs evenly all the way around the bottom edge
- Each lattice round has exactly 17 V-sts
- Triangle openings line up in neat staggered rows
- Rim rounds each have 68 sc
- Three loops sit on the same long side, evenly spaced 5 sts apart
- Total height is 4 in (10.2 cm) to the rim, plus 1 in (2.5 cm) for the loops
- All ends are woven in on the inside, with no tails showing through the openings
Troubleshooting
Base curls into a bowl: You are making too few increases or working too tightly. Check that each round adds exactly 6 sts, or go up a hook size for the base only.
Base ruffles: You have extra increases, or you put increases in the straight sections. Keep the 13 straight sts plain in every round.
V-sts lean in a spiral: Make sure the start of each offset round moves to the next gap with sl sts and doesn’t start in the same place twice.
Ended up with 16 or 18 V-sts: Recount Round 9. It must be 68 sts. In Round 10, skip exactly 3 sts every time.
Wall flares outward: Your dc are loose. Shorten the ch-2 spaces, or work the lattice with a hook 0.5 mm smaller.
Loops flop over: Pack the 12 sc tightly into each ring and block the loops upright.
Rim waves: Round 14 has too many sts. Work exactly 2 sc per ch-2 space and nothing into the gaps.
Care
Hand wash in cool water with a mild detergent, press out the water in a towel, and dry it flat over the same form you used for blocking. Don’t tumble dry, because heat can shrink cotton and distort the oval.
Final Notes
Everything in this basket follows from one measurement chain. The 68-st base is 9 in × 5 in (22.9 × 12.7 cm). Rounds 8–9 keep the 68 sts and raise the wall ¾ in (1.9 cm). The lattice splits 68 into 17 V-st repeats and adds 2¼ in (5.7 cm) of height. Round 14 returns to exactly 68 sts (34 + 34), and the rim finishes at 4 in (10.2 cm) tall with three 1 in (2.5 cm) loops. If your base matches the checkpoint, every round after it will fit.
Happy crocheting!