

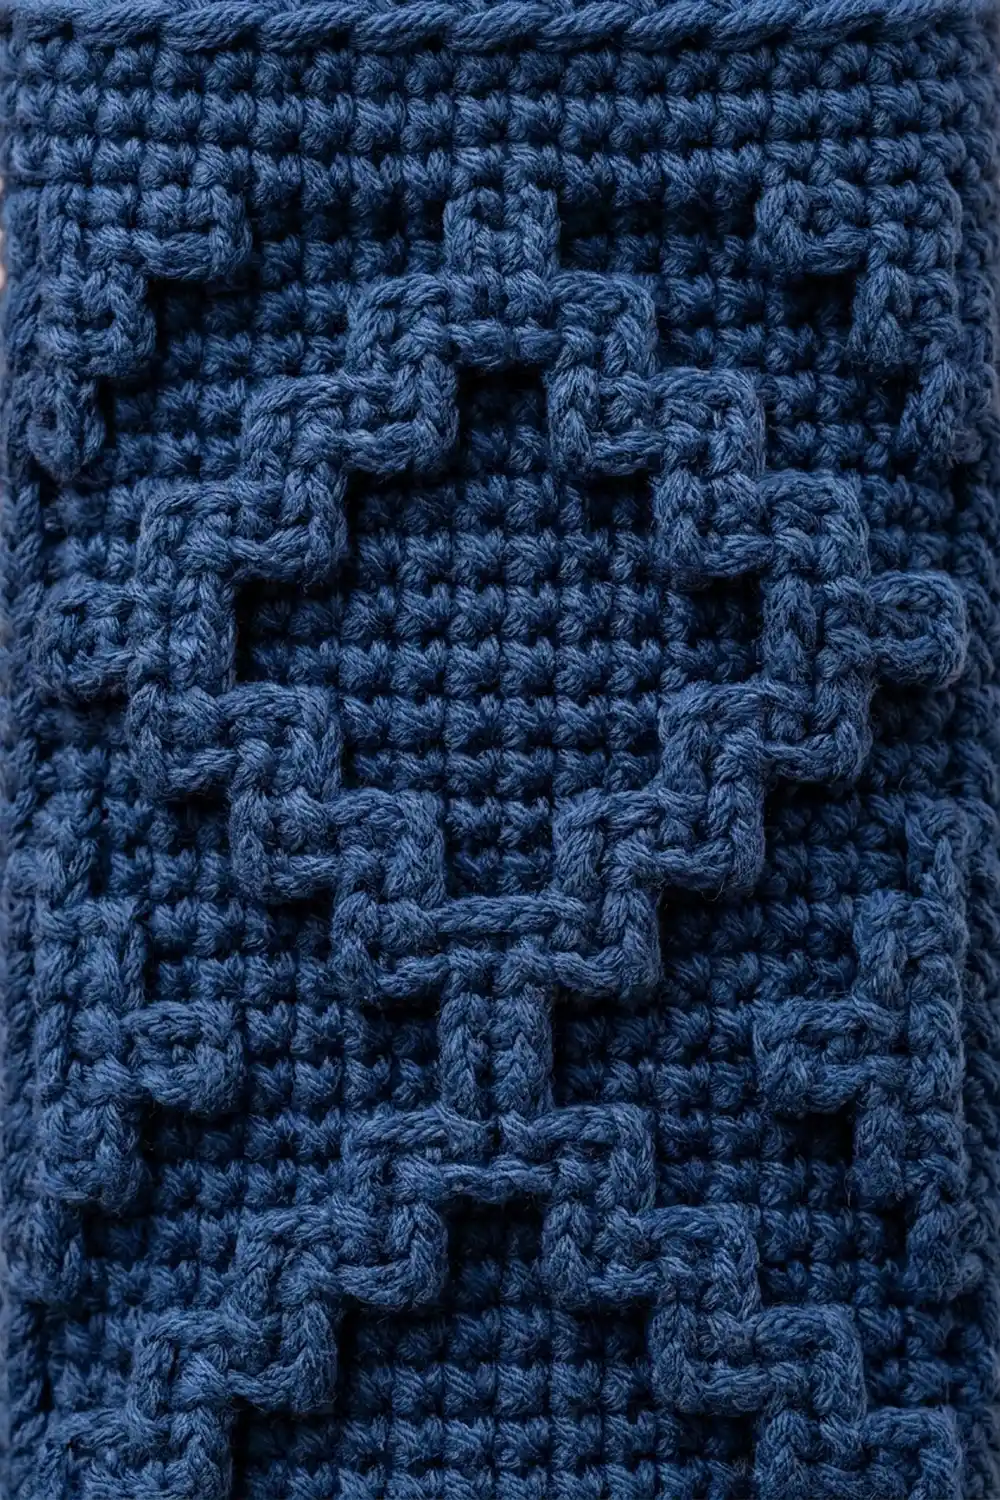
This bag holder is a tall, square tube covered in raised diamonds. Stepped relief lines outline a column of three stacked diamonds on every face, and a short vertical link joins each diamond to the next. A narrow strap at the top hangs it from a cabinet knob or hook. A drawstring near the bottom gathers the lower edge and ties in a bow, so plastic bags pull out one at a time.
The sample is deep navy, and the same pattern looks just as good in a warm beige. Use one solid color: the texture makes the pattern, so you don’t need any colorwork. The look is tidy and slightly graphic, which suits a kitchen or laundry room.
This pattern uses US crochet terms. The finished holder is 5 in (12.7 cm) wide on each of its four faces and 16 in (40.6 cm) tall, not counting the strap. The strap loop rises about 3.5 in (8.9 cm) above the top edge.
You work the body from the bottom up in joined rounds of single crochet. The diamonds are front post double crochet stitches worked around the stitch directly below. A raised column at each corner keeps the tube square. You then work the strap straight off the top edge and thread a crocheted drawstring through an eyelet round near the bottom.
Finished Size and Construction
- Finished size: 5 in (12.7 cm) per face x 16 in (40.6 cm) tall
- Skill level: Intermediate
- Terminology: US
- Yarn weight: Worsted (#4) cotton or cotton blend
- Hook: 4.5 mm (US 7)
- Number of pieces: 1 body with the strap worked on, plus 1 drawstring cord
- Layout: Square tube with 4 identical faces; diamond motif repeated 3 times vertically
- Piece size: circumference 20 in (50.8 cm), which lies 10 in (25.4 cm) wide when flattened
- Size before border (motif section only): 12 in (30.5 cm) tall
- Border depth: a 2 in (5.1 cm) band at the bottom and a 2 in (5.1 cm) band at the top
Materials
Choose a smooth, firm cotton or cotton blend. Cotton holds the raised lines crisply and won’t sag when the holder is packed with bags. Avoid fuzzy or very soft acrylics, because they blur the stepped edges.
- Main color (navy, or beige for the variation): 200 g, about 312 m (341 yd) of worsted cotton at about 78 m (85 yd) per 50 g
- 4.5 mm (US 7) crochet hook
- 3.5 mm (US E-4) hook (optional, for a firmer drawstring)
- 5 stitch markers (1 for the start of round, 4 for corners)
- Tapestry needle
- Scissors
- Measuring tape
- A 5 in (12.7 cm) square box, or a rolled towel, for blocking
These quantities include a margin of about 25%. The holder uses roughly 160 g, so the extra covers your gauge swatch and any ripping back.
Abbreviations (US Terms)
- ch – chain
- sl st – slip stitch
- sc – single crochet
- FPdc – front post double crochet
- sk – skip
- sp – space
- st(s) – stitch(es)
- rnd(s) – round(s)
Special stitch – FPdc in sc fabric: Yarn over and insert the hook from front to back to front around the post of the stitch directly below, in the previous round. Yarn over, pull up a loop, then (yarn over, pull through 2 loops) twice. Skip the stitch in the current round that sits behind the FPdc. Each FPdc counts as 1 stitch.
Round setup: Every round is joined with a sl st to the first sc. Begin each round with ch 1, which does not count as a stitch, and work the first stitch into the same stitch as the join.
Gauge and Checkpoints
Gauge: 16 sc and 18 rnds = 4 in (10.2 cm) in sc worked in joined rounds.
Test a small tube before you commit to the full holder. Chain 40, join into a ring without twisting, and work 18 rnds of sc. Flatten it and measure. It should be 5 in (12.7 cm) wide and 4 in (10.2 cm) tall.
If your swatch is too big, go down half a hook size. If it is too small, go up half a hook size. Fix stitch gauge first. Round gauge matters too, because it sets the diamond height, but sc is usually close to square.
Checkpoints:
– After Rnd 9 (bottom band): 2 in (5.1 cm) tall, 10 in (25.4 cm) flat width
– After each 18-round motif repeat: 4 in (10.2 cm) more height
– After Rnd 63 (all motifs): 14 in (35.6 cm) tall
– After Rnd 72 (top band): 16 in (40.6 cm) tall
Body
Face Layout
The body has 80 stitches: 4 faces of 20 stitches each. On each face, stitches 1–19 are the face and stitch 20 is the corner stitch. So each face’s count of 20 already includes its 1 corner stitch. Corner stitches are never counted twice.
Face 1 is the back, Face 2 is the right side, Face 3 is the front, and Face 4 is the left side. The start of the round sits at the corner between Face 4 and Face 1, at the back. Place a corner marker in stitch 20 of each face once Rnd 1 is done.
Bottom Band (Rnds 1–9)
Foundation: Ch 80. Join with a sl st to the first ch, taking care not to twist the ring.
Rnd 1: Sc in each ch around. Join. (80 sc)
Rnds 2–3: Sc in each st around. Join. (80 sc)
Rnd 4 (eyelet round): *Sc in next 3 sts, ch 1, sk 1 st; rep from * 20 times. Join. (60 sc + 20 ch-1 sps = 80 sts)
This puts 5 eyelets on each face, at stitch positions 4, 8, 12, 16, and 20. The front face’s eyelets at positions 8 and 12 sit evenly on either side of its center stitch, 10. The bow ties there.
Rnd 5: Sc in each sc and each ch-1 sp around. Join. (80 sc)
Rnds 6–9: Sc in each st around. Join. (80 sc)
Checkpoint: 2 in (5.1 cm) tall.
Diamond Section (Rnds 10–63)
Each motif round repeats the same sequence on all 4 faces. Within a face, the raised positions are stitches a and b, where a is the smaller number. Work every face as:
sc (a − 1), FPdc, sc (b − a − 1), FPdc, sc (19 − b), FPdc (corner)
That gives (a − 1) + 1 + (b − a − 1) + 1 + (19 − b) + 1 = 20 stitches per face, and 80 per round. Rounds with a single raised stitch (position 10) are worked as: sc 9, FPdc, sc 9, FPdc (corner) = 20.
Work the following 18 motif rounds (M1–M18). Each sequence is worked 4 times per round. Join each round.
| Motif round | Raised sts | Per face | Round count |
|---|---|---|---|
| M1 (link) | 10 | sc 9, FPdc, sc 9, FPdc | 72 sc + 8 FPdc = 80 |
| M2 (lower point) | 10 | sc 9, FPdc, sc 9, FPdc | 72 sc + 8 FPdc = 80 |
| M3 | 9, 11 | sc 8, FPdc, sc 1, FPdc, sc 8, FPdc | 68 sc + 12 FPdc = 80 |
| M4 | 8, 12 | sc 7, FPdc, sc 3, FPdc, sc 7, FPdc | 68 sc + 12 FPdc = 80 |
| M5 | 7, 13 | sc 6, FPdc, sc 5, FPdc, sc 6, FPdc | 80 |
| M6 | 6, 14 | sc 5, FPdc, sc 7, FPdc, sc 5, FPdc | 80 |
| M7 | 5, 15 | sc 4, FPdc, sc 9, FPdc, sc 4, FPdc | 80 |
| M8 | 4, 16 | sc 3, FPdc, sc 11, FPdc, sc 3, FPdc | 80 |
| M9 | 3, 17 | sc 2, FPdc, sc 13, FPdc, sc 2, FPdc | 80 |
| M10 (widest) | 2, 18 | sc 1, FPdc, sc 15, FPdc, sc 1, FPdc | 80 |
| M11 | 3, 17 | as M9 | 80 |
| M12 | 4, 16 | as M8 | 80 |
| M13 | 5, 15 | as M7 | 80 |
| M14 | 6, 14 | as M6 | 80 |
| M15 | 7, 13 | as M5 | 80 |
| M16 | 8, 12 | as M4 | 80 |
| M17 | 9, 11 | as M3 | 80 |
| M18 (upper point) | 10 | as M2 | 80 |
Every two-point round has 68 sc and 12 FPdc. Every one-point round has 72 sc and 8 FPdc.
The diamond’s outline steps out by 1 stitch per round on each side, which gives the stepped edge. Because each FPdc wraps the stitch directly below, the outline only moves sideways when its position changes. The corner FPdc stacks into one solid raised column that keeps the tube square.
Rnds 10–27: Work M1–M18 once. (80 sts per round)
Rnds 28–45: Work M1–M18 again. (80 sts per round)
Rnds 46–63: Work M1–M18 a third time. (80 sts per round)
Where two diamonds meet, M18, M1, and M2 stack into a 3-round vertical link at stitch 10. This matches the short connecting bar between diamonds.
Checkpoint: the diamond section is 12 in (30.5 cm) and the body is 14 in (35.6 cm) tall. Each diamond is 17 sts wide, about 4.25 in (10.8 cm), and 17 rounds tall, about 3.8 in (9.7 cm).
Top Band (Border)
Border gauge: the same 16 sc = 4 in (10.2 cm), so 20 sts per face = 5 in (12.7 cm).
Rnd 64: Sc in each st around, working the sc into the top of each FPdc. Join. (80 sc; 20 per face)
Rnds 65–72: Sc in each st around. Join. (80 sc; 20 per face)
Don’t fasten off at the end of Rnd 72 if you’d like to start the strap from the same yarn. Otherwise, fasten off and weave in the end.
Why the math works: The diamond section ends with exactly 80 stitches, 20 per face. The band works 1 sc in each one, so the top edge has the same 20 in (50.8 cm) circumference as the base. The edge doesn’t ruffle or pull in, and the faces stay a true 5 in (12.7 cm). Nine rounds at 18 rounds per 4 in (10.2 cm) make 2 in (5.1 cm), which matches the bottom band.
Strap
Row 1: With the right side facing, join the yarn in Face 1 (back), stitch 9 of Rnd 72. Ch 1, sc in sts 9, 10, and 11. (3 sc)
Rows 2–54: Ch 1, turn, sc in each st across. (3 sc)
The strap is now 12 in (30.5 cm) long and 0.75 in (1.9 cm) wide. Check that it isn’t twisted. Then sl st it to Face 3 (front), stitches 9–11 of Rnd 72, working through both layers. Fasten off.
The strap spans the 5 in (12.7 cm) opening, so the loop rises about 3.5 in (8.9 cm) above the edge.
Drawstring
Using the 3.5 mm hook for a firmer cord, ch about 136, so the chain measures 30 in (76.2 cm) unstretched. Sl st in the back bump of the 2nd ch from the hook and in each ch across. Fasten off and knot each end.
Begin at Face 3 (front), eyelet 12. Weave the cord in and out of the 20 eyelets all the way around, and bring it back out at Face 3, eyelet 8. Both tails now come out on either side of the front center stitch. Pull them until the opening gathers to about 2 in (5.1 cm) across, then tie a bow.
Final Blocking
- Weave in all ends on the inside, following the sc rows.
- Slide the 5 in (12.7 cm) box or a tightly rolled towel inside the tube.
- Line up the corner FPdc columns so they run straight up all four edges.
- Hold a steam iron 0.5 in (1.3 cm) above the surface and steam each face. Don’t press, or you’ll flatten the relief.
- Pinch each diamond outline gently so it stands up.
- Measure: 5 in (12.7 cm) per face and 16 in (40.6 cm) tall.
- Let it dry completely before taking out the form.
Final Quality-Control Checklist
- 80 stitches in every round, 20 per face
- 4 corner columns, straight and unbroken from Rnd 10 to Rnd 63
- 3 complete diamonds per face, with points centered on stitch 10
- 20 eyelets, with eyelets 8 and 12 on the front face for the bow
- Strap is centered on the back and front, untwisted, and 12 in (30.5 cm) long
- Body is 16 in (40.6 cm) tall and 5 in (12.7 cm) per face
- All ends are secured inside
Troubleshooting
The diamonds lean to one side. Joined rounds can drift. Make sure the first sc of each round goes into the same stitch as the join, and recount the 20 stitches per face against your markers.
The FPdc lines look flat. You may be skipping the wrong stitch. Skip the sc behind each FPdc, not the one after it, and keep your tension even.
The tube is twisting. Check that the foundation chain wasn’t twisted at the join. If the twist started later, you are probably adding or losing a stitch at the join.
The fabric is puckering around the FPdc. Your post stitches are too tight. Pull up a slightly longer first loop.
The bottom won’t close. Make the drawstring longer, or use a thinner hook for the cord so it slides more easily.
The holder is too short or tall. Check your round gauge, and adjust the plain rounds in the bottom and top bands only.
Care
Hand wash in cool water and lay flat over the box form to dry. Don’t wring or tumble dry, because heat and twisting flatten the raised diamonds.

Final Notes
The size of the holder depends on one chain of measurements. A gauge of 16 sc and 18 rnds = 4 in (10.2 cm) gives 20 stitches per face, or 5 in (12.7 cm). Four faces make 80 stitches, a 20 in (50.8 cm) circumference. The 9-round bottom band adds 2 in (5.1 cm). Three 18-round diamond repeats add 12 in (30.5 cm). The 9-round top band adds 2 in (5.1 cm), for a total height of 16 in (40.6 cm). Finally, the 12 in (30.5 cm) strap gives a loop about 3.5 in (8.9 cm) high. Check each step as you go, and the finished holder will come out square.
Happy crocheting!