

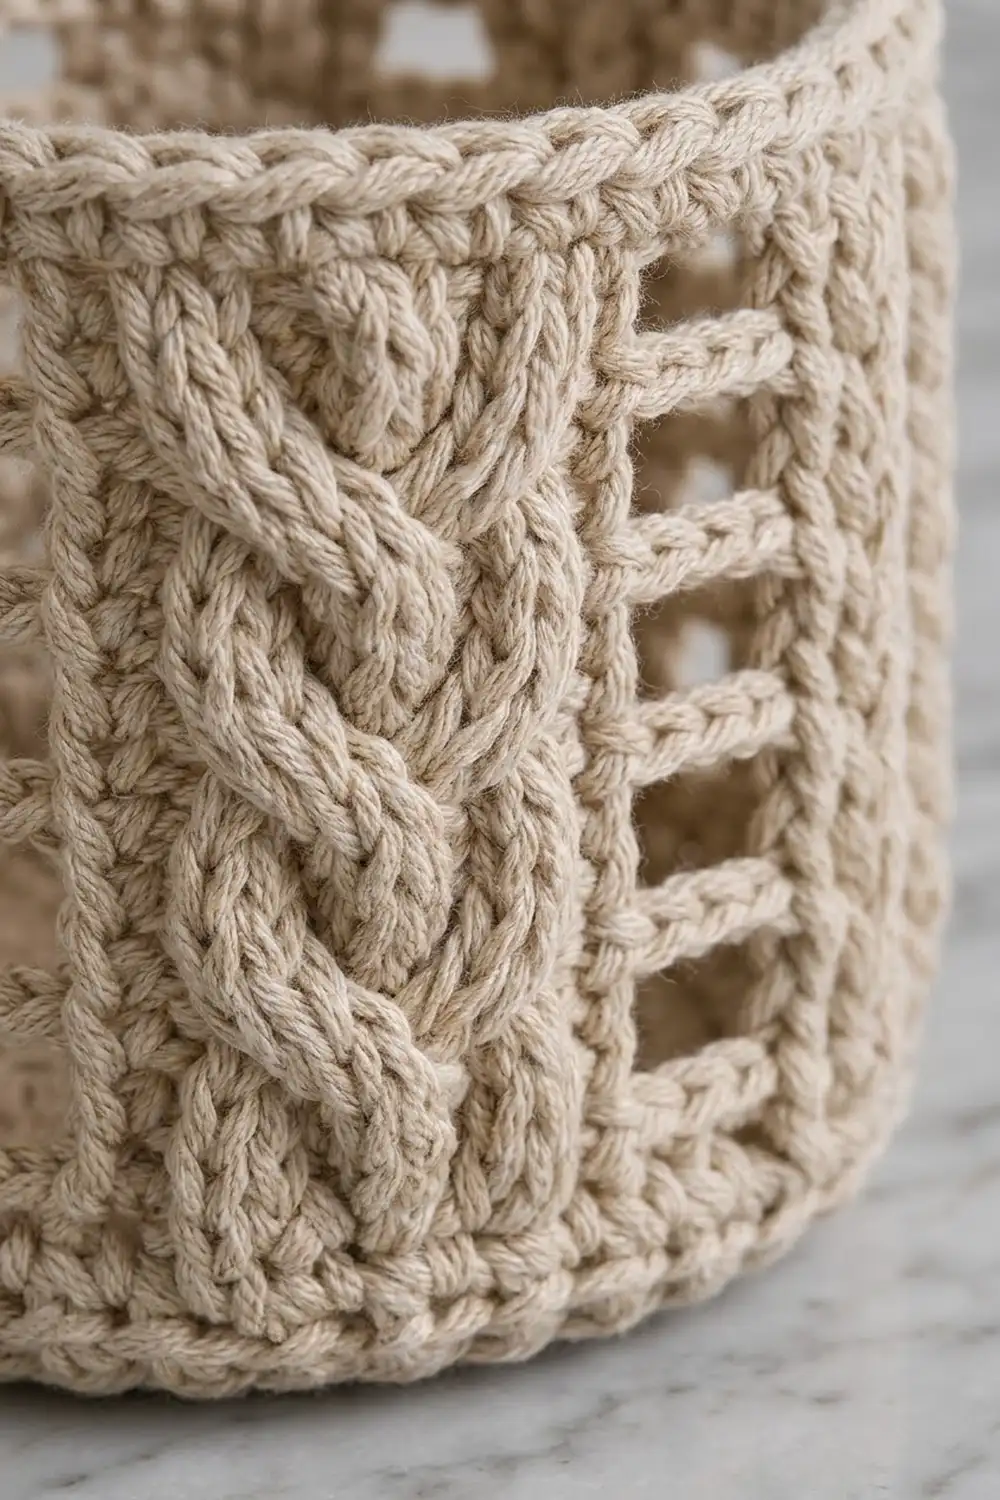
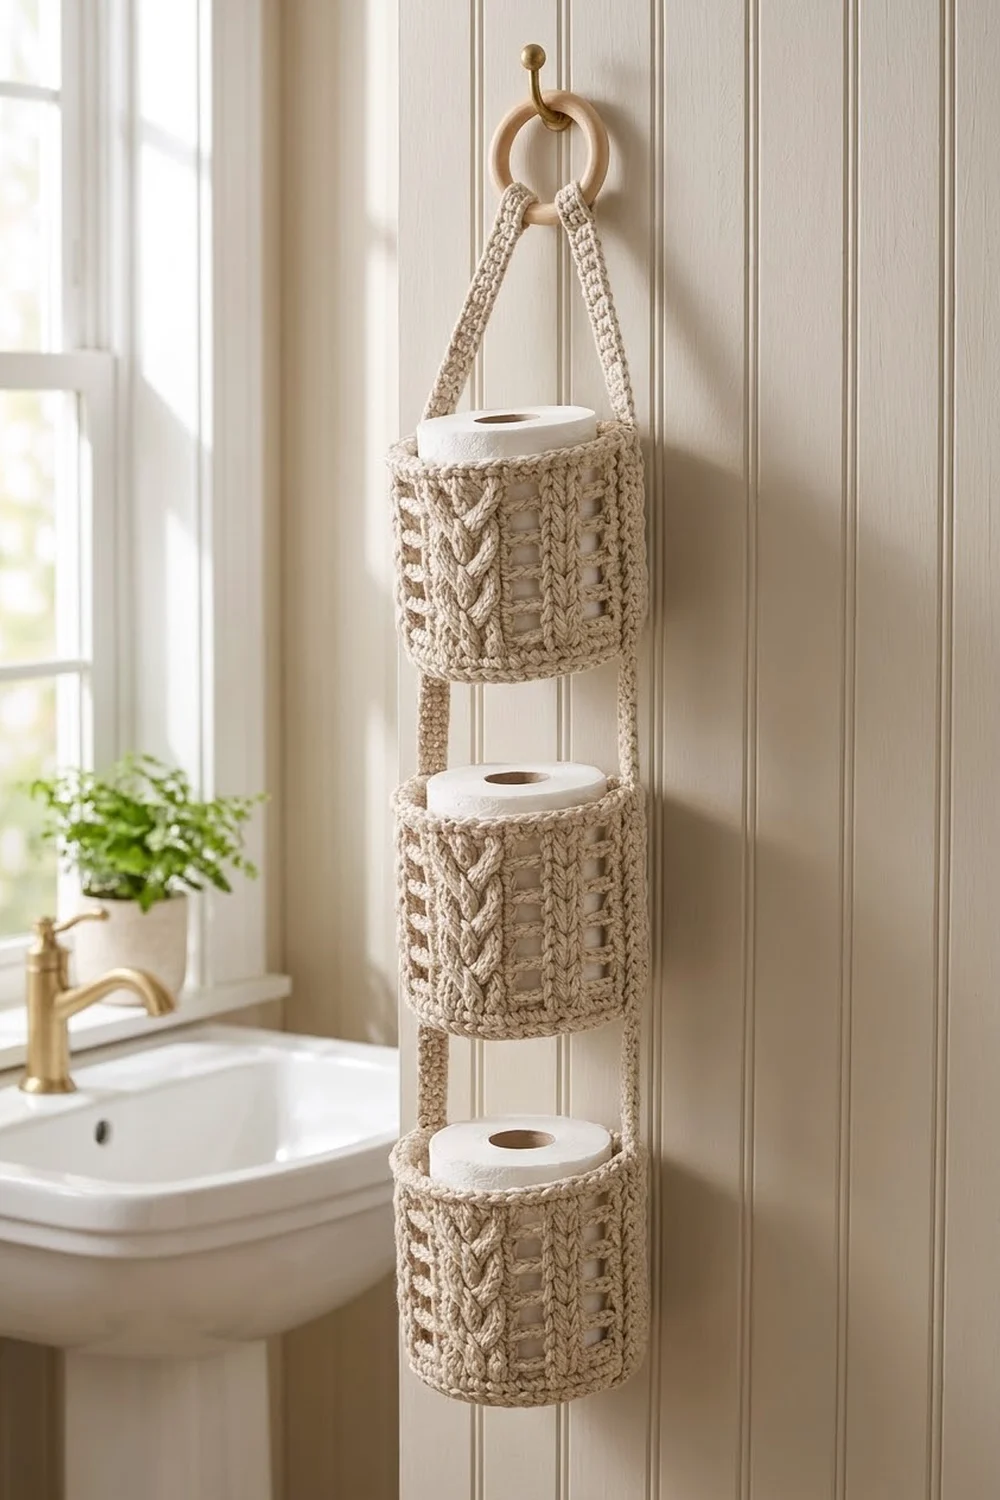
This hanging holder stores three spare toilet rolls in a neat vertical stack. Each roll sits in its own sturdy cylinder basket. Raised braided cables and open ladder windows give the walls a cozy, cabin-knit look. A wooden ring at the top hangs from any hook or towel knob.
The sample is worked in one natural oatmeal shade, which suits a calm, neutral bathroom. Any solid light color will show the cable texture well. The pattern uses US crochet terms throughout.
Each basket is 5.75 in (14.6 cm) across and 5 in (12.7 cm) tall. The assembled holder hangs about 28 in (71.1 cm) from the top of the ring to the bottom of the lowest basket.
Construction is simple and modular. You crochet each basket in the round from the base up, adding post-stitch cables and ladder columns on the wall. You finish each basket with a rope rim. Two straps are worked in short rows, folded over the ring, and sewn down the sides of the three baskets.
Finished Size and Construction
- Basket size: 5.75 in (14.6 cm) diameter x 5 in (12.7 cm) tall
- Overall hanging length: approx. 28 in (71.1 cm) including ring
- Skill level: Intermediate (front and back post stitches, cable crosses)
- Terminology: US crochet terms
- Yarn weight: Worsted weight (#4), cotton or cotton blend
- Hook: 5.0 mm (H-8)
- Number of pieces: 3 baskets + 2 straps + 1 wooden ring
- Layout: 3 baskets stacked vertically in a single column, straps on the left and right
- Piece size (basket wall before rim): 4.5 in (11.4 cm) tall
- Rim (border) depth: 0.5 in (1.3 cm), 2 rounds
- Strap size: 0.75 in (1.9 cm) wide x 28 in (71.1 cm) long
Materials
Yarn: Use a smooth worsted-weight cotton or cotton blend at about 170 m per 100 g. Cotton holds its shape, shows cables crisply and copes with bathroom humidity. Avoid fuzzy or very soft acrylics, because the walls will slump.
- Oatmeal (natural beige): 300 g / 510 m total
- Each basket uses about 70 g (119 m)
- Each strap uses about 15 g (26 m)
These quantities include a margin of about 20% for gauge swatches and differences in tension.
Tools:
- 5.0 mm (H-8) crochet hook
- 1 wooden ring, 2.75 in (7.0 cm) outer diameter
- Tapestry needle
- 4 locking stitch markers
- Scissors
- Measuring tape
- Rustproof pins and a spray bottle for blocking
Abbreviations (US Terms)
- ch – chain
- sl st – slip stitch
- sc – single crochet
- inc – 2 sc in the same stitch
- dc – double crochet
- FPdc – front post double crochet
- BPdc – back post double crochet
- FPtr – front post treble crochet
- rev sc – reverse single crochet (crab stitch)
- BLO – back loop only
- st(s) – stitch(es)
- sp – space
- sk – skip
- rep – repeat
Special stitches:
- Right Cross (RC), worked over 6 sts: Sk 3 sts. FPtr around each of the next 3 sts. Then, working in front of the sts just made, FPtr around each of the 3 skipped sts.
- Left Cross (LC), worked over 6 sts: Sk 3 sts. FPtr around each of the next 3 sts. Then, working behind the sts just made, FPtr around each of the 3 skipped sts.
The braid panel is 9 sts wide. Alternating an RC on the right 6 sts with an LC on the left 6 sts gives a three-strand plait.
Gauge and Checkpoints
- Single crochet: 16 sc and 17 rounds = 4 in (10.2 cm)
- Double crochet: 16 dc and 8 rounds = 4 in (10.2 cm)
Make one complete basket before starting the others, and use it as your gauge piece. Measure at each of these checkpoints:
- After base Round 6: diameter 2.75 in (7.0 cm)
- After base Round 12: diameter 5.75 in (14.6 cm), circumference 18 in (45.7 cm)
- After wall Round 9: wall height 4.5 in (11.4 cm)
- After the rim: total height 5 in (12.7 cm)
If your base is too large, go down 0.5 mm in hook size. If it is too small, go up 0.5 mm. Your basket needs an inner diameter of at least 5 in (12.7 cm) to fit a standard roll. If the base cups instead of lying flat, your sc tension is tighter than your increases, so go up a hook size for the base only. If the base ruffles, go down one size.
Basket (Make 3)
Base
Work in continuous rounds with sc. Do not join. Move a marker up to the first st of each round.
- Rnd 1: Magic ring, 6 sc in ring. (6 sts)
- Rnd 2: Inc in each st around. (12 sts)
- Rnd 3: (Sc 1, inc) 6 times. (18 sts)
- Rnd 4: (Sc 1, inc, sc 1) 6 times. (24 sts)
- Rnd 5: (Sc 3, inc) 6 times. (30 sts)
- Rnd 6: (Sc 2, inc, sc 2) 6 times. (36 sts)
Checkpoint: The base should measure 2.75 in (7.0 cm) across.
- Rnd 7: (Sc 5, inc) 6 times. (42 sts)
- Rnd 8: (Sc 3, inc, sc 3) 6 times. (48 sts)
- Rnd 9: (Sc 7, inc) 6 times. (54 sts)
- Rnd 10: (Sc 4, inc, sc 4) 6 times. (60 sts)
- Rnd 11: (Sc 9, inc) 6 times. (66 sts)
- Rnd 12: (Sc 5, inc, sc 5) 6 times. (72 sts)
Sl st to the next st.
Checkpoint: The base should measure 5.75 in (14.6 cm) across, and it should lie flat.
Staggering the increases on alternate rounds keeps the circle round rather than hexagonal.
Wall
From now on, join each round with a sl st to the first st. Start each round with ch 2; this ch 2 does not count as a st. Make the first st of the round in the same st as the join.
The wall has 4 repeats of 18 sts, for 72 sts in every round.
- Wall Rnd 1 (turning ridge): Working in BLO, dc in each st around. (72 sts)
The unused front loops form a crisp fold, so the wall stands straight up from the base.
- Wall Rnd 2 (set-up): BPdc 1, FPdc 9, BPdc 1, FPdc 1, (ch 1, sk 1, FPdc 1) 3 times; rep from * 3 more times. (72 sts: 4 repeats of 18)
Each repeat is 1 BPdc + 9 cable sts + 1 BPdc + a 7-st ladder. The ladder is 4 FPdc and 3 ch-1 sps.
-
Wall Rnd 3 (Right Cross): BPdc 1, RC over the next 6 sts, FPdc 3, BPdc 1, FPdc 1, (ch 1, sk ch-1 sp, FPdc 1) 3 times; rep from * 3 more times. (72 sts)
-
Wall Rnd 4: BPdc 1, FPdc 9, BPdc 1, FPdc 1, (ch 1, sk ch-1 sp, FPdc 1) 3 times; rep from * 3 more times. (72 sts)
-
Wall Rnd 5 (Left Cross): BPdc 1, FPdc 3, LC over the next 6 sts, BPdc 1, FPdc 1, (ch 1, sk ch-1 sp, FPdc 1) 3 times; rep from * 3 more times. (72 sts)
-
Wall Rnd 6: Repeat Wall Rnd 4. (72 sts)
- Wall Rnd 7: Repeat Wall Rnd 3. (72 sts)
- Wall Rnd 8: Repeat Wall Rnd 4. (72 sts)
- Wall Rnd 9: Repeat Wall Rnd 5. (72 sts)
Checkpoint: The wall should be 4.5 in (11.4 cm) tall and the circumference about 18 in (45.7 cm). The cables pull in slightly, and that is normal.
The ch-1 sps stacked over the ch-1 sps below form the rectangular ladder windows. The FPdc columns between them form the vertical posts.
Make All Pieces
Make the following:
- 3 baskets in Oatmeal, at 70 g (119 m) each
- 2 straps in Oatmeal, at 15 g (26 m) each
Strap (Make 2)
- Row 1: Ch 4. Sc in 2nd ch from hook and in each remaining ch, turn. (3 sts)
- Rows 2–119: Ch 1, sc in each st across, turn. (3 sts)
Fasten off and leave a 24 in (61.0 cm) tail for sewing.
Checkpoint: Each strap should be 0.75 in (1.9 cm) wide and 28 in (71.1 cm) long. That works out to 17 rows per 4 in (10.2 cm).
Layout Grid (Front View)
          ( RING )
           /    \
       Strap A  Strap B
         |  [BASKET 1]  |
         |   gap 1.5"   |
         |  [BASKET 2]  |
         |   gap 1.5"   |
         |  [BASKET 3]  |
Joining
Position the baskets so that one cable panel faces straight forward. The cable panels at the left side (9 o’clock) and right side (3 o’clock) become the strap seats. Mark the center stitch (the 5th cable st) of each side panel with a locking marker on every basket.
Measure each strap from the top end and work through these steps:
- Ring (strap 0 to 1.5 in / 3.8 cm): Fold 1.5 in (3.8 cm) of the strap over the ring. Whipstitch the 3 strap sts of the end row to the strap row they meet, working through both thicknesses.
- V section (1.5 to 9 in / 3.8 to 22.9 cm): Leave the next 7.5 in (19.1 cm) free.
- Basket 1 (9 to 14 in / 22.9 to 35.6 cm): Sew the next 5 in (12.7 cm) of strap down the side of Basket 1, from the rim to the base fold.
- Gap (14 to 15.5 in / 35.6 to 39.4 cm): Leave 1.5 in (3.8 cm) free.
- Basket 2 (15.5 to 20.5 in / 39.4 to 52.1 cm): Sew the next 5 in (12.7 cm) to Basket 2.
- Gap (20.5 to 22 in / 52.1 to 55.9 cm): Leave 1.5 in (3.8 cm) free.
- Basket 3 (22 to 27 in / 55.9 to 68.6 cm): Sew the next 5 in (12.7 cm) to Basket 3.
- Tuck (27 to 28 in / 68.6 to 71.1 cm): Tuck the final 1 in (2.5 cm) under the base and sew it to base Round 12.
Stitch-to-stitch logic: Each basket wall is 9 dc rounds plus 2 rim rounds. Its 5 in (12.7 cm) of height matches 21 strap rows, because 5 x 17 ÷ 4 = 21.25. Sew 2 strap rows to each wall round, and 1 strap row to each rim round, which comes to 21 rows. Sew both long edges of the strap, catching the post of the marked cable stitch and its neighbors on each side.
Tension advice: Keep the whipstitches snug but not tight. The strap should lie flat, without dimpling the wall. Pin every basket in place before sewing, then hang the holder on a hook to check that the baskets sit level before you weave in the ends.
Size checkpoint: When hanging, the holder measures about 28 in (71.1 cm) from the ring top to the base of Basket 3.
Border (Basket Rim)
Each basket gets the rim before joining. It is described here because it is the finishing edge.
Border gauge: 4 sc per 1 in (2.5 cm). The rim is 0.5 in (1.3 cm) deep.
- Rim Rnd 1: Ch 1. Sc in each of the next 12 sts, then work the ladder: sc in the FPdc, (sc in the ch-1 sp, sc in the FPdc) 3 times; rep from * 3 more times. Join. (72 sc: 18 per repeat)
This is a conversion round. It is 51 sc worked 1 per existing post stitch, plus 21 sc worked into the 12 ch-1 sps. The cable section is 11 sts (BPdc 1, cable 9, BPdc 1) plus the FPdc that opens the ladder, which makes the first 12 sc. To keep the rim the same size as the base, treat each ch-1 sp as one stitch, as follows:
- Each repeat is 15 post sts + 3 ch-1 sps = 18 sc. Across 4 repeats, that is 60 post sts + 12 ch-sps = 72 sc.
-
The rule is simply 1 sc into every stitch and every ch-1 sp, which gives 18 per repeat.
-
Rim Rnd 2: Ch 1. Rev sc in each st around. Join and fasten off. (72 rev sc: 18 per repeat)
Why the math works: Base Rnd 12 has 72 sts. Every wall round holds 72 sts, as 4 repeats of 18. Both rim rounds also hold 72 sts, 18 per repeat. Nothing is added or removed after the base, so the wall rises straight and the rim matches the base circumference of 18 in (45.7 cm). Rev sc twists over itself to make the rounded rope edge without flaring.
Final Blocking
- Weave in all ends inside the baskets, running them along post stitches so they stay hidden.
- Lightly mist each basket until it is damp.
- Stuff each basket with a toilet roll wrapped in a plastic bag so the walls dry straight and round.
- Pinch each cable to define the braid, and gently square the ladder windows.
- Pin the straps flat to a blocking mat at 0.75 in x 28 in (1.9 cm x 71.1 cm). Do this before sewing if you can, or block the whole assembled holder flat.
- Let everything dry completely, for at least 24 hours.
Final Quality-Control Checklist
- [ ] All three bases lie flat and measure 5.75 in (14.6 cm)
- [ ] Every wall round holds 72 sts, as 4 repeats of 18
- [ ] Cable crosses alternate RC and LC, so the braid reads as a plait
- [ ] Ladder windows line up vertically
- [ ] The rim is 72 sts with no ruffling
- [ ] All three baskets are 5 in (12.7 cm) tall
- [ ] Both straps are the same length, 28 in (71.1 cm)
- [ ] The gaps between baskets are equal at 1.5 in (3.8 cm)
- [ ] The baskets hang level, with the front cable centered
- [ ] All ends are secured inside
Troubleshooting
- Base cups upward: Your increase rounds are too tight. Go up a hook size for the base.
- Base ripples: Your stitches are too loose. Go down a hook size, or check that you made exactly 6 increases per round.
- Wall flares outward: You may have worked into the ch-1 sps as stitches during the wall rounds. Skip each ch-1 sp, and chain over it.
- Wall leans inward: Your cable FPtr are too tight. Pull up a slightly taller loop on each post stitch.
- Braid looks like a rope twist: You worked the same cross every time. Alternate RC (Rnds 3 and 7) with LC (Rnds 5 and 9).
- Rim count is off: Work 1 sc in every post stitch and every ch-1 sp, with nothing else.
- Baskets tilt: The straps are sewn at different heights. Unpick the strap and re-pin it at the marked side cable stitches.
- Roll doesn’t fit: Check the base diameter and the wall gauge. A standard roll needs 5 in (12.7 cm) of inner space.
Care
Remove the rolls, then hand wash in cool water with a mild detergent. Reshape the baskets around rolls wrapped in plastic bags, and dry flat. Do not tumble dry, because heat can shrink cotton unevenly.
Final Notes
The measurement chain works like this. The base grows to 72 stitches, which gives 5.75 in (14.6 cm) across. The wall keeps those 72 stitches through nine rounds, as 4 braid-and-ladder repeats of 18, rising 4.5 in (11.4 cm). The rim converts the same count into 72 sc and 72 rev sc, adding 0.5 in (1.3 cm) for a 5 in (12.7 cm) basket. Each 28 in (71.1 cm) strap divides into a 1.5 in (3.8 cm) ring fold, a 7.5 in (19.1 cm) V, three 5 in (12.7 cm) basket seats, two 1.5 in (3.8 cm) gaps and a 1 in (2.5 cm) tuck. When every checkpoint matches, the holder hangs straight and holds three rolls securely.
Happy crocheting!