

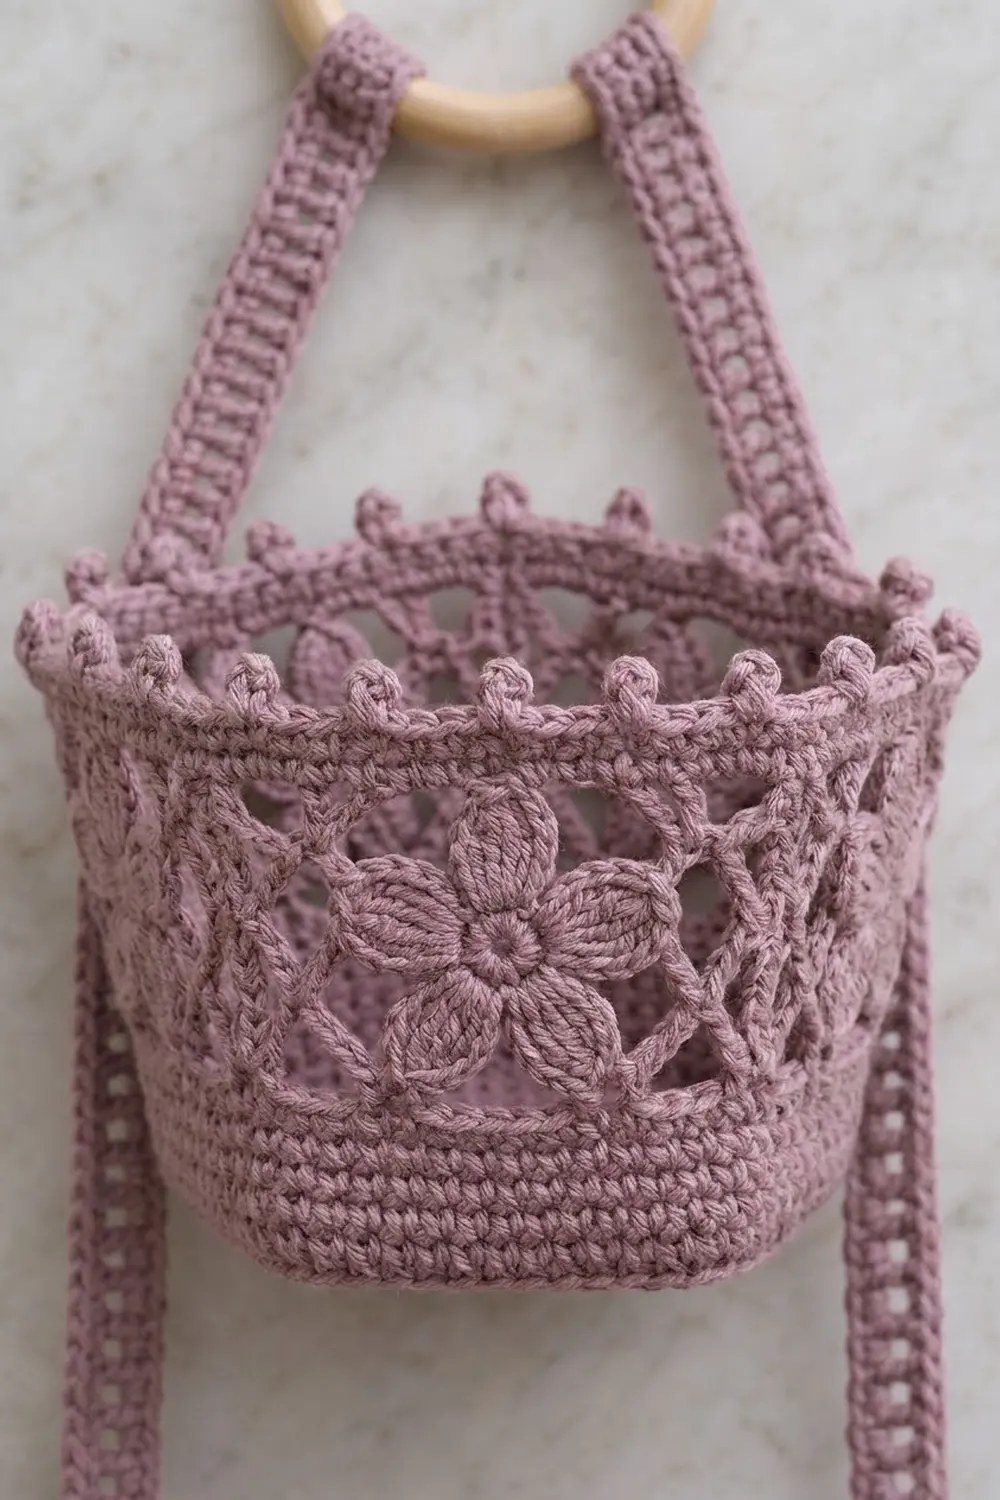
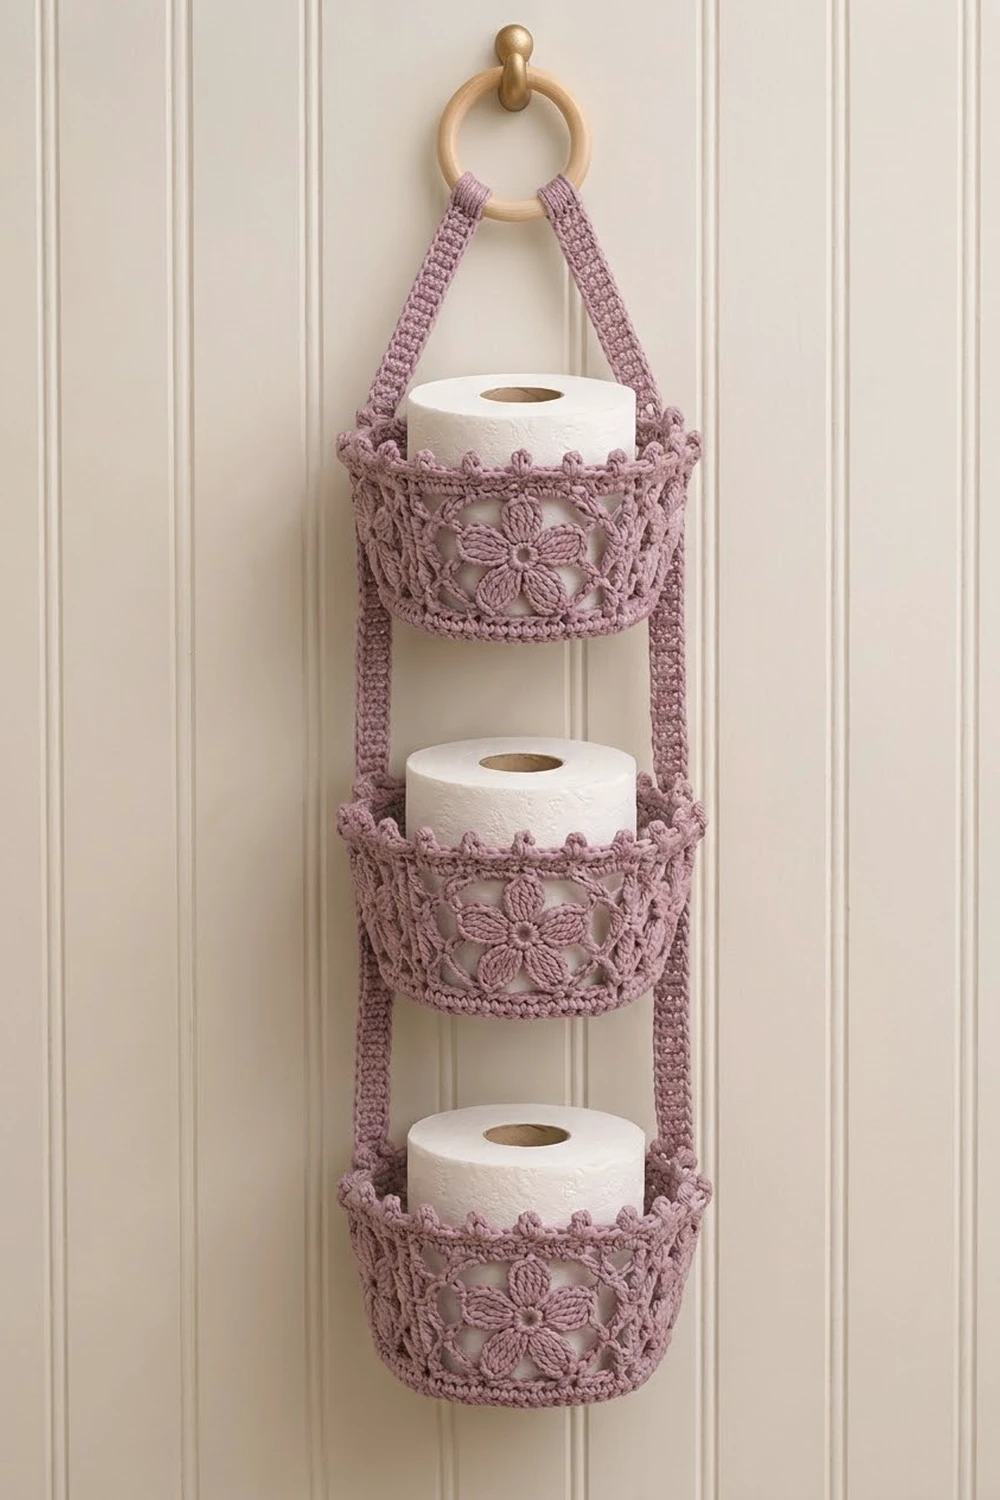
This hanging organizer has three pentagon baskets stacked on two slim straps, all hung from a natural wooden ring. Each basket has a solid base, a lacy lattice band and a raised five-petal flower on every face. A row of little picot bobbles finishes the rim.
The sample is worked in a single dusty mauve cotton, which looks soft but holds its shape well enough for a bathroom or nursery wall. Each basket holds one standard toilet paper roll, a stack of washcloths or a few small toiletries.
All instructions use US crochet terms. The finished organizer measures about 23 in (58.4 cm) from the top of the ring to the bottom of the lowest basket and about 8 in (20.3 cm) across at the widest point. Each basket is 3.25 in (8.3 cm) tall.
Construction is modular. You work each basket base in the round as a flat hdc pentagon, then build the walls straight up from it. You make the flowers separately and sew them on, crochet two straps in short rows, and then sew everything together on the ring.
Finished Size and Construction
- Overall size: about 23 in (58.4 cm) long x 8 in (20.3 cm) wide
- Skill level: Intermediate
- Terminology: US crochet terms
- Yarn weight: worsted (category 4) cotton
- Hook: 4.5 mm (US 7)
- Number of pieces: 3 baskets, 15 flowers, 2 straps, 1 wooden ring
- Layout: 3 baskets stacked vertically, 1.75 in (4.4 cm) apart
- Base size: 4 in (10.2 cm) per side, about 6.5 in (16.5 cm) corner to corner
- Basket size before border: 2.75 in (7.0 cm) tall, 5 in (12.7 cm) per face at the top
- Border depth: 0.5 in (1.3 cm), picot rim included
- Finished basket: 3.25 in (8.3 cm) tall
Materials
Pick a smooth, firm worsted-weight cotton or cotton blend. Cotton keeps the basket walls upright and the lattice crisp. Acrylic tends to sag once the basket is holding something.
- Dusty mauve: 250 g, about 425 m
This quantity includes a margin of about 25 percent. The finished sample used about 190 g.
Tools:
- 4.5 mm (US 7) crochet hook
- Wooden ring, 3 in (7.6 cm) outside diameter
- 10 locking stitch markers
- Tapestry needle
- Scissors
- Measuring tape
- Rust-proof pins and a blocking mat
Abbreviations (US Terms)
- ch – chain
- sl st – slip stitch
- sc – single crochet
- hdc – half double crochet
- dc – double crochet
- tr – treble crochet
- BLO – back loop only
- MR – magic ring
- sk – skip
- sp – space
- st(s) – stitch(es)
- rep – repeat
Special stitch – picot: ch 3, then sl st into the front loop and the left vertical bar of the sc you just made. This gives a small round bump that sits on top of the rim.
Gauge and Checkpoints
- Sc gauge: 16 sc x 16 rows = 4 in (10.2 cm)
- Hdc gauge: 16 hdc x 12 rounds = 4 in (10.2 cm)
Make one complete basket before starting the others, and measure it at each of these checkpoints:
- Base Rnd 4: each side is 2 in (5.1 cm).
- Base Rnd 8: each side is 4 in (10.2 cm), and the base lies flat.
- Wall Rnd 4: the wall is 1 in (2.5 cm) tall, and each face is 5 in (12.7 cm) across at the top.
- Wall Rnd 8: the wall is 2.75 in (7.0 cm) tall.
If your pieces come out larger than these numbers, go down half a hook size. If they come out smaller, go up half a hook size. If the base cups, your hdc rounds are too short, so loosen up or go up a hook size. If it ruffles, go down a hook size.
Basket Base (make 3)
Each round adds 2 hdc per side, so the total grows by 10 hdc every round. The ch-2 corner spaces are not counted as stitches.
Rnd 1: MR, ch 2 (does not count as a st), (2 hdc, ch 2) 5 times into ring, sl st to first hdc. [10 hdc, 5 ch-2 sp; 2 hdc per side]
Rnd 2: Ch 2 (does not count), hdc in same st and next hdc, *(hdc, ch 2, hdc) in ch-2 sp, hdc in next 2 hdc; rep from * 3 more times, (hdc, ch 2, hdc) in last ch-2 sp, sl st to first hdc. [20 hdc; 4 per side]
Rnds 3–8: Ch 2 (does not count), hdc in each hdc to the corner, then work (hdc, ch 2, hdc) in each ch-2 sp. Sl st to first hdc.
- Rnd 3: 30 hdc (6 per side)
- Rnd 4: 40 hdc (8 per side)
- Rnd 5: 50 hdc (10 per side)
- Rnd 6: 60 hdc (12 per side)
- Rnd 7: 70 hdc (14 per side)
- Rnd 8: 80 hdc (16 per side)
Fasten off.
Basket Walls
Each face is counted as 1 corner stitch followed by the side stitches. Move your markers up onto the corner stitch in every round.
Wall Rnd 1 (conversion): Join yarn in any ch-2 corner sp. Ch 1, sc in the same sp and place a marker. *Sc in BLO of the next 16 hdc, sc in the next ch-2 sp and place a marker; rep from * 3 more times, sc in BLO of the last 16 hdc, sl st to first sc. [80 sc worked into the hdc + 5 sc worked into the corners = 85 sc; 17 per face]
The front loops left unworked make a crisp ridge, which turns the wall up from the base.
Wall Rnds 2–3: Ch 1, sc in each st around, sl st to first sc. [85 sc]
Wall Rnd 4 (flare): Ch 1, *sc in corner st, (sc in next 4, 2 sc in next) 3 times, sc in next; rep from * 4 more times, sl st to first sc. [85 sc worked 1 per st + 15 increases = 100 sc; 20 per face]
Wall Rnd 5 (Mesh 1): Ch 1, *sc in corner st, (ch 3, sk 3, sc in next) 4 times, ch 3, sk 3; rep from * 4 more times, sl st to first sc. [25 sc, 25 ch-3 loops; 5 loops per face]
On each face, the sc land on stitches 4, 8, 12 and 16, and the last ch-3 carries you straight to the next corner.
Wall Rnd 6 (Mesh 2): Sl st in first 2 ch, ch 1, sc in same loop, ch 3, *sc in next loop, ch 3; rep from * around, sl st to first sc. [25 sc, 25 loops]
Wall Rnd 7 (Mesh 3): Sl st in first 2 ch, ch 1, sc in same loop, ch 3, *sc in next loop, ch 3; rep from * around, sl st to first sc. [25 sc, 25 loops]
The sc in this round sit directly above the sc in Rnd 5, which closes the diamonds of the lattice. Move each marker onto the Rnd 7 sc that sits directly above a Rnd 5 corner sc.
Wall Rnd 8 (conversion): Ch 1, sc in each sc and 3 sc in each ch-3 loop around, sl st to first sc. [25 sc worked 1 per st + 75 sc worked into the loops = 100 sc; 20 per face]
Move each marker onto the sc worked into a marked stitch. Check the height now: it should be 2.75 in (7.0 cm).
Flowers (make 15)
Rnd 1: MR, ch 1, 10 sc into ring, sl st to first sc. [10 sc]
Rnd 2: *Sl st in next sc, (hdc, 2 dc, tr, 2 dc, hdc) in next sc; rep from * 4 more times, sl st to first sl st. [5 petals of 7 sts each]
Fasten off, leaving a 12 in (30.5 cm) tail. The flower measures about 2.25 in (5.7 cm) across, and each petal is about 0.75 in (1.9 cm) long.
Petal veins: Thread the tail onto a needle. Work 1 straight stitch from the center ring to the tr at the tip of each petal. This makes the fine center line on each petal.
Straps (make 2)
Row 1: Ch 4, sc in 2nd ch from hook and next 2 ch. [3 sc]
Rows 2–88: Ch 1, turn, sc in each sc. [3 sc]
Fasten off. Each strap is 0.75 in (1.9 cm) wide and 22 in (55.9 cm) long. The short rows form the small horizontal ladder bars you can see along the strap.
Make All Pieces
All pieces use the dusty mauve yarn.
- 3 baskets (base and walls in one piece), about 45 g each
- 15 flowers (5 per basket), about 3 g each
- 2 straps, about 10 g each
Sew 1 flower to each face. Center the flower over the third Rnd 5 loop on that face so that the petals overlap the solid band and the lattice. Stitch through the center ring and the tip of each petal.
Layout (front view, top to bottom):
        ( RING )
         /    \
   strap A    strap B
      |  TOP  |
      | BASKET|
      |  gap  |
      |  MID  |
      | BASKET|
      |  gap  |
      |BOTTOM |
      | BASKET|
Mark the strap rows from the bottom end as follows:
- Rows 1–13: bottom basket
- Rows 14–20: gap
- Rows 21–33: middle basket
- Rows 34–40: gap
- Rows 41–53: top basket
- Rows 54–82: free strap rising to the ring
- Rows 83–88: fold around the ring
Joining
Choose one face of each basket to be the front. Count 1 corner along from each end of that face. These two side corners are the widest points of the basket, and they are where the straps go. The remaining back corner points toward the wall.
- Lay strap A over the left side corner. Its center should run along the corner column, with Row 1 level with Wall Rnd 1.
- With mattress stitch, sew each long edge of the strap to the wall on either side of the corner. Take 1 stitch per strap row, which makes 13 stitches per edge. That works out to about 4 strap rows per 1 in (2.5 cm) of wall, so the 13 rows cover all 10 wall rounds.
- Repeat with strap B on the right side corner.
- Attach the middle and top baskets the same way at their marked rows.
Keep the tension firm but not tight. The strap should lie flat without puckering the lattice. Pull each stitch only until the yarn disappears into the fabric.
Size checkpoint: The distance from the bottom of the lowest basket to the rim of the top basket should be 13.25 in (33.7 cm). The gaps should be 1.75 in (4.4 cm) each.
Ring: Pass Rows 83–88 of each strap through the ring from front to back. Fold them down and whipstitch Row 88 to Row 82 across all 3 sts. Rows 54–82 form a free length of 7.25 in (18.4 cm) on each side, and the two straps meet in a V at the ring.
Border
The border is worked on each basket after Wall Rnd 8. It runs at the sc gauge of 4 sts per 1 in (2.5 cm).
Border Rnd 1 (Wall Rnd 9): Ch 1, sc in each st around, sl st to first sc. Move the markers up. Fasten off. [100 sc; 20 per face]
Border Rnd 2 (Wall Rnd 10, picot rim): Join yarn in any marked corner st. Ch 1, *sc in corner st, picot, (sc in next 3, sc in next, picot) 4 times, sc in next 3; rep from * 4 more times, sl st to first sc. Fasten off. [100 sc and 25 picots; 20 sc and 5 picots per face]
Why the math works: Each face has 20 sts. On each face you work 1 corner sc + (4 x 4) sts + 3 sc = 20. The picots land on stitches 0, 4, 8, 12 and 16 of every face. That puts one picot on every corner and four spaced evenly across the face, so they line up with the 5 lattice columns below. No stitches are added in the border, so the rim stays 5 in (12.7 cm) per face.
Ideally, finish the border before you join the straps. If you’ve already joined them, work right over the top edge of the strap.
Final Blocking
- Wet each basket thoroughly, then gently squeeze out the water. Don’t wring it.
- Stuff each basket firmly with a toilet paper roll wrapped in a plastic bag, or with rolled towels.
- Pinch each corner column so that it stands vertical and crisp.
- Pin each flower flat against its face, and push the picots upward.
- Lay the straps flat at 0.75 in (1.9 cm) wide and pin them straight.
- Let everything dry completely, which usually takes 24 hours.
- Take out the stuffing, then hang the organizer and check that all three baskets sit level.
Final Quality-Control Checklist
- Each base has 80 hdc and 4 in (10.2 cm) sides, and it lies flat.
- Each wall has 100 sts at Rnd 8 and is 2.75 in (7.0 cm) tall.
- Every face has a centered flower with 5 petal veins.
- There are 25 picots per basket, one on every corner.
- Each strap has 88 rows and is 22 in (55.9 cm) long.
- The baskets are 1.75 in (4.4 cm) apart and level from side to side.
- All ends are woven in securely on the inside.
Troubleshooting
- The base cups: The hdc rounds are too tight. Go up a hook size, or pull up taller loops.
- The base ruffles: The tension is too loose. Go down a hook size.
- The lattice looks crooked: Check that each ch-3 loop skips exactly 3 sts in Rnd 5, and recount the 5 loops per face.
- The picots miss the corners: The border was started off a corner. Rip back, rejoin at a marked stitch and recount 20 per face.
- A basket tilts forward: Re-sew the straps so they sit on the two widest corners, not the front corners.
- The flowers curl: Pin the flowers flat while blocking, and add a stitch under each petal tip.
Care
Hand wash in cool water with mild soap. Reshape the baskets over a roll and lay them flat to dry.
Final Notes
Each stage depends on the measurement before it:
- The 16-hdc gauge produces a 4 in (10.2 cm) base side.
- The base becomes 85 wall stitches, which flare to 100.
- Those 100 stitches give 20 per face, which makes 5 lattice loops and 5 picots per face.
- Thirteen strap rows match each 3.25 in (8.3 cm) basket.
- The 88 rows add up to a 22 in (55.9 cm) strap.
Check the numbers at each checkpoint, and all three baskets will come out the same and hang straight. Happy crocheting!