

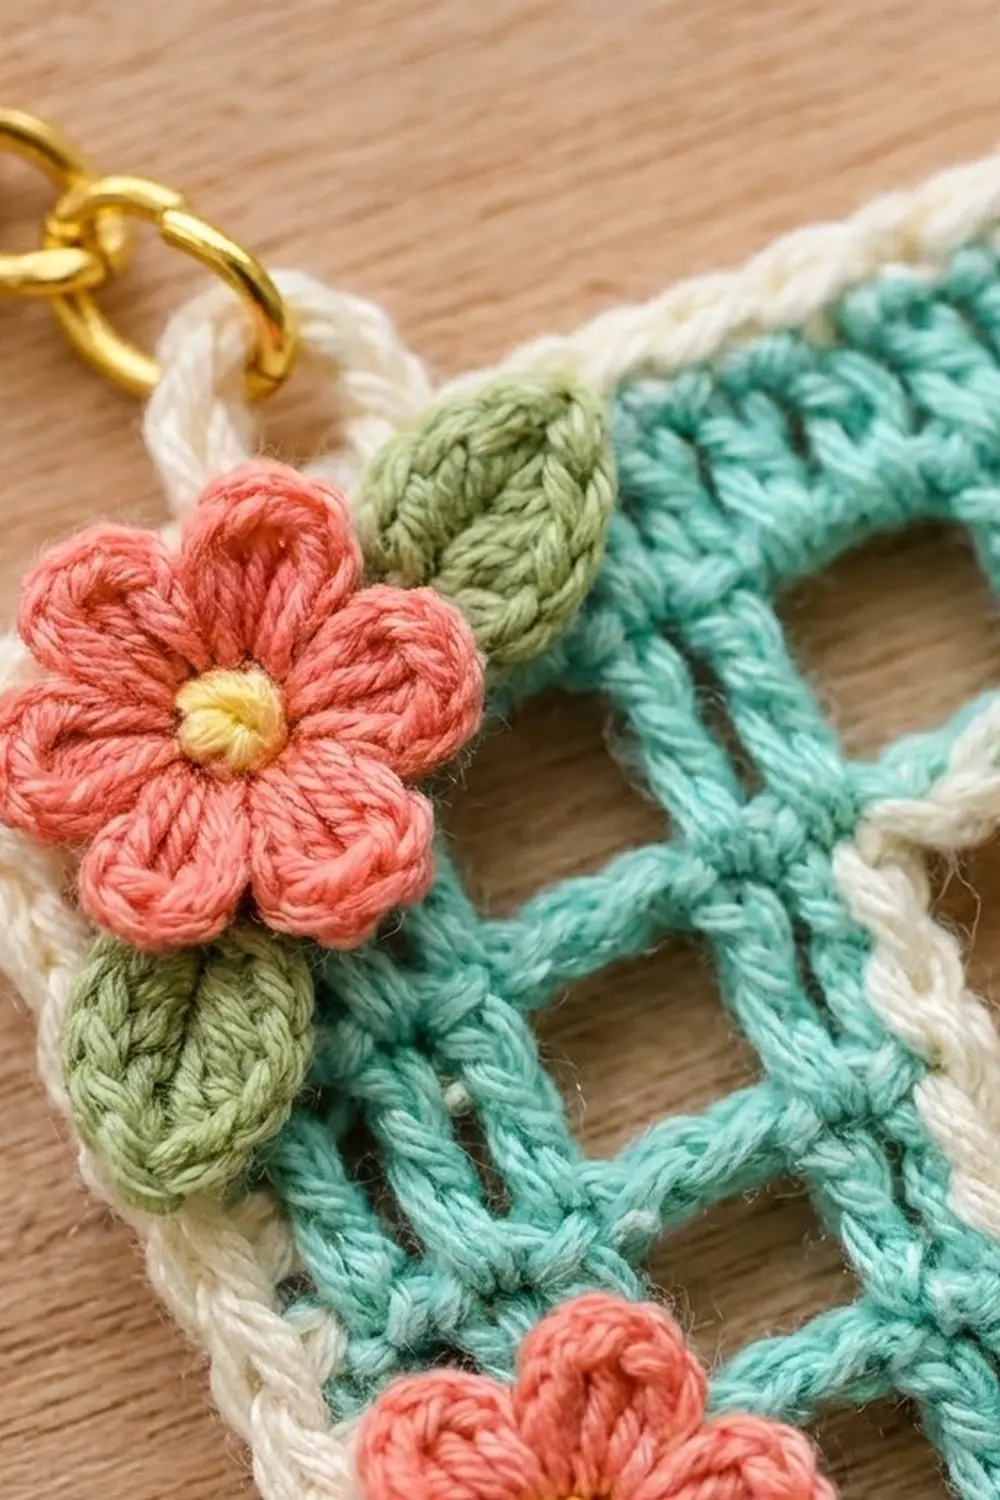
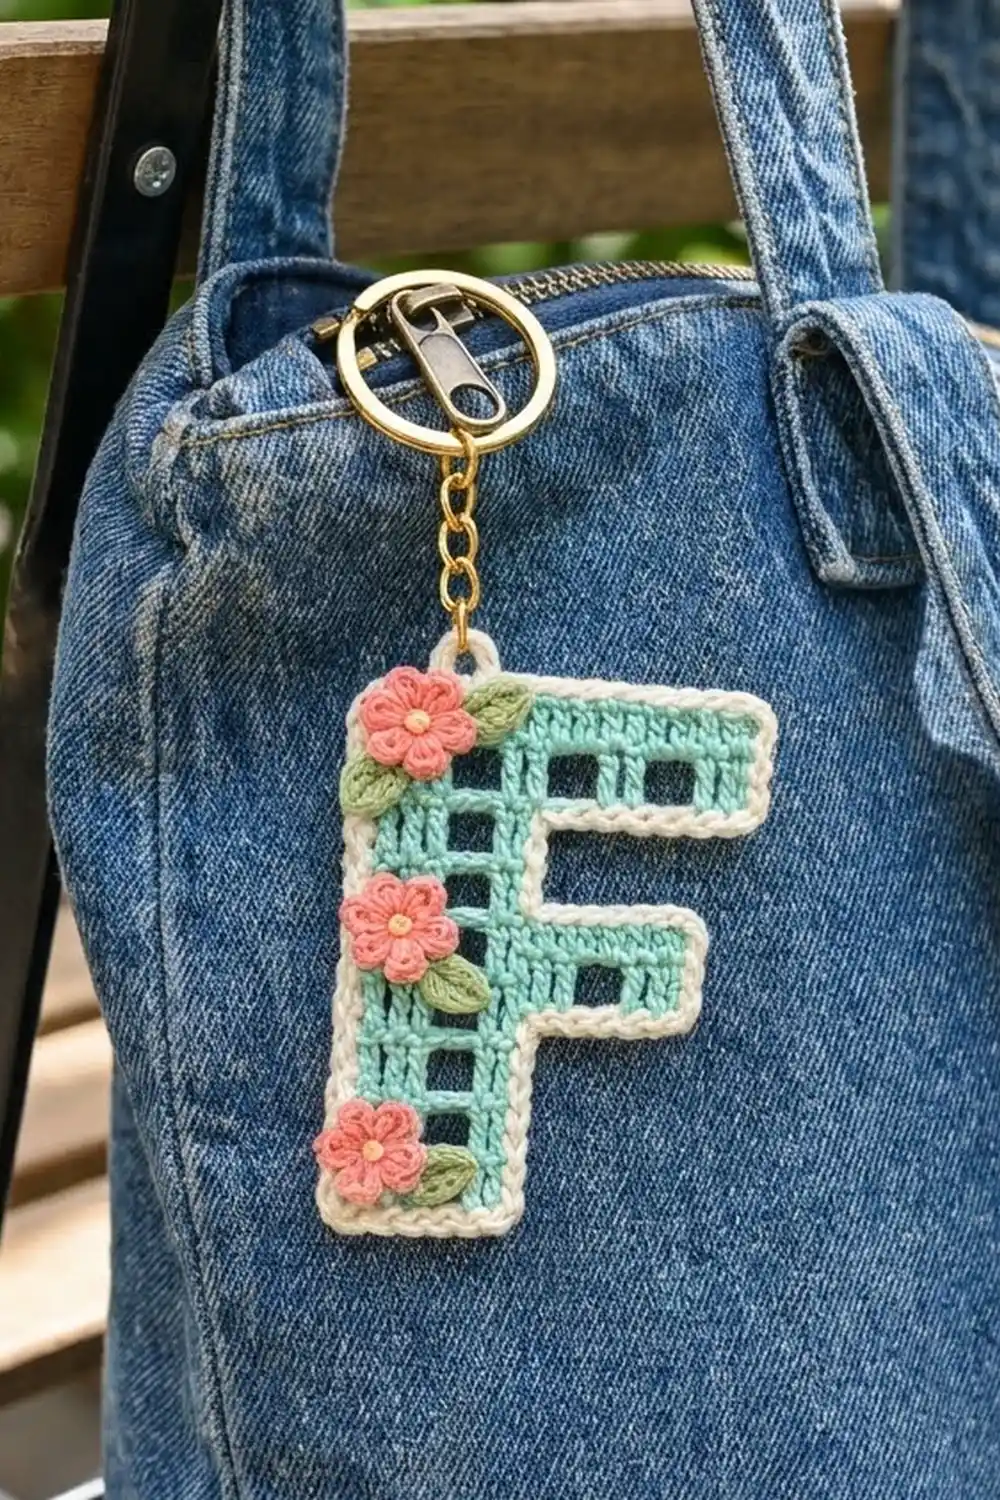
This little letter F keychain is small, sturdy, and personal. The letter is worked in a soft mint filet mesh, with solid blocks framing a neat column of open windows up the stem. A single round of cream single crochet gives it a clean outline.
Three coral flowers with sunny yellow centers climb the left side of the stem, each with small sage-green leaves. A gold split ring and chain clip it to a bag, a backpack, or your keys.
The pattern uses US crochet terms. The finished keychain measures 3 in (7.6 cm) wide and 4 in (10.2 cm) tall, not counting the hanging loop and hardware.
Construction is simple. You work the F flat in 10 filet rows from the bottom up. You add the arm and top bar with chain increases at the start of a row, and you end the arm with slip stitches. Then you work one cream border round, add a hanging loop, and sew on the flowers and leaves.
Finished Size and Construction
- Finished size: 3 in (7.6 cm) wide x 4 in (10.2 cm) tall
- Skill level: Easy+ (basic filet crochet and simple shaping)
- Terminology: US crochet terms
- Yarn weight: Super fine / fingering (#1) cotton
- Hook: 2.5 mm
- Number of pieces: 1 main letter, plus 3 flower and 4 leaf appliqués
- Layout: Single piece, no joining
- Piece size before border: 2.75 in (7.0 cm) wide x 3.75 in (9.5 cm) tall
- Border depth: 1/8 in (0.3 cm) on every edge
- Section widths: stem 1.25 in (3.2 cm); arm 2 in (5.1 cm); top bar 2.75 in (7.0 cm)
Materials
Use a smooth mercerized cotton in fingering weight, roughly 170 m per 50 g. Cotton keeps the mesh windows crisp and holds up well on a keyring. Avoid fuzzy or very stretchy yarns, because they blur the filet squares.
- Mint (main): 5 g / 17 m
- Cream (border and loop): 3 g / 10 m
- Coral (flowers): 2 g / 7 m
- Sage green (leaves): 1 g / 3 m
- Yellow (flower centers): 1 g / 3 m (or three 4 mm gold beads)
All quantities include extra for your gauge check and for weaving in ends.
Tools:
- 2.5 mm crochet hook
- Tapestry needle
- 1 in (2.5 cm) gold split keyring with a short chain and jump ring
- Small flat-nose pliers
- Rust-proof pins and a blocking mat
- Ruler or tape measure
Abbreviations (US Terms)
- ch: chain
- sl st: slip stitch
- sc: single crochet
- hdc: half double crochet
- dc: double crochet
- sk: skip
- sp: space
- st(s): stitch(es)
- tch: turning chain
- sc2tog: single crochet 2 together. Insert hook in first place, pull up a loop, insert hook in second place, pull up a loop, yarn over and draw through all 3 loops.
Filet mesh terms:
- Block (B): 3 dc. Over a block, dc in next 3 sts. Over a space, 2 dc in the ch-2 sp, dc in next dc.
- Space (S): ch 2, sk next 2 sts (or the ch-2 sp), dc in next st.
- Every row starts with ch 3, which counts as the first dc. Each mesh adds 3 sts, so a row of n meshes has 1 + (3 x n) sts.
Gauge and Checkpoints
Gauge: 8 dc = 1 in (2.5 cm) wide, and 8 dc rows = 3 in (7.6 cm) tall. One filet mesh (3 sts x 1 row) is a 3/8 in (1.0 cm) square.
Rows 1–4 are your gauge test. Work them first and measure before you go on:
- After Row 4: 1.25 in (3.2 cm) wide x 1.5 in (3.8 cm) tall
- After Row 6: arm reaches 2 in (5.1 cm) wide; height 2.25 in (5.7 cm)
- After Row 8: height 3 in (7.6 cm)
- After Row 10: 2.75 in (7.0 cm) wide x 3.75 in (9.5 cm) tall
- After the border: 3 in (7.6 cm) x 4 in (10.2 cm)
Too big? Switch to a 2.25 mm hook. Too small? Switch to a 2.75 mm hook. If only the height is off, change how far you pull up the first loop of each dc. The stitch counts stay the same either way.
The Letter F (Main Piece)
Use mint. With the right side facing, odd rows run right to left and even rows run left to right. Increases always happen at the start of an odd row, so the arm and top bar grow out to the right. Meshes are numbered from the left edge, so mesh 1 is the left side of the stem.
Row 1 (stem: B, S, B): Ch 12. Dc in 4th ch from hook and in next 2 ch, ch 2, sk 2 ch, dc in next ch, dc in last 3 ch. Turn. (10 sts: 3 meshes)
Rows 2–4: Ch 3 (counts as dc), dc in next 3 dc, ch 2, sk ch-2 sp, dc in next dc, dc in next 2 dc, dc in top of tch. Turn. (10 sts)
Check: each row has one open window in the center of the stem, and the stem is 1.25 in (3.2 cm) wide.
Row 5 (arm increase, B S B S B): Ch 8. Dc in 4th ch from hook and in next 2 ch (mesh 5, B). Ch 2, sk next 2 ch, dc in last dc of Row 4 (mesh 4, S). Continue across the stem: dc in next 3 dc (mesh 3, B), ch 2, sk ch-2 sp, dc in next dc (mesh 2, S), dc in next 2 dc, dc in top of tch (mesh 1, B). Turn. (16 sts: 1 + 15 = 5 meshes)
Row 6 (B S B B B): Ch 3, dc in next 3 dc, ch 2, sk ch-2 sp, dc in next dc, dc in next 3 dc, 2 dc in ch-2 sp, dc in next dc, dc in next 2 dc, dc in top of tch. Turn. (16 sts)
The arm now has one window in its lower row and a solid upper row.
Row 7 (arm decrease): Sl st in first 7 sts. This carries the yarn across the 6 arm sts to the right edge of the stem. Ch 3 (counts as dc), dc in next 3 dc, ch 2, sk ch-2 sp, dc in next dc, dc in next 2 dc, dc in top of tch. Turn. (10 sts)
Row 8: Work as Row 2. Turn. (10 sts)
Row 9 (top bar increase, B S B S B S B): Ch 14. Dc in 4th ch from hook and in next 2 ch (mesh 7, B). Ch 2, sk next 2 ch, dc in next ch (mesh 6, S). Dc in next 3 ch (mesh 5, B). Ch 2, sk last 2 ch, dc in last dc of Row 8 (mesh 4, S). Continue across the stem: dc in next 3 dc, ch 2, sk ch-2 sp, dc in next dc, dc in next 2 dc, dc in top of tch. Turn. (22 sts: 1 + 21 = 7 meshes)
Chain check for Row 9: 3 (tch) + 3 + 2 + 1 + 3 + 2 = 14 chains, all used.
Row 10 (solid top edge): Ch 3, dc in next 3 dc, 2 dc in ch-2 sp, dc in next dc; rep from * twice more, dc in next 2 dc, dc in top of tch. (22 sts: all blocks) Fasten off.
Count check for Row 10: 1 + (3 x 6) + 3 = 22. Weave the mint ends through solid blocks so they stay hidden.
Border
Border gauge: 8 sc = 1 in (2.5 cm), the same as the dc gauge. Along stitch edges, work 1 sc per st. Along row ends, work 3 sc per dc row. One dc row is 3/8 in (1.0 cm) tall, which is the width of 3 sc.
Corner rules:
- Outer corners (7): 3 sc in the corner st.
- Inner corners (3): sc2tog. Put the first leg in the row end and the second leg in the first free chain loop of the overhang. This turns 1 row-end sc and 1 edge sc into a single st, so the inside angle lies flat.
Border round: With the right side facing, join cream in the bottom-left corner (the first free loop of the foundation chain). Work counterclockwise:
- Bottom of stem (10 sts): 3 sc in first st, sc in next 8, 3 sc in last st. (14 sc)
- Right side of stem, Rows 1–4: 3 sc in each of Rows 1–3, 2 sc in Row 4. (11 sc)
- Inner corner: sc2tog over the Row 4 end and the first free loop of the arm chain. (1 sc)
- Underside of arm (remaining 5 free loops): sc in next 4, 3 sc in last. (7 sc)
- Right end of arm, Rows 5–6: 3 sc in each row end. (6 sc)
- Top of arm (Row 6, 6 sts): 3 sc in corner st, sc in next 4, sc2tog over the next st and the Row 7 end. (8 sc)
- Right side of stem, Rows 7–8: 2 sc in the rest of the Row 7 end, 2 sc in Row 8, then sc2tog over the Row 8 end and the first free loop of the top bar chain. (5 sc)
- Underside of top bar (remaining 11 free loops): sc in next 10, 3 sc in last. (13 sc)
- Right end of top bar, Rows 9–10: 3 sc in each row end. (6 sc)
- Top edge (Row 10, 22 sts): 3 sc in first st, sc in next 20, 3 sc in last st. (26 sc)
- Left side, Rows 10–1: 3 sc in each row end. (30 sc)
Sl st to first sc. (127 sc total) Do not fasten off.
Why the math works: The stitch edges total 56 sts (10 + 6 + 6 + 12 + 22) at 1 sc each, for 56 sc. The row-end edges total 20 rows (10 + 4 + 2 + 2 + 2) at 3 sc each, for 60 sc. The 7 outer corners add 2 sc each, for 14. The 3 inner sc2togs take away 1 each, for –3. That gives 56 + 60 + 14 – 3 = 127. Because the sc gauge matches the dc gauge, the border lies flat. It adds 1/8 in (0.3 cm) per side, for a finished 3 in (7.6 cm) x 4 in (10.2 cm).
Hanging loop: Sl st along the border to the center sc of the top-left corner. Ch 8, sl st in the same sc. Work 12 sc into the ch-8 loop, then sl st in the same sc. Fasten off. The loop is about 3/8 in (1.0 cm) across.
Flowers and Leaves (Appliqués)
Flower (make 3, coral): Make a magic ring, ch 1, 5 sc in ring, sl st to first sc. (5 sc) Next round: (sl st, ch 2, 2 dc, ch 2, sl st) in next sc; rep from * 4 more times. (5 petals) Fasten off, leaving a 6 in (15.2 cm) tail. Each flower is about 0.6 in (1.5 cm) across.
Center: With yellow, make a French knot in the middle (wrap 2 times), or sew on a 4 mm gold bead.
Leaf (make 4, sage green): Ch 5. Working in the back bumps, sl st in 2nd ch from hook, sc in next ch, hdc in next ch, sc in last ch. Rotate and work along the other side of the chain: hdc in next ch, sc in next ch, sl st in last ch. Fasten off, leaving a 6 in (15.2 cm) tail. Each leaf is about 0.5 in (1.3 cm) long.
Placement: Center each flower over the left solid column of the stem. Put one at the top-left corner (Rows 9–10), one at Rows 5–6, and one at Rows 1–2. Tuck one leaf under the right side of each flower so it peeks out. Add the fourth leaf below and to the left of the top flower. Pin everything in place. Then use the tails to whipstitch around the flower centers and leaf bases, leaving the petal tips free so they lift slightly.
Final Blocking
- Soak the letter in cool water for 5 minutes, then press the water out in a towel. If you can, block before sewing on the appliqués.
- Lay it flat on a blocking mat, right side up.
- Pin the 7 outer corners first. Check for 3 in (7.6 cm) across the top and 4 in (10.2 cm) down the left side.
- Pin the 3 inner corners so each forms a clean right angle.
- Use a pin tip to gently open each filet window into a square.
- Let it dry completely, about 6–8 hours.
- Sew on any appliqués you haven’t attached yet. Open the jump ring with pliers, thread it through the hanging loop, and close it.
Final Quality-Control Checklist
- Row counts are 10 sts (stem), 16 sts (arm), 10 sts (upper stem), and 22 sts (top bar).
- Before the border, the piece measures 2.75 in (7.0 cm) x 3.75 in (9.5 cm).
- The border has 127 sc and lies flat without ruffling.
- All 7 outer corners are sharp, and all 3 inner corners are crisp.
- The stem has 9 windows in a straight column (Rows 1–9).
- The finished size is 3 in (7.6 cm) x 4 in (10.2 cm).
- Flowers and leaves are firmly attached, and every end is woven in.
- The jump ring is fully closed.
Troubleshooting
- Windows are rectangles: Your rows are too tall. Pull up the first loop of each dc less, or go down a hook size.
- Arm or top bar slants: Check your chain counts. The arm needs ch 8 (2 meshes) and the top bar needs ch 14 (4 meshes).
- Border ruffles on the sides: On every third row end, work 2 sc instead of 3. Keep the corner rules the same.
- Border cups inward: Crochet more loosely, or use a larger hook for the border only.
- Inner corners gape: Make sure you work an sc2tog there, not 2 separate sc.
- Flowers flop: Tack down the base of each petal with one small stitch.
Care
Hand wash in cool water with mild soap, press dry in a towel, and lay flat to dry. Take off the metal keyring before washing to avoid rust marks.
Final Notes
The measurement chain is short and easy to check. Each mesh is 3/8 in (1.0 cm), so the 3-mesh stem is 1.25 in (3.2 cm), the 5-mesh arm is 2 in (5.1 cm), and the 7-mesh top bar is 2.75 in (7.0 cm). Ten rows give 3.75 in (9.5 cm) of height. The 127-stitch cream border adds 1/8 in (0.3 cm) on each side, so the keychain finishes at 3 in (7.6 cm) wide and 4 in (10.2 cm) tall. Add three coral flowers, clip on the gold ring, and your letter is ready to go.
Happy crocheting!