

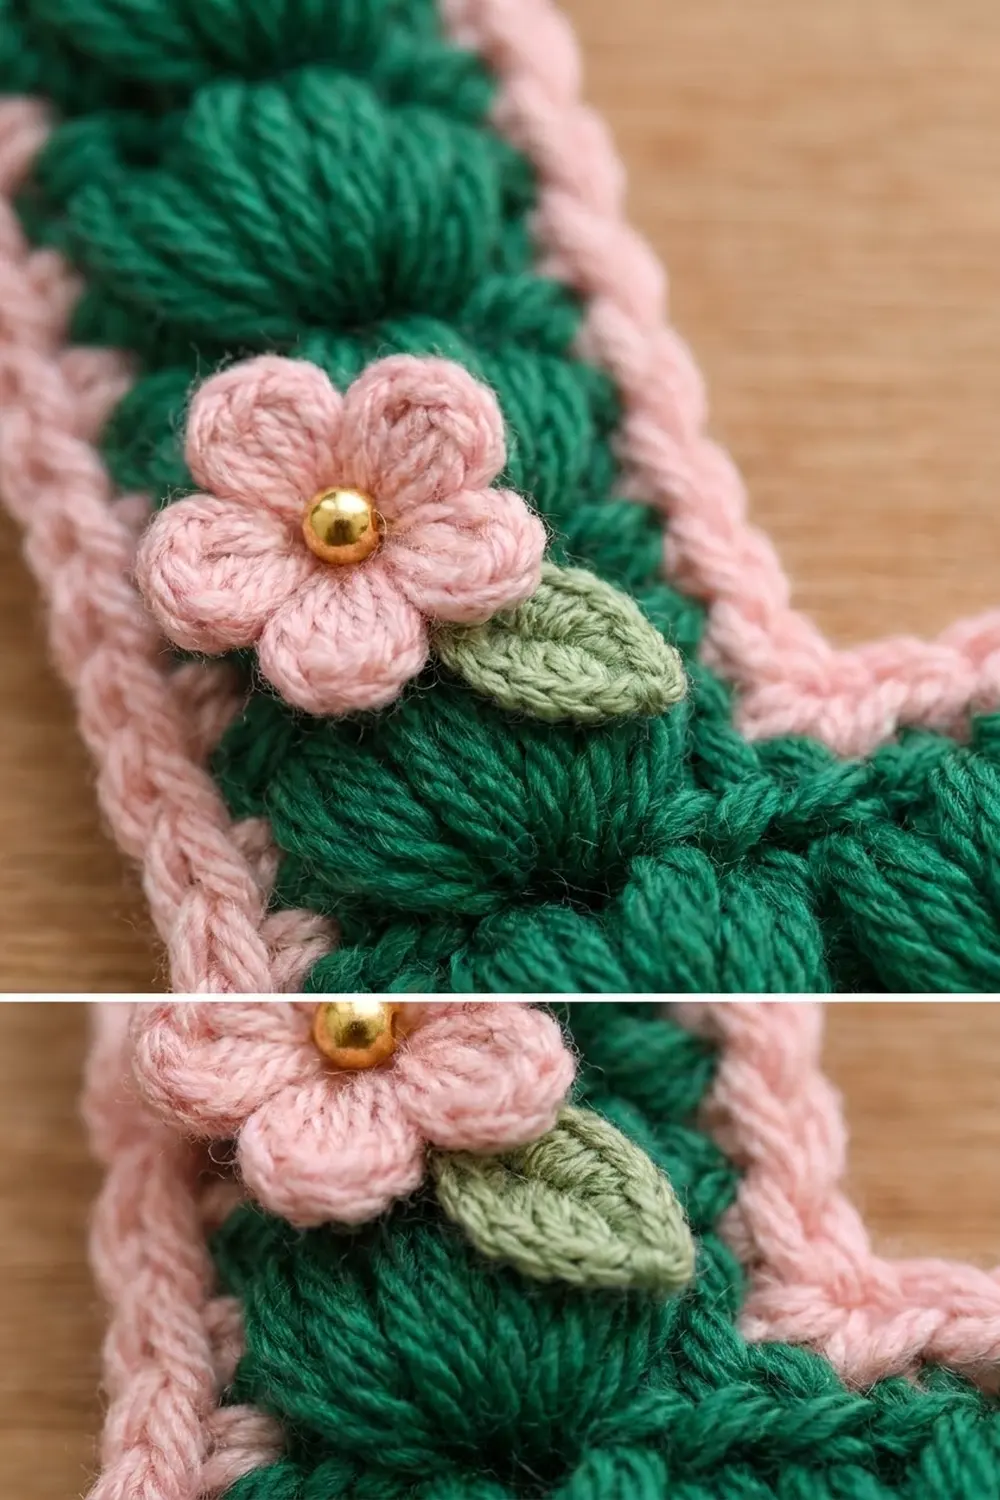
This little letter L is a quick, satisfying make for initials, gifts and bag charms. The body is a column of plump emerald green puff stitches shaped like a capital L. A soft blush pink border goes around it and gives it a neat, rope-like edge.
Three tiny pink five-petal flowers with gold bead centers sit on top, each with small sage green leaves. A gold key ring on a short chain finishes it, so you can clip it to a bag handle, keys or a zipper pull.
The pattern uses US crochet terms. The finished keychain measures about 2.0 in (5.1 cm) wide and 3.7 in (9.4 cm) tall, not counting the hardware.
Construction is simple. You work the foot of the L in rows, then keep going up from the left end to build the stem without cutting the yarn. A two-round pink border goes all the way around. The flowers and leaves are made separately and sewn on.
Finished Size and Construction
- Finished size: about 2.0 in x 3.7 in (5.1 cm x 9.4 cm), hardware not included
- Skill level: Easy / advanced beginner
- Terminology: US crochet terms
- Yarn weight: DK (#3), cotton or cotton blend
- Hook: 3.5 mm (E-4)
- Number of pieces: 1 main L body, plus 3 flowers and 4 leaves as appliqués
- Layout: one single L shape; the foot is 4 puffs across and the stem is 6 puffs tall (the corner puff is shared)
- Body size before border: about 1.5 in (3.8 cm) wide x 3.2 in (8.1 cm) tall
- Stem width before border: about 0.5 in (1.3 cm)
- Border depth: about 0.25 in (0.6 cm) on every side
Materials
Choose a smooth DK cotton or cotton blend. Cotton shows the puff stitches clearly and holds its shape on a keychain that gets handled a lot. Avoid fuzzy yarns, which blur the puffs and the border texture.
- Emerald green (body): 6 g, about 14 m
- Blush pink (border and flowers): 5 g, about 12 m
- Sage green (leaves): 2 g, about 5 m
All quantities include extra yarn for checking your gauge and for yarn tails.
Tools and notions:
- 3.5 mm (E-4) crochet hook
- Tapestry needle
- Scissors
- 3 gold 4 mm beads (for flower centers)
- Sewing needle and pink or clear thread
- 1 gold split key ring, about 1 in (2.5 cm) across
- 1 short gold chain, about 1 in (2.5 cm) long, with 2 jump rings
- Flat-nose pliers
- Optional: a few drops of fabric glue
Abbreviations (US Terms)
- ch – chain
- sl st – slip stitch
- sc – single crochet
- hdc – half double crochet
- dc – double crochet
- sc2tog – single crochet 2 together
- st(s) – stitch(es)
- rep – repeat
- yo – yarn over
- RS / WS – right side / wrong side
- MR – magic ring
Puff stitch (puff): (Yo, insert hook in st, yo and pull up a loop to about 0.25 in / 0.6 cm) 3 times, yo and draw through all 7 loops on hook, ch 1 to close. The closing ch does not count as a stitch. On the next row, work into the top of the puff, not into the closing ch.
Gauge and Checkpoints
Gauge: 6 sc and 6 sc rows = 1 in (2.5 cm). One puff row is about as tall as 2 sc rows.
You don’t need a separate swatch. The foot of the L (Rows 1–3) works as your test piece. Make it, then measure before you continue.
Checkpoints:
- After Row 3 (foot): 1.5 in (3.8 cm) wide x about 0.7 in (1.8 cm) tall.
- After Row 13 (full body): 1.5 in (3.8 cm) wide x about 3.2 in (8.1 cm) tall; stem about 0.5 in (1.3 cm) wide.
- After the border: about 2.0 in (5.1 cm) wide x 3.7 in (9.4 cm) tall.
If your foot is too wide (over 1.6 in / 4.1 cm), go down to a 3.25 mm hook. If it is too narrow (under 1.4 in / 3.6 cm), go up to a 3.75 mm hook. Small differences are fine for a keychain, but loose gauge makes floppy puffs and a wavy border.
Main Body: The L
The body is worked flat in rows. Odd rows are RS sc rows. Even rows are WS puff rows, so the puffs bulge toward the RS.
With emerald green, ch 10.
Row 1 (RS): Sc in 2nd ch from hook and in each ch across, turn. (9 sts)
Row 2 (WS): Ch 1 (does not count as a st here and throughout), sc in first st, puff in next st, sc in next st; rep from * 3 more times, turn. (9 sts: 4 puffs + 5 sc)*
Row 3 (RS): Ch 1, sc in each st across, working into the tops of the puffs, turn. (9 sc)
Checkpoint 1: measure now. The foot should be 1.5 in (3.8 cm) wide.
Row 3 ends at the left edge as seen from the RS. Build the stem on the 3 sts at that end, directly above the first puff of Row 2, so the stem’s puffs stack on top of the corner puff.
Row 4 (WS): Ch 1, sc in first st, puff in next st, sc in next st, turn, leaving the remaining 6 sts unworked. (3 sts: 1 puff + 2 sc)
Row 5 (RS): Ch 1, sc in each of the 3 sts, turn. (3 sc)
Rows 6–13: Repeat Rows 4–5 four more times. (3 sc in Row 13)
The stem now has 5 puffs of its own. With the shared corner puff, that makes 6 puffs from top to bottom and 4 puffs along the foot.
Fasten off, leaving a 6 in (15.2 cm) tail. Weave in all green tails on the WS.
Checkpoint 2: the body measures about 1.5 in x 3.2 in (3.8 cm x 8.1 cm), and the stem is about 0.5 in (1.3 cm) wide.
Flowers (Make 3)
With blush pink, make a MR.
Rnd 1: Ch 1, 5 sc in ring, sl st to first sc to join. Pull the ring tight. (5 sc)
Rnd 2: (Sl st, ch 2, 2 dc, ch 2, sl st) all in next sc; rep from * 4 more times. (5 petals)*
Fasten off, leaving an 8 in (20.3 cm) tail for sewing. Each flower measures about 0.75 in (1.9 cm) across.
Sew a gold 4 mm bead to the center of each flower with sewing thread. Go through the bead twice so it sits firmly in the ring.
Leaves (Make 4)
With sage green, ch 5.
Rnd 1: Working in the back bumps, sl st in 2nd ch from hook, sc in next ch, hdc in next ch, sc in last ch, ch 1. Then work along the other side of the foundation chain: sc in first ch, hdc in next ch, sc in next ch, sl st in last ch. (8 sts + 1 tip ch)
Fasten off, leaving a 6 in (15.2 cm) tail. Each leaf is about 0.6 in (1.5 cm) long, with a pointed tip.
Border
The border has two rounds in blush pink. It adds about 0.25 in (0.6 cm) on every side: 0.2 in (0.5 cm) from the sc round and a little more from the sl st round.
Border gauge: Work 1 sc per st along the top and bottom edges. Along the sides, work 1 sc in each sc row-end and 2 sc in each puff row-end. One sc is 1/6 in wide and one sc row is 1/6 in tall, and a puff row is twice as tall as a sc row. These ratios keep every edge flat.
Hold the body with the RS facing you and the stem pointing up.
Rnd 1: Join pink with a sc in the top-right st of the stem. This sc is the first of 3 corner sc. Then work as follows:
- Top-right stem corner: 2 more sc in the same st (corner group complete: 3 sc).
- Top of stem: sc in the middle st. (1 sc)
- Top-left stem corner: 3 sc in the last st. (3 sc)
- Left edge, going down: work along all 13 row-ends: 1 sc in each sc row-end (7 rows) and 2 sc in each puff row-end (6 rows). (19 sc)
- Bottom-left corner: 3 sc in the first foundation ch. (3 sc)
- Bottom edge: sc in each of the next 7 foundation chs. (7 sc)
- Bottom-right corner: 3 sc in the last foundation ch. (3 sc)
- Right edge of foot, going up: 1 sc in the Row 1 row-end, 2 sc in the Row 2 row-end, 1 sc in the Row 3 row-end. (4 sc)
- Top-right foot corner: 3 sc in the last st of Row 3. (3 sc)
- Top of foot: sc in each of the next 4 unworked sts. (4 sc)
- Inner corner: sc2tog, working the first leg in the last unworked st of Row 3 and the second leg in the Row 4 row-end. Then work 1 more sc in the same Row 4 row-end. (1 sc2tog + 1 sc)
- Right edge of stem, going up: 1 sc in each sc row-end (Rows 5, 7, 9, 11 and 13: 5 sc) and 2 sc in each puff row-end (Rows 6, 8, 10 and 12: 8 sc). (13 sc)
Sl st to the first sc to join. (65 sts)
Count check for Rnd 1: In this list, each side count means only the stitches between the corner groups. The corner groups are listed separately, so nothing is counted twice.
- Top of stem: 1
- Left edge: 19
- Bottom edge: 7
- Right edge of foot: 4
- Top of foot: 4
- Right edge of stem: 1 + 13 = 14
- Outer corner groups: 5 x 3 = 15
- Inner corner sc2tog: 1
Total: 1 + 19 + 7 + 4 + 4 + 14 + 15 + 1 = 65 sts.
Why the math works: The body is 9 sts wide and 19 sc rows tall. Row 1, Row 3 and the 5 stem sc rows give 7 units. The 6 puff rows count as 2 units each, giving 12. That makes 7 + 12 = 19.
The left edge gets exactly 19 sc. The right side gets 4 sc on the foot plus 15 on the stem (2 from Row 4 + 13), which also adds up to 19. The bottom edge gets 1 sc for each of its 9 sts, plus the corner extras. Nothing stretches or bunches.
Rnd 2: Sl st loosely in each st around, working through both loops. Do not add extra sts at the corners. (65 sl sts) Join to the first sl st, fasten off and weave in the tail.
The sl st round sits on top of the sc round and makes the neat, braided edge.
Checkpoint 3: the bordered L measures about 2.0 in (5.1 cm) wide x 3.7 in (9.4 cm) tall.
Final Blocking
- Lightly mist the L with water until it is damp, not soaked.
- Lay it RS up on a foam mat or folded towel.
- Gently push each puff into a rounded shape with your fingertips.
- Straighten the border so the edges are straight and all 5 outer corners are square.
- Pin at the corners. Check that it measures 2.0 in (5.1 cm) across the foot and 3.7 in (9.4 cm) tall.
- Let it dry completely, then remove the pins.
- Block the flowers and leaves flat at the same time, opening the petals.
Assembly and Hardware
After blocking, arrange the flowers and leaves on the RS:
- Flower 1: top of the stem, with 2 leaves tucked along its right side.
- Flower 2: middle of the stem, with 1 leaf below it and to the right.
- Flower 3: right end of the foot, with 1 leaf to its left.
Sew on each leaf first, then sew each flower over the base of its leaf. Stitch through the flower’s center ring and the tips of 2–3 petals. Keep your stitches inside the green body so they don’t show on the border. Add a drop of fabric glue under each flower if you like.
Open a jump ring with pliers. Pass it through the top center of the stem border, between 2 sc of Rnd 1, add one end of the chain and close the ring. Attach the other end of the chain to the split key ring with the second jump ring.
Final Quality-Control Checklist
- The foot has 4 puffs, and the stem shows 6 puffs from top to bottom, including the corner.
- Every puff sits on the RS, rounded and even.
- The body is 1.5 in x 3.2 in (3.8 cm x 8.1 cm) before the border.
- Border Rnd 1 has 65 sts and Rnd 2 has 65 sl sts.
- The finished L is about 2.0 in x 3.7 in (5.1 cm x 9.4 cm).
- All 5 outer corners are square, and the inner corner lies flat.
- All 3 flowers have a firmly sewn gold bead.
- All 4 leaves are placed as described.
- The jump rings are fully closed with no gaps.
- All tails are woven in and trimmed.
Troubleshooting
Puffs pop out on the wrong side. Work puffs only on WS (even) rows.
Puffs look thin or uneven. Pull each loop up to the same height, about 0.25 in (0.6 cm), before closing.
The stem leans or sits in the wrong place. Check that Row 4 starts at the same edge where Row 3 ended, so the stem stacks on the corner puff.
The border ruffles along the sides. You may be working 2 sc into sc row-ends. Use 2 sc only in puff row-ends.
The border pulls and cups. Go up half a hook size for Rnd 1, and check that each outer corner got 3 sc.
There is a hole at the inner corner. Work the sc2tog snugly, and close the gap with the tail when you weave it in.
The sl st round is too tight. Work it with a hook one size larger.
Care
Hand wash in cool water with mild soap, press out the water in a towel and dry flat. Keep the gold hardware dry when possible to protect the finish.

Final Notes
The measurements build on each other in a short, easy chain. The 9-st foot sets your width at 1.5 in (3.8 cm), and 13 rows bring the body to 3.2 in (8.1 cm) tall. The 65-st border then adds 0.25 in (0.6 cm) all around, for a finished L of 2.0 in x 3.7 in (5.1 cm x 9.4 cm). If those three numbers check out, the flowers, leaves and hardware will fall into place.
Make one for yourself, or stitch one as a personalized gift for someone whose name starts with L.
Happy crocheting!