

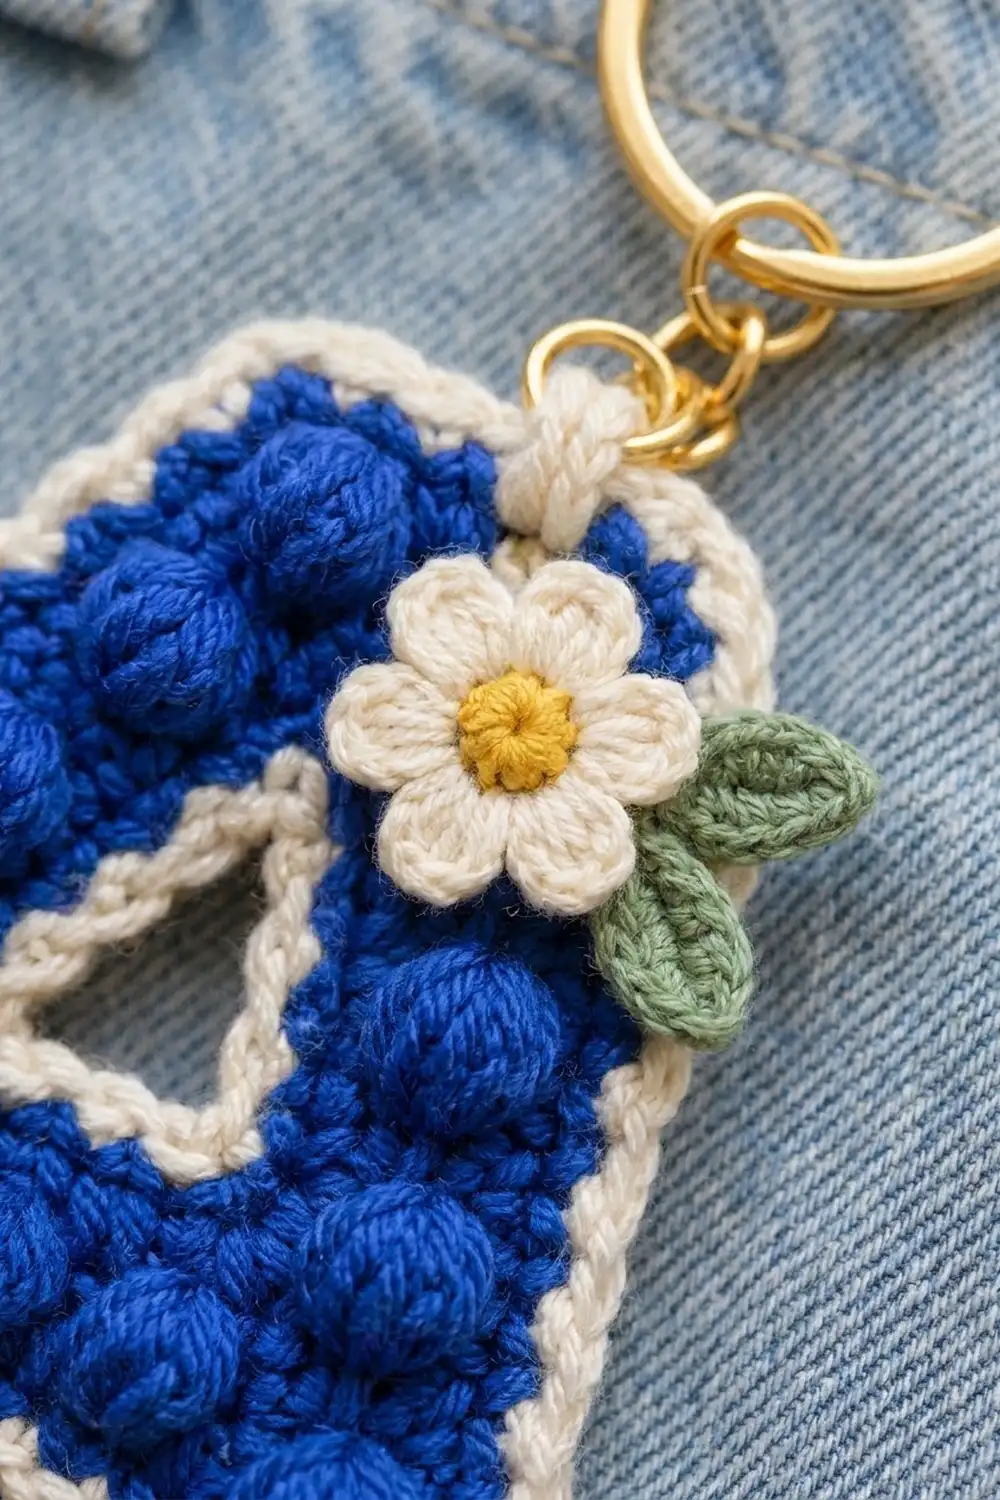
This little letter A keychain is cobalt blue with rows of raised puff stitches, a cream corded edge and three tiny daisies. It’s a quick, satisfying make that turns a few grams of cotton into a personal gift or a bag charm.
The colors are simple: cobalt blue for the letter, cream for the border and petals, sunny yellow for the flower centers and sage green for the leaves. The puffs give it a soft, textured look, and the crab-stitch edge makes it look neat and finished.
The pattern uses US crochet terms. The finished letter measures 3.5 in (8.9 cm) tall by 3.5 in (8.9 cm) wide. That doesn’t include the hanging loop or the key ring hardware.
You work the letter flat in rows from the bottom up. First you make the two legs separately and link them with a chain bridge to form the crossbar. Then you split again around the triangular counter opening and close into the apex. A cream border, a counter lining, three appliqué flowers and the key ring hardware finish it off.
Finished Size and Construction
- Finished size: 3.5 x 3.5 in (8.9 x 8.9 cm)
- Skill level: Advanced beginner to intermediate
- Terminology: US
- Yarn weight: DK (weight 3) cotton
- Hook: 3.25 mm (US D-3)
- Number of pieces: 1 letter, plus 3 small flowers and 6 leaves as appliqués
- Layout: Single letter; no joining
- Piece size before border: 3 x 3 in (7.6 x 7.6 cm), 18 stitches wide at the feet and 21 rows tall
- Border depth: 0.25 in (0.6 cm) on each side
- Length with hardware: about 5.5 in (14.0 cm)
Materials
Use a smooth DK cotton or cotton blend. Firm cotton keeps the puffs crisp and stops the letter from stretching on a key ring. Fuzzy or very splitty yarns hide the texture.
- Cobalt blue: 8 g, about 18 m
- Cream: 4 g, about 9 m
- Yellow: 1 g, about 2 m
- Sage green: 1 g, about 2 m
These amounts already include a margin for your gauge swatch and weaving in ends.
Tools:
- 3.25 mm (US D-3) crochet hook
- Tapestry needle
- 3 locking stitch markers
- 25 mm (1 in / 2.5 cm) split key ring with a short chain attached
- 8 mm jump ring
- 2 pairs of flat-nose pliers
- Rust-proof pins and a blocking mat or folded towel
Abbreviations (US Terms)
- ch – chain
- sl st – slip stitch
- sc – single crochet
- sc2tog – single crochet 2 together (decrease)
- hdc – half double crochet
- dc – double crochet
- st(s) – stitch(es)
- RS / WS – right side / wrong side
- rev sc – reverse single crochet (crab stitch): work sc from left to right instead of right to left
- puff – puff stitch (see below)
Puff stitch: (Yarn over, insert hook in st, yarn over and pull up a loop to the height of a sc) 4 times, so you have 9 loops on your hook. Yarn over and pull through all 9 loops, then ch 1 to close. The puff counts as 1 st, and the closing ch-1 doesn’t count. You work puffs only on WS rows so they pop out on the RS.
Shift rows: To slant a leg or arm, sc2tog at its outer edge and work 2 sc in the st at its inner edge. The count stays the same, and the whole column moves 1 st toward the center.
Gauge and Checkpoints
Gauge: 12 sc and 14 rows = 2 in (5.1 cm) in sc worked in rows, before blocking.
Make one leg (Rows 1–8 below) as your test piece. It should measure 0.83 in (2.1 cm) wide and 1.14 in (2.9 cm) tall. If it matches, you can keep it as the right leg.
Checkpoints:
- After Row 8 (each leg): 0.83 in (2.1 cm) wide, 1.14 in (2.9 cm) tall
- After Row 9: 2.33 in (5.9 cm) across the crossbar
- After Row 16: 1.33 in (3.4 cm) wide, opening closed at the top
- After Row 21: 3 in (7.6 cm) tall, 3 in (7.6 cm) across the feet
- After the border: 3.5 x 3.5 in (8.9 x 8.9 cm)
If it’s too big: go down to a 3.0 mm hook. If it’s too small: go up to a 3.5 mm (US E-4) hook. Getting the row gauge right matters most, because the slant depends on it.
Letter Body
Use cobalt blue. Turn at the end of every row. The ch 1 at the start of each row doesn’t count as a st. On RS rows, you work from right to left with the RS facing you.
Right Leg (make 1, keep yarn attached)
Row 1 (RS): Ch 6, sc in 2nd ch from hook and in each ch across. (5 sts) Mark this side as the RS.
Row 2 (WS): Ch 1, sc 2, puff, sc 2. (5 sts)
Row 3 (RS, shift): Ch 1, sc2tog, sc 2, 2 sc in last st. (5 sts) You start at the outer edge, so the leg moves 1 st inward.
Row 4 (WS): Ch 1, sc 2, puff, sc 2. (5 sts)
Row 5 (RS): Ch 1, sc 5. (5 sts)
Row 6 (WS): Ch 1, sc 2, puff, sc 2. (5 sts)
Row 7 (RS, shift): Ch 1, sc2tog, sc 2, 2 sc in last st. (5 sts)
Row 8 (WS): Ch 1, sc 2, puff, sc 2. (5 sts) Don’t fasten off. Put the live loop on a marker.
Left Leg (make 1, fasten off)
Row 1 (RS): Ch 6, sc in 2nd ch from hook and in each ch across. (5 sts)
Row 2 (WS): Ch 1, sc 2, puff, sc 2. (5 sts)
Row 3 (RS, shift): Ch 1, 2 sc in first st, sc 2, sc2tog. (5 sts) You start at the inner edge, so this shift mirrors the right leg.
Rows 4–6: Work as for the right leg. (5 sts)
Row 7 (RS, shift): Ch 1, 2 sc in first st, sc 2, sc2tog. (5 sts)
Row 8 (WS): Ch 1, sc 2, puff, sc 2. (5 sts) Fasten off.
Lay both legs RS up, with the right leg on the right. The feet should be 8 sts, or 1.33 in (3.4 cm), apart at Row 1. The gap narrows to 4 sts, or 0.67 in (1.7 cm), at Row 8.
Crossbar
Row 9 (RS): Put the right leg’s loop back on your hook. Ch 1, sc 5 across the right leg, ch 4, then sc 5 across the left leg, starting at its inner edge. (14 sts: 10 sc + 4 ch)
Row 10 (WS): Ch 1, sc 2, puff, sc 2, puff, sc 2, puff, sc 2, puff, sc 2. (14 sts, with 4 puffs) Work into the back bump of each ch so the bridge stays firm.
Row 11 (RS): Ch 1, sc2tog, sc 10, sc2tog. (12 sts)
Counter Opening
You work the arms separately over Rows 12–15. This leaves a 4-st gap that steps down to 2 sts, which forms the triangular opening.
Left arm, Row 12 (WS): Ch 1, sc 1, puff, sc 2. Leave the remaining 8 sts unworked. (4 sts)
Row 13 (RS): Ch 1, sc 4. (4 sts)
Row 14 (WS, shift): Ch 1, sc2tog, puff, 2 sc in last st. (4 sts)
Row 15 (RS): Ch 1, sc 4. (4 sts) Put the live loop on a marker.
Right arm, Row 12 (WS): Skip the 4 sts of Row 11 after the left arm. Join cobalt in the next st, ch 1, sc in the same st, sc 1, puff, sc 1. (4 sts)
Row 13 (RS): Ch 1, sc 4. (4 sts)
Row 14 (WS, shift): Ch 1, 2 sc in first st, puff, sc2tog. (4 sts)
Row 15 (RS): Ch 1, sc 4. (4 sts) Fasten off.
Checkpoint: the opening is 4 sts, or 0.67 in (1.7 cm), wide at its base and about 0.57 in (1.4 cm) tall.
Apex
Row 16 (WS, join): Pick up the left arm’s live loop. Ch 1, sc2tog, puff, 2 sc in next st (the last st of the left arm), 2 sc in first st of the right arm, puff, sc2tog. (8 sts)
Row 17 (RS): Ch 1, sc2tog, sc 4, sc2tog. (6 sts)
Row 18 (WS): Ch 1, sc 1, puff, sc 2, puff, sc 1. (6 sts)
Row 19 (RS): Ch 1, sc2tog, sc 2, sc2tog. (4 sts)
Rows 20–21: Ch 1, sc 4. (4 sts) Fasten off.
The top edge should be 4 sts, or 0.67 in (1.7 cm), wide. The body now measures 3 x 3 in (7.6 x 7.6 cm). Weave in all the blue ends on the WS.
Border
Border gauge: 6 sc per 1 in (2.5 cm) along stitch edges, and 1 sc per row end along the side edges.
Rnd 1: With RS facing, join cream in the first st of Row 21 at the top right corner. Then work around the letter as follows:
- Top: 3 sc in the same st, sc 2, 3 sc in the last st. (8 sc)
- Left outer slant: Sc in each row end down to Row 1. (21 sc)
- Left foot: Working into the free loops of the foundation ch, 3 sc in the first ch, sc 3, 3 sc in the last ch. (9 sc)
- Left inner edge: Sc in row ends 1–7. (7 sc)
- Under the crossbar: Sc2tog over the Row 8 row end and the first bridge ch, sc in the next 2 ch, then sc2tog over the last ch and the right leg’s Row 8 row end. (4 sts)
- Right inner edge: Sc in row ends 7–1. (7 sc)
- Right foot: 3 sc in the first ch, sc 3, 3 sc in the last ch. (9 sc)
- Right outer slant: Sc in each row end up to Row 21. (21 sc)
Sl st to the first sc. Total: 86 sts (8 + 21 + 9 + 7 + 4 + 7 + 9 + 21).
Rnd 2: Ch 1, rev sc in each st around. (86 sts) Sl st to the first st and fasten off.
Why the math works: The top has 4 sts and each foot has 5. Each of the 6 outer corners gets 3 sc, which adds 2 sts per corner, or 12 extra sts in total. The two sc2tog at the inner corners under the crossbar each remove 1 st so those corners don’t bunch up. That gives 76 base positions + 12 − 2 = 86. One sc per row end works because sc rows are almost as tall as a stitch is wide. The outer slants are a little longer than the 3 in (7.6 cm) height, so the 21 sc on each one lie flat without ruffling.
Counter lining: Join cream in the first unworked st of Row 11 at the base of the opening. Work 2 sc in the first st, sc 2, 2 sc in the last st (6 sc). Sc in each of the 4 row ends up one side, sc 1 into the joining point of Row 16, then sc in each of the 4 row ends down the other side. (15 sts) Sl st to the first sc and fasten off. With the lining in place, the opening is about 0.4 in (1.0 cm) wide.
Hanging loop: The top edge of Rnd 2 has 8 sts. Join cream in the 4th of those sts, ch 6, then sl st in the 5th. Fasten off. The loop is about 0.5 in (1.3 cm) long.
Flowers and Leaves
Flower (make 3): With yellow, make a magic ring and work 5 sc into it. Pull the ring closed, sl st to the first sc and fasten off. Join cream in any sc. *(Sl st, ch 2, 2 dc, ch 2, sl st) in the same st, then move to the next st. Repeat from * 4 more times. (5 petals) Fasten off and leave a 6 in (15.2 cm) tail. Each flower is about 0.75 in (1.9 cm) across.
Leaf (make 6): With green, ch 5. Sl st in the 2nd ch from the hook, then sc, hdc and sc in the remaining 3 ch. Fasten off and leave a tail. Each leaf is about 0.5 in (1.3 cm) long.
Placement: Sew one flower at the upper right, where the right arm meets the apex. Sew one on the outer corner of each foot so it overlaps the border. Tuck 2 leaves behind each flower, angled outward. Use the tails to sew through the blue fabric only, and keep your stitches hidden under the petals.
Final Blocking
- Spritz the letter with water until it’s evenly damp, or hold a steam iron just above it. Never press the puffs flat.
- Pin it RS up to a 3.5 x 3.5 in (8.9 x 8.9 cm) outline.
- Straighten both outer slants so they run in clean lines.
- Pin the counter and the gap between the legs open so the cream lining shows evenly.
- Gently plump each puff with your fingertip.
- Let it dry completely, then unpin.
- Open the jump ring with the two pliers. Thread on the cream loop and the end of the chain, then close the ring fully.
Final Quality-Control Checklist
- The letter measures 3.5 x 3.5 in (8.9 x 8.9 cm)
- Rnd 1 and Rnd 2 each have exactly 86 sts
- The counter lining has 15 sts, and the opening is clearly visible
- Every puff sits on the RS
- Both legs mirror each other
- The flowers are sewn on securely, with no visible stitching
- All ends are woven in, and the jump ring is fully closed
Troubleshooting
- The legs slant outward: You worked the shift backwards. The 2-sc increase belongs at the inner edge.
- The puffs show on the wrong side: Work puffs only on WS rows.
- The crossbar puckers: Your bridge chain is too tight. Chain loosely, or use a 3.5 mm hook just for the chain.
- The border ruffles: Your hook may be too big, or you added extra sc on the slants. Recount 21 sc per slant.
- The border cups: Your tension is too tight. Relax it, or go up a hook size for Rnd 2 only.
- The opening has closed up: The lining is too bulky. Work exactly 1 sc per row end.
Care
Spot clean with mild soap and cool water, and dry flat. Take off the metal hardware before soaking the whole piece.

Final Notes
All the measurements build on each other. A gauge of 12 sc and 14 rows to 2 in (5.1 cm) gives 5-st legs 0.83 in (2.1 cm) wide. Those legs build an 18-st by 21-row letter of 3 x 3 in (7.6 x 7.6 cm), and the 0.25 in (0.6 cm) border brings it to 3.5 x 3.5 in (8.9 x 8.9 cm). Check your measurements at each stage and the letter will come out crisp and even. Happy crocheting!