

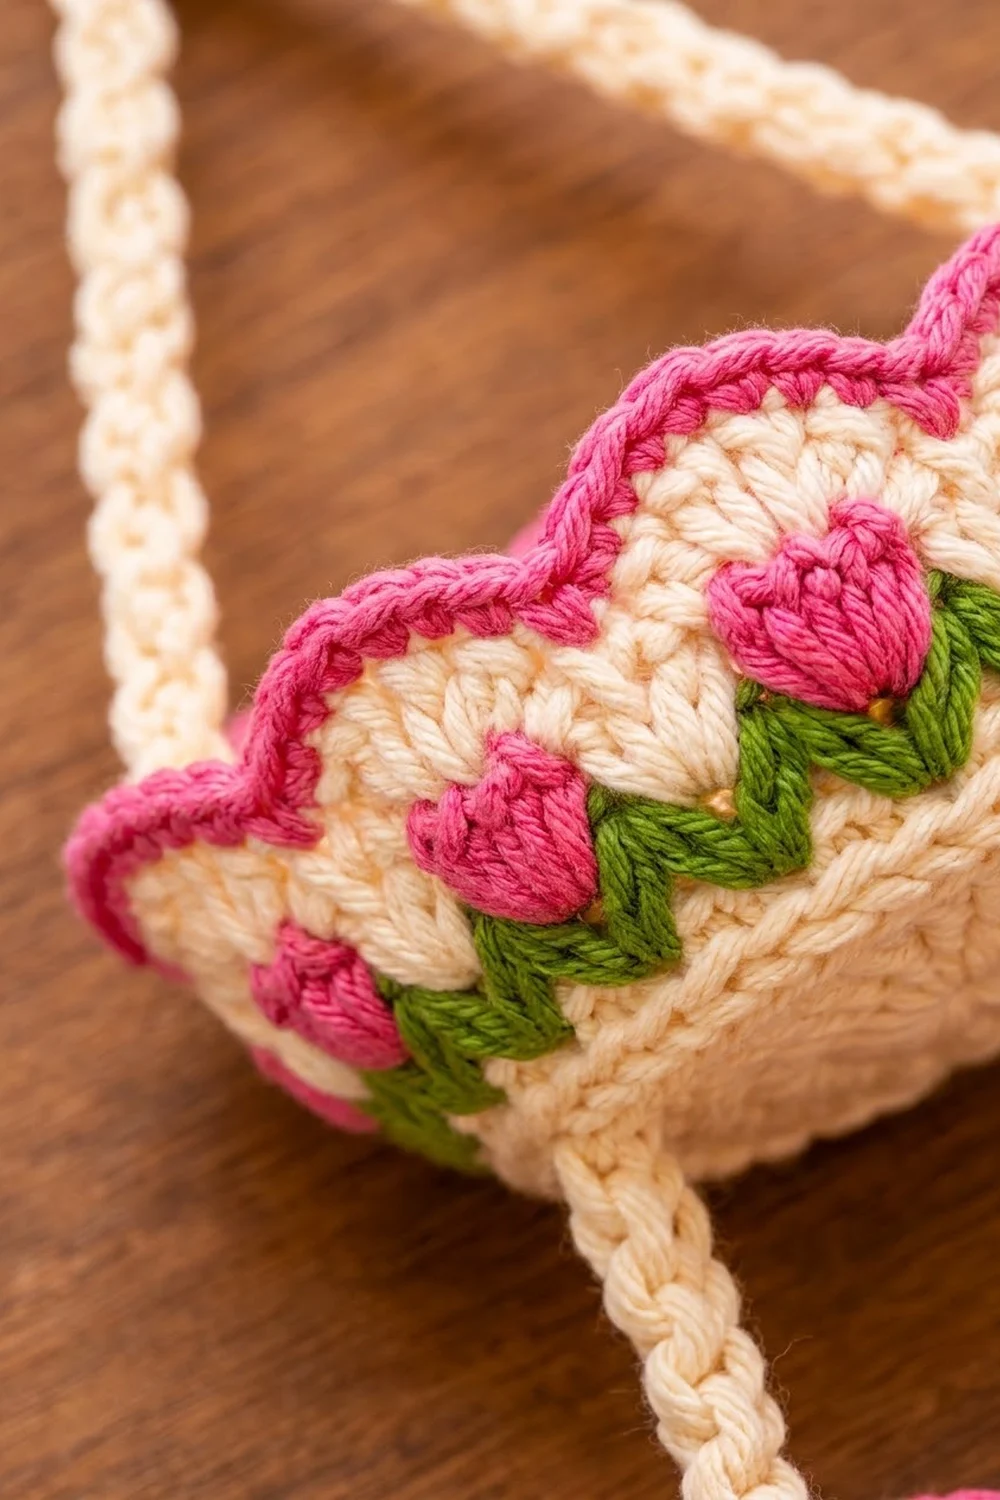
This hanging organizer has three small cream baskets stacked one above another, each with a band of pink tulips on green leaves and a scalloped pink-edged rim. Two chain-textured cream cords run down the sides and meet in a neat V over a wall hook. Each basket holds one standing toilet paper roll. You can also use it for washcloths, hair accessories or small plants.
The colors are cream, raspberry pink and leaf green, for a cottage-garden look that works in a bathroom, nursery or craft corner. The tulips use simple tapestry crochet plus one puff stitch, so each flower stands out slightly from the wall.
This pattern uses US crochet terms. Each basket measures 6.5 in (16.5 cm) across the wall, about 7.5 in (19.1 cm) across the scallop tips, and 3.25 in (8.3 cm) tall. Hung up, the organizer is about 25 in (63.5 cm) from the top of the V to the bottom of the lowest basket.
Construction is simple. Each basket starts as a flat double crochet circle, then the wall is worked upward in single crochet rounds, followed by the colorwork band and a three-round scalloped border. Two slip-stitch cords are sewn to opposite sides of all three baskets, and their tops are joined into the hanging V.
Finished Size and Construction
- Finished size (hung): about 7.5 in (19.1 cm) wide x 25 in (63.5 cm) tall
- Skill level: Intermediate (tapestry color changes)
- Terminology: US
- Yarn weight: Worsted (#4)
- Hook: 5.0 mm (H-8)
- Number of pieces: 5 (3 baskets + 2 cords)
- Layout: 3 baskets stacked vertically, 4 in (10.2 cm) apart, hung from 2 side cords
- Piece size (each basket): 6.5 in (16.5 cm) diameter x 3.25 in (8.3 cm) tall
- Size before border: 6.5 in (16.5 cm) diameter x 2 in (5.1 cm) wall
- Border depth: 1.25 in (3.2 cm)
Materials
Choose a firm worsted-weight cotton or cotton blend so the baskets keep their shape. Acrylic also works but gives a softer basket. The amounts below assume about 200 m per 100 g.
- Cream: 150 g / 300 m (bases, walls, scallops, cords)
- Raspberry pink: 40 g / 80 m (tulips, rim line, scallop edging)
- Leaf green: 25 g / 50 m (leaf band)
All amounts include a margin of roughly 15–20% for gauge swatches and weaving in ends.
Tools:
– 5.0 mm (H-8) crochet hook
– Tapestry needle
– 4 stitch markers
– Measuring tape
– Pins
– Wall hook or wooden peg
Abbreviations (US Terms)
- ch – chain
- sl st – slip stitch
- sc – single crochet
- dc – double crochet
- BLO – back loop only
- st(s) – stitch(es)
- sk – skip
- rnd – round
Puff stitch (puff): (Yarn over, insert hook in st, pull up a loop to about 0.5 in / 1.3 cm) 3 times, yarn over and pull through all 7 loops on the hook. The puff counts as 1 stitch. Do not add a closing chain.
Tapestry color change: Work the last yarn over of the stitch before the change in the new color. Carry the unused color along the tops of the stitches and work over it so it stays hidden.
Gauge and Checkpoints
Gauge: 14 sc and 16 rnds = 4 in (10.2 cm) in single crochet.
Crochet one complete basket before starting the other two, and check it at each stage:
- After base Rnd 3: 2.75 in (7.0 cm) diameter
- After base Rnd 6: 5.5 in (14.0 cm) diameter
- After wall Rnd 9: 6.5 in (16.5 cm) diameter across the opening
- After wall Rnd 14: wall height 2 in (5.1 cm), measured from the turning ridge
- After Rnd 17: total height 3.25 in (8.3 cm)
If your basket is too big, go down a hook size (4.5 mm). If it’s too small, go up one size (5.5 mm). A basket that’s too narrow at Rnd 9 won’t hold a standard roll, which is about 4.5 in (11.4 cm) across.
Basket (Make 3)
Base
Use cream throughout the base. Join each round with a sl st to the top of the beginning ch-3. The ch-3 counts as a dc.
Rnd 1: Magic ring, ch 3, 9 dc in ring. Join. (10 dc)
Rnd 2: Ch 3, dc in same st, 2 dc in each st around. Join. (20 dc)
Rnd 3: Ch 3, 2 dc in next st, dc in next st, 2 dc in next st; repeat from * around. Join. (30 dc)
Rnd 4: Ch 3, dc in next st, 2 dc in next st, dc in next 2 sts, 2 dc in next st; repeat from * around. Join. (40 dc)
Rnd 5: Ch 3, dc in next 2 sts, 2 dc in next st, dc in next 3 sts, 2 dc in next st; repeat from * around. Join. (50 dc)
Rnd 6: Ch 3, dc in next 3 sts, 2 dc in next st, dc in next 4 sts, 2 dc in next st; repeat from * around. Join. (60 dc)
Because the 10 increases stack on top of each other, the base keeps a slightly lobed outline. That’s intended. The base should lie flat and measure 5.5 in (14.0 cm).
Wall
From here on, join each round with a sl st to the first sc and begin with ch 1, which does not count as a stitch. Work with the outside of the basket facing you.
Rnd 7 (turning ridge): Ch 1, sc in BLO of each st around. Join. (60 sc)
Rnd 8: Ch 1, sc in each st around. Join. (60 sc)
Rnd 9 (flare): Ch 1, sc in next 4 sts, 2 sc in next st; repeat from * 11 more times. Join. (60 + 12 = 72 sc)
The basket now has 72 stitches, which is 12 repeats of 6. Place a marker in the first st of every second repeat so you can follow the colorwork easily.
Rnd 10 (green): Change to green. Ch 1, sc in each st around. Join. (72 sc)
Rnd 11 (leaf base): Ch 1, cream sc in next st, green sc in next 3 sts, cream sc in next 2 sts; repeat from * around. Join. (72 sc: 36 green, 36 cream)
Rnd 12 (leaves and stem): Join pink and carry it along with the other colors. Ch 1, cream sc in next st, green sc in next st, pink sc in next st, green sc in next st, cream sc in next 2 sts; repeat from * around. Join. Fasten off green. (72 sc)
The 2 green stitches on either side of each pink one form a small V of leaves around the tulip stem.
Rnd 13 (tulip heads): Ch 1, cream sc in next st, pink sc in next st, pink puff in next st, pink sc in next st, cream sc in next 2 sts; repeat from * around. Join. (72 sts: 60 sc + 12 puffs)
Each puff sits right above the pink stem stitch and pops outward to form a rounded tulip cup.
Rnd 14: Fasten off pink. With cream, ch 1, sc in each st around, including the top of each puff. Join. (72 sc)
Checkpoint: the wall measures 2 in (5.1 cm) from the turning ridge, and the opening measures 6.5 in (16.5 cm) across. Do not fasten off cream yet. You’ll start the border next (see Border).
Cord (Make 2)
Hold 2 strands of cream together.
Ch 85. Sl st in the back bump of the 2nd ch from the hook and in the back bump of each ch across. (84 sl sts)
At about 3 sts per inch, the cord measures 28 in (71.1 cm). It should be firm and round, with a chain-like texture on one face. If it’s short, add or remove chains in multiples of 3 until it measures 28 in (71.1 cm). Fasten off and weave in ends.
Make All Pieces
You’ll need:
- Baskets: 3, each including the Border rounds 15–17
- Cords: 2 in doubled cream
Color use per basket:
– Cream: base, Rnds 7–9, Rnd 14 and Rnd 16
– Green: Rnds 10–12
– Pink: Rnds 12–13, 15 and 17
Finish the border on all 3 baskets before joining.
Layout grid (front view):
              [ HOOK ]
               /    \
         Cord A      Cord B
            /          \
     [ BASKET 1 - TOP ]
        |                |
       4 in (10.2 cm) gap
        |                |
     [ BASKET 2 - MIDDLE ]
        |                |
       4 in (10.2 cm) gap
        |                |
     [ BASKET 3 - BOTTOM ]
Joining
Method: whipstitch with cream yarn and a tapestry needle, sewing each cord flat against the outside of each basket wall.
Stitch-to-stitch logic: On each basket, Cord A sits in the column above tulip 1, and Cord B sits in the column above tulip 7. That puts them 36 stitches apart, exactly half of 72, so the cords are directly opposite each other and the basket hangs level.
Sew one whipstitch through each wall round from Rnd 7 to Rnd 17. That’s 11 stitches per cord per basket, covering 3.25 in (8.3 cm) of cord.
Order and measurements along each cord (from the bottom up):
1. Line up the cord end with the turning ridge (Rnd 7) of Basket 3, then sew up through Rnd 17: 3.25 in (8.3 cm).
2. Leave a 4 in (10.2 cm) unsewn gap.
3. Sew Basket 2 from Rnd 7 to Rnd 17: 3.25 in (8.3 cm).
4. Leave a 4 in (10.2 cm) gap.
5. Sew Basket 1 from Rnd 7 to Rnd 17: 3.25 in (8.3 cm).
6. Leave 8 in (20.3 cm) free, rising to the apex.
7. The last 2.25 in (5.7 cm) overlaps the other cord’s end.
Check the total: 3.25 + 4 + 3.25 + 4 + 3.25 + 8 + 2.25 = 28 in (71.1 cm).
Apex: Lay the two cord tops side by side so they overlap by 2.25 in (5.7 cm). Whipstitch them together along both edges. The V that opens below this joined section rests on the hook.
Tension: Pull each whipstitch just snug, not tight. Tight stitches pucker the scallops and make the cord ripple. Pin both cords in place on all three baskets before sewing, and measure each gap twice.
Size checkpoint: Before sewing the apex, hold the organizer up by both cords. All three baskets should hang level, and each gap should measure 4 in (10.2 cm). The bottom basket’s base sits 17.75 in (45.1 cm) below the top rim of Basket 1.
Border (Scalloped Rim)
Work these rounds on each basket right after Rnd 14, before joining.
Border gauge: One scallop takes 6 stitches of Rnd 15 and spans about 1.7 in (4.3 cm). Across 12 scallops, that adds up to the full 20.6 in (52.3 cm) circumference at 14 sts per 4 in (10.2 cm).
Rnd 15 (pink line): Change to pink. Ch 1, sc in each st around. Join. Fasten off. (72 sc, which is 6 per scallop section x 12)
Rnd 16 (cream scallops): Count stitches using the 6-stitch repeat from the wall rounds. Join cream in the 6th stitch of the first repeat. Ch 1, sc in the same st.
– Sk 2 sts, 7 dc in next st, sk 2 sts, sc in next st; repeat from * around.
– On the last repeat, replace the final sc with a sl st to the first sc.
– Fasten off.
– Count: 12 sc + 84 dc = 96 sts (8 per scallop x 12).
Each shell lands in the 3rd stitch of a repeat, so it sits directly above a tulip.
Rnd 17 (pink edging): Join pink in any sc. Ch 1, sc in each sc and each dc around, working 2 sc in the 4th (center) dc of each shell. Join. Fasten off. (96 + 12 = 108 sc, which is 9 per scallop x 12)
Why the math works:
– 72 divides evenly by 6, so the 12 scallops fit with no leftover stitches.
– Each 7-dc shell fills the width of 5 base stitches (2 skipped, 1 worked, 2 skipped). That gives a gentle outward ruffle without cupping.
– The extra sc at each peak in Rnd 17 rounds off the scallop tips so they lie open instead of curling inward.
The border adds 1.25 in (3.2 cm) to the wall, for a total of 3.25 in (8.3 cm).
Final Blocking
- Weave in all ends on the inside of each basket, following stitches of the same color.
- Spray each basket lightly with water until damp but not wet.
- Stuff each basket with a toilet paper roll wrapped in a plastic bag, or with a rolled towel, so the wall stands straight.
- Pull each scallop outward with your fingers, and pin the tips to the stuffing so all 12 are evenly spaced.
- Press each tulip puff outward from the inside with a fingertip.
- Let dry completely, about 12–24 hours.
- Hang the cords with a light weight (such as a full water bottle) on the bottom end for a few hours so they hang straight.
Final Quality-Control Checklist
- Each base lies flat at 5.5 in (14.0 cm).
- Each wall has 72 sts with 12 evenly spaced tulips.
- All puffs face outward.
- Each rim has 12 scallops of 9 edging sts (108 total).
- Each basket measures 6.5 in (16.5 cm) across and 3.25 in (8.3 cm) tall.
- Each cord measures 28 in (71.1 cm).
- The cords sit 36 sts apart on every basket.
- Both gaps measure 4 in (10.2 cm).
- The apex overlap is 2.25 in (5.7 cm) and is sewn securely.
- No carried strands show on the outside.
Troubleshooting
Base ruffles: Your tension is loose or you added extra increases. Recount each round and drop to a 4.5 mm hook for the base.
Base cups upward: Too few stitches or tight tension. Make sure Rnd 6 has 60 dc.
Carried yarn shows through: Keep the carried strand along the top of the previous round and work over it more firmly.
Tulips slant sideways: Joined rounds can drift. Start each round in the stitch you joined into, and check the tulip column against your markers.
Scallops curl inward: You skipped the 2-sc increase in Rnd 17, or blocking was too light. Re-block with pins.
Baskets tilt: The cords aren’t exactly opposite, or the gaps differ. Count 36 sts between cords and re-measure the gaps.
Baskets too small for rolls: Your gauge is too tight. Remake with a 5.5 mm hook.
Care
Hand wash in cool water, roll in a towel to remove moisture, and dry flat with the baskets stuffed into shape. Unpin the cords from each other only if a seam needs repair.

Final Notes
The measurement chain is simple:
– 60 dc base → 5.5 in (14.0 cm)
– 72 sc wall → 6.5 in (16.5 cm) wide and 2 in (5.1 cm) tall
– Border of 72 → 96 → 108 sts → 1.25 in (3.2 cm) more, for 3.25 in (8.3 cm) total
– 28 in (71.1 cm) cords sewn with 4 in (10.2 cm) gaps → a 25 in (63.5 cm) hanging organizer
Check gauge on the first basket and the other two will match.
Happy crocheting!