

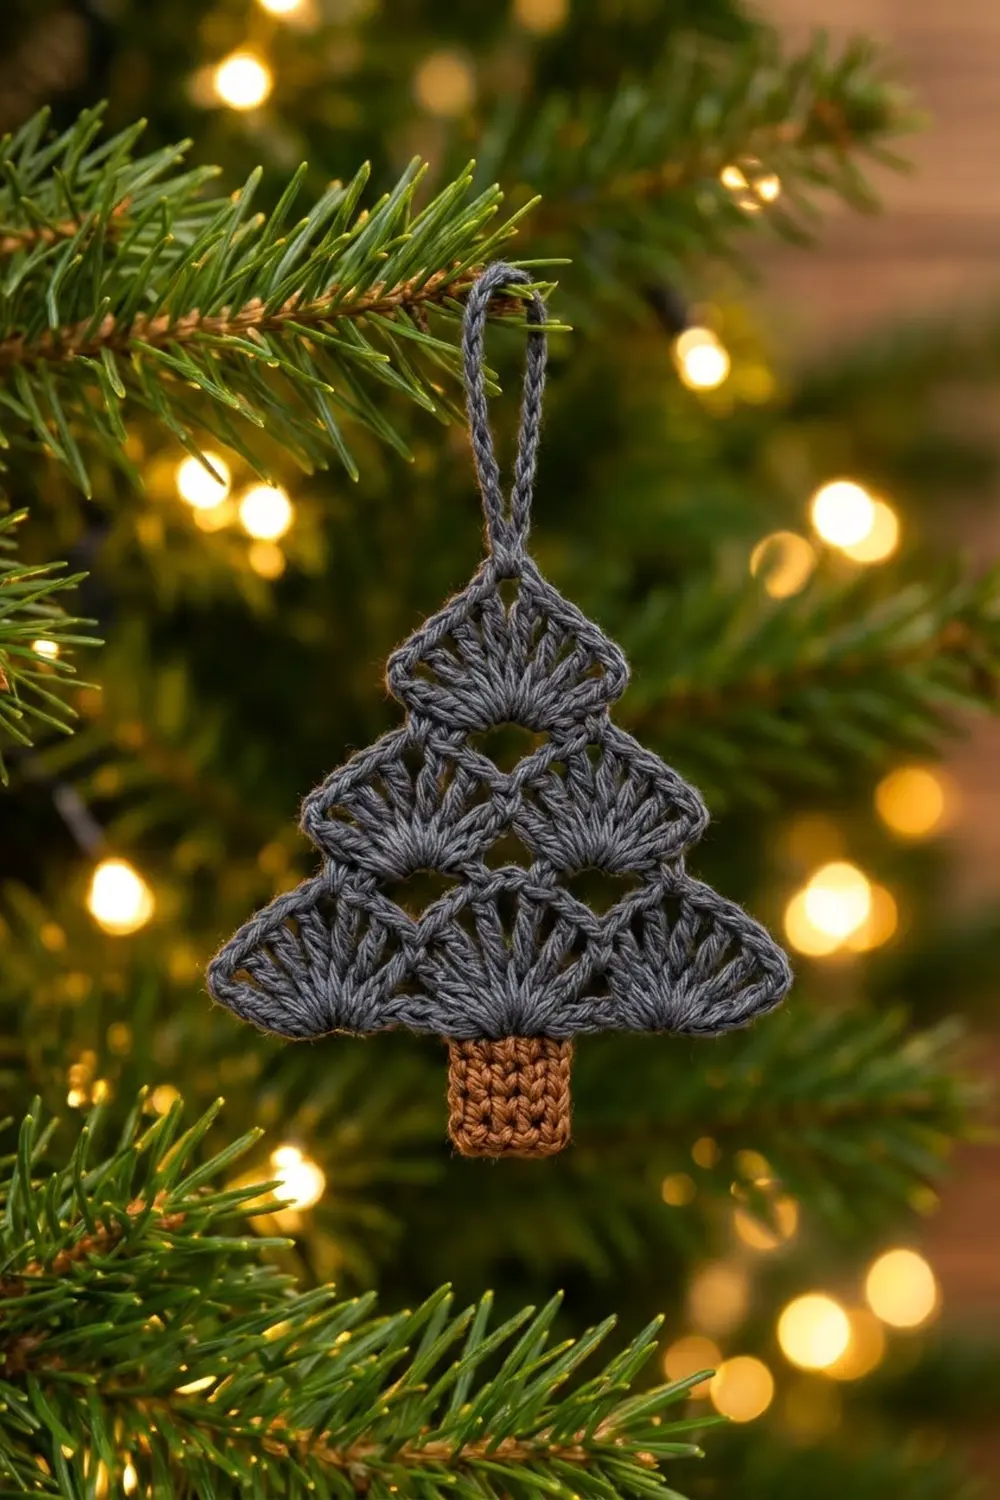
This little tree is built from fan-shaped shells stacked in three tiers. Three fans form the bottom, two sit in the middle and one makes the top. Diamond-shaped holes open up between the tiers, so light passes through when the ornament hangs on a branch.
The palette is simple: charcoal grey for the tree and caramel brown for a small solid trunk. The look is modern and calm, and it works on a real tree, on a gift tag or hung in a window. This pattern uses US crochet terms throughout.
The finished tree measures 3.75 in (9.5 cm) wide by 2.5 in (6.4 cm) tall with its border. With the trunk, it is about 3.375 in (8.6 cm) from top point to trunk base. The hanging loop adds about 1.75 in (4.4 cm).
Construction is in one piece. You work a grey chain-loop foundation, then the three fan tiers in turned rows. Next you work the trunk down from the center of the foundation, and finish with a single-crochet border that forms the hanging loop at the top point.
Finished Size and Construction
- Finished size: 3.75 in (9.5 cm) wide x 2.5 in (6.4 cm) tall (tree only, bordered)
- Height including trunk: 3.375 in (8.6 cm); about 5.125 in (13.0 cm) with the loop
- Skill level: Easy / advanced beginner
- Terminology: US
- Yarn weight: DK (#3)
- Hook: 3.5 mm (E-4)
- Number of pieces: 1
- Layout: 3 fan tiers (3, 2 and 1 fans) with a trunk centered underneath
- Trunk: 5 sts x 6 rows, about 1 in (2.5 cm) square
- Size before border: 3.5 in (8.9 cm) wide x 2.25 in (5.7 cm) tall
- Border depth: 0.125 in (0.3 cm), 1 round of sc
Materials
Choose a smooth, firmly twisted DK yarn. Cotton or a cotton blend gives the clearest fan stitches and keeps the ornament flat. Acrylic also works, but it can need a bit more blocking.
- Color A, charcoal grey: 6 g, about 14 m (15 yd)
- Color B, caramel brown: 2 g, about 5 m (5.5 yd)
Tools:
- 3.5 mm (E-4) crochet hook
- Tapestry needle
- Scissors
- Rust-proof pins and a foam blocking mat
- Spray bottle with water
- Ruler or tape measure
These quantities include a safety margin of about 20%. You will likely have a little yarn left over.
Abbreviations (US Terms)
- ch – chain
- sl st – slip stitch
- sc – single crochet
- dc – double crochet
- st(s) – stitch(es)
- sp – space
- sk – skip
- RS – right side
Special stitch: Fan. Work 9 dc into the same stitch or space. The 5th dc is the center dc, and the upper tiers are built on it.
Gauge and Checkpoints
Gauge: 16 sc and 18 rows = 3 in (7.6 cm) in sc with a 3.5 mm hook. That works out to about 5.3 sc per inch.
One fan of 9 dc is about 1.25 in (3.2 cm) wide and 0.75 in (1.9 cm) tall.
This ornament is small, so make one test piece first: work Rows 1–2 and measure them. The tree is quick, so a test costs very little yarn.
Checkpoints:
- After Row 1: the strip is 3.5 in (8.9 cm) long.
- After Row 2: the bottom tier is 3.5 in (8.9 cm) wide and 0.75 in (1.9 cm) tall.
- After Row 4: the tree is 1.5 in (3.8 cm) tall.
- After Row 6: the tree is 2.25 in (5.7 cm) tall.
- After the trunk: the trunk is 1 in (2.5 cm) square.
- After the border: the tree is 3.75 in (9.5 cm) x 2.5 in (6.4 cm).
If your piece is too big, go down a hook size (3.25 mm). Also check that your foundation chain is not loose.
If it is too small, go up to a 3.75 mm (F-5) hook. Tight fans look like cups instead of half-circles.
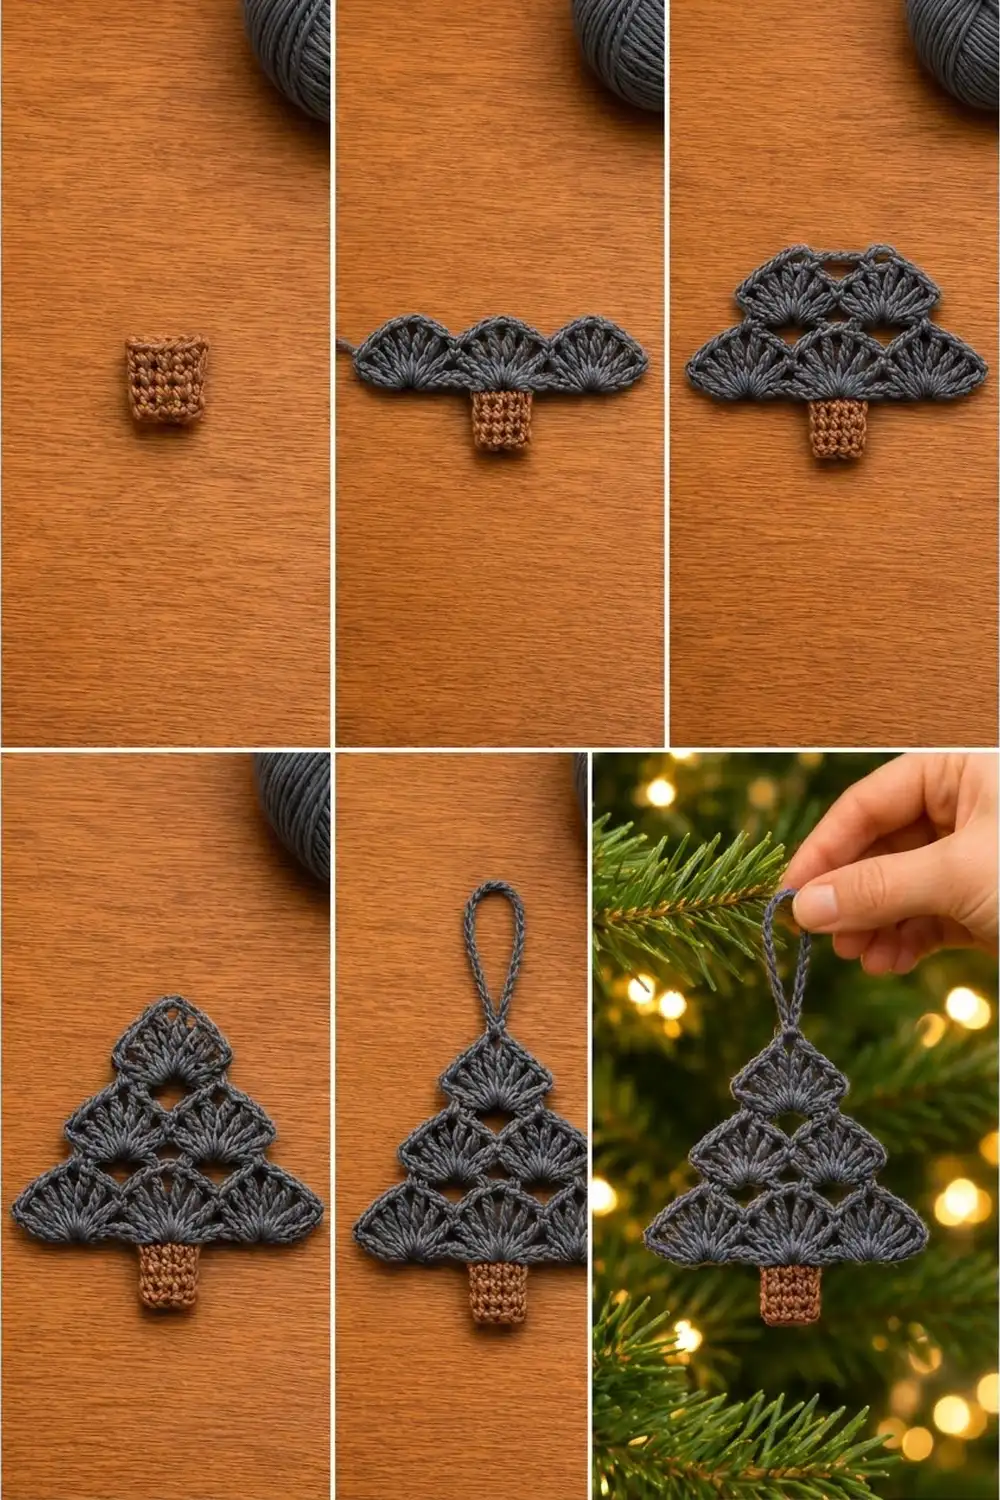
Tree Tiers (Color A)
Foundation and Row 1: Loop Row
With A, ch 20.
Row 1: Sc in 2nd ch from hook, ch 2, sk 2 ch, sc in next ch; repeat from * 5 more times. Turn. (7 sc and 6 ch-2 sps; 19 sts wide)*
Check the count: 1 sc + 6 x (2 ch + 1 sc) = 19 stitches across. The 19 foundation chains match those 19 positions exactly.
Row 2: Bottom Tier
Row 2: Ch 1 (does not count as a st). Sc in first sc, sk next ch-2 sp, Fan (9 dc) in next sc, sk next ch-2 sp, sc in next sc; repeat from * 2 more times. Turn. (4 sc and 27 dc = 31 sts; 3 fans)*
Each fan sits on the 2nd, 4th or 6th sc of Row 1. Each one spans 7 foundation positions, so the 9 dc spread out into a full half-circle. The sc between fans anchors them at the bottom.
Lay the piece flat. It should measure 3.5 in (8.9 cm) wide.
Row 3: Loops for the Middle Tier
Row 3: Sl st in first 5 sts (the end sc and 4 dc). Ch 1, sc in next dc (center dc of the first fan). Ch 5, sc in center dc of next fan; repeat from * once more. Turn. (3 sc and 2 ch-5 sps)*
Each ch-5 bridges the gap above a valley between two fans. That gap becomes the diamond-shaped hole.
Row 4: Middle Tier
Row 4: Ch 1. Sc in first sc, Fan in next ch-5 sp, sc in next sc; repeat from * once more. Turn. (3 sc and 18 dc = 21 sts; 2 fans)*
Push the dc together so each fan spreads evenly across its loop. The tree should now be 1.5 in (3.8 cm) tall.
Row 5: Loop for the Top Tier
Row 5: Sl st in first 5 sts. Ch 1, sc in next dc (center dc of the first fan). Ch 5, sc in center dc of next fan. Turn. (2 sc and 1 ch-5 sp)
Row 6: Top Tier
Row 6: Ch 1. Sc in first sc, Fan in ch-5 sp, sc in last sc. (2 sc and 9 dc = 11 sts; 1 fan)
Fasten off and weave in the end. The tree now measures 3.5 in (8.9 cm) wide x 2.25 in (5.7 cm) tall.
Trunk (Color B)
The trunk is worked straight down from the unused loops of the foundation chain. It needs no sewing.
Turn the tree upside down so the foundation chain points up. Count 7 free loops in from either end. The trunk is worked in the center 5 loops: positions 8–12 of 19.
Row 1: With RS facing, join B with a sl st in the free loop at position 8. Ch 1, sc in the same loop and in the next 4 free loops. Turn. (5 sc)
Rows 2–6: Ch 1, sc in each st across. Turn. (5 sc in each row)
Fasten off after Row 6. The trunk should measure 1 in (2.5 cm) wide x 1 in (2.5 cm) tall. Seven free loops remain on each side of the trunk, and the border will use them.
Border and Hanging Loop (Color A)
Border gauge: One round of sc at the main gauge adds 0.125 in (0.3 cm) to every outer edge. The tree grows from 3.5 in (8.9 cm) to 3.75 in (9.5 cm) wide and from 2.25 in (5.7 cm) to 2.5 in (6.4 cm) tall.
The border is worked as one long row. It starts at the left side of the trunk, travels around the tree and ends at the right side of the trunk. The trunk itself stays brown and unbordered.
Border row:
With the tree right side up and RS facing, join A in the free loop at position 7, next to the trunk’s left edge. Ch 1, then work:
- Bottom left: Sc in the same loop and in each free loop through position 2. (6 sc)
- Bottom-left corner: 3 sc in the free loop at position 1. (3 sc)
- Left slanted side: Sc in each of the 4 outer dc of the bottom-left fan. Sc in the row end of Row 4’s end sc. Sc in each of the 4 outer dc of the middle-left fan. Sc in the row end of Row 6’s end sc. Sc in each of the first 4 dc of the top fan. (14 sc)
- Top point and loop: In the center dc of the top fan, work (sc, ch 20, sc). (2 sc and a ch-20 loop)
- Right slanted side: Mirror step 3, working down to the bottom-right fan. (14 sc)
- Bottom-right corner: 3 sc in the free loop at position 19. (3 sc)
- Bottom right: Sc in each free loop from position 18 through position 13. (6 sc)
Fasten off, leaving a 6 in (15.2 cm) tail. Use it to secure the border to the trunk’s top corner.
Border total: 6 + 3 + 14 + 2 + 14 + 3 + 6 = 48 sc, plus the ch-20 loop
On the side where Row 3 or Row 5 began, the slip stitches lie on top of the outer dc. Work your sc under both the dc top and the sl st. The count stays at 4 per fan.
Why the math works:
- Bottom edge: the foundation has 19 positions. The trunk uses 5 of them (positions 8–12), which leaves 7 on each side. Each half takes 1 corner position (3 sc) plus 6 single positions, for 9 sc per half.
- Slanted sides: each fan has 9 dc, with the center dc as the 5th. That leaves exactly 4 outer dc per side. Three tiers give 3 x 4 = 12 dc-based sc, and the 2 tier steps add 2 row-end sc, for 14 sc per side.
- Symmetry: the left and right sides match stitch for stitch, so the triangle stays even.
The ch-20 loop is about 3.75 in (9.5 cm) of chain. Folded in half, it hangs about 1.75 in (4.4 cm) above the top point.
Final Blocking
- Weave in all remaining ends through stitches of the same color.
- Lightly spray the ornament with water until it is evenly damp, not soaked.
- Lay it face up on the blocking mat.
- Pin the two bottom corners 3.75 in (9.5 cm) apart.
- Pin the top point 2.5 in (6.4 cm) above the bottom edge, centered between the corners.
- Open each fan into a smooth half-circle with your fingertips. Pin the center of each fan’s edge if it curls.
- Pin the trunk square at 1 in (2.5 cm), with its sides parallel.
- Lay the loop straight up from the top point.
- Let it dry completely, usually 4–6 hours, before unpinning.
Final Quality-Control Checklist
- Bottom tier: 3 fans, each with 9 dc.
- Middle tier: 2 fans; top tier: 1 fan.
- Two diamond holes are visible between tiers, one above each valley in the bottom tier.
- The trunk is 5 sts wide, 6 rows tall and exactly centered (7 free loops on each side).
- Border count: 6 + 3 + 14 + 2 + 14 + 3 + 6 = 48 sc.
- Width is 3.75 in (9.5 cm) and tree height is 2.5 in (6.4 cm).
- The loop comes from the exact top point, and the ornament hangs straight.
- All ends are secured and invisible from the front.
Troubleshooting
Fans cup or ruffle: If a fan ruffles, your dc are too loose; go down a hook size. If it cups, check that you skipped both ch-2 spaces on each side of every fan.
The tree leans to one side: Recount the sl sts at the start of Rows 3 and 5. You need exactly 5 (end sc + 4 dc) before the sc in the center dc.
Diamond holes are too big: Your ch-5 bridges are loose. Chain more tightly, or try ch 4 and check that the width still matches.
The trunk is off-center: Pull out the trunk and recount the free loops so there are 7 on each side. Rejoin at position 8.
Border puckers at the corners: Make sure you worked all 3 sc into the corner loop. If it still puckers, work the border with a hook 0.25 mm larger.
The loop twists: Keep your chains loose and even. Block the loop flat with a pin at its tip.
Care
Hand wash in cool water with mild soap, press out the water in a towel and dry flat. Reshape the fans while damp, and store the ornament flat, away from heavy decorations.
Final Notes
The measurement chain is short and easy to check:
- The 19-st foundation sets the 3.5 in (8.9 cm) base.
- Each tier adds 0.75 in (1.9 cm), bringing the tree to 2.25 in (5.7 cm).
- The 5-st trunk adds a 1 in (2.5 cm) square below.
- The 48-sc border brings the tree to 3.75 in (9.5 cm) x 2.5 in (6.4 cm), with a 1.75 in (4.4 cm) loop at the top.
Check each step as you go and every ornament will match. Make one, then make a forest!
Happy crocheting!