

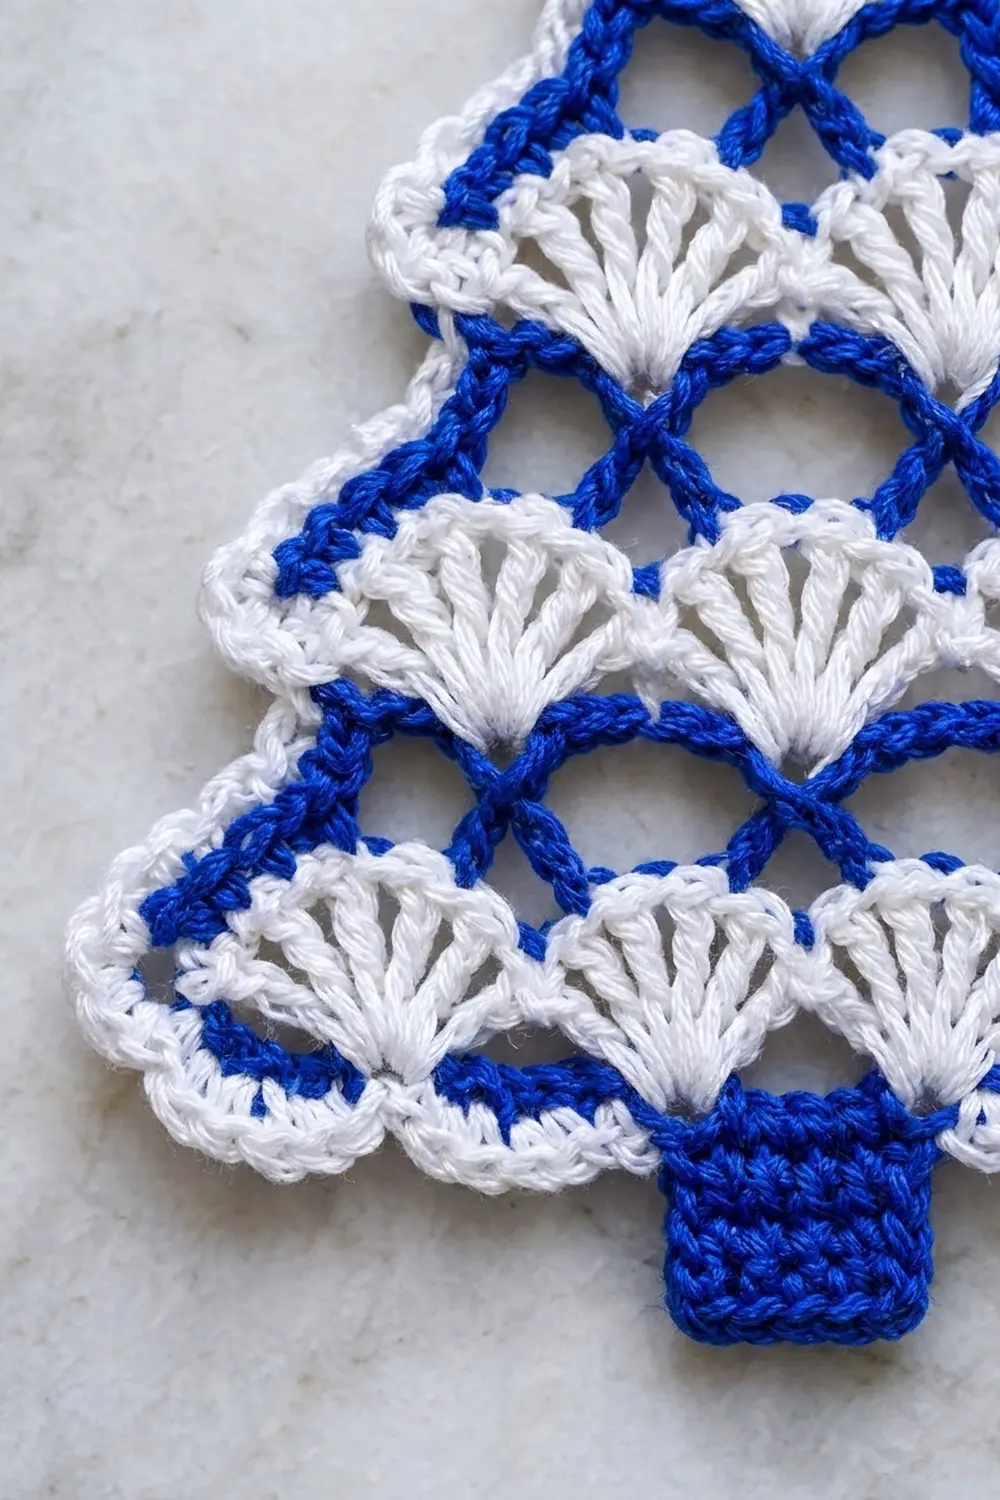
This little tree is all crisp contrast. Tiers of white fan shells sit inside a royal-blue lattice, and a tidy blue outline with a white scalloped edge finishes the shape. It looks like hand-painted porcelain and makes a light, lacy ornament for the tree or a gift tag.
The palette is two colors only: royal blue and white. Blue does the structural work (foundation, crossed lattice, outline, trunk, and loop). White carries the fans and the outer scallops.
This pattern uses US crochet terms. The finished ornament is 5 in (12.7 cm) wide and 4 1/2 in (11.4 cm) tall across the canopy. With the trunk it is 5 3/8 in (13.7 cm) tall, plus a hanging loop about 2 in (5.1 cm) long.
The tree is worked flat from the bottom up in short color-change rows. Each white shell row is one shell narrower than the last. The blue X-stitch rows bridge the tiers. Two border rounds then outline the whole tree, and the trunk and loop are added last.
Finished Size and Construction
- Finished size: 5 in (12.7 cm) wide × 4 1/2 in (11.4 cm) tall canopy; 5 3/8 in (13.7 cm) tall with trunk
- Skill level: Intermediate
- Terminology: US
- Yarn weight: Fingering (#1 super fine) mercerized cotton
- Hook: 2.25 mm (B-1)
- Number of pieces: 1 (single flat ornament)
- Layout: Stepped triangle of 4 shell tiers (4-3-2-1 shells)
- Piece size before border: 4 1/4 in (10.8 cm) wide × 3 3/4 in (9.5 cm) tall
- Border depth: 3/8 in (1.0 cm) on every edge
- Trunk: 7/8 in (2.2 cm) × 7/8 in (2.2 cm)
Materials
Choose a smooth, mercerized cotton. It gives the shells clean edges and holds a blocked shape well. Avoid fuzzy or very stretchy fibers, because the lattice will lose its crisp X shapes.
- Royal blue: 10 g, about 35 m (38 yd)
- White: 8 g, about 28 m (31 yd)
These quantities include a margin for swatching and weaving in the many ends.
Tools:
– 2.25 mm (B-1) crochet hook
– Tapestry needle
– Scissors
– Blocking mat or foam board and rustproof pins
– Spray bottle, plus optional light spray starch
Abbreviations (US Terms)
- ch: chain
- sc: single crochet
- hdc: half double crochet
- dc: double crochet
- sl st: slip stitch
- sk: skip
- sp: space
- st(s): stitch(es)
- RS: right side
Shell: 7 dc in the same st or sp.
X-st (crossed treble): Yo twice, insert hook in the first leg st, pull up a loop (4 loops on hook). Yo, draw through 2 (3 loops). Yo, insert hook in the second leg st, pull up a loop (5 loops). (Yo, draw through 2) 4 times (1 loop). Ch 2, then dc into the center where the two legs meet, working under the 2 strands at the junction. The ch-2 sp at the top of the X-st is the base for the next shell.
Scallop: (hdc, dc, hdc) in the same st.
Gauge and Checkpoints
Gauge: 25 sc = 4 in (10.2 cm); 6 sc rows = 1 in (2.5 cm).
Test first. Work Rows 1–2 as your swatch. You can keep it as the start of the ornament if the measurements match.
Checkpoints:
– After Row 1: 4 in (10.2 cm) wide
– After Row 2: 4 1/4 in (10.8 cm) across the shell tops, 3/4 in (1.9 cm) tall
– After Row 4: 3 1/4 in (8.3 cm) across the second tier, 1 3/4 in (4.4 cm) tall overall
– After Row 6: 2 1/4 in (5.7 cm) across the third tier, 2 3/4 in (7.0 cm) tall overall
– After Row 8: 1 1/4 in (3.2 cm) top shell, 3 3/4 in (9.5 cm) tall overall
– After the border: 5 in (12.7 cm) × 4 1/2 in (11.4 cm)
If your piece is too big, go down to a 2.0 mm hook. If it is too small, go up to a 2.5 mm hook. Each shell-and-X tier pair should add 1 in (2.5 cm) of height. If it doesn’t, check your X-st height first, since those stitches are tall and easy to over-pull.
Tree Body
Fasten off at the end of every row. Rejoin at the right-hand edge with the RS facing, so every row is worked in the same direction. Leave 6 in (15.2 cm) tails.
Row 1 (blue): Ch 26, sc in 2nd ch from hook and in each ch across. (25 sc) Fasten off. The side facing you now is the RS.
Row 2 (white): Join with sc in first sc. Sk 2 sts, shell in next st, sk 2 sts, sc in next st; rep from * 3 more times. (4 shells, 5 sc — 33 sts)*
Each shell sits on 1 st with 2 skipped sts on each side, so every shell uses 6 sts of Row 1. That gives 1 + (4 × 6) = 25. ✓
Row 3 (blue, X-lattice): Join with sc in 4th (center) dc of first shell. Ch 2, X-st with the first leg in 6th dc of the same shell and the second leg in 2nd dc of the next shell, ch 2, sc in 4th dc of that next shell; rep from * 2 more times. (4 sc, 3 X-sts, 6 ch-2 sps)*
Each X-st skips 3 sts between its legs: the 7th dc, the sc, and the 1st dc of the next shell. The outer 3 dc and the end sc on each side of the row stay unworked. The border uses them later.
Row 4 (white): Join with sc in first sc of Row 3. Sk ch-2 sp, shell in ch-2 sp at top of next X-st, sk ch-2 sp, sc in next sc; rep from * 2 more times. (3 shells, 4 sc — 25 sts)*
Row 5 (blue): Work as Row 3 across the 3 shells. (3 sc, 2 X-sts, 4 ch-2 sps)
Row 6 (white): Work as Row 4. (2 shells, 3 sc — 17 sts)
Row 7 (blue): Work as Row 3 across the 2 shells. (2 sc, 1 X-st, 2 ch-2 sps)
Row 8 (white): Work as Row 4. (1 shell, 2 sc — 9 sts)
Weave in all ends now, working them into same-color stitches. Check the 3 3/4 in (9.5 cm) height and the 4 1/4 in (10.8 cm) bottom width.
Border
Border gauge: about 6 sc per 1 in (2.5 cm) along the outline. Work the sts snugly so the edge doesn’t ruffle.
Round 1 (blue outline)
Each tier side leaves 3 outer dc and 1 end sc unworked. Each X-row side gets 2 sc. Each side count below includes the sc worked into the apex dc.
- Apex: With RS facing, join blue with sc in the 4th dc of the top shell, ch 2, sc in the same dc. The second sc is st 1 of Side A.
- Side A (24 sc):
- Top tier: sc in the 3 outer dc of the top shell and 1 sc in the end sc of Row 8 (sts 2–5).
- Row 7 step: 2 sc in the side of the end sc of Row 7 (6–7).
- Third tier: sc in the 3 outer dc of the end shell of Row 6 and 1 sc in the end sc (8–11).
- Row 5 step: 2 sc in the side of Row 5 (12–13).
- Second tier: sc in the 3 outer dc and end sc of Row 4 (14–17).
- Row 3 step: 2 sc in the side of Row 3 (18–19).
- Bottom tier: sc in the 3 outer dc and end sc of Row 2 (20–23).
- Row 1: 1 sc in the side of Row 1 (24).
- Ch 2 (corner).
- Bottom (25 sc): sc in each free loop of the foundation ch.
- Ch 2 (corner).
- Side B (24 sc): Mirror Side A from the bottom up, ending with sc in the 3 outer dc of the top shell. Sl st to the first sc. The joining sc counts as st 24 of Side B.
Round total: 24 + 25 + 24 = 73 sc, plus 3 ch-2 corners.
Why the math works: Each side has 4 tiers × (3 dc + 1 sc) = 16, plus 3 X-row steps × 2 = 6, plus 1 sc in Row 1 and 1 apex sc, for 24 in all. The bottom matches the Row 1 count of 25 exactly.
Round 2 (white scallops)
- Join white with sc in the apex ch-2 sp, ch 2, sc in the same sp.
- Side A: Scallop in next st, sc in next st; rep from * 11 more times. (12 scallops, 12 sc)*
- Bottom corner: (sc, ch 2, sc) in the ch-2 sp.
- Bottom:
- *Scallop in next st, sc in next st; rep from * 4 more times (sts 1–10).
- Sc in each of the next 5 sts (11–15).
- *Sc in next st, scallop in next st; rep from * 4 more times (16–25).
- (10 scallops, 15 sc)
- Bottom corner: (sc, ch 2, sc) in the ch-2 sp.
- Side B: Sc in next st, scallop in next st; rep from * 11 more times. Sl st to the first sc. (12 scallops, 12 sc)*
Round total: 34 scallops, 39 sc along the sides, 6 corner sc, 3 ch-2 sps.
Why the math works: 24 is even, so each side takes 12 two-st repeats. On the bottom, 25 = 10 + 5 + 10. That gives mirrored scallops and a flat 7-sc center (sts 10–16) where the trunk attaches.
Trunk (blue)
Turn the tree upside down with the RS facing. Join blue in the first of the center 5 sc on the bottom edge (Round 1 sts 11–15).
- Row 1: Ch 1, sc in the same st and in the next 4 sts. (5 sc)
- Rows 2–5: Ch 1, turn, sc in each st. (5 sc)
Fasten off. The trunk should measure 7/8 in (2.2 cm) square.
Hanging Loop (blue)
- Join blue in the apex ch-2 sp of Round 2.
- Ch 25, sl st in the same sp.
- Work 30 sc tightly over the chain loop and sl st in the apex sp.
- Fasten off. The loop stands about 2 in (5.1 cm) tall.
Final Blocking
- Weave in all remaining ends, keeping blue in blue and white in white.
- Spritz the ornament until it is evenly damp, but not dripping.
- Pin it flat on the mat. Pin the apex and both bottom corners first to set the 5 in (12.7 cm) width and 4 1/2 in (11.4 cm) canopy height.
- Open each shell into a full fan. Pin the X-sts so both legs and arms show clearly.
- Pin each white scallop as a small round bump.
- Square the trunk, and pin the loop straight up.
- Mist with light starch if you want a stiffer ornament, then let it dry fully before unpinning.
Final Quality-Control Checklist
- [ ] Shell tiers read 4-3-2-1 from bottom to top
- [ ] Every shell has 7 dc and opens in a clean fan
- [ ] 6 X-sts total (3 + 2 + 1), each with a clear X shape
- [ ] Round 1 has 24 / 25 / 24 sc
- [ ] 34 scallops in Round 2, with mirrored sides
- [ ] Trunk is centered at 5 sc wide
- [ ] Canopy measures 5 in × 4 1/2 in (12.7 cm × 11.4 cm)
- [ ] All ends are hidden in matching colors
Troubleshooting
Shells cup or ruffle: Your dc are too tall or too loose. Go down a hook size, or shorten each dc by pulling the first loop up snugly.
The X-sts pull the tier up into a point: Pull the X legs up evenly, and keep the ch-2 sps loose enough to lie flat.
The edge waves in Round 1: You have too many sts on the steps. Work exactly 2 sc per X-row side.
The edge puckers in Round 1: Your tension is too tight. Go up half a hook size for the border only.
The trunk sits off-center: Count the 5 center sc from both bottom corners before joining.
The loop twists: Keep every sc of the cord over the same side of the chain.
Care
Hand wash in cool water with mild soap and press out the water in a towel. Reshape and pin it flat to dry, re-starching if you like a firm finish.

Final Notes
Measure at every step and the shape takes care of itself:
– Row 1 must measure 4 in (10.2 cm).
– Each shell-and-X tier pair adds 1 in (2.5 cm), bringing the body to 3 3/4 in (9.5 cm).
– The two border rounds add 3/8 in (1.0 cm) on every edge, for a 5 in × 4 1/2 in (12.7 cm × 11.4 cm) canopy.
– The trunk adds 7/8 in (2.2 cm) below.
Happy crocheting!