
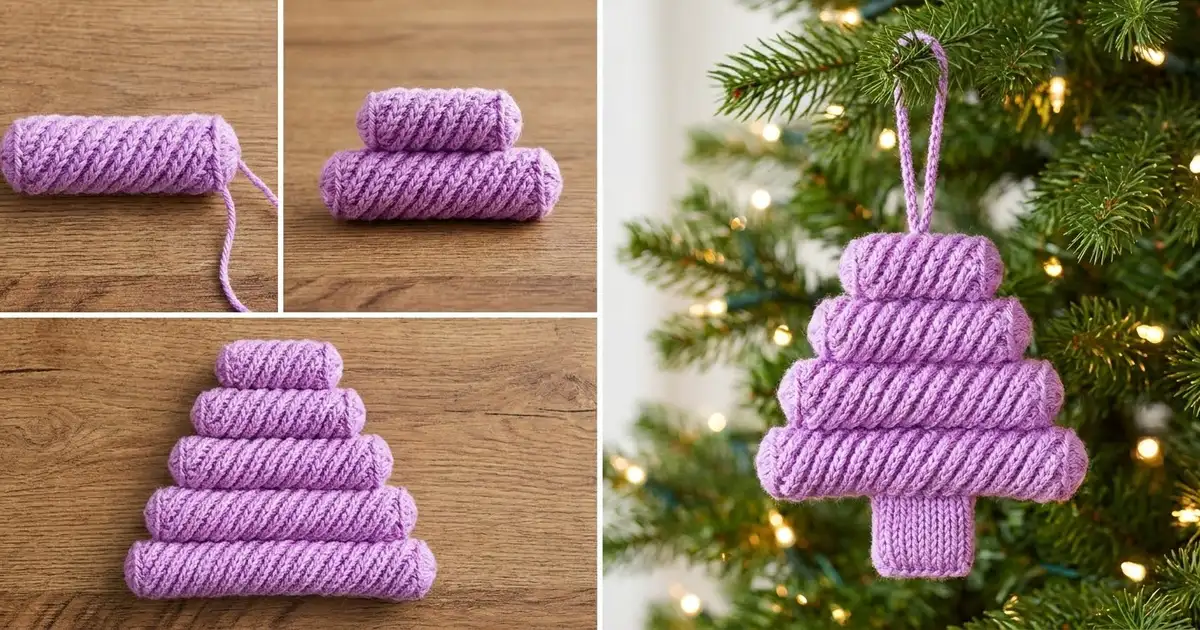
This little tree ornament is built from five stacked tiers. Each one is covered in slanted, rope-like ridges, so the tree looks twisted and full even though it is worked flat. A short knit-look trunk anchors the bottom, and a firm slip-stitch loop at the top lets it hang straight on a branch.
The sample is worked in one lavender/orchid shade. A single soft color lets the texture stand out, and it feels a little more modern than classic green. Any solid color works, but avoid heavily variegated yarn because it hides the diagonal ridges.
The pattern uses US crochet terms throughout. The finished ornament measures about 5.4 in (13.7 cm) wide by 5.4 in (13.7 cm) tall, plus a hanging loop about 3 in (7.6 cm) long.
You work the tree from the bottom up in one continuous piece. Tier 1 starts on a foundation chain. Each tier above is worked directly onto the top of the one below, leaving the end stitches unworked. Then you add the trunk into the foundation chain, work one shaping round of edging that rounds every tier end, and finish with the loop. There is no sewing apart from weaving in ends.
Finished Size and Construction
- Finished size: 5.4 in (13.7 cm) wide × 5.4 in (13.7 cm) tall, loop not included
- Skill level: Easy-Intermediate
- Terminology: US crochet terms
- Yarn weight: Worsted (#4)
- Hook: 4.0 mm (G-6)
- Number of pieces: 1
- Layout: Single piece: five stepped tiers plus a centered trunk
- Piece size before edging: 5 in (12.7 cm) wide × 5 in (12.7 cm) tall: tiers 4 in (10.2 cm) plus trunk 1 in (2.5 cm)
- Edging (border) depth: about 0.2 in (0.5 cm) on all sides
- Hanging loop: about 3 in (7.6 cm) tall when folded
Materials
Yarn: Use a smooth worsted-weight yarn. Mercerized cotton or a firm acrylic shows the slanted ridges most clearly. Fuzzy or brushed yarns soften the texture too much.
- Lavender/orchid: 15 g, about 30 m (33 yd)
The quantity includes a margin for your gauge swatch, the edging, and weaving in ends. The ornament itself uses closer to 10 g.
Tools:
– 4.0 mm (G-6) crochet hook
– Tapestry needle
– Scissors
– 2 stitch markers
– Ruler or measuring tape
– Blocking mat and rust-proof pins
– Spray bottle with water
Abbreviations (US Terms)
- ch: chain
- sl st: slip stitch
- sc: single crochet
- hdc: half double crochet
- st(s): stitch(es)
- RS / WS: right side / wrong side
- rep: repeat
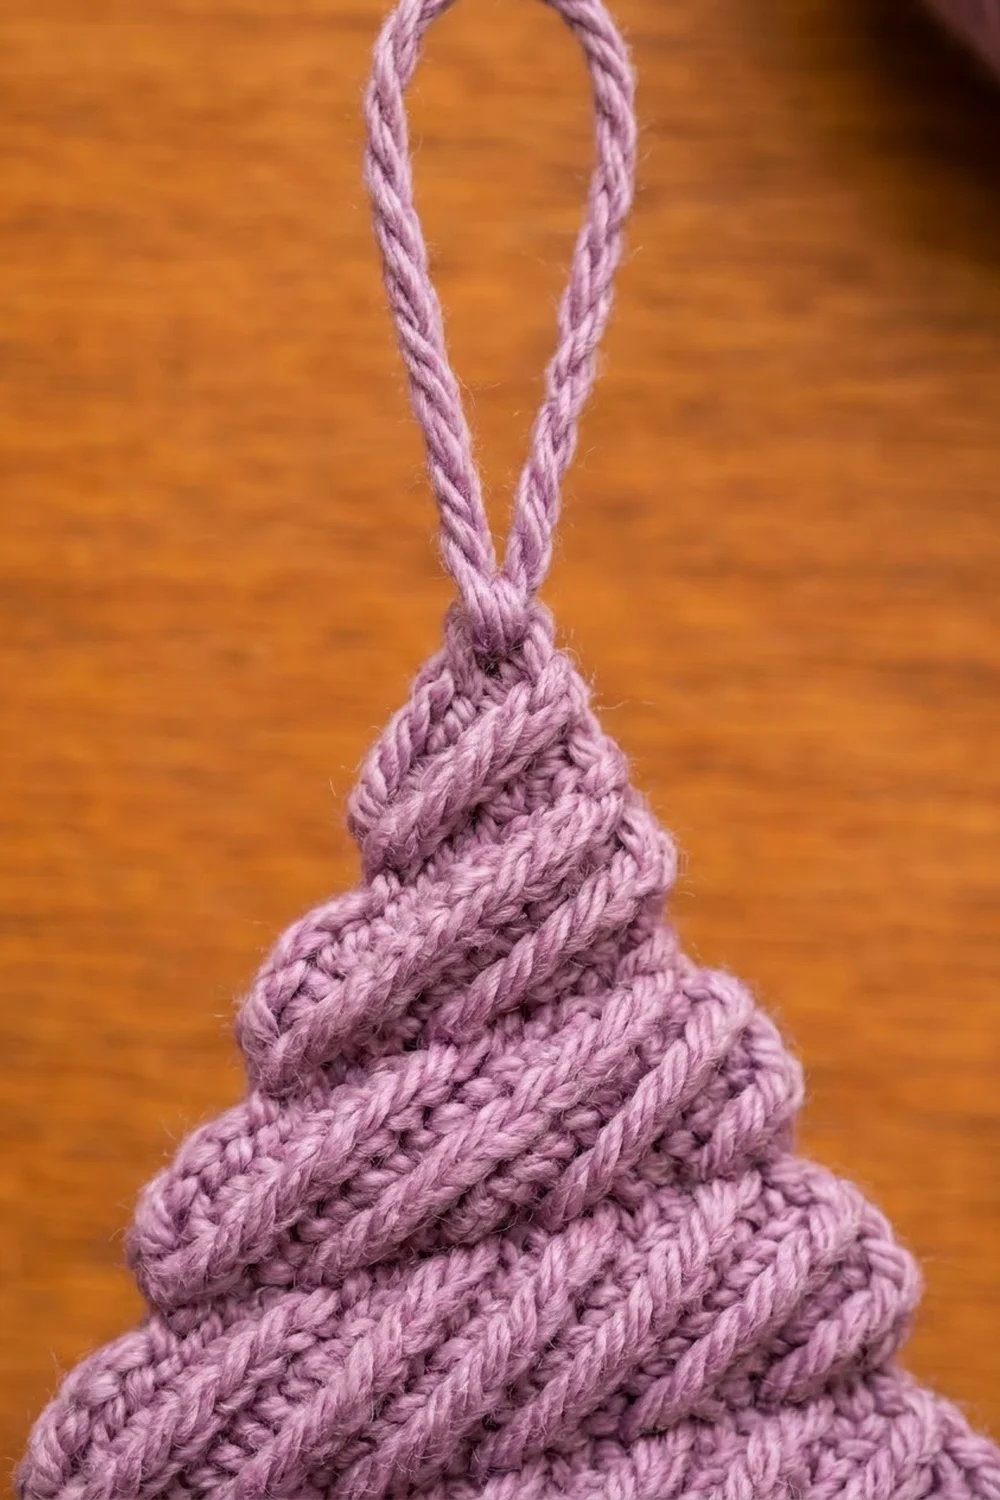
Slant spike (SS): Insert your hook front to back into the Row 1 stitch of the current tier that sits directly below the stitch you just made, one stitch back toward where the row began. Draw up a long loop to the height of the working row, keeping it relaxed. Yo and pull through both loops on the hook. The stitch of Row 3 directly in front of the hook is skipped, because the spike takes its place. Each spike lies at an angle across Rows 2 and 3, and a full row of them makes the twisted ridge texture.
Camel hdc: Work an hdc into the third loop only. That is the horizontal bar just below the top two loops on the side facing away from you. It pushes the top loops forward and makes knit-like V columns on the RS.
Gauge and Checkpoints
Gauge: 16 sc and 20 sc rows = 4 in (10.2 cm). That works out to 4 stitches and 5 rows per 1 in (2.5 cm).
Test first: Work Tier 1 (Rows 1–4) and measure it before going further. It should be 5 in (12.7 cm) wide and 0.8 in (2.0 cm) tall. Tier 1 is the widest part of the tree, so it works as your gauge swatch.
Checkpoints:
– After Tier 1: 5 in (12.7 cm) wide × 0.8 in (2.0 cm) tall
– After Tier 2: total height 1.6 in (4.1 cm); Tier 2 width 4 in (10.2 cm)
– After Tier 3: total height 2.4 in (6.1 cm); Tier 3 width 3 in (7.6 cm)
– After Tier 4: total height 3.2 in (8.1 cm); Tier 4 width 2 in (5.1 cm)
– After Tier 5: total height 4 in (10.2 cm); Tier 5 width 1 in (2.5 cm)
– After trunk: trunk 1 in (2.5 cm) square; total height 5 in (12.7 cm)
– After edging: 5.4 in (13.7 cm) × 5.4 in (13.7 cm)
If Tier 1 is too big (wider than 5.2 in / 13.2 cm), change to a 3.75 mm (F-5) hook.
If Tier 1 is too small (narrower than 4.8 in / 12.2 cm), change to a 4.5 mm (7) hook.
Small differences of ±0.2 in (0.5 cm) are fine for an ornament. Spike rows tend to pull in slightly, and blocking will even them out.
Pattern: Tree Tiers
Every tier has the same four-row structure:
– Row 1 (WS) sets the width.
– Rows 2 and 3 are plain sc and build height.
– Row 4 (RS) is the slant-spike row that makes the twisted ridges.
Tiers 2–5 start by slip stitching across 2 stitches, which creates the ledge on each side.
Tier 1
Foundation: Ch 21.
Row 1 (WS): Sc in 2nd ch from hook and in each ch across. Turn. (20 sc)
Row 2 (RS): Ch 1 (does not count as a st here or in any row), sc in each st across. Turn. (20 sc)
Row 3 (WS): Ch 1, sc in each st across. Turn. (20 sc)
Row 4 (RS): Ch 1, sc in first st, SS 18 times, sc in last st. Turn. (20 sts: 2 sc + 18 SS)
Check that every spike slants the same way and lies flat without pulling. If the tier cups, draw each spike loop up longer.
Checkpoint: 5 in (12.7 cm) × 0.8 in (2.0 cm).
Tier 2
Row 1 (WS): Sl st loosely in first 2 sts, ch 1, sc in same st as last sl st is NOT worked. Instead, sc in each of the next 16 sts and leave the last 2 sts unworked. Turn. (16 sc)
To keep it simple: after the 2 sl sts, ch 1, then work 16 sc. Four stitches of the row below stay uncovered, 2 at each end.
Row 2 (RS): Ch 1, sc in each st across. Turn. (16 sc)
Row 3 (WS): Ch 1, sc in each st across. Turn. (16 sc)
Row 4 (RS): Ch 1, sc in first st, SS 14 times, sc in last st. Turn. (16 sts: 2 sc + 14 SS)
Checkpoint: Tier 2 is 4 in (10.2 cm) wide, and the total height is 1.6 in (4.1 cm). You should see a ledge 0.5 in (1.3 cm) wide on each side of Tier 1.
Tier 3
Row 1 (WS): Sl st loosely in first 2 sts, ch 1, sc in next 12 sts, leave last 2 sts unworked. Turn. (12 sc)
Rows 2–3: Ch 1, sc in each st across. Turn. (12 sc)
Row 4 (RS): Ch 1, sc in first st, SS 10 times, sc in last st. Turn. (12 sts: 2 sc + 10 SS)
Checkpoint: Tier 3 is 3 in (7.6 cm) wide; total height 2.4 in (6.1 cm).
Tier 4
Row 1 (WS): Sl st loosely in first 2 sts, ch 1, sc in next 8 sts, leave last 2 sts unworked. Turn. (8 sc)
Rows 2–3: Ch 1, sc in each st across. Turn. (8 sc)
Row 4 (RS): Ch 1, sc in first st, SS 6 times, sc in last st. Turn. (8 sts: 2 sc + 6 SS)
Checkpoint: Tier 4 is 2 in (5.1 cm) wide; total height 3.2 in (8.1 cm).
Tier 5 (Top)
Row 1 (WS): Sl st loosely in first 2 sts, ch 1, sc in next 4 sts, leave last 2 sts unworked. Turn. (4 sc)
Rows 2–3: Ch 1, sc in each st across. Turn. (4 sc)
Row 4 (RS): Ch 1, sc in first st, SS 2 times, sc in last st. (4 sts: 2 sc + 2 SS)
Fasten off, leaving a 4 in (10.2 cm) tail.
Checkpoint: Tier 5 is 1 in (2.5 cm) wide; total height 4 in (10.2 cm). The tiers form an even staircase, with a 2-stitch ledge on each side at every step.
Pattern: Trunk
The trunk is worked into the unused loops on the underside of the foundation chain, centered under Tier 1.
Turn the tree upside down with the RS facing you. Count 8 unused foundation loops in from the right edge and place a marker in the 9th loop. Place a second marker in the 12th loop. The trunk is worked over loops 9–12, which leaves 8 loops uncovered on each side.
Row 1 (RS): Join yarn in the 9th loop, ch 2, hdc in same loop and in each of next 3 loops. Turn. (4 hdc)
Row 2 (WS): Ch 2 (does not count as a st), hdc in each st across through both loops. Turn. (4 hdc)
Row 3 (RS): Ch 2, camel hdc in each st across. Turn. (4 hdc)
Row 4 (WS): Ch 2, hdc in each st across through both loops. (4 hdc)
Fasten off and weave in the end.
Working camel hdc on RS rows and regular hdc on WS rows keeps the V columns on the front. Done this way the third loop of Row 2 sits on the RS, so Row 3’s V’s line up with it.
Checkpoint: The trunk is 1 in (2.5 cm) wide × 1 in (2.5 cm) tall, and the whole piece is 5 in (12.7 cm) wide × 5 in (12.7 cm) tall.
Border (Shaping Edging)
This one round gives the tier ends their rounded, pillowy shape, covers the slip stitches on the ledges, and gives the outline a neat finish.
Border gauge:
– 1 stitch per stitch along tops and the foundation edge
– 1 stitch per row end along tier ends and the trunk
– No extra corner stitches anywhere, so the outer corners stay rounded instead of square
Tier-end group (TE): Worked over the 4 row ends of one tier side: sc in the first row end, hdc in each of the next 2 row ends, sc in the last row end. (4 sts)
The taller hdc in the middle makes the end bulge outward like a rolled cushion.
Rnd 1 (RS): With the RS facing, join yarn in the first st of the top of Tier 5 (the right-hand st). Ch 1, then:
- Top of Tier 5: sc in each of 4 sts. (4)
- Left side, going down:
- TE down Tier 5.
- Sc in each of the 2 exposed sl sts on the Tier 4 ledge. Work into the sl sts so they disappear.
- TE down Tier 4, 2 sc on the Tier 3 ledge, TE down Tier 3, 2 sc on the Tier 2 ledge, TE down Tier 2, 2 sc on the Tier 1 ledge, TE down Tier 1.
- Count: 5 TE × 4 = 20, plus 4 ledges × 2 = 8. (28)
- Left underside of Tier 1: sc in each of the 8 unused foundation loops. (8)
- Left trunk side: sc in each of 4 row ends. (4)
- Trunk bottom: sc in each of 4 sts. (4)
- Right trunk side: sc in each of 4 row ends. (4)
- Right underside of Tier 1: sc in each of 8 unused foundation loops. (8)
- Right side, going up: TE up Tier 1, then 2 sc on the Tier 1 ledge, TE up Tier 2, and so on until the last TE up Tier 5. (28)
Sl st to the first sc. (88 sts total)
Why the math works:
– Each half of the tree takes 28 + 8 + 4 = 40 stitches. The two halves give 80, and the top (4) and trunk bottom (4) bring the total to 88.
– Every edge gets exactly 1 stitch per stitch or row end, which matches the 4 sts and 5 rows per inch (2.5 cm) gauge closely.
– The edge therefore neither ruffles nor pulls in. The only shaping comes from the hdc in each TE, and that shaping is deliberate.
The edging adds about 0.2 in (0.5 cm) on every side. That brings the piece from 5 in (12.7 cm) to 5.4 in (13.7 cm) in both width and height.
Hanging Loop
Do not fasten off after Rnd 1:
1. Sl st across the top of Tier 5 into the 2nd edging st, so you are at top center.
2. Ch 36, which is about 6 in (15.2 cm) of chain.
3. Sl st into the same top-center st to close the loop.
4. Sl st into the back bump of each of the 36 ch around the loop. This firms the loop and gives it the twisted, braided look.
5. Sl st into the top-center st again and fasten off.
The folded loop stands about 3 in (7.6 cm) tall.
Final Blocking
- Weave in all ends along the WS of the tiers, running each tail through at least 1 in (2.5 cm) of stitches.
- Lightly spritz the whole ornament with water until it is damp, not soaked.
- Lay it RS up on the blocking mat.
- Pin the bottom corners of Tier 1 so the tier is 5.4 in (13.7 cm) wide including the edging.
- Pin the top center so the overall height is 5.4 in (13.7 cm), loop not included.
- Check that each ledge is level and that the tiers sit centered above the trunk.
- Shape each tier end into a rounded curve with your fingers. Do not pin it flat or square.
- Lay the hanging loop straight and pin its tip.
- Let it dry completely, about 6–8 hours, before unpinning.
Final Quality-Control Checklist
- Five tiers measuring 5, 4, 3, 2, and 1 in (12.7, 10.2, 7.6, 5.1, 2.5 cm) wide before edging
- Each tier is 4 rows, about 0.8 in (2.0 cm) tall
- All spikes slant the same direction on every tier
- Ledges are 2 stitches, 0.5 in (1.3 cm), on both sides at every step
- Trunk is centered over 4 foundation loops with 8 loops on each side
- Edging count is 88 stitches with no extra corner stitches
- Tier ends look rounded, not pointed
- Finished size is 5.4 in (13.7 cm) × 5.4 in (13.7 cm)
- The loop is firm and the ornament hangs straight
Troubleshooting
The tiers cup or curl upward. The spikes are too short. Pull each spike loop up to the full height of the working row before finishing it.
The spikes look vertical, not slanted. You are inserting the hook into the stitch directly below the current stitch. Go one stitch back toward where the row began.
The tree leans to one side. You probably left an uneven number of stitches at the ledges. Recount Row 1 of each tier: 2 sl sts, the tier count, then 2 unworked sts.
The trunk is off-center. Undo it and recount the foundation loops. It should sit on loops 9–12 of 20.
The edging ruffles. You added extra stitches at the corners. Use exactly one stitch per stitch or row end.
The tier ends look square. Make sure the two middle stitches of each TE are hdc, then shape the ends while blocking.
The loop twists or droops. Work the sl sts back along the chain more firmly, or use a hook one size smaller for the loop only.
Care
Hand wash in cool water and press out the moisture in a towel without wringing. Reshape and dry flat, then store flat or hung so the tiers keep their shape.

Final Notes
The measurement chain is short and easy to check:
– Gauge: 4 sts and 5 rows per 1 in (2.5 cm)
– Tier 1: 5 in (12.7 cm) wide
– Each tier above: 1 in (2.5 cm) narrower, built from 2-stitch ledges
– Tiers: 4 in (10.2 cm) tall, plus a 1 in (2.5 cm) trunk
– Edging: 0.2 in (0.5 cm) on each side, for a finished 5.4 in (13.7 cm) square outline
– Loop: about 3 in (7.6 cm)
If your gauge matches at Tier 1, every later number will follow. Make a few in different shades for a whole branch of twisted trees.
Happy crocheting!