
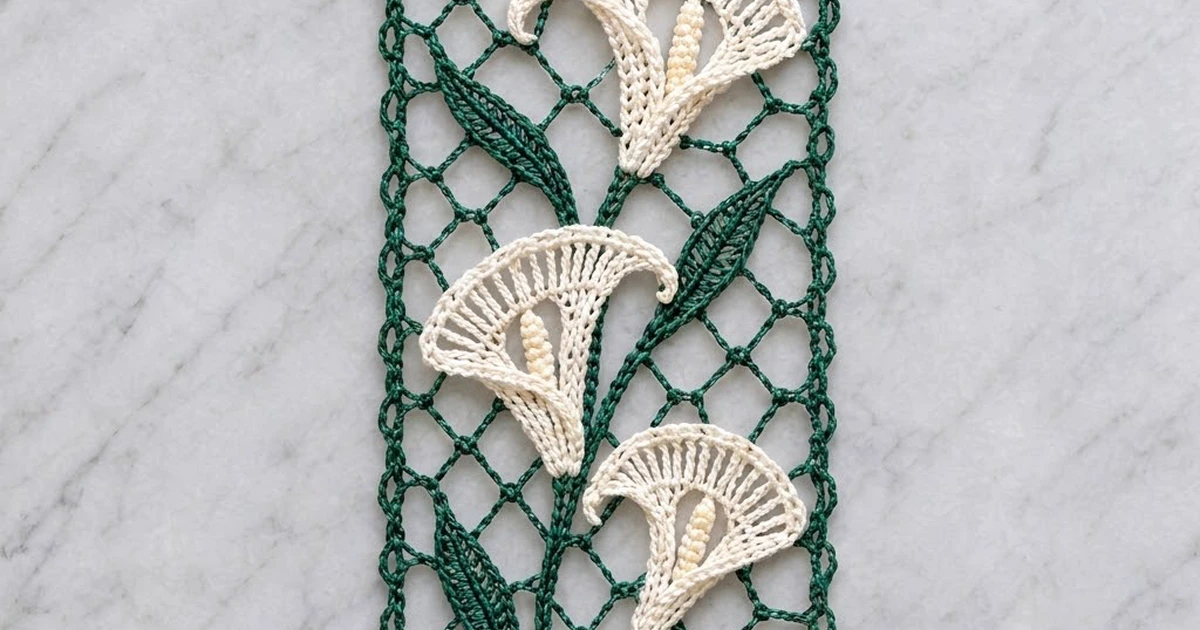
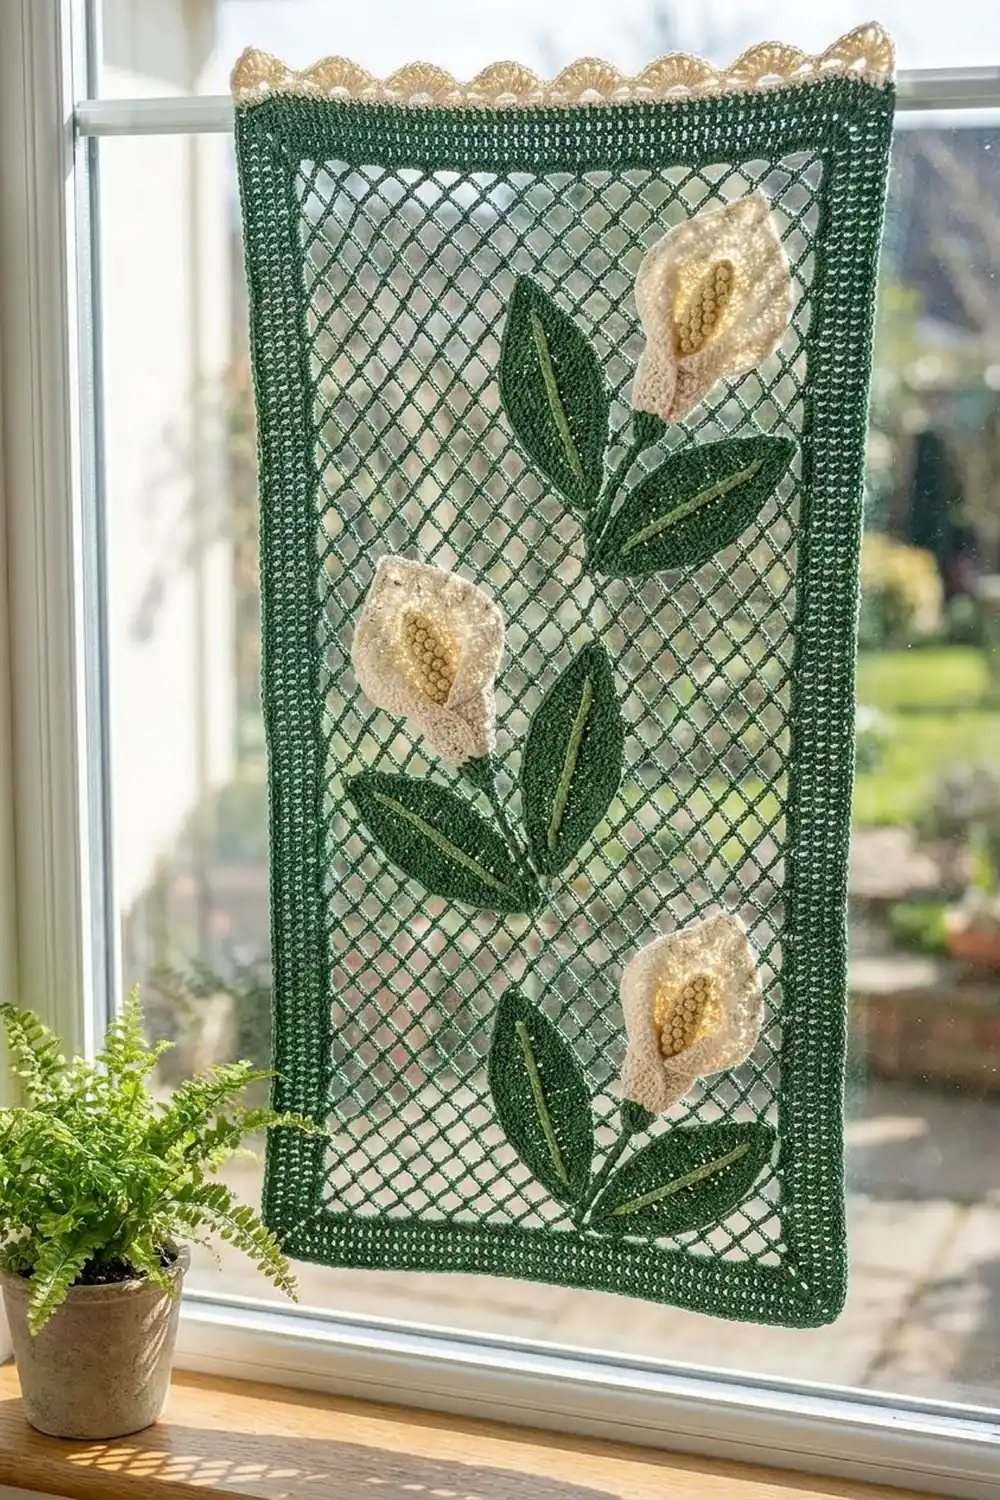
This lace panel has a vintage, elegant look. Three cream calla lilies rise on slender green stems with pointed leaves, set against a deep emerald diamond mesh. Across the top edge runs a row of cream fan scallops finished with tiny picots.
It uses just two colors. Deep forest green makes the mesh, frame, stems, and leaves. Soft cream makes the lilies, their bobbled centers, and the fan edging. The style mixes Irish crochet appliqué with classic net lace.
The pattern uses US crochet terms. The finished panel measures 8 in (20.3 cm) wide and 16 in (40.6 cm) tall, fan edging included.
First you work the mesh flat in rows. Then you frame it with two rounds of single crochet and work the fan edging across the top only. Last, you make the stems, leaves, and lilies separately and sew them on in layers.
Finished Size and Construction
- Finished size: 8 in (20.3 cm) wide x 16 in (40.6 cm) tall
- Skill level: Intermediate
- Terminology: US crochet terms
- Yarn weight: Fingering / super fine (#1) mercerized cotton
- Hook: 2.5 mm
- Number of pieces: 1 mesh panel, plus sewn-on appliqués (3 stems, 5 leaves, 3 lily spathes, 3 spadices)
- Layout: One vertical rectangle; lilies stepped low right, middle left, top right
- Mesh size before border: 7 x 13.5 in (17.8 x 34.3 cm)
- Size after green frame: 8 x 14.5 in (20.3 x 36.8 cm)
- Border depth: green frame 0.5 in (1.3 cm) on every edge; cream fan edging 1.5 in (3.8 cm) on the top edge only
Materials
Choose a smooth mercerized cotton in fingering weight. It gives crisp stitches and blocks sharply, which lace needs. Fuzzy yarn will blur the diamond mesh.
- Deep forest green: 30 g, about 102 m (112 yd)
- Cream / ivory: 15 g, about 51 m (56 yd)
These amounts are based on roughly 170 m per 50 g ball. They already include a margin of about 15%.
Tools: 2.5 mm hook, tapestry needle, rust-proof pins, blocking mat, spray bottle, tape measure.
Abbreviations (US Terms)
- ch – chain
- sl st – slip stitch
- sc – single crochet
- hdc – half double crochet
- dc – double crochet
- tr – treble crochet
- st(s) – stitch(es)
- sp – space
- rep – repeat
- RS / WS – right side / wrong side
Special stitches:
- Picot: ch 3, sl st in 3rd ch from hook.
- 3-dc bobble: (yarn over, insert hook in st, pull up a loop, yarn over, pull through 2 loops) 3 times in same st, yarn over, pull through all 4 loops.
Gauge and Checkpoints
Before starting the panel, make a test swatch. Ch 18 and work the mesh as written below for 8 rows, which gives 4 loops across. Pin it out gently before you measure.
- Mesh gauge: 1 loop = 1 in (2.5 cm) wide; 2 rows = 1 in (2.5 cm) tall.
- Frame gauge: 4 sc = 1 in (2.5 cm); 4 sc rounds = 1 in (2.5 cm).
Checkpoints:
- After Row 1: 7 in (17.8 cm) wide.
- After Row 9: 4.5 in (11.4 cm) tall.
- After Row 27: 7 x 13.5 in (17.8 x 34.3 cm).
- After frame Rnd 2: 8 x 14.5 in (20.3 x 36.8 cm).
- After fan edging: 8 x 16 in (20.3 x 40.6 cm).
If your swatch comes out too big, switch to a 2.25 mm hook; if it comes out too small, switch to a 2.75 mm hook. Never change the chain counts, because the edging math depends on them.
Diamond Mesh Panel (Green)
Ch 30 (a multiple of 4, plus 2).
Row 1 (RS): Sc in 2nd ch from hook, *ch 5, skip 3 ch, sc in next ch; rep from * across. (8 sc, 7 ch-5 loops)
Row 2: Ch 5 (counts as dc + ch 2), turn, sc in first ch-5 loop, *ch 5, sc in next loop; rep from * across, ch 2, dc in last sc. (6 full loops, plus 1 ch-2 half loop at each edge)
Row 3: Ch 1, turn, sc in first dc, *ch 5, sc in next ch-5 loop; rep from * 5 more times, ch 5, sc in 3rd ch of turning ch. (7 ch-5 loops)
Rows 4–27: Rep Rows 2–3 twelve more times. Do not fasten off.
Row 27 is a full-loop row, so it has a center loop (the 4th of 7). You will use it in the frame.
Checkpoint: 7 x 13.5 in (17.8 x 34.3 cm).
Lily Spathe (Cream, Make 3)
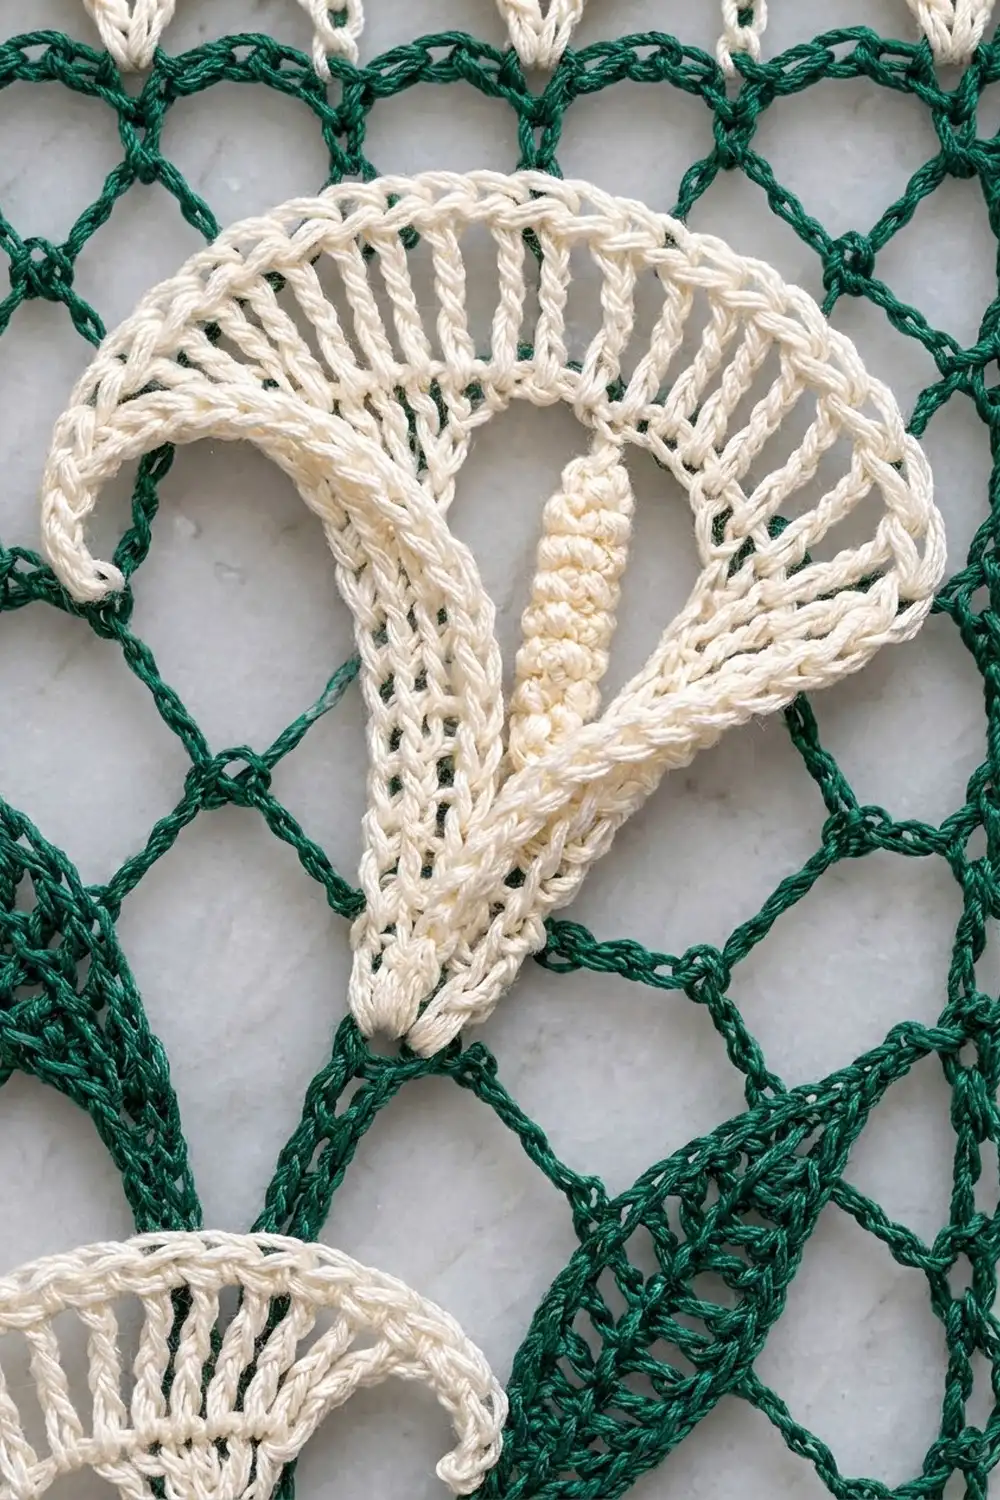
Each spathe starts as a flat, ridged fan, then you overlap its base to form the trumpet.
Row 1: Ch 4, 7 dc in 4th ch from hook (the skipped ch count as first dc). (8 dc)
Row 2: Ch 3 (counts as dc), turn, dc in first st, 2 dc in each st across. (16 dc)
Row 3: Ch 4 (counts as dc + ch 1), turn, skip first dc, *dc in next dc, ch 1; rep from * 13 more times, dc in last dc. (16 dc, 15 ch-1 sps; these form the open spokes)
Row 4: Ch 1, turn, sc in first dc, *sc in next ch-1 sp, sc in next dc; rep from * across. (31 sc)
Curled tip: Ch 6, sl st in 2nd ch from hook, sc in next ch, hdc in next ch, dc in next ch, tr in next ch, sl st in last sc of Row 4. Fasten off with a 12 in (30.5 cm) tail.
Shaping: Place the fan RS up with the tip at the left. Bring the two straight edges together and overlap them 0.5 in (1.3 cm) at the base point, keeping the tipped edge on top. Use the tail to tack the overlap. The fan stays wide at the mouth and narrows to a point.
Checkpoint: About 2.25 in (5.7 cm) wide and 2.5 in (6.4 cm) tall.
Spadix (Cream, Make 3)
Ch 8. Bobble in 3rd ch from hook, (sl st in next ch, bobble in next ch) twice, sl st in last ch. (3 bobbles, 3 sl sts)
Fasten off with an 8 in (20.3 cm) tail. This bumpy column is about 1.25 in (3.2 cm) long. Sew it upright inside the spathe’s throat, hiding its lower end in the overlap.
Leaves (Green)
Each leaf is worked along both sides of a chain, and that chain becomes the center vein.
Large leaf (make 3): Ch 21. Sl st in 2nd ch from hook, sc in next 2 ch, hdc in next 3 ch, dc in next 8 ch, hdc in next 3 ch, sc in next 2 ch, (sc, ch 2, sc) in last ch for the tip. Working in free loops on the other side: sc in next 2 ch, hdc in next 3 ch, dc in next 8 ch, hdc in next 3 ch, sc in next 2 ch, sl st in last ch. (19 sts per side, plus tip) Fasten off. About 3 in (7.6 cm) long.
Small leaf (make 2): Ch 14. Sl st in 2nd ch from hook, sc in next 2 ch, hdc in next 2 ch, dc in next 4 ch, hdc in next 2 ch, sc in next ch, (sc, ch 2, sc) in last ch. Other side: sc in next ch, hdc in next 2 ch, dc in next 4 ch, hdc in next 2 ch, sc in next 2 ch, sl st in last ch. (12 sts per side, plus tip) About 2 in (5.1 cm) long.
Stems (Green, Make 3)
Chain the length given, then sl st in the back bump of each ch, starting in the 2nd ch from hook. At about 7 ch per inch:
- Low stem: Ch 29 (28 sl sts), about 4 in (10.2 cm).
- Middle stem: Ch 50 (49 sl sts), about 7 in (17.8 cm).
- Top stem: Ch 71 (70 sl sts), about 10 in (25.4 cm).
If your chain gauge is different, change the chain counts to hit these lengths.
Border: Green Frame and Fan Edging
Border gauge: 4 sc = 1 in (2.5 cm). Each round adds 0.25 in (0.6 cm) to every edge. Work corners as (sc, ch 2, sc). Each side count includes the sc at both of its ends.
Rnd 1: Continuing from Row 27, ch 1, turn.
- Top: (sc, ch 2, sc) in first sc. Work 4 sc in each of the next 3 loops, 5 sc in the center loop, and 4 sc in each of the last 3 loops. (sc, ch 2, sc) in last sc. (29 sc between corners; 31 sc on top side)
- Side: 2 sc in each row end. (27 x 2 = 54 between corners; 56 on side)
- Bottom: (sc, ch 2, sc) in the end foundation ch, sc in free loop of next 28 ch, (sc, ch 2, sc) in the other end ch. (28 between corners; 30 on bottom side)
- Side: 2 sc in each row end (56 on side). Join with sl st to first sc.
Rnd 1 total: 31 + 56 + 30 + 56 = 173 sc, plus 4 corner ch-2 sps.
Rnd 2: Sl st into corner sp, ch 1, (sc, ch 2, sc) in corner sp, sc in each sc to next corner; rep from * around. Join and fasten off. Each side gets exactly 2 more sc. Rnd 2 total:* top 33 + side 58 + bottom 32 + side 58 = 181 sc, plus 4 corner ch-2 sps.
Checkpoint: 8 x 14.5 in (20.3 x 36.8 cm).
Cream Fan Edging (Top Edge Only)
Row 1 (RS): Join cream in the first sc of the top side. Ch 1, sc in same st, *skip 3 sc, 9 dc in next sc, skip 3 sc, sc in next sc; rep from * 3 more times. (4 fans of 9 dc, 5 sc = 41 sts)
Row 2 (WS): Ch 1, turn, sc in first sc, *ch 1, (dc in next dc, ch 1) 9 times, sc in next sc; rep from * across. (5 sc, 36 dc, 40 ch-1 sps)
Row 3 (RS): Ch 1, turn, sc in first sc, *skip next ch-1 sp, (2 sc in next ch-1 sp, picot) 7 times, 2 sc in next ch-1 sp, skip next ch-1 sp, sc in next sc; rep from * across. (5 sc + 4 x 16 sc = 69 sc, plus 28 picots) Fasten off.
Why the math works: Each loop is 1 in (2.5 cm) wide, and 4 sc per loop matches the 4 sc per inch gauge. That puts 28 sc across 7 in. One extra sc in the center loop raises the top to 29. Adding the corner sc makes 31, and Rnd 2 makes 33. The fan repeat is 8 sts plus 1, and 4 x 8 + 1 = 33, so the fans fit corner to corner exactly. Each fan covers 2 in (5.1 cm), which totals 8 in (20.3 cm). Down the sides, 2 sc per row matches 2 rows per inch. Adding 1 sc at each end of every side, every round, keeps the corners square.
Appliqué Assembly
Pin the framed panel flat at 8 x 14.5 in (20.3 x 36.8 cm). Then build the layers from back to front:
- Stems: Begin all three together at the bottom center, 0.5 in (1.3 cm) above the frame. Curve the low stem right, ending 4.5 in (11.4 cm) above the mesh’s bottom edge. Curve the middle stem left, ending at 7.5 in (19.1 cm). Run the top stem up the right side, ending at 10.5 in (26.7 cm). Whipstitch each in place.
- Leaves: Fan two large leaves out to the left and right at the base, covering the stem ends. Set the third large leaf next to the middle stem. Tuck the small leaves under the low and top lilies. Sew along the vein and around the tips.
- Lilies: Place each base point over the top of its stem, with the mouth facing up and slightly out. Sew around the outer edge only, so the spokes stay open.
Weave in all ends on the back, hiding them under the appliqués.
Final Blocking
- Soak for 10 minutes in cool water.
- Roll in a towel and press. Do not wring.
- Pin the frame to 8 x 14.5 in (20.3 x 36.8 cm), with a pin every 1 in (2.5 cm).
- Pin each fan up to 1.5 in (3.8 cm), putting a pin in every picot.
- Use your fingertips to open the mesh diamonds evenly.
- Cup each lily mouth and point each leaf tip.
- Dry completely before unpinning.
Final Quality-Control Checklist
- Total size 8 x 16 in (20.3 x 40.6 cm)
- Mesh is 7 loops across and 27 rows tall
- Frame Rnd 2 counts: 33 / 58 / 32 / 58
- 4 even fans, 7 picots each
- 3 lilies, each with a spadix and curled tip
- 5 leaves and 3 stems, all secure
- No ends showing on the front
Troubleshooting
- Mesh slants: You may have skipped a half loop. Every even row must start with ch 5 and end with ch 2, dc.
- Fans don’t fit: Recount the top of Rnd 2. It needs exactly 33 sc.
- Frame ripples: The sides have too many sts. Use 2 sc per row end.
- Frame pulls in: Your tension is too tight. Go up 0.25 mm for the frame only.
- Lily lies flat: Overlap the base more, up to 0.75 in (1.9 cm).
- Panel puckers: Sew more loosely, with the panel pinned flat.
Care
Hand wash in cool water with mild soap, reshape, and dry flat. If needed, press lightly from the back, but avoid flattening the lilies.
Final Notes
Your measurement chain: the 7-loop mesh measures 7 x 13.5 in (17.8 x 34.3 cm). Two sc rounds take it to 8 x 14.5 in (20.3 x 36.8 cm). Four fans across 33 sts add 1.5 in (3.8 cm), for a finished 8 x 16 in (20.3 x 40.6 cm). Hit each checkpoint and the lilies will sit exactly where they belong.
Happy crocheting!