

This hanging holder keeps three spare rolls in a neat vertical column. It has three oval baskets with fish-scale arches, all sewn to a long teal backing panel. A wooden ring at the top hangs it from a hook or towel ring, and a cream tassel finishes the pointed bottom.
The colors are deep teal with a creamy white rim on each basket. The open arches let the rolls show through, and the picot rims give it a soft, beachy look. It suits a coastal or boho bathroom.
The pattern uses US crochet terms. With the tab folded over the ring, the panel measures about 4.5 in (11.4 cm) wide and 22 in (55.9 cm) long. Including the ring and tassel, the holder hangs about 29 in (73.7 cm) long. Each basket is about 6.25 in (15.9 cm) wide, 4.5 in (11.4 cm) deep, and 3.5 in (8.9 cm) tall.
First you make three baskets in the round, each starting with an oval single crochet base. Then you crochet one flat backing panel in rows and sew the baskets onto it. To finish, you add a single crochet border, the ring and the tassel.
Finished Size and Construction
- Finished size: 4.5 in x 22 in (11.4 cm x 55.9 cm) panel; about 29 in (73.7 cm) total hanging length
- Skill level: Intermediate
- Terminology: US
- Yarn weight: Worsted (#4) cotton
- Hook: US H-8 (5.0 mm)
- Number of pieces: 3 baskets, 1 backing panel, 1 tassel, plus 1 wooden ring
- Layout: 1 column of 3 baskets stacked vertically
- Basket size: 6.25 in x 4.5 in x 3.5 in tall (15.9 cm x 11.4 cm x 8.9 cm)
- Panel size before border: 4 in x 23 in (10.2 cm x 58.4 cm), tab unfolded
- Border depth: 0.25 in (0.6 cm) per side
Materials
Use a smooth worsted-weight cotton or cotton blend. Cotton holds its shape and won’t stretch out under the weight of the rolls. Avoid fuzzy acrylic, because it blurs the arch lines.
Pick a teal that is dark enough to contrast clearly with the cream. That contrast is what makes the picot rims stand out.
- Teal (Color A): 200 g, about 340 m (372 yd)
- Cream (Color B): 50 g, about 85 m (93 yd)
Tools:
- US H-8 (5.0 mm) crochet hook
- 1 wooden ring, 2.5 in (6.4 cm) outside diameter
- Tapestry needle
- 4 stitch markers
- Scissors
- Cardboard, 5.5 in (14.0 cm) wide, for the tassel
- Measuring tape, rust-proof pins and a spray bottle
These quantities include a safety margin of about 20%.
Abbreviations (US Terms)
- ch: chain
- sl st: slip stitch
- sc: single crochet
- sc2tog: single crochet 2 together
- BLO: back loop only
- sp: space
- st(s): stitch(es)
- inc: 2 sc in the same st
Picot: Ch 3, then sl st in the front loop and left leg of the sc you just made.
Gauge and Checkpoints
Gauge: 14 sc and 16 rows = 4 in (10.2 cm), in sc worked in rows.
Make one basket first and check it before you start the others.
- Base, after Rnd 5: about 4.25 in x 2.5 in (10.8 cm x 6.4 cm)
- Base, after Rnd 9: about 6.25 in x 4.5 in (15.9 cm x 11.4 cm), lying flat
- Wall, after Rnd 11: 0.5 in (1.3 cm) tall
- Wall, after Rnd 17: 2.75 in (7.0 cm) tall
- Finished basket: 3.5 in (8.9 cm) tall
- Panel, Row 1: 14 sc = 4 in (10.2 cm)
- Panel, after Row 72: 18 in (45.7 cm) long
If your base comes out too big, go down half a hook size. If it’s too small, go up half a size.
If the base cups upward, your increases are too tight. If it ruffles, your tension is too loose. A standard roll should drop into the finished basket with a little room to spare.
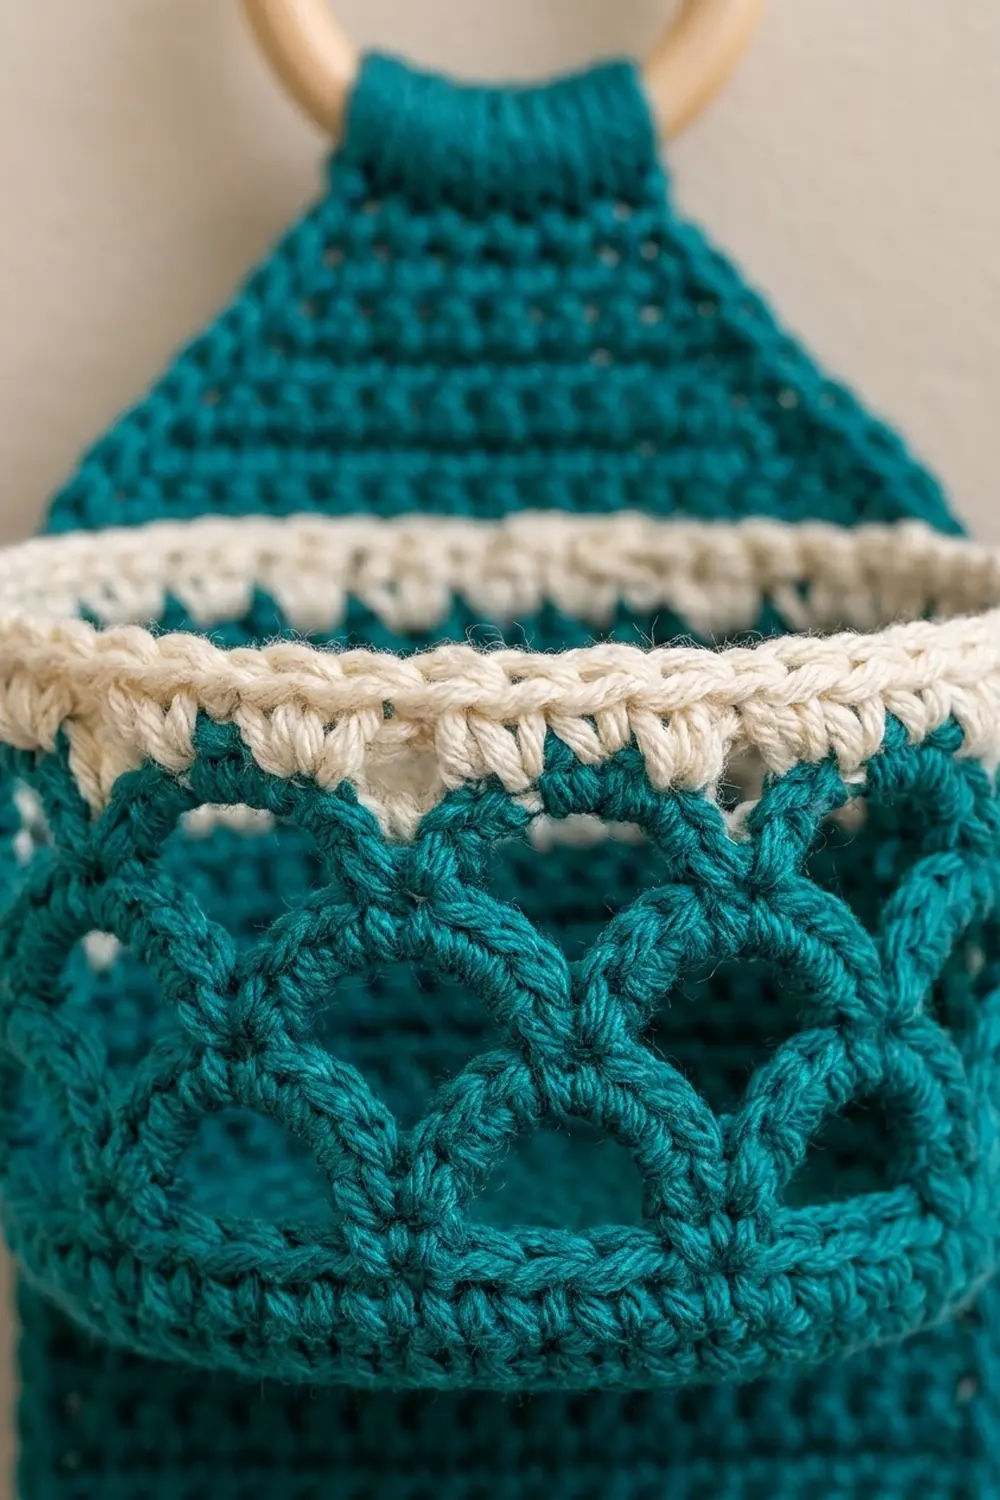
Basket (Make 3)
Work in joined rounds: end each round with a sl st into the first sc. The ch 1 at the start of a round does not count as a stitch. Moving a marker up to the first st of each round makes the joins easy to find.
Oval Base
With Color A, ch 9.
Rnd 1: Sc in 2nd ch from hook, sc in next 6 ch, 3 sc in last ch. Rotate the work and crochet into the free loops on the other side of the chain: sc in next 6 ch, 2 sc in last ch (the same ch as the first sc). Join. (18 sts)
Rnd 2: Ch 1, inc in first st, sc in next 6, inc in each of next 3, sc in next 6, inc in each of last 2. Join. (24 sts)
Rnds 3–9: Ch 1, [sc in next X, inc] once, sc in next 6, [sc in next X, inc] 3 times, sc in next 6, [sc in next X, inc] 2 times. Join. X is 1 in Rnd 3 and goes up by 1 each round.
- Rnd 3 (X = 1): 30 sts
- Rnd 4 (X = 2): 36 sts
- Rnd 5 (X = 3): 42 sts
- Rnd 6 (X = 4): 48 sts
- Rnd 7 (X = 5): 54 sts
- Rnd 8 (X = 6): 60 sts
- Rnd 9 (X = 7): 66 sts
Each round adds 6 sts, 3 at each curved end. Each straight side stays at 6 sts.
Walls
Rnd 10: Ch 1, sc in BLO of each st around. Join. (66 sts) This leaves a ridge of front loops around the edge of the base, and you’ll use that ridge for sewing later.
Rnd 11: Ch 1, sc in each st around. Join. (66 sts)
Fish-Scale Arches
Rnd 12 (loop round): Ch 1, sc in first st, ch 4, skip 2 sts, sc in next st; repeat from * around, ending with ch 4, skip 2 sts, join to first sc. (22 sc, 22 ch-4 loops)*
Rnd 13 (arch round): Sl st into first ch-4 sp, ch 1, 5 sc in each ch-4 sp around. Join. (110 sc, 22 arches)
Rnd 14 (offset loops): Sl st in next 2 sts to reach the center (3rd) sc of the first arch. Ch 1, sc in same st, ch 4, sc in center sc of next arch; repeat from * around, ending with ch 4, join to first sc. (22 sc, 22 ch-4 loops)*
Rnd 15: Repeat Rnd 13. (110 sc)
Rnds 16–17: Repeat Rnds 14–15. (110 sc)
Each new loop runs from the center of one arch to the center of the next. That staggers the openings like fish scales. Fasten off Color A.
Cream Rim
Rnd 18 (conversion round): Join Color B in the first sc of any arch. Ch 1, sc in 1st, 3rd and 5th sc of the arch; repeat from * on all arches. Join. (22 arches x 3 = 66 sts)* This pulls the rim back in to match the base.
Rnd 19: Ch 1, sc in each st around. Join. (66 sts)
Rnd 20 (picot round): Ch 1, sc in next 2 sts, sc in next st, picot; repeat from * around. Join. (66 sc, 22 picots)*
Fasten off and weave in the ends.
Backing Panel (Make 1)
Work in rows. The ch 1 at the start of each row does not count as a stitch.
With Color A, ch 15.
Row 1: Sc in 2nd ch from hook and in each ch across. Turn. (14 sts)
Rows 2–72: Ch 1, sc in each st across. Turn. (14 sts) The body should now measure 18 in (45.7 cm).
Top Taper and Tab
Row 73: Ch 1, sc2tog, sc in next 10, sc2tog. Turn. (12 sts)
Row 74: Ch 1, sc2tog, sc in next 8, sc2tog. Turn. (10 sts)
Row 75: Ch 1, sc2tog, sc in next 6, sc2tog. Turn. (8 sts)
Row 76: Ch 1, sc2tog, sc in next 4, sc2tog. Turn. (6 sts)
Rows 77–84: Ch 1, sc in each st across. Turn. (6 sts) The tab is 2 in (5.1 cm) long. Fasten off.
Bottom Point
Turn the panel upside down. Join Color A in the first free loop of the foundation chain.
Row B1: Ch 1, sc in each free loop across. Turn. (14 sts)
Rows B2–B7: Ch 1, sc2tog, sc across to the last 2 sts, sc2tog. Turn. Stitch counts: 12, 10, 8, 6, 4, 2 sts
Row B8: Ch 1, sc2tog. (1 st) Fasten off.
The point is 2 in (5.1 cm) long. Before the border, the panel measures 4 in x 23 in (10.2 cm x 58.4 cm).
Make All Pieces
- Color A: 3 basket bodies (Rnds 1–17) and 1 backing panel
- Color B: 3 basket rims (Rnds 18–20) and 1 tassel
Layout, with rows counted up from Row 1 at the bottom of the body:
        [ ring ]
        [ tab  ]       Rows 73–84
        [ gap  ]       Rows 65–72   2 in (5.1 cm)
      [ Basket 1 ]     Rows 51–64   3.5 in (8.9 cm)
        [ gap  ]       Rows 43–50   2 in (5.1 cm)
      [ Basket 2 ]     Rows 29–42   3.5 in (8.9 cm)
        [ gap  ]       Rows 21–28   2 in (5.1 cm)
      [ Basket 3 ]     Rows 7–20    3.5 in (8.9 cm)
        [ gap  ]       Rows 1–6     1.5 in (3.8 cm)
        [ point]       Rows B1–B8
        [tassel]
Check: 6 + 14 + 8 + 14 + 8 + 14 + 8 = 72 rows.
The 2 in (5.1 cm) gaps give each roll room to lift out without hitting the basket above.
Joining
Sew each basket to the panel with a whipstitch, using Color A and a tapestry needle.
Stitch-to-stitch logic: On one long side of the basket, find the 14 center sts in two places:
- On the base, use the front-loop ridge from Rnd 10.
- On the rim, use the sts of Rnd 19, just below the picots.
Mark both ends of each 14-st section.
- Lay the panel flat, right side up. Place the basket with its marked side against the panel.
- Whipstitch the 14 marked ridge sts to the 14 sts of the base row (Row 7 for Basket 3), working 1 basket st to 1 panel st.
- Whipstitch the 14 marked rim sts to the 14 sts of the top row (Row 20 for Basket 3), also 1 to 1.
- Repeat for Basket 2 (Rows 29 and 42) and Basket 1 (Rows 51 and 64).
Tension: Pull each stitch snug but not tight, so the panel stays flat instead of gathering. If it puckers, loosen the stitches.
Checkpoint: The gaps between baskets should still measure 2 in (5.1 cm), and the panel should still be 4 in (10.2 cm) wide.
Border
Work one round of sc around the whole panel in Color A. The baskets overhang the edges, so fold them toward the center while you work.
Border gauge: The panel has 14 sts and 16 rows per 4 in (10.2 cm). Along straight row-end edges, work 7 sc for every 8 rows.
Border Round: Join Color A at the bottom point. Ch 1, then work (sc, ch 2, sc) in the point. Continue as follows:
- Side 1, going up (85 sc):
- Bottom taper: 10 sc over 8 rows (1 per row end, plus 2 extra spaced evenly)
- Body: 63 sc over 72 rows (7 sc per 8 rows, 9 times)
- Top taper: 5 sc over 4 rows (1 per row end, plus 1 extra)
- Tab: 7 sc over 8 rows
- Tab top (10 sc): 3 sc in first st, sc in next 4, 3 sc in last st. That’s the 6 sts worked 1 per st, plus 4 extra at the corners.
- Side 2, going down (85 sc): Mirror Side 1, working 7 sc on the tab, 5 on the top taper, 63 on the body and 10 on the bottom taper.
Join to the first sc. (182 sc + 1 ch-2 sp)
Why the math works: The fabric has 14 sts for every 16 rows. 14/16 reduces to 7/8, so 7 sc per 8 rows matches the fabric’s width without ruffling or pulling. The diagonal taper edges are longer than their row count suggests, so they get a few extra stitches. The border adds 0.25 in (0.6 cm) on every side, which brings the panel to 4.5 in x 23.5 in (11.4 cm x 59.7 cm).
Ring and Tassel
Ring: Pass the tab through the wooden ring from front to back. Fold the top 1.5 in (3.8 cm) to the back and whipstitch it down. The panel now hangs 22 in (55.9 cm) below the ring.
Tassel:
- Wrap Color B 30 times around the 5.5 in (14.0 cm) cardboard.
- Tie the loops together at the top with a 12 in (30.5 cm) strand, then cut through the loops at the bottom.
- Wrap another strand around the bundle 0.75 in (1.9 cm) below the top to form the head.
- Trim the ends to a tassel length of 5 in (12.7 cm).
- Sew the tassel to the bottom point using the tails from the top tie.
Final Blocking
- Mist the panel and baskets lightly with water.
- Lay the holder face up on a towel.
- Pin the panel straight at 4.5 in x 22 in (11.4 cm x 55.9 cm).
- Fill each basket with a roll or a folded towel so the arches open evenly.
- Shape the picot rims with your fingers.
- Comb the tassel straight and trim the ends evenly.
- Let everything dry completely before hanging.
Final Quality-Control Checklist
- Each basket base measures 6.25 in x 4.5 in (15.9 cm x 11.4 cm) and lies flat.
- Each basket has 22 arches per arch round and 22 picots on the rim.
- All three baskets are 3.5 in (8.9 cm) tall.
- The panel is 4.5 in (11.4 cm) wide with straight edges.
- The gaps between baskets measure 2 in (5.1 cm).
- Each basket is centered and sewn 14 sts to 14 sts at both base and rim.
- The ring tab is sewn down securely.
- The tassel hangs straight from the point.
- All ends are woven in.
Troubleshooting
Base cups upward: Your increases are too tight. Go up half a hook size and check that the increases sit at the curved ends.
Base ruffles: Your stitches are too loose. Go down half a hook size.
Arches look uneven: Make sure each ch-4 lands exactly on the center sc of an arch.
Rim flares: In Rnd 18, work only 3 sc per arch and confirm you have 66 sts.
Panel puckers at the seams: Your whipstitch is too tight. Re-sew with looser stitches.
Border waves: Work 7 sc per 8 rows, not 1 sc per row.
Holder tilts: Re-center the baskets so the weight is balanced on the panel.
Tassel looks thin: Add 10 more wraps before tying.
Care
Hand wash in cool water and lay flat to dry. Reshape the baskets while they’re damp.

Final Notes
The measurement chain starts with gauge: 14 sc = 4 in (10.2 cm). The 66-st base makes a 6.25 in x 4.5 in (15.9 cm x 11.4 cm) oval, and 22 arches build a 3.5 in (8.9 cm) wall. The 14-st panel is 4 in (10.2 cm) wide, and each basket is sewn on with 14-st seams. The border brings the panel to 4.5 in (11.4 cm) wide. Check each stage and the finished holder will come out the right size.
Happy crocheting!