
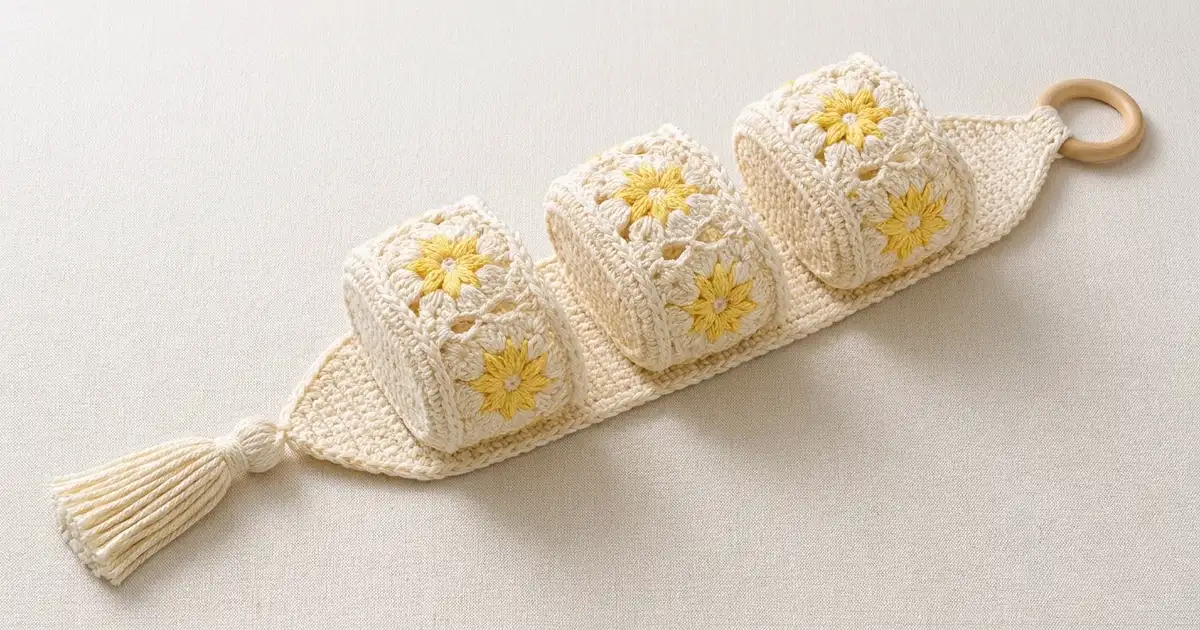
This hanging holder stores three toilet paper rolls in a slim column on the wall. Three oval baskets are stitched to a long cream back strip, the strip hangs from a wooden ring, and a full cream tassel finishes the pointed bottom.
The wall of each basket is a ring of five granny squares. Every square has a butter-yellow eight-petal flower with a tiny cream center. A plain cream band runs below the squares, and a twisted rope rim runs along the top. The color scheme is just cream and yellow, so it looks soft and fresh.
The pattern uses US crochet terms. The finished strip is 4 in (10.2 cm) wide and 22.4 in (56.9 cm) long from the fold at the ring to the bottom point. Each basket measures 6 in x 4.75 in (15.2 cm x 12.1 cm) across the base and stands 4.75 in (12.1 cm) tall.
Construction is simple and modular: make 15 flower squares, join them into three rings of five, crochet an oval base into each ring, add the rim, then sew the baskets onto the back strip and add the ring and tassel.
Finished Size and Construction
- Finished size: strip 4 in x 22.4 in (10.2 cm x 56.9 cm) as it hangs, plus ring and a 4.5 in (11.4 cm) tassel
- Skill level: Intermediate
- Terminology: US
- Yarn weight: worsted (#4) cotton
- Hook: 5.0 mm (H-8)
- Number of pieces: 15 squares, 3 oval bases, 1 back strip, 1 tassel
- Layout: 5 squares per basket ring, 3 baskets stacked vertically
- Piece size: each square 3.5 in (8.9 cm)
- Size before border: basket 4.25 in (10.8 cm) tall
- Border depth: rim adds 0.5 in (1.3 cm), for a total height of 4.75 in (12.1 cm)
Materials
Use a smooth, worsted-weight cotton or cotton blend. Cotton holds its shape in a damp bathroom and gives the clusters crisp definition. The amounts below assume roughly 85 m per 50 g.
- Cream: 200 g, about 340 m
- Butter yellow: 25 g, about 43 m
Tools:
- 5.0 mm (H-8) crochet hook
- Wooden ring, 2.5 in (6.4 cm) outer diameter
- Tapestry needle
- 4 stitch markers
- Scissors
- Stiff card, 4.5 in (11.4 cm) tall, for the tassel
- Spray bottle and blocking pins
The quantities include a margin of about 15% for gauge differences, swatching and seams.
Abbreviations (US Terms)
- ch: chain
- sl st: slip stitch
- sc: single crochet
- dc: double crochet
- sc2tog: single crochet 2 together
- BLO: back loop only
- sp(s): space(s)
- st(s): stitch(es)
- RS / WS: right side / wrong side
- rep: repeat
3-dc cluster (3dc-cl): [yarn over, insert hook in st, yarn over, pull up a loop, yarn over, draw through 2 loops] 3 times in the same st, yarn over, draw through all 4 loops on hook.
2-dc cluster (2dc-cl): the same as 3dc-cl but worked twice, finishing through 3 loops.
Reverse sc (rev sc): working from left to right (right-handers), insert hook in next st to the right, pull up a loop, yarn over, draw through both loops. This makes the rope rim.
Gauge and Checkpoints
Gauge: 16 sc x 18 rows = 4 in (10.2 cm) in sc.
Make one full square before you start the rest. Use these checkpoints:
- After Rnd 2 (flower): 1.75 in (4.4 cm) across
- After Rnd 3: 2.5 in (6.4 cm) square
- After Rnd 4: 3.25 in (8.3 cm) square
- After Rnd 5: 3.5 in (8.9 cm) square, 14 sts per side
The whole design depends on 14 sts = 3.5 in, which matches the sc gauge of 4 sts per inch. That lets the square edges, the oval base and the rim all line up one-to-one.
If your square is bigger than 3.5 in (8.9 cm), go down a hook size. If it is smaller, go up a size. Check the sc gauge again on the first base, which should measure 6 in x 4.75 in (15.2 cm x 12.1 cm) after Rnd 10.
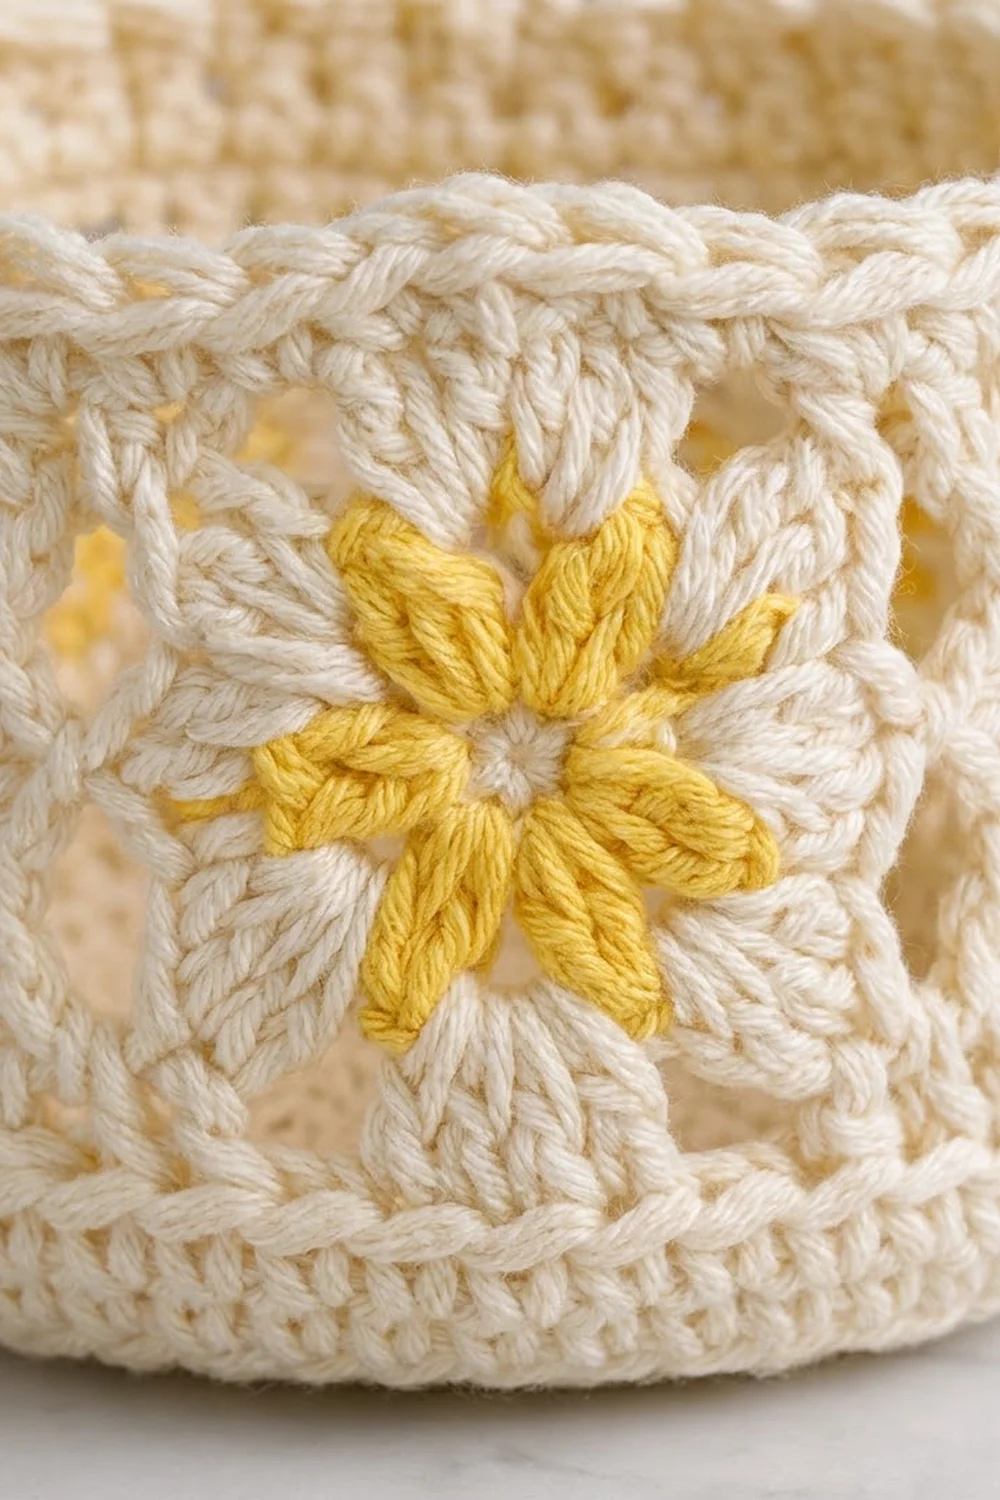
Flower Square (make 15)
Rnd 1 (cream): Make a magic ring, ch 1, 8 sc in ring, sl st to first sc. Fasten off. (8 sc)
Rnd 2 (yellow): Join in any sc, ch 2, 2dc-cl in same st (counts as first cluster), ch 3, [3dc-cl in next sc, ch 3] 7 times, sl st to top of first cluster. Fasten off. (8 clusters, 8 ch-3 sps)
Rnd 3 (cream): Join in any ch-3 sp, ch 3 (counts as dc), (2 dc, ch 2, 3 dc) in same sp, ch 1, 3 dc in next ch-3 sp, ch 1, *(3 dc, ch 2, 3 dc) in next ch-3 sp, ch 1, 3 dc in next ch-3 sp, ch 1; rep from * 2 more times, sl st to top of ch-3. (36 dc: 9 dc per side between corner sps, 4 corner ch-2 sps, 8 ch-1 sps)
Rnd 4: Sl st in next 2 dc and into corner ch-2 sp, ch 3, (2 dc, ch 2, 3 dc) in same sp, [ch 1, 3 dc in next ch-1 sp] twice, ch 1*, (3 dc, ch 2, 3 dc) in next corner sp; rep from * 2 more times, then from * to ** once, sl st to top of ch-3. (48 dc: 12 dc per side, 12 ch-1 sps)
Rnd 5 (trim round): Ch 1, sc in same st and next 2 dc, [skip ch-1 sp, sc in next 3 dc] 3 times, sc in corner ch-2 sp, sc in next 3 dc; rep from * around, ending last rep at *, sl st to first sc. Fasten off, leaving a 6 in (15.2 cm) tail.
Count for Rnd 5: 48 (1 sc in each dc) + 4 (1 sc in each corner sp) = 52 sc. Each side has 14 sts, including the corner st at each end.
Weave in the ends. Lightly spray-block each square to 3.5 in (8.9 cm).
Make All Pieces
- Squares: 15 in total, 5 for each basket. Each square uses about 2 m of yellow and 7.5 m of cream.
- Bases: 3, all cream (worked onto the rings below)
- Back strip: 1, cream
- Tassel: 1, cream
Basket layout, viewed from above (each basket is one closed ring of five squares):
Basket ring:  [S1]-[S2]-[S3]-[S4]-[S5]-(back to S1)
Front:        S3 centered on the front
Back:         seam S5/S1 centered against the strip
Holder layout, top to bottom:
   (ring)
   [tab]
   [taper]
   [Basket 3]
   [gap]
   [Basket 2]
   [gap]
   [Basket 1]
   [point]
   (tassel)
Joining
Square rings: Place 2 squares WS together with the flowers pointing the same way. Working through the BLO of both layers, sl st across the 14 matching sts, from corner st to corner st. Join S1 through S5 in a line, then join S5 back to S1 to close the ring. That makes 5 seams.
Keep the sl sts as loose as your regular stitches. If the seam is tight, the ring will pucker and pull narrower than 17.5 in (44.5 cm).
Each ring edge now has 5 x 14 = 70 sts along the top and 70 along the bottom. No stitches are added at the seams, because both corner sts at a seam already belong to their own squares.
Size checkpoint: each flattened ring measures 8.75 in (22.2 cm) across, which is half of the 17.5 in (44.5 cm) circumference, and 3.5 in (8.9 cm) tall.
Oval base (make 3):
With cream, ch 8.
Rnd 1: 3 sc in 2nd ch from hook, sc in next 5 ch, 3 sc in last ch. Rotate and work along the bottom loops: sc in next 5 ch. Sl st to first sc. (16 sts)
Rnd 2: Ch 1, [2 sc in each of next 3 sts, sc in next 5] twice, sl st to first sc. (22 sts)
Rnd 3: Ch 1, [(sc in next st, 2 sc in next st) 3 times, sc in next 5] twice, sl st. (28 sts)
Rnds 4–10: On each round, work [(sc in next X sts, 2 sc in next st) 3 times, sc in next 5] twice, sl st, where X = round number minus 2. Totals: Rnd 4: 34, Rnd 5: 40, Rnd 6: 46, Rnd 7: 52, Rnd 8: 58, Rnd 9: 64, Rnd 10: 70 sts.
The base now measures 6 in x 4.75 in (15.2 cm x 12.1 cm).
Rnd 11: Ch 1, sc in BLO of each st around, sl st. (70 sts) This turns the edge upward.
Rnd 12: Ch 1, sc in each st around, sl st. (70 sts)
Rnd 13 (joining round): Set a ring on the base with the RS facing out. Line up S3 so it is centered on one long side of the oval. Ch 1, then work 1 sc through each bottom-edge st of the ring and the matching st of Rnd 12, so that each square gets 14 sc. Sl st to first sc. (70 sts = 5 x 14)
Checkpoint: the basket stands 4.25 in (10.8 cm) tall.
Border (Basket Rim)
The border gauge is the same as the main gauge: 4 sc per inch. Work all three rim rounds into the top edge of the ring, beginning at a seam.
Rnd 14: Join cream in the top corner st of any square, ch 1, sc in each of the 14 sts along the top of each square. Sl st to the first sc. (70 sts: 14 per square x 5)
Rnd 15: Ch 1, sc in each st, sl st. (70 sts: 14 per square)
Rnd 16: Ch 1, rev sc in each st, sl st. Fasten off. (70 rev sc: 14 per square)
Why the math works: 70 sts at 4 sts per inch gives 17.5 in (44.5 cm), and 5 squares x 3.5 in also gives 17.5 in (44.5 cm). Since the base, the ring and the rim all have the same count, the walls go straight up with no ruffling or cupping. The rim adds 0.5 in (1.3 cm), so each basket is 4.75 in (12.1 cm) tall.
Back Strip
With cream, ch 2.
Row 1: 2 sc in 2nd ch from hook, turn. (2 sts)
Rows 2–8: Ch 1, 2 sc in first st, sc across to last st, 2 sc in last st, turn. Each row adds 2 sts: Row 2: 4, Row 3: 6, Row 4: 8, Row 5: 10, Row 6: 12, Row 7: 14, Row 8: 16 sts. This forms the pointed tip, 1.75 in (4.4 cm) long.
Rows 9–89: Ch 1, sc in each st across, turn. (16 sts; 81 rows, 18 in / 45.7 cm)
Rows 90–101 (taper): Work a decrease row on Rows 90, 93, 96 and 99: ch 1, sc2tog, sc across to last 2 sts, sc2tog. Work all other rows even. Totals: Row 90: 14, Row 93: 12, Row 96: 10, Row 99: 8 sts. After Row 101, the taper is 2.75 in (7.0 cm) long.
Rows 102–112 (tab): Ch 1, sc in each st across, turn. (8 sts) Fasten off, leaving a 16 in (40.6 cm) tail.
Checkpoint: the flat strip is 4 in x 24.9 in (10.2 cm x 63.2 cm).
Attach the baskets: Count rows from the tip and pin each basket so that seam S5/S1 sits at the center of the strip.
- Basket 1: base edge at Row 10, rim at about Row 31
- Basket 2: base edge at Row 37
- Basket 3: base edge at Row 64
That leaves a gap of about 1.3 in (3.3 cm) between baskets. With cream, whipstitch the vertical edges of S5 and S1 to the strip at a point 1.75 in (4.4 cm) on each side of the seam, then stitch across Rnd 12 of the base. Leave the rim free.
Ring and tassel: Fold the tab over the wooden ring and whipstitch Row 112 to the back at Row 101.
For the tassel, wrap cream 30 times around the 4.5 in (11.4 cm) card. Tie the wraps at the top, cut the bottom loops, wrap the neck 0.5 in (1.3 cm) below the top, and sew the tassel to the tip of Row 1.
Final Blocking
- Mist each basket until it is damp, not soaked.
- Slide a toilet paper roll wrapped in plastic into each basket to shape the walls.
- Pin the strip flat to 4 in x 24.9 in (10.2 cm x 63.2 cm), with the baskets resting upright.
- Straighten the rev sc rim with your fingers so the rope twist is even.
- Gently fluff the yellow petals.
- Let everything dry completely, then remove the rolls and pins.
Final Quality-Control Checklist
- Each square measures 3.5 in (8.9 cm), with 14 sts per side.
- All flowers point the same way.
- Every ring, base and rim round has exactly 70 sts.
- Each base is 6 in x 4.75 in (15.2 cm x 12.1 cm).
- Each basket is 4.75 in (12.1 cm) tall.
- The gaps between baskets are even, about 1.3 in (3.3 cm).
- The strip hangs straight and is 22.4 in (56.9 cm) from the fold to the tip.
- The tassel is centered and its neck wrap is tight.
- All ends are woven in securely.
Troubleshooting
- Basket walls flare outward: your rim is loose. Redo Rnds 14–15 with a 4.5 mm hook.
- Base cups upward before Rnd 11: you have too few increases. Recount Rnds 4–10 against the totals.
- Base ruffles: your sc is too loose. Go down a hook size.
- Ring is shorter than the base: your seams are too tight. Rework them with looser sl sts.
- Square sides bow inward: check that you skipped only the ch-1 sps in Rnd 5 and worked into every dc.
- Strip curls: block it flat and pin the edges straight.
- The roll doesn’t fit: the base must reach 4.75 in (12.1 cm) across. Check your gauge.
Care
Hand wash in cool water and lay flat to dry, reshaping each basket around a roll. Avoid hanging the holder while it is wet, because the weight can stretch the strip.

Final Notes
The measurement chain is straightforward. Each square is 3.5 in (8.9 cm) with 14 sts per side. Five squares make a 70-st ring, 17.5 in (44.5 cm) around. The oval base grows to exactly 70 sts, and the rim keeps 70 sts. That gives a basket 4.75 in (12.1 cm) tall on a strip 4 in (10.2 cm) wide. As long as you keep the 16-st gauge, every piece fits the next.
Happy crocheting!