

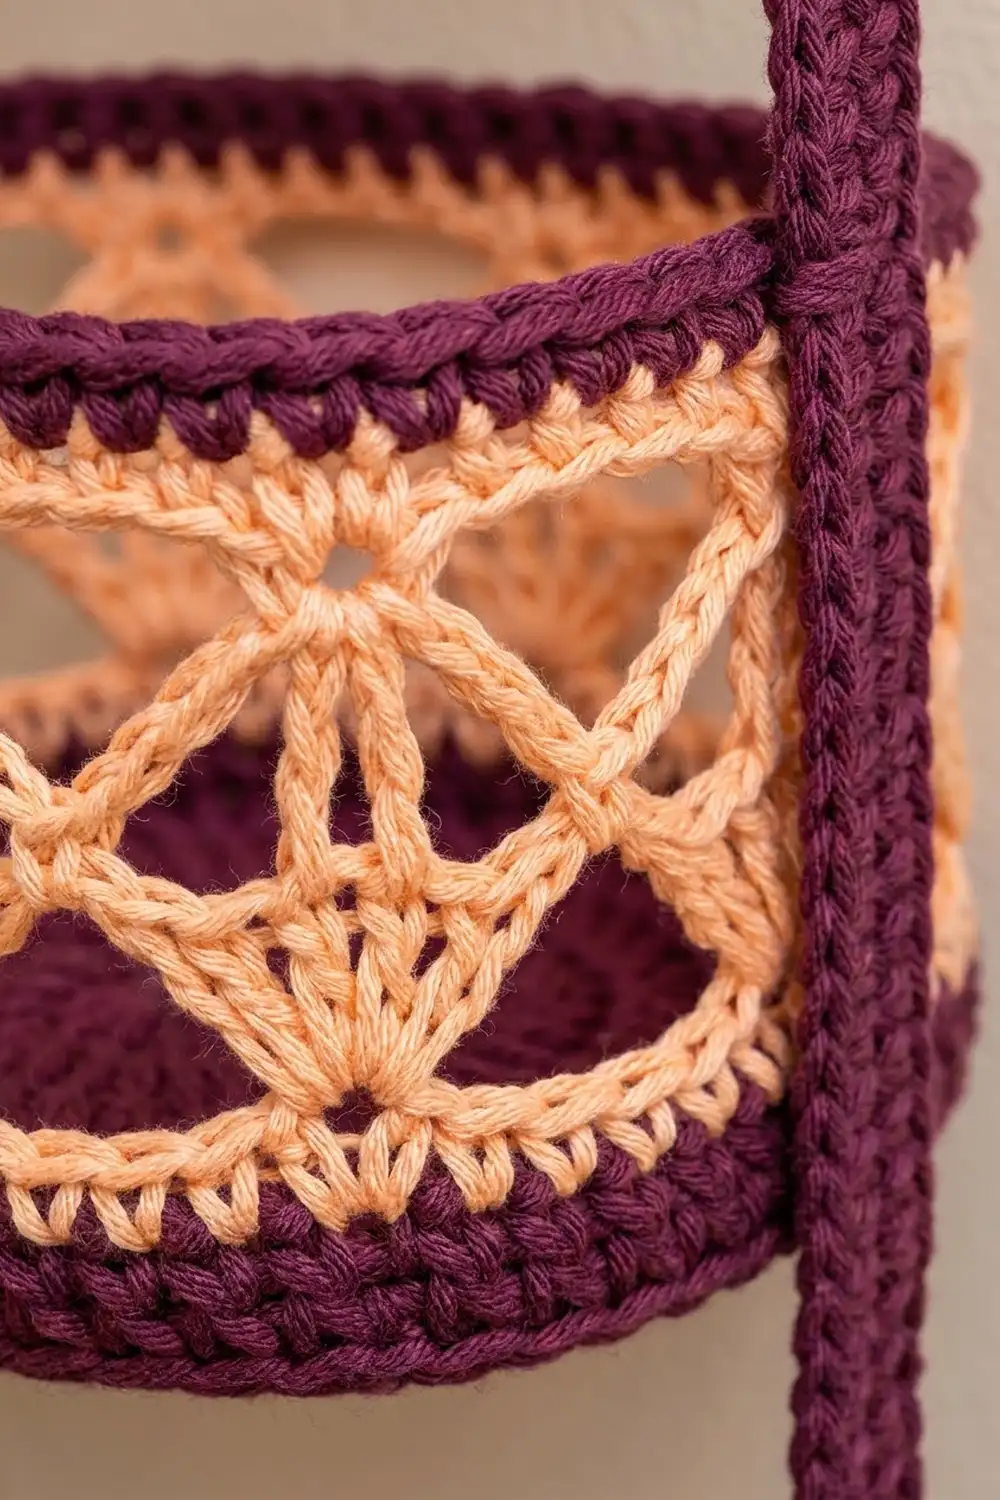
This three-tier hanging basket keeps spare toilet paper rolls tidy and easy to reach. It has three rounded-square baskets with solid plum bases, open peach lattice walls and a thick plum rim. Two plum straps with wooden rings hold the tiers together, and a short plum loop hangs the whole piece from a hook or peg rail.
The colors are a warm, saturated plum and a soft peach, so the holder feels both modern and a little vintage. The lattice is a diamond mesh with V-stitch “stars” where the lines meet, which keeps the walls light while the bases stay firm enough for a full roll.
The pattern uses US crochet terms. Each basket is 5.25 in (13.3 cm) square and 4 in (10.2 cm) tall. The assembled holder is about 5.5 in (14.0 cm) wide and 25 in (63.5 cm) tall from the top of the hanging loop to the bottom of the lowest basket.
You’ll work each base in joined rounds, crochet the wall straight up from the base, and finish with a corded rim. The straps are short-row strips worked off each wooden ring. They’re sewn to two opposite walls of each basket, and the hanging loop is crocheted from one ring to the other.
Finished Size and Construction
- Basket size: 5.25 in x 5.25 in x 4 in (13.3 cm x 13.3 cm x 10.2 cm)
- Assembled size: about 5.5 in (14.0 cm) wide x 25 in (63.5 cm) tall
- Skill level: Intermediate
- Terminology: US
- Yarn weight: Worsted (#4) cotton or cotton blend
- Hook: 4.5 mm (US 7)
- Number of pieces: 3 baskets, 2 side straps, 1 hanging loop
- Layout: 1 column of 3 baskets, stacked vertically
- Base size before trim round: 5 in (12.7 cm) square
- Base size after trim round: 5.25 in (13.3 cm) square
- Rim (border) depth: 0.75 in (1.9 cm)
Materials
Use a smooth worsted-weight cotton with about 85 m per 50 g. Cotton holds its shape well and won’t stretch under the weight of the rolls. Avoid fuzzy yarn because it hides the lattice.
- Color A, Plum: 120 g / 204 m (bases, wall bands, rims, straps, hanging loop)
- Color B, Peach: 60 g / 102 m (lattice walls)
These amounts include about a 25% margin, so one extra basket round or a longer strap won’t leave you short.
Tools:
– 4.5 mm (US 7) crochet hook
– 2 wooden rings, 1.5 in (3.8 cm) outer diameter
– Tapestry needle
– 4 locking stitch markers
– Measuring tape
– Rust-proof pins and a blocking mat
Abbreviations (US Terms)
- ch: chain
- sl st: slip stitch
- sc: single crochet
- dc: double crochet
- sk: skip
- sp: space
- st(s): stitch(es)
- BLO: back loop only
- rnd(s): round(s)
- rev sc: reverse single crochet (crab stitch)
Special stitch:
– V-st: (dc, ch 2, dc) in the same st.
Gauge and Checkpoints
Gauge: 16 dc x 8 rows = 4 in (10.2 cm). 16 sc x 16 rows = 4 in (10.2 cm).
Make one complete basket before starting the others. Check these measurements as you go:
- After Rnd 1: 1 in (2.5 cm) square
- After Rnd 3: 3 in (7.6 cm) square
- After Rnd 5: 5 in (12.7 cm) square
- After Rnd 6: 5.25 in (13.3 cm) square
- After Rnd 13: wall height from the base fold is 3 in (7.6 cm)
- Finished basket: 4 in (10.2 cm) tall
If your base is larger than 5.25 in (13.3 cm), go down to a 4 mm hook. If it’s smaller than 5 in (12.7 cm) after Rnd 6, a standard roll (about 4.5 in / 11.4 cm across) will feel tight, so go up to a 5 mm hook. Don’t add rounds to fix the size, because the 84-stitch count holds the lattice math together.
Basket (Make 3)
Base
Use Color A.
Rnd 1: Make a magic ring. Ch 3 (counts as dc), 2 dc in ring, ch 2, [3 dc in ring, ch 2] 3 times. Join with sl st to the top of the beginning ch-3. (12 dc, 3 dc per side, 4 ch-2 corners)
Rnd 2: Sl st in the next 2 dc and into the corner ch-2 sp. Ch 3 (counts as dc), (dc, ch 2, 2 dc) in the same sp. Dc in each dc across, (2 dc, ch 2, 2 dc) in the next corner sp; repeat from * 2 more times. Dc in each dc across to finish. Join. (28 dc, 7 dc per side)*
Rnd 3: Repeat Rnd 2, working into the new corner sps. (44 dc, 11 dc per side)
Rnd 4: Repeat Rnd 2. (60 dc, 15 dc per side)
Rnd 5: Repeat Rnd 2. (76 dc, 19 dc per side)
Checkpoint: the base measures 5 in (12.7 cm) square.
Rnd 6 (trim round): Ch 1. Sc in each dc around, and work 2 sc in each corner ch-2 sp. Join to the first sc. (76 sc worked 1 per dc + 8 sc added in corners = 84 sc, 21 per side)
Each side count of 21 includes 1 corner sc at each end. The 2-sc corners (instead of the usual 3) give the soft, rounded corners. Place a marker at the first and last st of each side.
Wall
Rnd 7 (base fold): Using Color A, ch 1, sc in BLO of each st around. Join. (84 sc)
The unworked front loops make a crisp fold line, so the wall stands upright.
Rnd 8: Ch 1, sc in each st around. Join. Fasten off Color A. (84 sc)
Rnd 9 (lattice set-up): Join Color B in any st. Ch 1, sc in the next st, ch 3, sk 2 sts, V-st in the next st, ch 3, sk 3 sts; repeat from * around. Join to the first sc. (12 sc, 12 V-sts)*
Each repeat uses 7 sts, so 12 repeats use all 84. That gives exactly 3 repeats per 21-stitch side.
Rnd 10: Sl st in each of the next 3 ch, sl st in the next dc, and sl st into the ch-2 sp of the V-st. Ch 1, sc in the ch-2 sp, ch 4, V-st in the next sc, ch 4; repeat from * around. The final V-st goes in the first sc of Rnd 9. Join to the first sc. (12 sc, 12 V-sts)*
This round shifts the pattern: each sc now sits above a V-st and each V-st above an sc. That offset is what forms the diamond lattice.
Rnds 11–13: Sl st in each of the next 4 ch, sl st in the next dc, and sl st into the ch-2 sp. Then repeat Rnd 10. (12 sc, 12 V-sts each round)
Checkpoint: the wall measures 3 in (7.6 cm) from the base fold.
Rnd 14 (trim round): Do not fasten off. Ch 1, sc in the next sc, 2 sc in the ch-4 sp, 2 sc in the ch-2 sp of the V-st, 2 sc in the next ch-4 sp; repeat from * around. Join. Fasten off Color B. (12 sc worked 1 per sc + 72 sc worked into spaces = 84 sc, 21 per side)*
Border (Basket Rim)
The rim is the border for each basket. It’s worked in Color A over the 84 sts of Rnd 14.
Border gauge: 4 sc = 1 in (2.5 cm), so 21 sc span one 5.25 in (13.3 cm) side.
Rnd 15: Join Color A in the first st of any side. Ch 1, sc in each st around. Join. (84 sc, 21 per side)
Rnd 16: Ch 1, sc in each st around. Join. (84 sc, 21 per side)
Rnd 17: Ch 1, rev sc in each st around. Join and fasten off. (84 rev sc, 21 per side)
Why the math works: The base perimeter is 84 sts, or 21 per side. The 7-stitch lattice repeat fits into 21 exactly 3 times, and Rnd 14 converts each 7-stitch repeat back into 7 sc. The rim starts on exactly the same 84-stitch count as the base. Because no stitches are added or lost, the walls stay straight and the rim matches the 5.25 in (13.3 cm) base. Rnds 15–17 add 0.75 in (1.9 cm), bringing the basket to its full 4 in (10.2 cm) height.
Side Strap (Make 2)
Use Color A.
Row 1: Join yarn around one wooden ring. Ch 1, work 3 sc into the ring. (3 sc)
Rows 2–72: Ch 1, turn, sc in each st across. (3 sc)
Fasten off, leaving a 24 in (61.0 cm) tail for sewing.
At 16 rows = 4 in (10.2 cm), the strap measures 18 in (45.7 cm) long and 0.75 in (1.9 cm) wide, not counting the ring. Mark these row positions:
- Rows 1–8: free strap, 2 in (5.1 cm)
- Rows 9–24: Basket 1, 4 in (10.2 cm)
- Rows 25–32: gap, 2 in (5.1 cm)
- Rows 33–48: Basket 2, 4 in (10.2 cm)
- Rows 49–56: gap, 2 in (5.1 cm)
- Rows 57–72: Basket 3, 4 in (10.2 cm)
Make All Pieces
- Color A: 3 bases with plum bands and rims, 2 side straps, 1 hanging loop (worked during assembly)
- Color B: 3 lattice walls
- Rings: 2
Layout (front view):
        /\        hanging loop
      O    O      rings
      |    |      free strap, 2 in
    [Basket 1]
      |    |      gap, 2 in
    [Basket 2]
      |    |      gap, 2 in
    [Basket 3]
Before assembling, check that all three baskets measure 5.25 in (13.3 cm) square and 4 in (10.2 cm) tall. If they don’t match, the tiers will tilt.
Joining
Strap placement: On each basket, pick two opposite sides. The strap covers the center 3 sts of each side, sts 10, 11 and 12 of the 21, which leaves 9 sts uncovered on each side of it. Pin a strap vertically over those stitches on one side and the second strap on the opposite side. Line up strap Row 9 with basket Rnd 17 (the rim) on Basket 1.
Stitch-to-stitch logic: The wall height (4 in / 10.2 cm) matches 16 strap rows, and the solid bands line up row-to-round:
- Strap rows 9–12 cover the rim and trim, Rnds 17–14.
- Strap rows 13–22 cover the lattice, Rnds 13–9.
- Strap rows 23–24 cover the plum band, Rnds 8–7.
Use the tail and a tapestry needle to whipstitch both long edges of the strap through every solid round (Rnds 7, 8, 14, 15, 16 and 17). Through the lattice, anchor the strap with 2 tight stitches at each sc and V-st that falls under it. Don’t sew across the open mesh, or it will pucker.
Repeat for Basket 2 (strap rows 33–48) and Basket 3 (strap rows 57–72). Weave the strap end under the base of Basket 3.
Tension: Sew firmly but don’t pull. The strap should lie flat with no waves, and the wall shouldn’t pinch inward.
Hanging loop: Join Color A around Ring 1. Ch 1, work 3 sc into the ring. Then work Rows 2–48 of sc, 3 sts each row. To finish, ch 1, turn, and work 3 sc through both the last row and Ring 2. Fasten off. (48 rows = 12 in / 30.5 cm)
Size checkpoint: Hang the holder empty. The rings sit about 5.25 in (13.3 cm) apart, the gaps between tiers measure 2 in (5.1 cm), and the total height is about 25 in (63.5 cm).
Final Blocking
- Weave in all ends securely, leaving no knots inside the baskets.
- Lightly spray each basket with water until it is damp but not soaked.
- Stuff each basket with a toilet roll wrapped in a plastic bag, or a 5 in (12.7 cm) box, to square the walls.
- Pull the lattice gently upward so the diamonds open evenly.
- Pinch the four corners so they’re rounded, not flat.
- Pin the straps flat, 18 in (45.7 cm) long, on the mat.
- Let everything dry completely, for 24 hours, before hanging.
Final Quality-Control Checklist
- Every base has 84 sts in Rnd 6, 21 per side.
- Every lattice round has 12 sc and 12 V-sts.
- Rnd 14 and all rim rounds have 84 sts.
- All baskets measure 5.25 in x 5.25 in x 4 in (13.3 cm x 13.3 cm x 10.2 cm).
- Both straps have 72 rows and measure 18 in (45.7 cm).
- Each strap is centered over sts 10–12 on its side.
- The gaps between tiers are 2 in (5.1 cm) on both straps.
- The hanging loop has 48 rows and is attached securely to both rings.
- The holder hangs level when empty.
Troubleshooting
- Base cups or ripples: Check your corner counts. Corners should have exactly 2 dc, ch 2 and 2 dc. A cupped base usually means a too-tight hook; ruffles mean too loose.
- Lattice slants: You’re starting each round in a different spot. Always sl st into the ch-2 sp before you begin.
- Wall flares outward: Your Rnd 14 count is over 84. Recount 7 sts per repeat.
- Corded rim ripples: Your rev sc is too loose. Go down half a hook size for Rnd 17 only.
- Basket tilts: One strap’s gap is a different length. Match the row markers on both straps.
- Strap stretches: Use 100% cotton and tighter sc, or work the straps with a 4 mm hook.
Care
Hand wash in cool water with mild soap, gently press out the water, and dry flat over a box form so the baskets stay square. Don’t put it in the dryer.

Final Notes
The measurements build on each other. A 5 in (12.7 cm) base after Rnd 5 becomes 5.25 in (13.3 cm) and 84 sts after the trim round. Those 84 sts carry the 7-stitch lattice up to a 4 in (10.2 cm) wall with a corded rim. The 18 in (45.7 cm) straps match 16 rows to each basket and 8 rows to each gap, and the 12 in (30.5 cm) loop finishes the hanger at about 25 in (63.5 cm) tall. If your counts and checkpoints match at each stage, the holder will hang level and fit standard rolls.
Happy crocheting!