

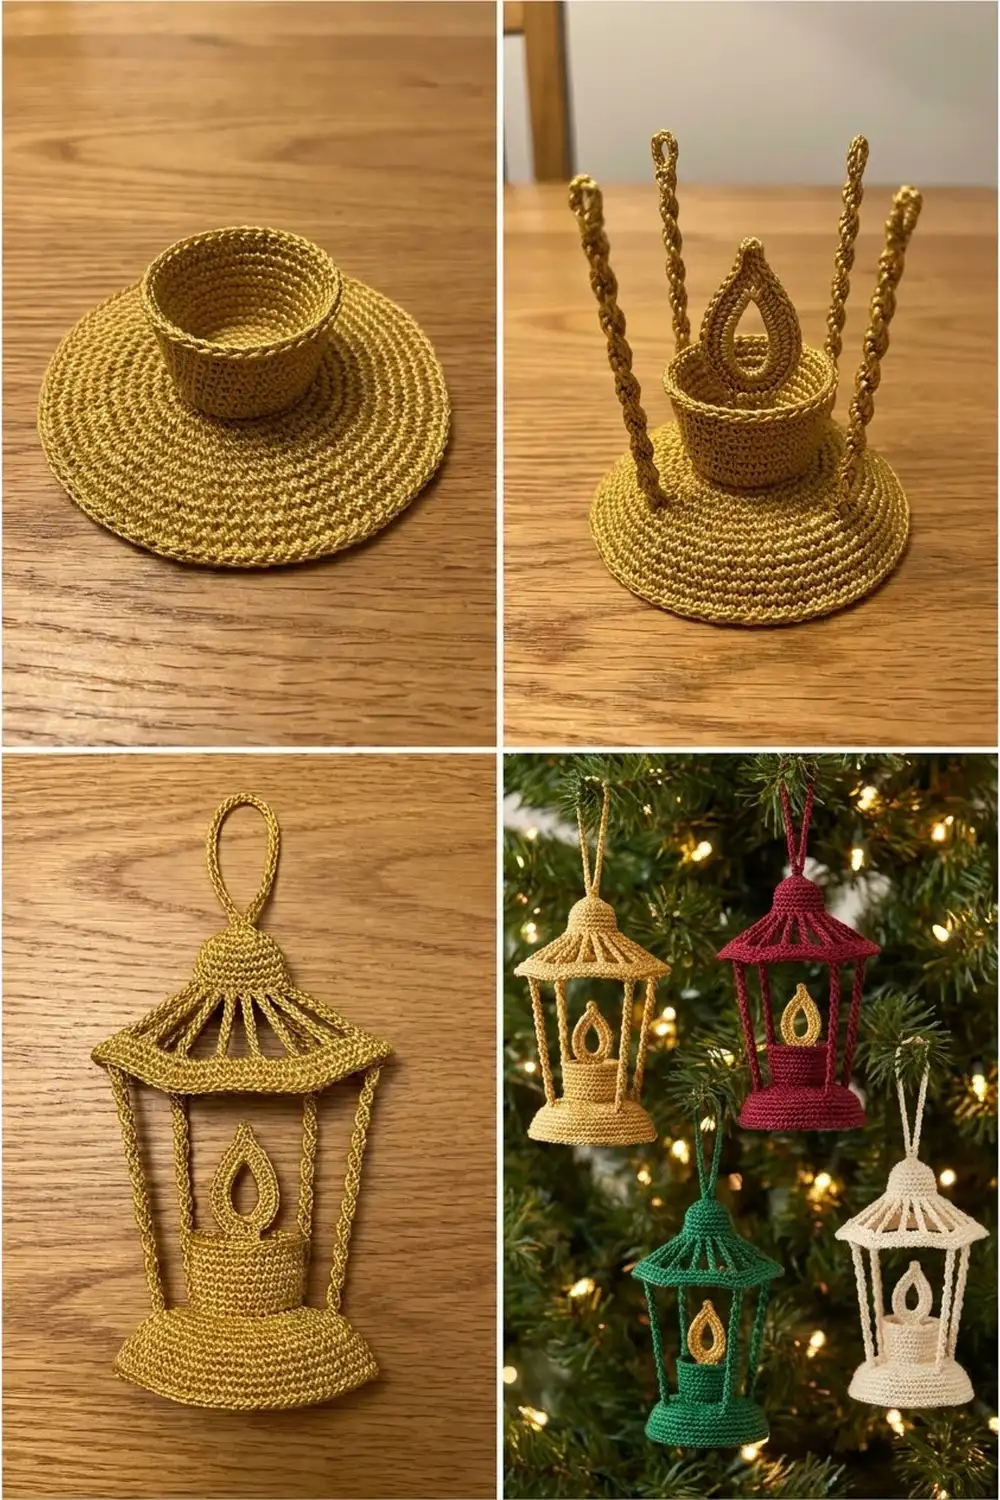
This little lantern is a flat, open-work ornament made in cotton crochet thread. It has a wide base, a candle cup with an open teardrop flame, two twisted-chain side posts and a spoked roof with a hanging loop. Because it’s lacy and see-through, tree lights glow through it.
The sample is in warm gold. The same pattern works in deep red, forest green or cream, and a mixed set of colors looks lovely together on a tree. Each lantern is one piece in one color.
This pattern uses US crochet terms. The finished lantern is 3 in (7.6 cm) wide and 3.75 in (9.5 cm) tall. With the hanging loop it’s 5 in (12.7 cm) tall.
You’ll work it in sections without any sewing. First comes the base and its edging, then the candle cup and flame. The roof is worked in rows and finished with an edging round and the hanging loop. Last, the two twisted-chain posts connect the base to the roof.
Finished Size and Construction
- Finished size: 3 in wide × 3.75 in tall (7.6 × 9.5 cm); 5 in (12.7 cm) tall with the loop
- Skill level: Easy-intermediate
- Terminology: US crochet terms
- Yarn weight: Size 3 cotton crochet thread (Super Fine #1)
- Hook: 2.25 mm (US B-1)
- Number of pieces: 1 (single ornament)
- Layout: Base at the bottom, two posts at the sides, roof on top, candle and flame centered inside
- Base size: 2.75 × 0.5 in (7.0 × 1.3 cm)
- Roof size before border: 2.75 × 1.125 in (7.0 × 2.9 cm)
- Roof border depth: 1 round of sc, about 0.125 in (0.3 cm)
Materials
Mercerized cotton thread in size 3 is the best choice. It’s crisp enough to keep the lantern’s straight lines and has a slight sheen that catches the light. Thread with a metallic strand also works, but test your gauge first because it tends to work up a little stiffer.
Thread per ornament (choose one color):
– Gold: 8 g / 13 m
– Deep red (optional variant): 8 g / 13 m
– Forest green (optional variant): 8 g / 13 m
– Cream (optional variant): 8 g / 13 m
These amounts include a margin for weaving in ends and for one test base.
Tools:
– 2.25 mm (US B-1) crochet hook
– Tapestry needle with a small eye
– Scissors
– Stitch markers (4)
– Fabric stiffener or spray starch
– Blocking board or foam mat, plus rustproof pins
– Ruler or measuring tape
Abbreviations (US Terms)
- ch – chain
- sl st – slip stitch
- sc – single crochet
- dc – double crochet
- tr – treble crochet
- st(s) – stitch(es)
- sp – space
- sk – skip
Special stitches
- Picot: Ch 3, then sl st in the 3rd ch from the hook.
- Twisted chain post: Make a chain. Then work back along it with a sl st in the back bump of each ch. This gives a firm, rope-like double strand.
Gauge and Checkpoints
Gauge: 8 dc or 8 sc = 1 in (2.5 cm). 10 ch = 1 in (2.5 cm).
Make the base first as your gauge test. Row 1 of the base (20 dc) should measure 2.5 in (6.4 cm). If it does, your gauge is correct for the whole ornament.
Checkpoints:
– Base Row 1 (20 dc): 2.5 in (6.4 cm) wide
– Base after edging: 2.75 × 0.5 in (7.0 × 1.3 cm)
– Candle cup rim (10 sc): 1.25 in (3.2 cm) wide
– Flame: about 1 in (2.5 cm) tall including the tip
– Roof Row 1 (22 sc): 2.75 in (7.0 cm)
– Roof Row 3 (15 sc): 1.875 in (4.8 cm)
– Roof cap (9 dc): 1.125 in (2.9 cm)
– Roof after edging: 3 × 1.25 in (7.6 × 3.2 cm)
– Posts (20 ch): 2 in (5.1 cm)
If your base is too big, go down one hook size to 2.0 mm. If it’s too small, go up to 2.5 mm. Measure again after a fresh test base. Chains often come out tighter than stitches. If your 20-ch post is shorter than 2 in (5.1 cm), add 1–2 ch to each post. Make sure both posts get the same number.

Section 1: Base
Row 1: Ch 22. Dc in the 4th ch from the hook and in each ch across. (20 dc; the skipped 3 ch count as the first dc.)
Round 2 (edging): Ch 1 and turn. Sc in each st across the top, including the top of the turning ch (20 sc). Work 5 sc around the post of the turning-ch end to round it. Rotate and work 1 sc in each foundation ch directly below a dc (20 sc). Work 5 sc around the post of the last dc. Sl st to the first sc to join.
(50 sc: 20 top + 5 end + 20 bottom + 5 end.)
Fasten off and leave a 6 in (15.2 cm) tail.
Number the top-edge sc from 1 to 20, starting from the first sc of Round 2. Place markers in sc 3 and sc 18. These are the post positions.
Checkpoint: 2.75 × 0.5 in (7.0 × 1.3 cm). The 5-sc ends should curve smoothly and lie flat without ruffling.
Section 2: Candle Cup
You’ll work this section on the top edge of the base, over sc 7–14. That leaves 6 sts free on each side (sc 1–6 and sc 15–20), so the cup sits exactly in the center.
Row 1: With the top edge facing, join the thread with a sl st in sc 7. Ch 3 (counts as the first dc), then dc in sc 8–14. (8 dc)
Row 2 (rim): Ch 1 and turn. Work 2 sc in the first dc, sc in the next 6 dc, and 2 sc in the top of the ch-3.
(10 sc: 8 worked 1-per-stitch + 2 extra for the flare.)
The 2 extra stitches make the rim slightly wider than the cup, which gives it the flared shape. Don’t fasten off.
Checkpoint: The rim measures 1.25 in (3.2 cm) and the cup is about 0.5 in (1.3 cm) tall.
Section 3: Flame
Row 1 (loop): Turn and sl st in each of the first 5 rim sc. Ch 18, then sl st in rim sc 6. (18-ch loop rising from the center of the rim)
Row 2 (doubling and tip): Work back along the loop. Sl st in the back bump of each of the next 9 ch, then make 1 picot for the flame tip. Sl st in the back bump of each of the remaining 9 ch. Sl st in rim sc 5.
(18 sl st + 1 picot)
Fasten off and leave a 6 in (15.2 cm) tail. Placing the picot exactly halfway up the loop gives the flame its pointed tip. During blocking you’ll pinch the sides of the loop into a teardrop.
Checkpoint: The flame stands about 1 in (2.5 cm) tall, and the picot sits straight above the center of the cup.
Section 4: Roof
Row 1 (eave): Ch 23. Sc in the 2nd ch from the hook and in each ch across. (22 sc)
Row 2 (spokes): Ch 4 and turn (counts as the first tr, in sc 1). Ch 1, sk 2 sc, tr in the next sc. Repeat from * 6 more times, so the tr land in sc 4, 7, 10, 13, 16, 19 and 22.
(8 tr + 7 ch-1 sps = 15 sts)
Each spoke has 3 sts of space at its base but only 2 sts (1 tr + 1 ch) at its top. That’s why the spokes lean inward and form the sloped roof. The roof narrows from 22 sts at the bottom to 15 sts at the top, which is 3.5 sts in from each side.
Row 3: Ch 1 and turn. Sc in the first tr. Sc in the next ch-1 sp, sc in the next tr. Repeat from * 6 more times, working the last sc in the top of the ch-4.
(15 sc: 1 + 7 × 2)
Row 4 (cap): Turn without chaining. Sl st in each of sc 1–4. Ch 3 (counts as the first dc, sitting on sc 4), then dc in sc 5–12.
(9 dc; sc 1–3 have only sl sts on top and sc 13–15 are unworked.)
Exactly 3 sts are left on each side, so the cap is centered.
Row 5: Ch 1 and turn. Sc in each dc. (9 sc)
Don’t fasten off. Go straight on to the border.
Checkpoint before border: 2.75 in (7.0 cm) wide at the eave, 1.875 in (4.8 cm) across Row 3 and about 1.125 in (2.9 cm) tall.
Border: Roof Edging and Hanging Loop
Border gauge: 8 sc = 1 in (2.5 cm). This is the same as the body gauge, so the edging won’t pull or ruffle.
Edging round: Ch 1. Working down the first side:
– 3 sc along the cap edge (1 sc in the end of Row 5, 2 sc in the end of Row 4)
– 1 sc in each of the 3 Row 3 sts on this side (work into the sl sts if this is the slip-stitched side)
– 5 sc around the post of the end tr (or the ch-4)
– 3 sc in the end of Row 1 for the rounded eave corner
First side total: 14 sc
Bottom: 1 sc in each free loop of the foundation ch. (22 sc)
Second side: 3 sc in the end of Row 1 (corner), 5 sc around the end tr post, 1 sc in each of the 3 Row 3 sts, and 3 sc up the cap edge.
Second side total: 14 sc
Top and hanging loop: Sl st in each of sc 1–5 of Row 5. Ch 24, then sl st again in sc 5. Sl st in sc 6–9.
(10 sl st + a 24-ch loop)
Fasten off and leave an 8 in (20.3 cm) tail.
Edging total: 14 + 22 + 14 = 50 sc, plus 10 sl st across the top.
Why the math works: The bottom edge has exactly 1 sc per foundation chain, so it stays 22 sts wide, which is 2.75 in (7.0 cm). Each 3-sc corner adds about 0.125 in (0.3 cm) to each side, so the roof finishes at 3 in (7.6 cm). The 5 sc around each tr fit the long, slanted side of the spoke without cupping. On top, the 1-sc border plus the slip stitches add about 0.125 in (0.3 cm), so the roof ends up 1.25 in (3.2 cm) tall. A 24-ch loop folded in half rises about 1.25 in (3.2 cm).
Number the 22 bottom-edge sc from 1 to 22 in the same direction as the base numbering. Mark sc 4 and sc 19.
Section 5: Twisted-Chain Posts
The roof’s 22 bottom sc sit centered over the base’s 20 top sc. That means roof sc 4 lines up over base sc 3, and roof sc 19 lines up over base sc 18. Both posts come out perfectly vertical.
Left post: Join the thread with a sl st in base sc 3. Ch 20, then sl st in roof bottom sc 4. Sl st in the back bump of each of the 20 ch going back down, then sl st in base sc 3. (20 ch + 20 sl st) Fasten off.
Right post: Work it the same way, from base sc 18 to roof sc 19.
Checkpoint: Each post is 2 in (5.1 cm) long, and both posts are the same length. The flame tip should sit about 0.5 in (1.3 cm) below the roof’s bottom edge.
Full checkpoint: 0.5 in base + 2 in posts + 1.25 in roof = 3.75 in (9.5 cm) tall, and 3 in (7.6 cm) wide at the eave.
Final Blocking
- Weave in all ends along the stitch lines. Hide the post tails inside the twisted chains.
- Mix the fabric stiffener according to the label, or prepare spray starch.
- Dip the lantern, or spray it well, then press out the excess liquid with a towel.
- Lay it on the blocking board. Pin the base flat at 2.75 in (7.0 cm) wide.
- Pin the posts so they’re straight and parallel, 2 in (5.1 cm) long, and pin the eave corners at 3 in (7.6 cm) apart.
- Space the roof spokes evenly and pin the cap straight.
- Shape the flame: pin the picot tip straight up, then pinch the lower sides into a round teardrop.
- Pin the hanging loop into a neat oval.
- Let it dry completely, 12–24 hours, before you take out the pins.
Final Quality-Control Checklist
- Base Row 1 has 20 dc and the base edging has 50 sc
- The cup is centered over sc 7–14, with 6 free sts on each side
- The rim has 10 sc and flares slightly
- The flame picot sits straight above the center of the cup
- The roof has 8 spokes, and Row 3 has 15 sc
- The cap has 9 dc, centered with 3 sts free on each side
- The roof edging has 14 + 22 + 14 sc
- The posts are vertical and equal, 2 in (5.1 cm) each
- The ornament measures 3 × 3.75 in (7.6 × 9.5 cm)
- All ends are secure and invisible
Troubleshooting
The base curls: The ch-22 foundation was too tight. Redo it with a hook one size larger for the chain only.
The rounded base ends ruffle: Use 4 sc around each end post instead of 5. The total becomes 48 sc, which is fine.
The roof spokes don’t lean in: Check that you skipped 2 sc between spokes. Row 2 must have exactly 8 tr.
The roof cap is off-center: Count again: sl st over sc 1–4 and dc over sc 4–12.
The posts are slanted: Make sure you used base sc 3 and 18 and roof sc 4 and 19.
The flame is lopsided: The picot isn’t at the 9th chain. Work Row 2 of the flame again.
The posts sag after blocking: Use more stiffener and dry the ornament flat.
Care
Hand-wash gently in cool water, then re-block and re-stiffen. Store flat in tissue so the roof and posts keep their shape.
Final Notes
Everything in this lantern follows from the gauge of 8 sts = 1 in (2.5 cm). The 20-dc base row gives a 2.75 in (7.0 cm) base, and the 22-sc eave gives a 3 in (7.6 cm) roof once the edging is on. The 20-ch posts add 2 in (5.1 cm), for a finished body of 3 × 3.75 in (7.6 × 9.5 cm), or 5 in (12.7 cm) tall with the loop. If your first base measures correctly, the rest will fall into place.
Happy crocheting!