
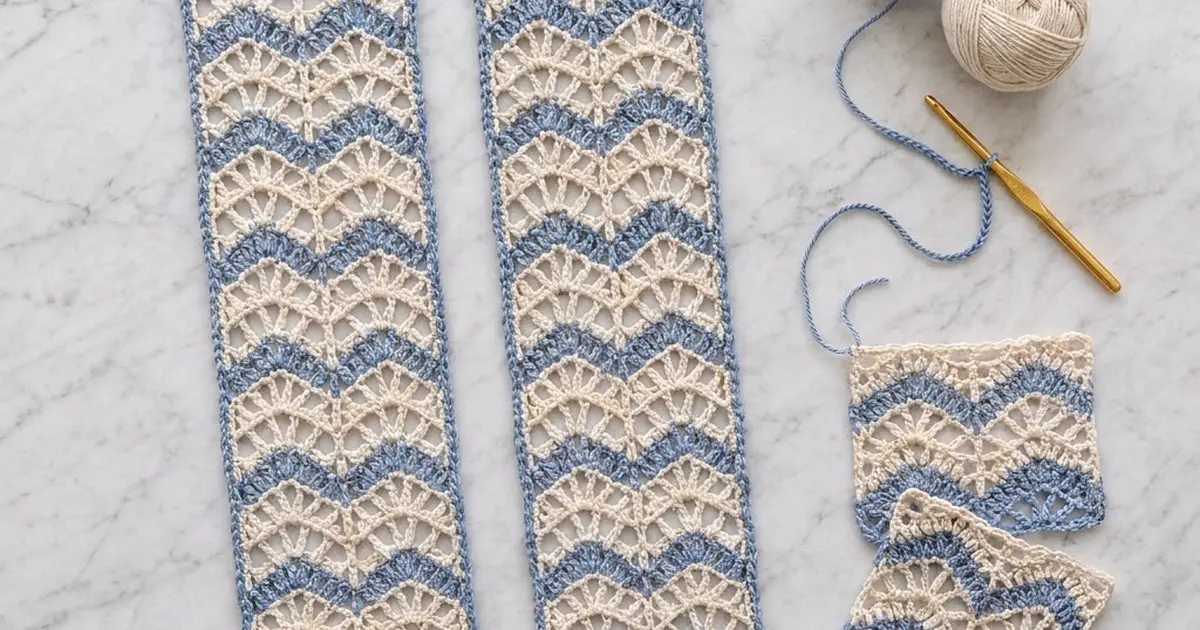
Coastal Fan Wave is a pair of lace door curtain panels in cornflower blue and cream. Columns of fans run down each panel, and the blue rows cross them every few inches, so the stripes look like small waves. The lace lets light through, and the panels give a doorway some privacy and a soft cottage-style look.
Each panel starts at the top with a solid blue band and works down to a bottom edge of blue fans, which form a natural scalloped hem. A two-round blue sc border finishes all four sides, and three sturdy loop tabs hold the panel on a rod.
This pattern uses US crochet terms. Each finished panel measures 16 in wide x 77 in long (40.6 x 195.6 cm) before the tabs. Hung side by side, the pair covers 32 in (81.3 cm) when closed.
Each panel is made in one piece, top down, in rows. You crochet a foundation dc band, work a two-row fan lace pattern with color stripes, edge the panel with sc, and add the tabs last. The two panels are made the same way and hang separately.
Finished Size and Construction
- Finished panel size: 16 x 77 in (40.6 x 195.6 cm)
- Skill level: Intermediate
- Terminology: US crochet terms
- Yarn weight: Worsted (#4) cotton
- Hook: 5.5 mm (US I-9)
- Number of pieces: 2 identical panels
- Layout: 2 panels hung side by side, not seamed
- Panel size before border: 15 x 76 in (38.1 x 193.0 cm)
- Border depth: 1/2 in (1.3 cm) on each side
- Tabs: 3 per panel; each loop rises about 2 in (5.1 cm) above the top edge
Materials
Yarn: Use a worsted-weight cotton or cotton blend of about 190 m per 100 g. Cotton holds the fan shapes, blocks crisply and washes well, which matters for a curtain that gets handled every day. Mercerized cotton gives a slight sheen. Matte cotton looks softer and more rustic.
- Color A, Cream: 750 g (about 1,425 m)
- Color B, Cornflower Blue: 500 g (about 950 m)
These amounts cover both panels and include roughly a 10% margin for swatching and joining in new yarn.
Tools:
– 5.5 mm (US I-9) crochet hook
– Tapestry needle
– Stitch markers (at least 6)
– Measuring tape
– Rust-proof pins and a large blocking surface (foam mats or a clean carpet with a towel)
– Spray bottle
– Scissors
Abbreviations (US Terms)
- ch: chain
- sl st: slip stitch
- sc: single crochet
- dc: double crochet
- sc2tog: single crochet 2 together
- sk: skip
- st(s): stitch(es)
- sp: space
- tch: turning chain
- RS / WS: right side / wrong side
Special stitches:
– V-st: (dc, ch 1, dc) in the same st or sp.
– Shell: 9 dc in the same st.
– Edge half-V: At the start of a row, ch 3 (counts as dc) and work 1 dc in the first st. At the end of a row, work 2 dc in the last st or tch.
Gauge and Checkpoints
- Dc gauge: 13 dc and 8 dc rows = 4 in (10.2 cm)
- Lace gauge: 1 lace repeat (16 sts) = 5 in (12.7 cm) wide; 8 lace rows = 5 in (12.7 cm) tall
- Border gauge: 16 sc = 5 in (12.7 cm)
Test one piece first. Rather than making a separate swatch, use the first 14 rows of Panel 1 as your test. That section has the band, one full cream stripe and one blue stripe, so it tells you everything about width and row height. Block it lightly with a spray bottle and measure:
- After Row 2: 15 in (38.1 cm) wide, 1 in (2.5 cm) tall
- After Row 14: 15 in (38.1 cm) wide, 8.5 in (21.6 cm) tall
- After Row 62: 38.5 in (97.8 cm) tall
- After Row 122: 15 x 76 in (38.1 x 193.0 cm)
- After the border: 16 x 77 in (40.6 x 195.6 cm)
If your piece is more than 1/2 in (1.3 cm) too wide after Row 14, switch to a 5.0 mm hook and restart. If it is more than 1/2 in (1.3 cm) too narrow, switch to a 6.0 mm hook. Row height is a little more forgiving because blocking can lengthen lace. Still, if Row 14 measures under 8 in (20.3 cm), try loosening the ch-4 arches before you change hooks.
Panel Pattern (Make 2)
Each row starts with its own turning chain. The ch 3 counts as the first dc throughout.
Color sequence:
– Rows 1–2: Blue (B)
– Rows 3–6: Cream (A)
– Rows 7–8: Blue (B)
– Repeat Rows 3–8 nineteen more times, for 20 stripe repeats in total, ending with Row 122 in Blue.
To change color, work the last yarn over of the final st of the row with the new color. Every color change happens at the end of an even-numbered row, so all changes fall on the same side edge. Carry the unused color loosely up that edge instead of cutting it. The border will hide it.
Top Band
Foundation: With B, ch 51.
Row 1 (RS): Dc in 4th ch from hook (the 3 skipped ch count as the first dc), then dc in each ch across. Turn. (49 dc)
Row 2: Ch 3, sk first st, dc in each st across, ending with dc in top of tch. On the final yarn over, change to A. Turn. (49 dc)
Checkpoint: the band measures 15 in (38.1 cm) wide and 1 in (2.5 cm) tall.
Lace Set-Up
The 49 sts divide into 3 repeats of 16 sts, plus 1. Counting the first st as st 0, the “boundary” sts (where the V-sts go) are sts 0, 16, 32 and 48. The “center” sts (where the fan columns sit) are sts 8, 24 and 40.
Row 3 (RS, connector row): Ch 3, dc in first st (edge half-V made). Ch 4, sk 7 sts, sc in next st (center), ch 4, sk 7 sts, V-st in next st (boundary). Repeat from * once more. Then ch 4, sk 7 sts, sc in next st, ch 4, sk 7 sts, 2 dc in top of tch. Turn.
(3 sc, 2 V-sts, 6 ch-4 sps, and 2 edge half-Vs)
Two-Row Lace Repeat
Row 4 (WS, shell row): Ch 3, dc in first dc (edge half-V). Sk ch-4 sp, shell in next sc, sk ch-4 sp, V-st in ch-1 sp of next V-st. Repeat from * once more. Then sk ch-4 sp, shell in next sc, sk ch-4 sp, 2 dc in top of tch. Turn.
(35 dc including tch: 3 shells of 9 dc = 27, 2 V-sts = 4 dc, 2 edge half-Vs = 4 dc; plus 2 ch-1 sps)
Row 5 (RS, connector row): Ch 3, dc in first dc (edge half-V). Ch 4, sc in 5th (center) dc of next shell, ch 4, V-st in ch-1 sp of next V-st. Repeat from * once more. Then ch 4, sc in 5th dc of last shell, ch 4, 2 dc in top of tch. Turn.
(3 sc, 2 V-sts, 6 ch-4 sps, and 2 edge half-Vs; same count as Row 3)
Row 6: Work as Row 4, changing to B at the end. (35 dc + 2 ch-1 sps)
Row 7: Work as Row 5 in B.
Row 8: Work as Row 4 in B, changing to A at the end.
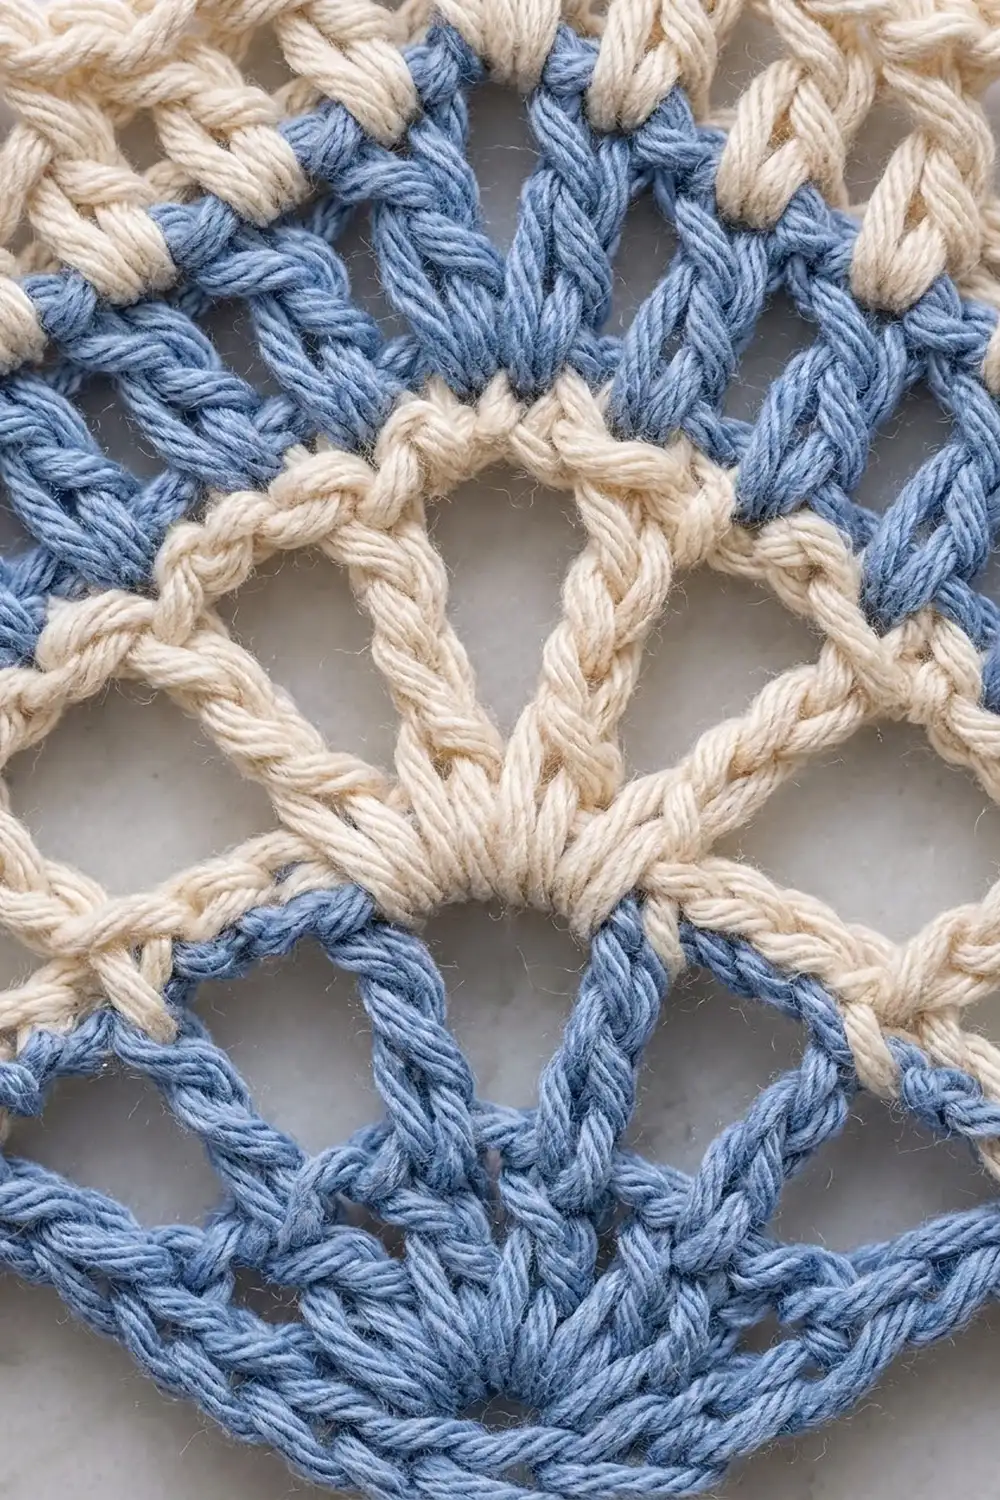
Each shell is worked into the sc that sits on the center of the shell below, so the fans stack in straight vertical columns. Each V-st is worked into the V-st below, which builds the straight dividing lines between the columns. The ch-4 arches link each fan to its neighbors. Because each fan opens downward, its curved lower edge reads as a small wave, and the blue rows outline one wave in every stripe repeat.
Rows 9–122: Repeat Rows 3–8 nineteen more times. Every repeat of Row 3 after the first is worked as Row 5 (sc in the 5th dc of each shell, V-st in each ch-1 sp), because from then on you are working into a shell row, not the dc band. Rows 9–12 are in A and Rows 13–14 in B, and so on. Row 122 is a blue shell row. Do not fasten off B.
Checkpoint after Row 122: 15 x 76 in (38.1 x 193.0 cm), with 61 shell rows per fan column and three blue fans along the bottom edge.
Make All Pieces
Make 2 identical panels. Per panel, before the margin, you will use about:
- Cream (A): 340 g, for 80 lace rows
- Blue (B): 210 g, for 2 band rows, 40 lace rows, the border and the tabs
Layout (as hung, from the front):
   o      o      o          o      o      o     <- tabs
+------------------+     +------------------+
|     PANEL 1      |     |     PANEL 2      |
|  16 in x 77 in   |     |  16 in x 77 in   |
| (40.6 x 195.6cm) |     | (40.6 x 195.6cm) |
+--\/--\/--\/------+     +--\/--\/--\/------+
     scalloped hem            scalloped hem
The grid is 2 panels across and 1 panel down. Closed, the pair is 32 in (81.3 cm) wide.
Joining (Panels Hang Separately)
The panels are not seamed to each other. Leaving them separate lets you draw one panel aside, as in a classic door curtain. What matters instead is that the two panels match row for row.
- Method: Hang both panels from the same rod by their tabs. Nothing is sewn.
- Stitch-to-stitch logic: Both panels have exactly 122 rows and 49 top sts, so the stripes line up across the doorway. Count rows by stripe: after every 6 rows there should be one blue stripe, 20 stripes in total.
- Tension advice: Make both panels with the same hook, and preferably from the same dye lots. If you take a long break between panels, re-measure your first 14 rows on Panel 2 against Panel 1 before continuing.
- Size checkpoint: Lay the bordered panels side by side. Their lengths should match within 1/2 in (1.3 cm), and their blue stripes should sit at the same heights within 1/4 in (0.6 cm).
Border
The border is 2 rounds of sc in B, followed by the tabs. Border gauge is 16 sc = 5 in (12.7 cm). The 2 rounds add 1/2 in (1.3 cm) on every side.
Continue with the B still attached at the end of Row 122, or join B at any corner. Each corner is a group of 3 sc worked into the corner st. In the counts below, “between corners” means the sts outside those groups.
Round 1 (RS): Ch 1. Work 3 sc in the outermost st of Row 122 (corner).
- Bottom edge: Sc in next dc. Sc in each of the 9 dc of the shell, then sc2tog over the 2 dc of the next V-st, skipping its ch-1 sp. Repeat from * once more. Sc in each of the 9 dc of the last shell, then sc in the next dc. (31 sc between corners)
- Corner: 3 sc in the outermost st.
- First side: 2 sc in each row end up to the top: 122 rows x 2. (244 sc)
- Top corner: 3 sc in the first foundation ch.
- Top edge: Sc in each of the next 47 foundation chs. (47 sc)
- Top corner: 3 sc in the last foundation ch.
- Second side: 2 sc in each row end down to the bottom. (244 sc)
- Sl st to the first sc.
Round 1 total: 12 corner sc + 31 + 244 + 47 + 244 = 578 sc
Round 2: Ch 1, sc in each st around, working 3 sc in the center sc of each corner group. Sl st to the first sc.
- Between corner centers: 33 bottom, 246 per side, 49 top
- Round 2 total: 12 + 33 + 246 + 49 + 246 = 586 sc (578 + 8)
Fasten off.
Why the math works:
– Top: 49 sts across the top of Round 1 (47 sc plus the 2 corner-center sc), one for each foundation st, so the band neither stretches nor ruffles.
– Sides: Every 2 lace rows measure 1.25 in (3.2 cm) and take 4 sc. That is 3.2 sc per inch, exactly the border gauge, so the 244 sc ease onto the 76 in (193.0 cm) side.
– Bottom: Each sc2tog at a V-st pulls the valley in, so the three blue fans stand out as clear scallops.
Tabs (make 3): With RS facing, mark sts 3, 25 and 47 of the 49 top sts of Round 2.
- Join B in the first marked st, ch 18, and sl st in the same st to form a loop.
- Ch 1, work 26 sc firmly into the ch-18 loop, and sl st in the same base st.
- Fasten off, leaving a 6 in (15.2 cm) tail.
- Repeat in sts 25 and 47.
The tabs are 22 sts, about 6.9 in (17.5 cm), apart. Each finished loop rises about 2 in (5.1 cm) and fits rods up to 1.25 in (3.2 cm) across. Use the tails to stitch through the base of each tab twice for strength.
Final Blocking
- Weave in all ends along the border or inside the dc, keeping them out of the open lace.
- Soak each panel in cool water for 15 minutes, then press the water out gently. Never wring it.
- Roll the panel in towels to remove excess water.
- Lay it flat on mats. Because a panel is long, block it in two halves if needed, keeping the wet half supported.
- Pin the side edges straight to 16 in (40.6 cm) apart, checking the width every 10 in (25.4 cm).
- Ease the length to 77 in (195.6 cm). Don’t over-stretch: the lace drops a little once it hangs.
- Pin the point of each bottom scallop, and open each fan evenly.
- Let it dry completely, then unpin and block the second panel to match.
Final Quality-Control Checklist
- Each panel measures 16 x 77 in (40.6 x 195.6 cm).
- Both panels have 122 rows and 20 blue stripes.
- Each fan column runs straight from top to bottom.
- The V-st lines are vertical and not drifting.
- Every shell row has 35 dc plus 2 ch-1 sps.
- The border counts are 578 sc (Round 1) and 586 sc (Round 2).
- The three bottom scallops are even and pinned symmetrically.
- The three tabs are evenly spaced and reinforced.
- The carried yarn on the side edge is fully hidden by the border.
Troubleshooting
- The fans lean sideways: You placed the sc in the wrong dc. Always count to the 5th dc of the 9.
- The panel is narrowing: You are missing an edge half-V. Every row needs 2 dc at each end.
- The arches pucker: Your chains are tight. Loosen the ch-4s, or go up 0.5 mm for the connector rows only.
- The side edge ripples after the border: You worked more than 2 sc per row end. Rework at exactly 2.
- The scallops look flat: You skipped the sc2tog at the V-sts in Round 1.
- The panels differ in length: Block the shorter panel slightly longer, up to 1/2 in (1.3 cm).
Care
Hand wash or machine wash on a cool delicate cycle in a mesh bag, then lay flat to dry and reshape the scallops. Avoid hanging the panels to dry while wet, because the weight will stretch the lace.

Final Notes
The measurement chain for each panel works like this:
- The 49-dc band sets the 15 in (38.1 cm) width.
- 120 lace rows at 1.25 in (3.2 cm) per pair, plus the band, make 76 in (193.0 cm).
- Two rounds of sc add 1/2 in (1.3 cm) on each side, for 16 x 77 in (40.6 x 195.6 cm).
- Three tabs carry the panel on the rod.
If you check those numbers at each stage, the second panel will match the first.
Happy crocheting!