

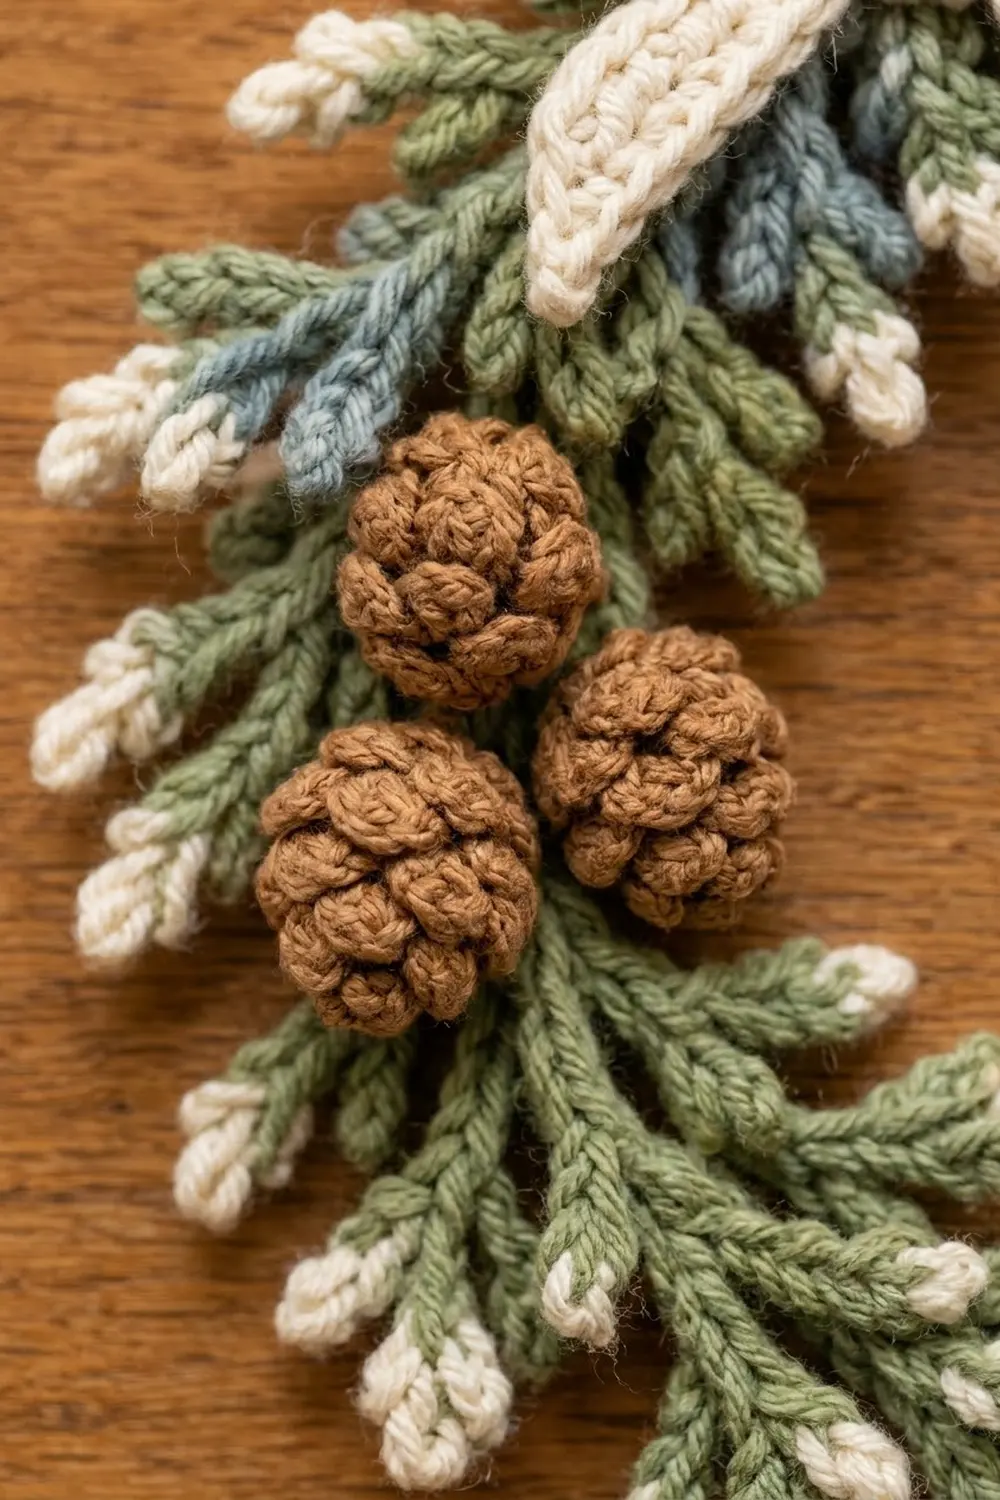
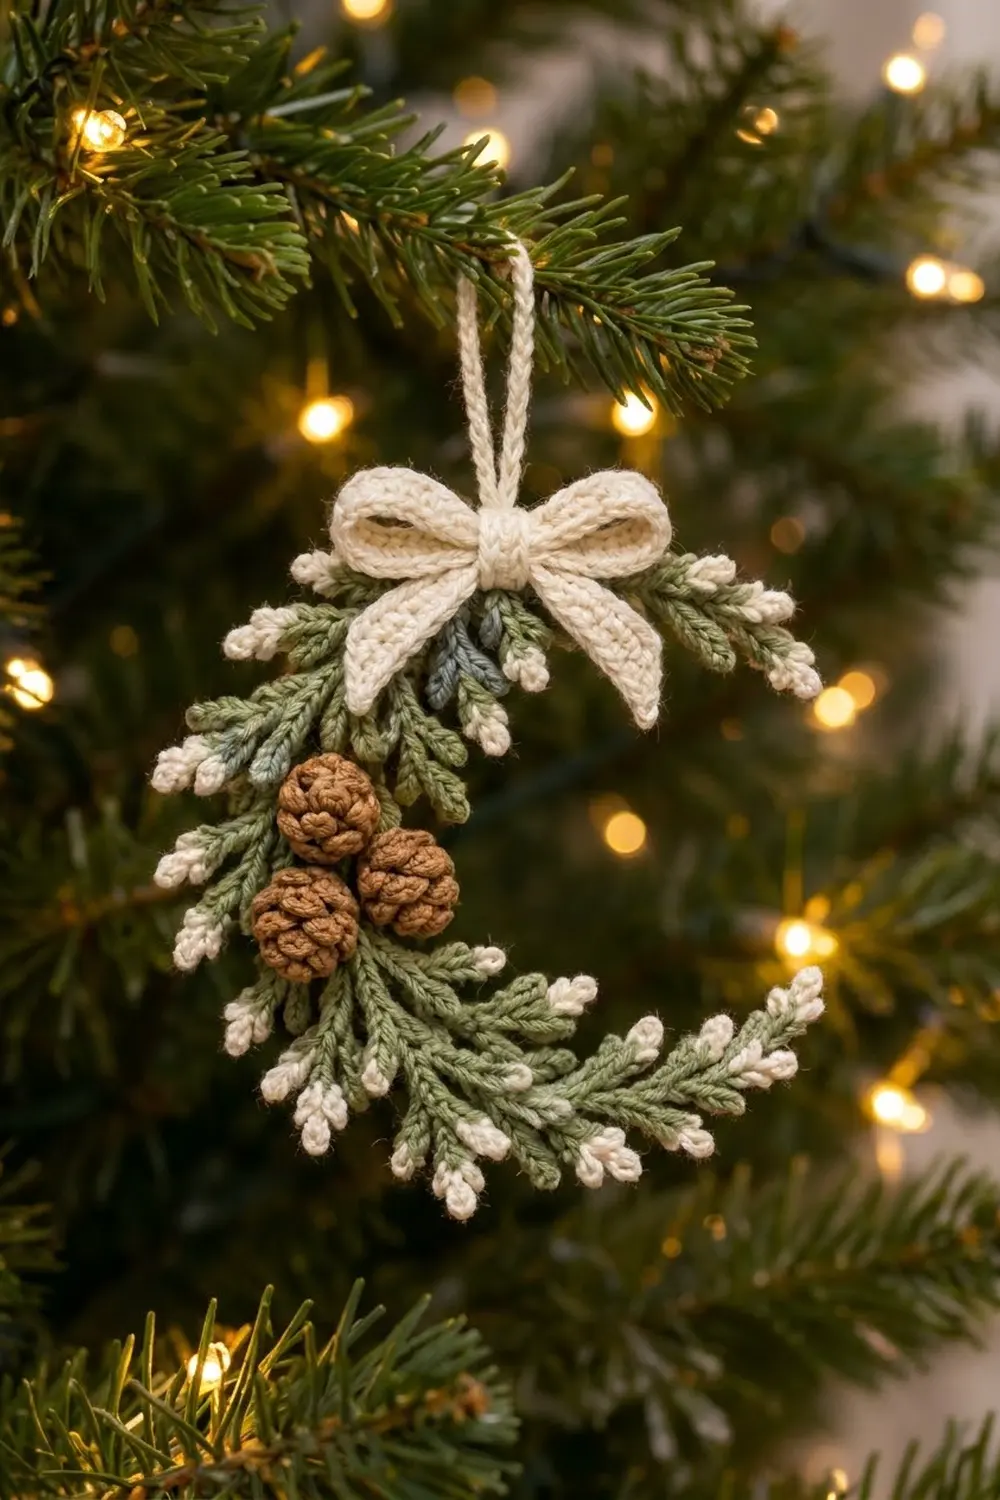
This small crescent wreath ornament looks like a sprig of winter greenery caught in the first frost. Sage green evergreen sprigs fan out along a curved base, and each sprig is tipped with tiny cream “snow” puffs. Three textured brown pinecones sit on the left curve, and a soft cream bow with a matching hanging loop sits at the top.
The colors are calm and natural: sage green, cream, warm brown, and a little dusty blue-gray in two sprigs under the bow. The style is rustic and Scandinavian, and the ornament works on a tree, a gift box or a door handle.
This pattern uses US crochet terms. The finished crescent is 5 in (12.7 cm) tall and 4 in (10.2 cm) wide. With the loop, the whole ornament is 7 in (17.8 cm) tall.
You’ll crochet a short single crochet base cord, a set of slip-stitch sprigs, three small stuffed pinecones, a three-part bow and a slip-stitch hanging loop. Then you sew everything to the curved cord and add the frosted tips last as the “border.”
Finished Size and Construction
- Finished size: 5 in (12.7 cm) tall x 4 in (10.2 cm) wide crescent; 7 in (17.8 cm) tall with the loop
- Skill level: Easy-intermediate
- Terminology: US crochet terms
- Yarn weight: DK (#3), cotton or cotton blend
- Hook: 3.5 mm (E-4)
- Number of pieces: 20 parts joined into one ornament: 1 base cord, 12 sprigs, 3 pinecones, 3 bow parts and 1 hanging loop
- Layout: Crescent opening to the right, with the bow at the top and the pinecone cluster on the left curve
- Piece size: Small sprig 2.4 in (6.1 cm); large sprig 3.6 in (9.1 cm); base cord 8 in (20.3 cm)
- Size before border: 4.75 in (12.1 cm) tall x 3.75 in (9.5 cm) wide
- Border depth: About 0.125 in (0.3 cm) of frost puffs on each edge
Materials
Use a smooth, tightly plied DK cotton or cotton blend. The sprigs are almost all slip stitches, so clear stitch definition matters. Fuzzy yarn will blur the needles.
- Sage green (main): 12 g, about 30 m
- Cream (frost, bow, loop): 6 g, about 15 m
- Warm brown (pinecones): 3 g, about 8 m
- Dusty blue-gray (accent sprigs): 2 g, about 5 m
These amounts include a margin of about 20% for swatching and for the long sewing tails.
Tools:
- 3.5 mm (E-4) crochet hook
- Tapestry needle
- A small pinch of fiberfill
- Scissors
- Stitch markers
- Rustproof pins and a foam blocking mat
- Spray bottle with water
- Optional: spray starch
Abbreviations (US Terms)
- ch: chain
- sl st: slip stitch
- sc: single crochet
- inc: 2 sc in the same stitch
- sc2tog: single crochet 2 stitches together
- BLO / FLO: back loop only / front loop only
- MR: magic ring
- st(s): stitch(es)
- RS / WS: right side / wrong side
Special stitches:
- Needle (ndl): Ch 4, then sl st in the back bump of the 2nd ch from the hook and of the next 2 ch. This makes a needle of 3 sl sts, about 0.6 in (1.5 cm) long, with its point at the skipped chain.
- Frost puff: Join cream with a sl st in the tip chain of a needle. [Yo, insert hook in the same ch, yo, pull up a loop] 2 times (5 loops on hook), yo and pull through all 5 loops, then ch 1 to lock. Fasten off, leaving a 3 in (7.6 cm) tail.
- Scale: Sl st in the free front loop, ch 2.
Gauge and Checkpoints
Gauge: 5 sc or 5 sl sts = 1 in (2.5 cm) along a cord. In flat rows, 5 sc and 6 rows = 1 in (2.5 cm).
Make the hanging loop first and use it as your test piece. Before you fold it, its 20 sl sts should measure 4 in (10.2 cm).
Checkpoints:
- Base cord: 40 sc = 8 in (20.3 cm).
- Small sprig: 2.4 in (6.1 cm) from stem end to tip.
- Large sprig: 3.6 in (9.1 cm) from stem end to tip.
- Pinecone: about 0.9 in (2.3 cm) long x 0.8 in (2.0 cm) wide.
- Bow loop strip: 6 in (15.2 cm) x 0.5 in (1.3 cm).
If your pieces are too big, go down 0.5 mm in hook size. If they’re too small, or the slip stitches are too tight to work into, go up 0.5 mm. Keep each loop on the shaft of the hook, not the throat, so the slip stitches don’t tighten.
Base Cord
With sage green, ch 41.
Row 1: Sc in the back bump of the 2nd ch from the hook and in each back bump across. (40 sc)
Fasten off, leaving a 6 in (15.2 cm) tail. The cord measures 8 in (20.3 cm). Stitch 1 is the starting end, which becomes the top horn of the crescent. Place a marker in stitch 20 to mark the middle for placement.
Small Sprigs
Make 6 in sage green and 2 in dusty blue-gray.
Ch 13, leaving a 6 in (15.2 cm) starting tail.
Tip: Sl st in the back bump of the 2nd, 3rd and 4th ch from the hook. (3 sl sts; 9 ch remain)
Stem: [Ndl, sl st in the back bump of the next 2 ch] 4 times, then sl st in the last ch. (9 stem sl sts)
Count: 3 tip sts + 9 stem sts + (4 needles x 3 sts) = 24 sl sts. The stem uses (4 x 2) + 1 = 9 ch, which matches the 9 ch left after the tip.
Fasten off. Each small sprig has 5 points: 1 tip and 4 needles. Push the needles so they alternate left and right of the stem.
Large Sprigs
Make 4 in sage green.
Ch 19, leaving a 6 in (15.2 cm) starting tail.
Tip: Sl st in the back bump of the 2nd, 3rd and 4th ch from the hook. (3 sl sts; 15 ch remain)
Stem part 1: [Ndl, sl st in the next 2 ch] 2 times. (11 ch remain)
Branch A: Ch 8. Sl st in the back bump of the 2nd, 3rd and 4th ch from the hook to make the branch tip. Then [ndl, sl st in the next 2 branch ch] 2 times. This uses the last 4 branch chains and brings you back to the stem. Sl st in the next 2 stem ch. (9 ch remain)
Stem part 2: Ndl, sl st in the next 2 ch. (7 ch remain)
Branch B: Work as for Branch A, then sl st in the next 2 stem ch. (5 ch remain)
Stem part 3: [Ndl, sl st in the next 2 ch] 2 times, then sl st in the last ch. (0 ch remain)
Stem check: 4 + 2 + 2 + 2 + 4 + 1 = 15 stem sl sts.
Count: 3 tip sts + 15 stem sts + (5 stem needles x 3 sts = 15) + (2 branches x 13 sts) = 59 sl sts. Each branch has 13 sts: 3 for the branch tip, 6 for the needles and 4 along the branch.
Fasten off. Each large sprig has 12 points: 1 main tip, 5 stem needles and 2 branches with 3 points each. Spread Branches A and B to opposite sides of the stem.
Pinecones
Make 3 in warm brown. Work Rounds 2–6 in BLO so that each round leaves free front loops for the scales.
Rnd 1: 4 sc in MR. (4)
Rnd 2: BLO, [sc, inc] 2 times. (6)
Rnd 3: BLO, inc in each st around. (12)
Rnd 4: BLO, sc in each st around. (12)
Rnd 5: BLO, [sc, sc2tog] 4 times. (8)
Stuff lightly with a small pinch of fiberfill.
Rnd 6: BLO, sc2tog 4 times. (4)
Fasten off, close the opening and leave a 6 in (15.2 cm) tail.
Scales: Hold the pinecone with the MR at the top. Join brown in the first free front loop of Rnd 2. Following the spiral of free front loops, work 1 scale in each loop of Rnds 2–5: 6 + 12 + 12 + 8 = 38 scales. Sl st in the last loop and fasten off. The free loops form one continuous spiral, so you never cut the yarn between rounds.
Bow
Make all bow parts in cream.
Loop strip: Ch 31.
- Row 1: Sc in the 2nd ch from the hook and in each ch across. (30 sc)
- Rows 2–3: Ch 1, turn, sc in each st across. (30 sc)
The strip measures 6 in (15.2 cm) x 0.5 in (1.3 cm). Fasten off, leaving a 10 in (25.4 cm) tail.
Tail strip: Ch 11. Work Rows 1–3 as for the loop strip. (10 sc) It measures 2 in (5.1 cm). Fasten off.
Center band: Ch 7. Work Rows 1–3 as above. (6 sc) It measures 1.2 in (3.0 cm). Fasten off, leaving an 8 in (20.3 cm) tail.
Shape the bow: Bring both short ends of the loop strip to the center back and tack them together. Pinch the center into a figure-eight so you have two loops about 1.5 in (3.8 cm) wide. Fold the tail strip into a V and place it behind the pinch. Wrap the center band around all the layers and sew its ends together at the back. The bow measures 3 in (7.6 cm) across.
Hanging Loop
With cream, ch 21.
Row 1: Sl st in the back bump of the 2nd ch from the hook and of each ch across. (20 sl sts)
The cord measures 4 in (10.2 cm). Fasten off, leaving a 6 in (15.2 cm) tail. Fold it in half to make a 2 in (5.1 cm) loop.
Make All Pieces
| Part | Color | Quantity |
|---|---|---|
| Base cord | Sage green | 1 |
| Large sprig | Sage green | 4 |
| Small sprig | Sage green | 6 |
| Small sprig | Dusty blue-gray | 2 |
| Pinecone | Warm brown | 3 |
| Bow (3 parts) | Cream | 1 |
| Hanging loop | Cream | 1 |
Layout grid: The numbers are cord stitches. The crescent opens to the right, so the outer edge is on the left and the inner edge is on the right.
Cord st | Outer edge (left)         | Inner edge (right)
--------+---------------------------+--------------------
   4    | Small green (top horn)    |
   8    | Large L1                  |
  10    |                           | Small blue-gray
  13    |                           | Small blue-gray
  16    | Large L2                  |
 17-21  | Pinecone cluster          |
  19    |                           | Small green
  24    | Large L3                  | Small green
  29    |                           | Small green
  32    | Large L4                  |
  34    |                           | Small green
  37    | Small green (bottom horn) |
 9-11   | Bow and hanging loop, centered on top of the cord
Joining
Method: Use the 6 in (15.2 cm) tails and a tapestry needle to sew each part to the WS of the base cord.
- Curve the cord into a C with the opening on the right, so that stitches 1 and 40 are about 3.5 in (8.9 cm) apart. Pin it to the mat.
- Stitch-to-stitch logic: Lay each sprig’s stem end over its listed cord stitch. Whipstitch the last 2 stem sl sts to 2 cord sc (the listed stitch and the next one), using 3 small stitches through the back bumps. This anchors each sprig along 0.4 in (1.0 cm) of cord so it can’t twist.
- Angle the sprigs on stitches 1–20 toward the top horn and the sprigs on stitches 21–40 toward the bottom horn. The two horn sprigs follow the curve and reach past the ends of the cord.
- Sew the pinecones in a triangle: one centered over stitch 17, one at stitch 20 on the outer side and one at stitch 21 overlapping the cord.
- Sew the bow over stitches 9–11 through its center band. Tuck both ends of the hanging loop behind the band and sew them to the cord.
Tension: Pull the sewing stitches just snug enough to close gaps. If you sew too tightly, the cord will crimp and the curve will flatten.
Size checkpoint: Measured from needle tip to needle tip, the crescent should now be 4.75 in (12.1 cm) tall x 3.75 in (9.5 cm) wide. Adjust the sprig angles if needed.
Border: Frosted Tips
The frost puffs form the border along the outer and inner edges of the crescent.
Border gauge: Each puff adds about 0.125 in (0.3 cm) beyond its needle tip.
Which points to frost: On each small sprig, frost the tip and the 2 needles closest to it (3 puffs). On each large sprig, frost the main tip, the 2 stem needles closest to it and both branch tips (5 puffs).
Outer edge: 4 large sprigs x 5 = 20, plus 2 horn sprigs x 3 = 6. Total: 26 puffs.
Inner edge: 4 green small sprigs x 3 = 12, plus 2 blue-gray small sprigs x 3 = 6. Total: 18 puffs.
Grand total: 26 + 18 = 44 puffs.
Add the puffs after assembly so you can see where each point ends up. On the WS, tie each puff tail to a neighboring tail with a square knot, then trim to 0.25 in (0.6 cm).
Why the math works: You have 8 small sprigs and 4 large sprigs, so 8 x 3 = 24 plus 4 x 5 = 20 gives 44 puffs, which matches the edge totals. The puffs add 0.125 in (0.3 cm) at the outermost points on both sides. That grows the 4.75 x 3.75 in (12.1 x 9.5 cm) crescent by 0.25 in (0.6 cm) in each direction, to 5 x 4 in (12.7 x 10.2 cm).
Final Blocking
- Mist the ornament until it’s damp but not wet.
- Lay it RS up on the blocking mat.
- Pin the crescent to 5 in (12.7 cm) tall x 4 in (10.2 cm) wide.
- Use pins to fan out the needles so they alternate evenly along each stem.
- Fluff the bow loops and shape the tails into a soft V.
- Optional: spray lightly with starch.
- Let it dry completely, 6–8 hours, before you unpin it.
Final Quality-Control Checklist
- The base cord has 40 sc and measures 8 in (20.3 cm).
- All 8 small sprigs (24 sl sts each) and 4 large sprigs (59 sl sts each) are attached.
- Each of the 3 pinecones has 38 scales.
- There are 44 frost puffs: 26 on the outer edge and 18 on the inner edge.
- The 3 in (7.6 cm) bow sits over cord stitches 9–11.
- The 2 in (5.1 cm) hanging loop is sewn on securely.
- The crescent measures 5 x 4 in (12.7 x 10.2 cm).
- No tails show on the RS.
Troubleshooting
- Needles curl or twist: Work into the back bump, not the front of the chain. Then mist the needles and pin them flat.
- Sprigs are too short: Your slip stitches are too tight. Use a hook one size larger for the sprigs.
- Scales lie flat: Work them more firmly, or change the ch 2 to ch 1.
- Crescent spreads open: Re-pin the curve and add a hidden stitch on the WS between stitches 18 and 22.
- Puffs come loose: Always lock each puff with the ch 1 and knot its tail securely.
- Bow droops: Sew through the center band into the cord twice more.
Care
Spot clean with cool water and mild soap, then reshape the ornament and dry it flat. Store it flat in tissue paper.
Final Notes
Here is the measurement chain from start to finish. A gauge of 5 sts per 1 in (2.5 cm) gives an 8 in (20.3 cm) cord and sprigs of 2.4 in (6.1 cm) and 3.6 in (9.1 cm). Together they make a 4.75 x 3.75 in (12.1 x 9.5 cm) crescent. The 44 frost puffs add 0.125 in (0.3 cm) on each edge, for a finished size of 5 x 4 in (12.7 x 10.2 cm). If you check each stage as you go, the ornament will come out at the right size.
Happy crocheting!