

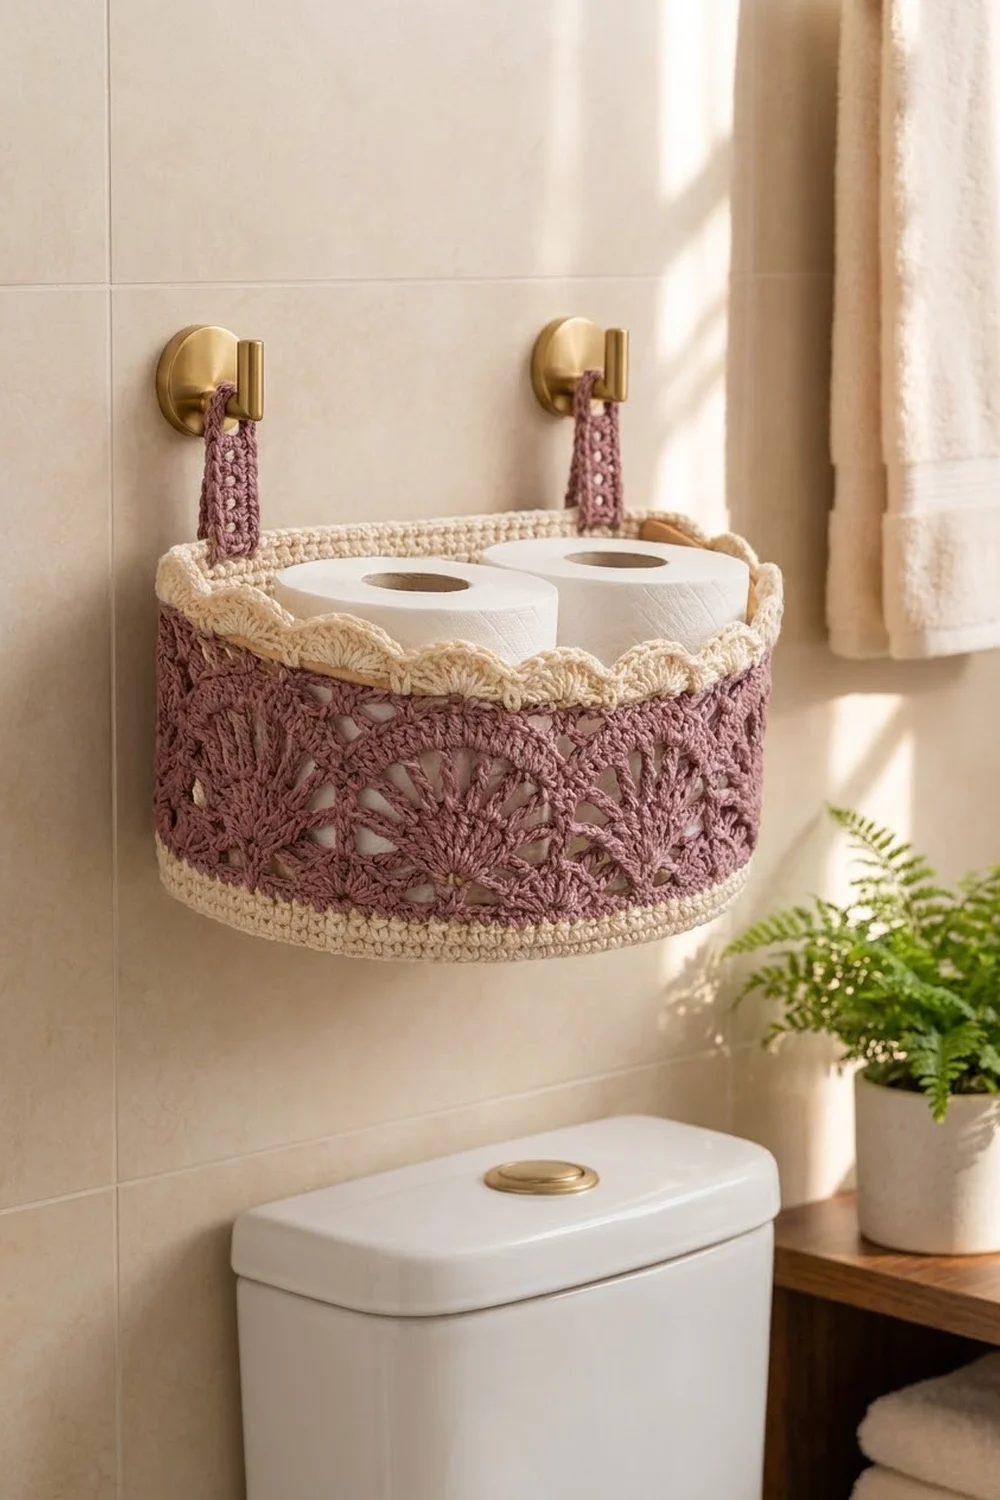
The Rosewood Fan Hanging Basket is a small D-shaped wall basket. Its flat back sits against the wall, and its curved front is wide enough for two spare toilet rolls. It also works for hand towels, soaps or small toiletries.
The design uses two colors. Cream forms the base, a plain band around the bottom, the solid back wall and the scalloped rim. Dusty mauve is used for the openwork front panel with three large radiating fans and for the two hanging straps. The style is soft and vintage, and the basket is sturdy enough for everyday use.
All instructions use US crochet terms. The finished basket measures about 11.75 in (29.8 cm) wide, 5 in (12.7 cm) deep and 5.75 in (14.6 cm) tall, not counting the straps.
Here is the construction in order. You work the half-oval base flat in rows, then crochet the cream bottom band in joined rounds. You then work the back wall and the front lace panel flat on top of that band and seam their side edges together. A two-round border encloses a curved reed along the front rim. Last, you sew two straps inside the back wall.
Finished Size and Construction
- Finished size: 11.75 in (29.8 cm) wide x 5 in (12.7 cm) deep x 5.75 in (14.6 cm) tall
- Skill level: Intermediate
- Terminology: US
- Yarn weight: Worsted (#4) cotton
- Hook: 5 mm (H-8)
- Number of pieces: 3 (1 basket body, 2 straps)
- Layout: Single D-shaped basket with a flat back and a curved front
- Base size: 11.75 in (29.8 cm) along the back x 5 in (12.7 cm) deep
- Height before border: 5 in (12.7 cm)
- Border depth: 0.75 in (1.9 cm)
Materials
Use a smooth, firm worsted-weight cotton or cotton blend. Cotton holds its shape well, shows the fan spokes clearly and copes with bathroom humidity. Avoid fuzzy or very stretchy yarns, because they blur the lace.
- Cream: 120 g / 200 m
- Dusty mauve: 60 g / 100 m
These quantities include a margin of about 15% for your gauge swatch and small differences in tension.
Tools and notions:
– 5 mm (H-8) crochet hook
– Tapestry needle
– 4 locking stitch markers
– Bendable rattan reed or a pre-curved thin wooden strip, about 3/16 in (0.5 cm) thick and 18 in (45.7 cm) long
– 2 wall hooks with screws and wall anchors
– Scissors, tape measure, rust-proof pins
Abbreviations (US Terms)
- ch: chain
- sl st: slip stitch
- sc: single crochet
- hdc: half double crochet
- dc: double crochet
- tr: treble crochet
- BLO: back loop only
- sk: skip
- sp: space
- st(s): stitch(es)
- RS / WS: right side / wrong side
- rep: repeat
V-stitch (V): (dc, ch 2, dc) all in the same stitch.
Scallop: 5 dc in the same stitch.
Gauge and Checkpoints
Gauge: 14 hdc and 11 rows = 4 in (10.2 cm) in hdc worked in rows.
Before you start the basket, make a swatch about 6 in (15.2 cm) square and measure the middle 4 in (10.2 cm). Every measurement in this pattern depends on this gauge. The front stitch count (61) and back stitch count (41) are what make the lace repeat and the scallop border come out evenly.
Checkpoints:
– After base Row 5: about 1.75 in (4.4 cm) deep.
– After base Row 10: about 3.6 in (9.1 cm) deep and 8.7 in (22.1 cm) along the straight edge.
– After base Row 14: 5 in (12.7 cm) deep, 11.75 in (29.8 cm) along the straight edge, and 17.4 in (44.2 cm) around the curve.
– After Round 19: the bottom band stands about 1.5 in (3.8 cm) tall.
– Back wall and lace panel: each about 3.6 in (9.1 cm) tall.
If your piece is too big: go down half a hook size and work a new swatch.
If your piece is too small: go up half a hook size.
Don’t change the stitch counts. The fan repeat and the scallops need exactly 61 front stitches.

Base (Cream)
The base is half of an oval, worked flat in rows. The foundation chain lies along the flat back edge. Each row adds 2 stitches at each curved end and keeps 5 straight stitches in the center.
Row 1 (RS): Ch 9. 2 hdc in 3rd ch from hook, hdc in next 5 ch, 2 hdc in last ch. Turn. (9 sts)
Rows 2–14: Ch 2 (does not count as a stitch here or anywhere else in the pattern), [hdc in next (R − 2) sts, 2 hdc in next st] twice, hdc in next 5 sts, [2 hdc in next st, hdc in next (R − 2) sts] twice. Turn at the end of each row except Row 14. Here R is the number of the row you are working.
For example:
– Row 2: Ch 2, 2 hdc in each of next 2 sts, hdc in next 5, 2 hdc in each of next 2 sts. (13 sts)
– Row 3: Ch 2, [hdc in next st, 2 hdc in next st] twice, hdc in next 5, [2 hdc in next st, hdc in next st] twice. (17 sts)
Stitch count for each row:
| Row | Sts | Row | Sts |
|---|---|---|---|
| 1 | 9 | 8 | 37 |
| 2 | 13 | 9 | 41 |
| 3 | 17 | 10 | 45 |
| 4 | 21 | 11 | 49 |
| 5 | 25 | 12 | 53 |
| 6 | 29 | 13 | 57 |
| 7 | 33 | 14 | 61 |
Each row has 5 + (4 x row number) stitches, so Row 14 has 5 + 56 = 61.
Bottom Band (Cream, Joined Rounds)
From here on, the side facing you is the RS of the basket.
Round 15: Do not turn. Ch 2 and rotate the base so you can work along the straight edge.
- Hdc in the end of each row from Row 14 down to Row 1, working 2 hdc in the ends of Rows 12, 8 and 4. (17)
- Hdc in the free loop of each of the 7 worked foundation chains. (7)
- Hdc in the end of each row from Row 1 up to Row 14, working 2 hdc in the ends of Rows 4, 8 and 12. (17)
- Hdc in each of the 61 sts of Row 14.
Join with a sl st to the first hdc. (41 back + 61 front = 102 sts)
Place markers so the two sections are easy to find. Stitches 1–41 are the back, and stitches 42–102 are the front.
Round 16: Ch 2, hdc in BLO of each st around, join. (102) This round makes the ridge that turns the wall upward.
Rounds 17–19: Ch 2, hdc in each st around, join. (102 sts each round)
Fasten off.
Back Wall (Cream, Rows)
Row 1 (RS): Join cream in st 1. Ch 2, hdc in same st and in each of the next 40 sts. Turn. (41)
Rows 2–10: Ch 2, hdc in each st across. Turn. (41 sts each row)
Fasten off. The back wall should measure about 3.6 in (9.1 cm) tall.
Front Fan Lace Panel (Mauve, Rows)
The panel is worked over the 61 front stitches. It uses a 20-stitch repeat plus 1 edge stitch (1 + 20 x 3 = 61), which gives three fans.
Row 1 (RS): Join mauve in st 42. Ch 1, sc in same st and in each of the remaining 60 front sts. Turn. (61 sc)
Row 2 (WS): Ch 1, sc in first sc. *Ch 4, sk 4, sc in next st, ch 4, sk 4, V in next st, ch 4, sk 4, sc in next st, ch 4, sk 4, sc in next st. Rep from * 2 more times. Turn.
This row has 3 Vs. It uses all 61 sts: 1 + (20 x 3).
Row 3 (RS): Skip every ch-4 space throughout this row.
Ch 5 (counts as dc + ch 2). *Sc in next sc, ch 3, 7 dc in ch-2 sp of next V, ch 3, sc in next sc, ch 2, dc in next sc. Ch 2 only if another rep follows. Rep from * 2 more times. Turn.
You now have three 7-dc fans and 4 single dc between and at the edges of the fans.
Row 4 (WS): Ch 1, sc in first dc. *Ch 3, (dc in next dc, ch 1) 6 times, dc in next dc, ch 3, sc in next single dc. Rep from * 2 more times. Work the final sc in the 3rd ch of the beginning ch-5. Turn.
Row 5 (RS): Ch 4 (counts as dc + ch 1). *(Dc in next dc, ch 2) 6 times, dc in next dc, ch 1, dc in next sc. Ch 1 only if another rep follows. Rep from * 2 more times. Turn.
Row 6 (WS): Ch 1, sc in first dc. *Ch 1, (sc in next dc, 2 sc in next ch-2 sp) 6 times, sc in next dc, ch 1, sc in next single dc. Rep from * 2 more times. Turn.
Each fan arch now has 19 sc.
Row 7 (RS, leveling row): Ch 4 (counts as tr). Sk ch-1 sp, dc in next 2 sc, hdc in next 3 sc, sc in next 9 sc, hdc in next 3 sc, dc in next 2 sc, sk ch-1 sp, tr in next sc. Rep from * 2 more times. (1 + 3 x 20 = 61 sts)*
Fasten off. The tall stitches fill the dips between the fan arches, so the top edge comes out straight. The panel should be about 3.6 in (9.1 cm) tall.
If your back wall is noticeably taller or shorter than the panel, add or remove one back-wall row.
Side seams: With mauve, mattress-stitch each side edge of the lace panel to the matching side edge of the back wall. Seam from the bottom band to the top.
Straps (Mauve, Make 2)
Row 1: Ch 6. Hdc in 3rd ch from hook and in each remaining ch. Turn. (4 hdc)
Rows 2–14: Ch 2, hdc in each st. Turn. (4)
Row 15 (eyelet): Ch 2, hdc in first st, ch 2, sk 2, hdc in last st. Turn. (2 hdc + ch-2 sp)
Row 16: Ch 2, hdc in first st, 2 hdc in ch-2 sp, hdc in last st. Turn. (4)
Rows 17–18: Ch 2, hdc in each st. Turn. (4)
Fasten off. Each strap measures about 6.5 in (16.5 cm) long and 1.1 in (2.8 cm) wide.
Border (Cream)
Border gauge: You work one sc into each stitch, so the rim keeps the body gauge of 3.5 sts per inch. The front rim is 61 sts, about 17.4 in (44.2 cm), and the back rim is 41 sts, about 11.75 in (29.8 cm).
Round 1 (RS): Join cream at the first st of the lace panel’s Row 7.
- Front: Lay the reed along the top edge. Ch 1, then work 1 sc in each of the 61 front sts, enclosing the reed inside each sc.
- Back: Work 1 sc in each of the 41 back-wall sts. Tuck about 0.25 in (0.6 cm) of each end of the reed into the back corners as you go.
Join. (61 + 41 = 102 sc)
Round 2:
- Front: Ch 1, sc in first sc. Sk 2, scallop in next sc, sk 2, sc in next sc. Rep from * 9 more times. (10 scallops; 11 sc + 50 dc = 61 sts)*
- Back: Sc in each of the 41 back sts. (41)
Join and fasten off.
Why the math works: Each scallop repeat uses 6 sts. 1 + (6 x 10) = 61, so the scallops start and end exactly at the side seams. The back count of 41 is unchanged because it carries no scallops. The border has no corner stitches to add, because the basket’s corners sit at the side seams, and each seam is already counted as the last stitch on one side.
Attach the Straps
On the inside of the back wall, count in from each side seam. Center one strap over back sts 5–8 and the other over sts 34–37. That spaces the strap centers about 8.25 in (21.0 cm) apart.
Overlap each strap 1.5 in (3.8 cm) below the rim and whipstitch all around the overlap. This leaves about 5 in (12.7 cm) of strap above the rim, with the eyelet near the top.
Final Blocking
- Weave in all ends. Lock each one along a seam or the bottom band.
- Soak the basket in cool water for 10 minutes, then press out the water in a towel. Don’t wring it.
- Stuff the basket firmly with a folded towel to shape a flat back and a rounded front.
- Pin out each fan’s spokes and each scallop.
- Lay the straps flat and pin them straight.
- Let everything dry completely, usually 24–48 hours.
- Recheck the size: 11.75 in (29.8 cm) wide, 5 in (12.7 cm) deep and 5.75 in (14.6 cm) tall.
Final Quality-Control Checklist
- The base lies flat, and Round 15 has 102 sts.
- The BLO ridge from Round 16 is clean and runs all the way around.
- All three fans have 7 spokes and are centered on the front.
- The lace panel and back wall are the same height, and the seams are straight.
- The reed is fully enclosed, with only its ends showing at the corners.
- There are 10 even scallops across the front.
- Both straps are level, sewn securely, and spaced 8.25 in (21.0 cm) apart.
Troubleshooting
- The base ruffles: Your tension is loose. Go down half a hook size.
- The base cups: You missed an increase. Count each row against the table.
- The fans lean to one side: Row 2 is miscounted. Each V must sit 10 sts from the start of its repeat.
- The panel top is wavy: Check the tr placement in Row 7, or block it harder.
- The scallops don’t fit: Recount Round 1. The front must have exactly 61 sts.
- The basket sags on the wall: Use a thicker reed and reinforce the stitching on the straps.
Care
Hand wash in cool water and lay the basket flat to dry, reshaping it over a towel. Remove the reed before washing if it isn’t water-safe.
Final Notes
Here is the full measurement chain:
- Gauge: 14 hdc = 4 in (10.2 cm).
- The base grows to 61 curved sts, then 102 sts around the base.
- The walls divide into 41 back sts and 61 front sts.
- The front fans repeat over 20 sts, and the scallops repeat over 6 sts, so both fit the 61 front sts exactly.
If your counts hold at each checkpoint, the finished basket will hang straight and hold its shape.
Happy crocheting!