
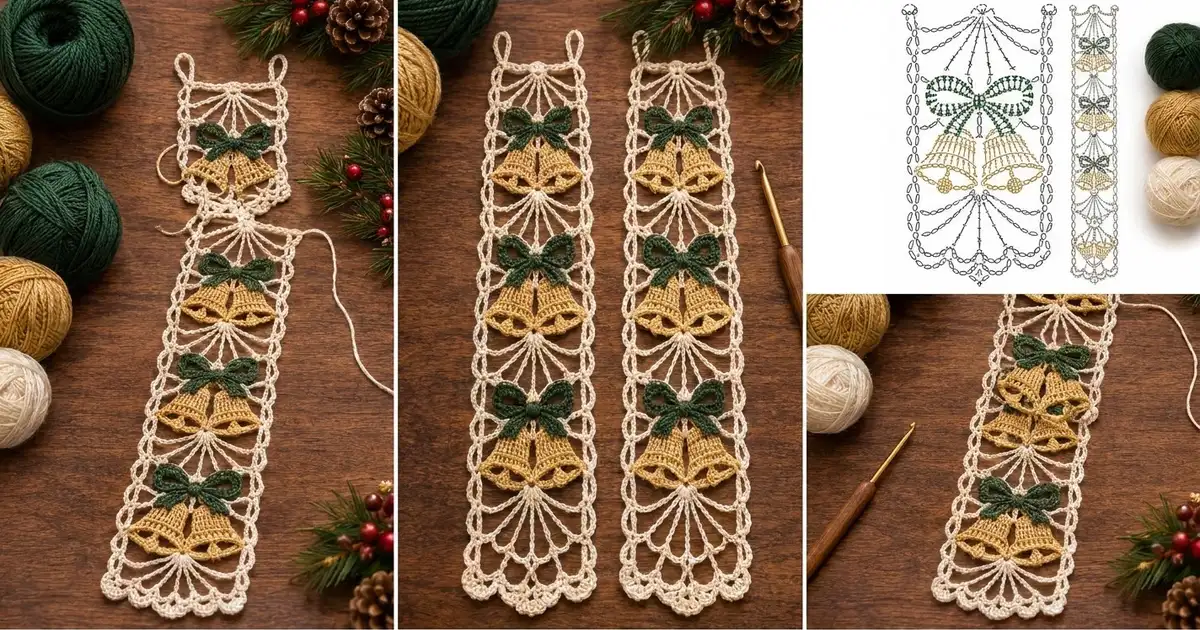
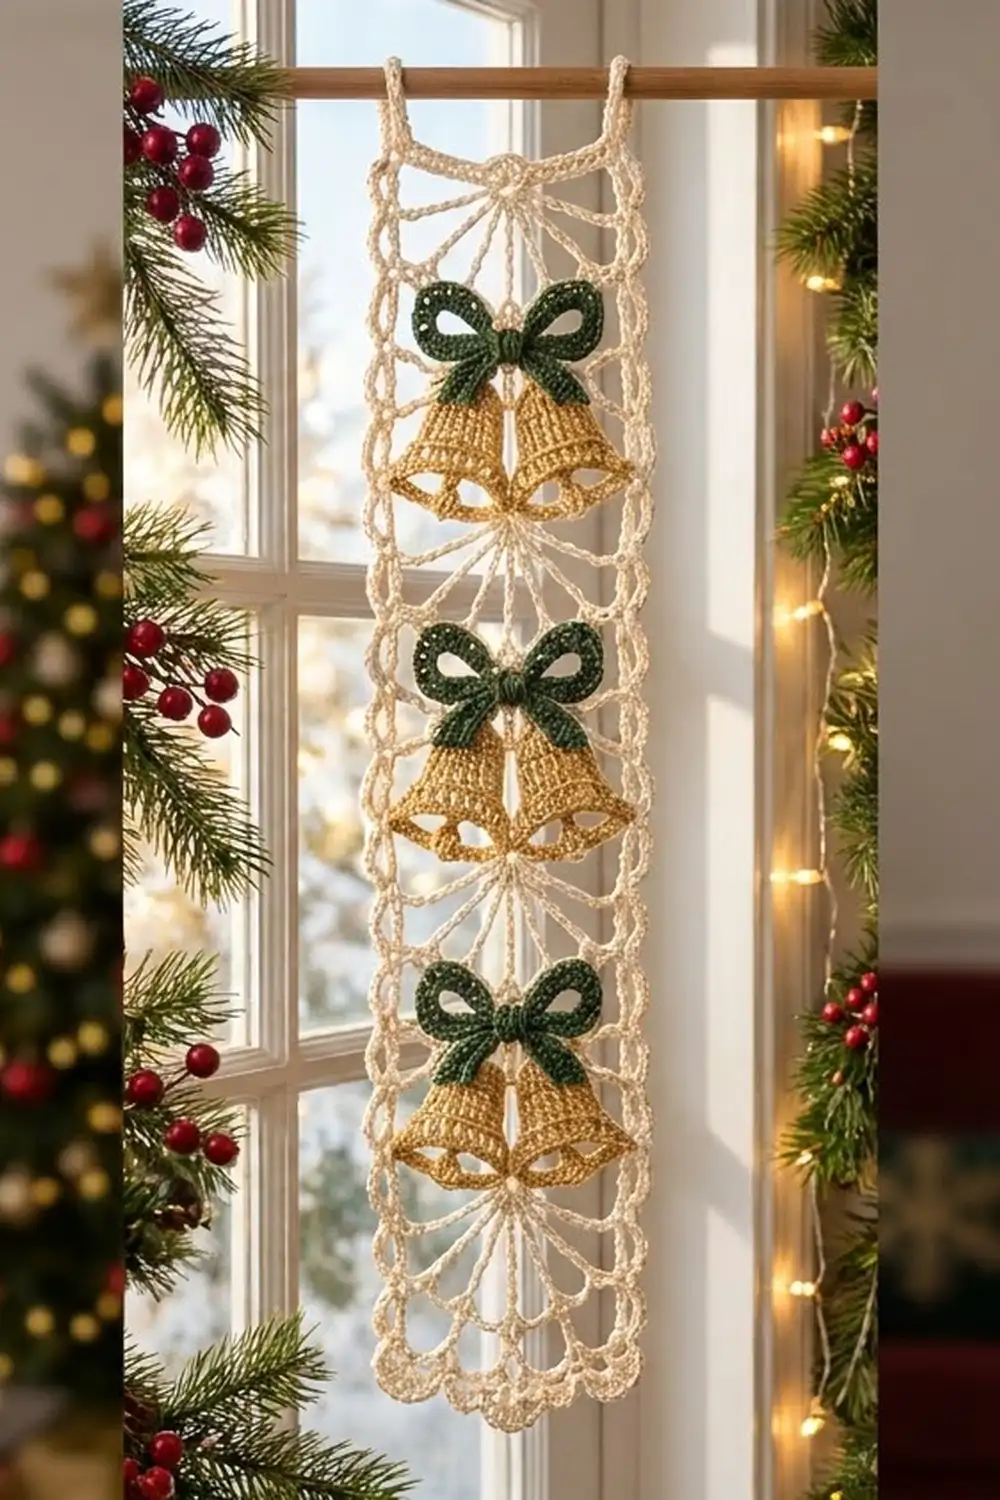
This lace strip is long and narrow, and it has a festive look. A cream background of fans and filet mesh carries three pairs of golden bells, and each pair is topped with a forest-green bow. The bottom edge has shell scallops, and two loops at the top let you hang it from a rod, hook or door handle.
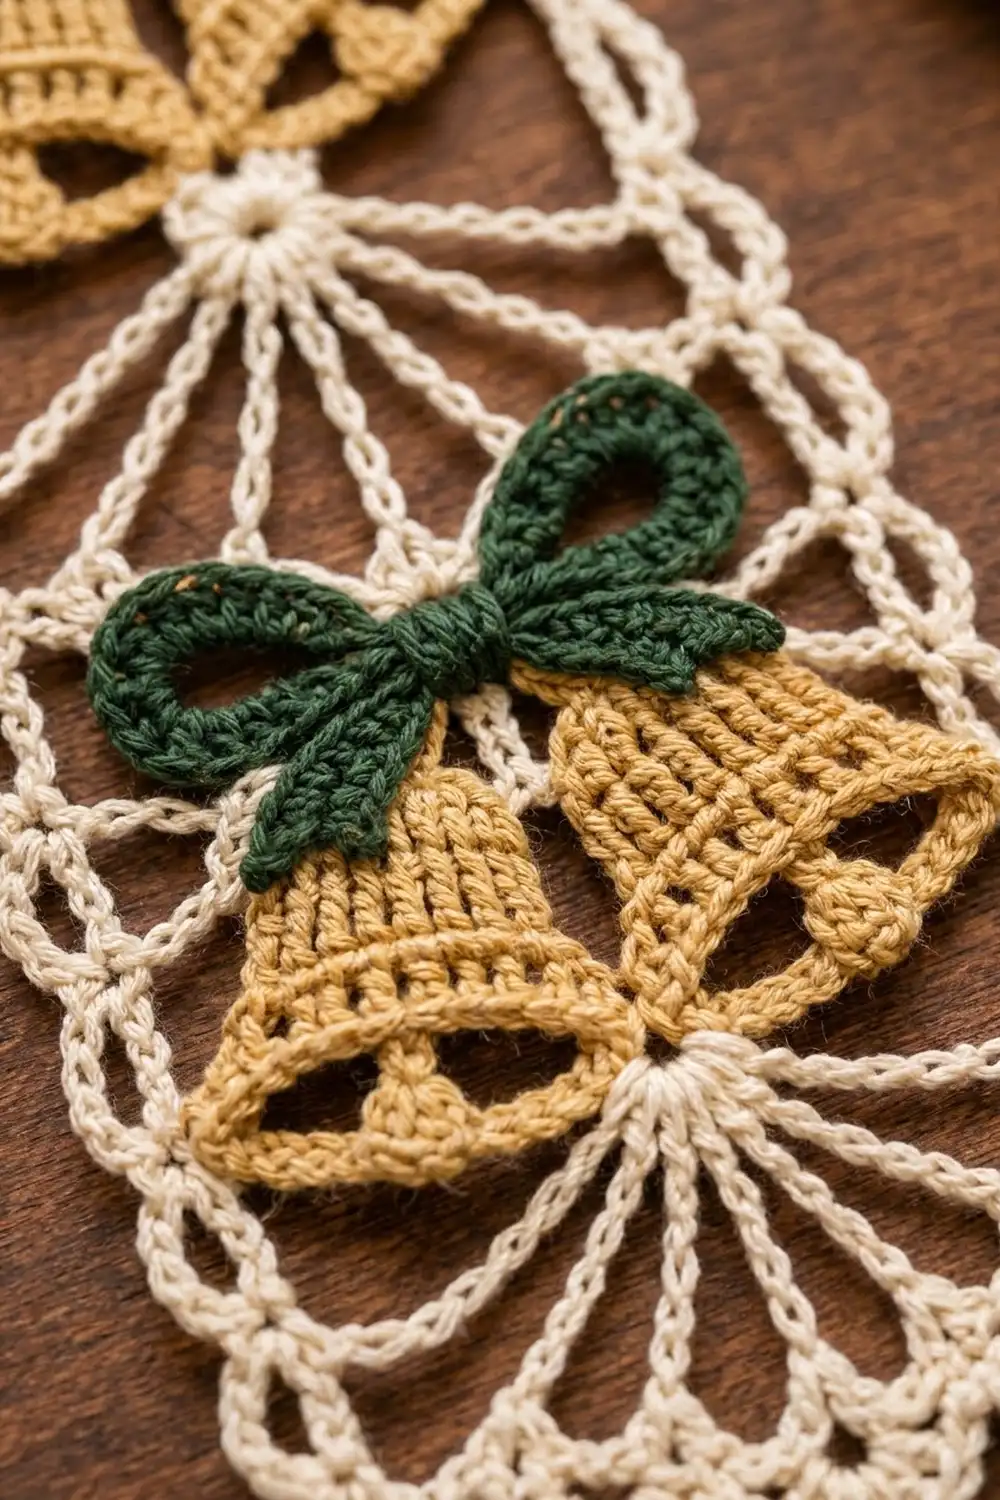
The palette has three colors: cream for the lace, gold for the bells and deep green for the bows. The style is vintage and lacy. Stacked double crochet gives the bells a ribbed texture, and the lace has open fans that radiate down from small solid hubs.
The pattern uses US crochet terms. The finished strip measures 6.0 in (15.2 cm) wide by 19.0 in (48.3 cm) long, not counting the hanging loops. The loops rise another 1.0 in (2.5 cm).
Construction is simple. You work the lace strip top-down in rows as one piece, then add a two-round border. Next you crochet six small flat bells and three bows. Finally you sew the bells and bows onto the mesh bands.
Finished Size and Construction
- Finished size: 6.0 in × 19.0 in (15.2 cm × 48.3 cm), plus 1.0 in (2.5 cm) hanging loops
- Skill level: Intermediate
- Terminology: US
- Yarn weight: Sport-weight (#2) mercerized cotton
- Hook: 3.25 mm (US D-3)
- Number of pieces: 1 lace strip, plus sewn-on appliqués (6 bells, 3 bows)
- Layout: One vertical strip with 4 fans and 3 bell bands
- Strip size before border: 5.0 in × 18.0 in (12.7 cm × 45.7 cm)
- Border depth: 0.5 in (1.3 cm) on the long sides, 0.4 in (1.0 cm) at the top, 0.6 in (1.5 cm) at the scallop tips
- Bell size: 2.2 in (5.6 cm) wide at the rim × 2.1 in (5.3 cm) tall
- Bow size: 3.0 in (7.6 cm) wide
Materials
Choose a smooth mercerized cotton in sport weight. It gives crisp stitch definition and holds the lace shape well after blocking. The amounts below assume about 150 m per 50 g.
- Cream (strip and border): 40 g, about 120 m
- Gold (bells): 15 g, about 45 m
- Forest green (bows): 10 g, about 30 m
These amounts include a safety margin of roughly 20 percent.
Tools:
– 3.25 mm (US D-3) crochet hook
– Tapestry needle
– Sewing pins
– Scissors
– Blocking mat and rust-proof pins
– Spray bottle
– Measuring tape
Abbreviations (US Terms)
- ch – chain
- sl st – slip stitch
- sc – single crochet
- dc – double crochet
- dtr – double treble crochet (yarn over 3 times)
- st(s) – stitch(es)
- sp – space
- tch – turning chain
- RS / WS – right side / wrong side
Special stitches
- Popcorn: Work 5 dc in the same st. Drop the loop from your hook, insert the hook front to back into the first dc of the group, pick up the dropped loop and pull it through.
- Picot: Ch 3, then sl st in the 3rd ch from the hook.
Gauge and Checkpoints
Gauge: 20 dc and 10 dc rows = 4 in (10.2 cm). One dtr row measures 0.8 in (2.0 cm).
Before you start, make a test swatch. Chain 27 and work the Foundation Row plus Rows 1–9. This is one full fan-and-band section.
Checkpoints:
– Foundation Row: 5.0 in (12.7 cm) wide
– After Row 9: 5.2 in (13.2 cm) tall
– After Row 27: 14.8 in (37.6 cm) tall
– After Row 32: 18.0 in (45.7 cm) tall
– After the border: 6.0 in × 19.0 in (15.2 cm × 48.3 cm)
If your swatch is too big, go down to a 3.0 mm hook. If it is too small, go up to a 3.5 mm hook. If only the height is off, check your dtr stitches: pull up each loop to an even height and don’t yank the yarn-overs tight.
The Lace Strip
Use cream throughout. Turning chains count as stitches. Every row has exactly 25 sts, counting chain stitches and chain spaces stitch-for-stitch. When you work into a mesh row, treat each dc and each ch-1 space as one stitch.
Foundation Row: Ch 27. Dc in the 4th ch from the hook and in each ch across. The skipped 3 ch count as the first dc. (25 sts)
Fan Section (Rows 1–4)
Row 1 (hub row): Ch 3 (counts as dc), dc in the next st. Ch 7, skip the next 7 sts, then dc in the next 7 sts. Ch 7, skip the next 7 sts, then dc in the last 2 sts. (2 + 7 + 7 + 7 + 2 = 25 sts)
The 7 dc in the center form the solid hub at the top of the fan.
Row 2: Ch 5 (counts as dtr), dtr in the next dc. Ch 4. Dtr in the first hub dc, then (ch 1, dtr in the next hub dc) 6 times. Ch 4, then dtr in the last 2 sts. (2 + 4 + 13 + 4 + 2 = 25 sts)
Row 3: Ch 5, dtr in the next dtr. Ch 1. Dtr in the first spoke, then (ch 2, dtr in the next spoke) 6 times. Ch 1, then dtr in the last 2 sts. (2 + 1 + 19 + 1 + 2 = 25 sts)
Row 4: Repeat Row 3. (25 sts)
The 7 spokes widen from 7 sts to 13 sts to 19 sts, which gives the radiating fan shape.
Band Section (Rows 5–9)
Row 5 (closing row): Ch 3, dc in the next dtr. Dc in the ch-1 sp, then dc in the first spoke. Work (2 dc in the next ch-2 sp, dc in the next spoke) 6 times. Dc in the ch-1 sp, then dc in the last 2 sts. (2 + 1 + 1 + 18 + 1 + 2 = 25 sts)
Row 6 (mesh): Ch 4 (counts as dc + ch 1). Skip the next st, dc in the next st. Work (ch 1, skip the next st, dc in the next st) 11 times. (13 dc + 12 ch = 25 sts)
Rows 7–9: Ch 4. Skip the ch-1 sp, dc in the next dc. Work (ch 1, dc in the next dc) 11 times; the last dc goes in the 3rd ch of the tch. (25 sts each)
Checkpoint: the strip should measure 5.2 in (13.2 cm) tall.
Continue the Strip
Rows 10–18: Repeat Rows 1–9.
Rows 19–27: Repeat Rows 1–9. Checkpoint: 14.8 in (37.6 cm).
Rows 28–32: Repeat Rows 1–5. This makes the fourth fan and a solid closing row along the bottom edge.
Check the height: 21 dc rows × 0.4 in plus 12 dtr rows × 0.8 in equals 18.0 in (45.7 cm). Don’t fasten off.
Bells (Make 6)
Use gold. Each bell is worked flat from the top down. The stacked dc columns create the ribbed texture.
Row 1: Ch 7. Dc in the 4th ch from the hook and in each ch across. (5 sts)
Row 2: Ch 3, dc in the same st. Dc in the next 3 sts, then 2 dc in the top of the tch. (7 sts)
Row 3: Ch 3, dc in the same st. Dc in the next 5 sts, then 2 dc in the top of the tch. (9 sts)
Row 4: Ch 3, dc in each st across. (9 sts)
Row 5 (rim): Ch 1, 2 sc in the first st. Sc in the next 7 sts, then 2 sc in the top of the tch. (11 sc)
Row 6 (mouth): Ch 1, sc in the first sc. Ch 4, skip 4 sc, then work a popcorn in the next sc. Ch 4, skip 4 sc, then sc in the last sc. (2 sc + 1 popcorn + 8 ch = 11 sts)
The two ch-4 arches outline the open bell mouth, and the popcorn hangs in the center as the clapper. Fasten off and leave a 12 in (30.5 cm) tail for sewing.
Bell checkpoint: 1.0 in (2.5 cm) wide at the top, 2.2 in (5.6 cm) at the rim, 2.1 in (5.3 cm) tall.
Bows (Make 3)
Use green.
Loops (make 2 per bow): Ch 16 and join with a sl st to form a ring. Ch 1, work 24 sc into the ring, then join. (24 sc) Fasten off. Pinch one side of the ring flat to make a teardrop shape about 1.4 in (3.6 cm) wide.
Tails (make 1 per bow): Ch 19. Sc in the 2nd ch from the hook and in each ch across. (18 sc, 3.6 in / 9.1 cm) Fold the strip into a V at its center, which gives two tails of 1.8 in (4.6 cm) each.
Knot (make 1 per bow):
– Row 1: Ch 5, then sc in the 2nd ch from the hook and in each ch across. (4 sc)
– Rows 2–4: Ch 1, sc in each st across. (4 sc)
Assemble each bow:
1. Lay the two loops point-to-point.
2. Place the V of the tails behind them.
3. Wrap the knot around the center and sew its ends together at the back.
The finished bow is 3.0 in (7.6 cm) wide.
Attaching the Appliqués
Each of the three bands (Rows 5–9, 14–18 and 23–27) gets one bell pair and one bow.
- Place the bells. Pin two bells side by side with their tops touching at the center of Row 5. Tilt their rims slightly outward. The pair spans about 4.0 in (10.2 cm), which leaves 0.5 in (1.3 cm) of mesh visible on each side.
- Check the bell position. The mouths should sit just above the hub of the next fan. The bells are 2.1 in (5.3 cm) tall and the band is 2.0 in (5.1 cm), so the bell tops overlap the last fan row slightly. This is intended.
- Sew the bells. Whipstitch around each bell’s top and sides through the dc and mesh stitches. Leave the mouth arches and the popcorn free.
- Add the bow. Center the bow over the bell tops, on the Row 4/Row 5 line. Sew down the knot and the loop points, and tack the tail ends onto the bells.
Sew loosely so the lace doesn’t pucker.
Border
Border gauge: 5 sc = 1 in (2.5 cm).
On the long sides, each dc row edge measures 0.4 in and takes 2 sc. Each dtr row edge measures 0.8 in and takes 4 sc.
The corner ch-1 spaces and the corner (sc, ch 1, sc) groups are separate from the side counts given below.
Round 1
With the RS facing, ch 1. Work 25 sc across Row 32 (the bottom edge), then ch 1 for the corner.
Down the long side, work 2 sc in each dc row edge and 4 sc in each dtr row edge. (90 sc) Ch 1 for the corner.
Work 25 sc across the free loops of the foundation chain (the top edge), then ch 1 for the corner. Work the second long side the same way. (90 sc) Ch 1 for the corner, then join to the first sc.
Count: 25 + 90 + 25 + 90 = 230 sc, plus 4 corner ch-1 sps.
Round 2
Bottom edge: Ch 1, sc in the first sc. Work (skip 2 sc, 7 dc in the next sc, skip 2 sc, sc in the next sc) 4 times. This uses 1 + 4 × 6 = 25 sts and makes 4 scallops, each 1.25 in (3.2 cm) wide.
Corner: (sc, ch 1, sc) in the corner sp.
Long side: Work (sc in the next 2 sc, picot, sc in the next sc) 30 times. This uses all 90 sc.
Corner: (sc, ch 1, sc) in the corner sp.
Top edge: Sc in the next sc, ch 14, skip the next sc. Sc in the next 21 sc. Ch 14, skip the next sc, then sc in the last sc. This uses 1 + 1 + 21 + 1 + 1 = 25 sts.
Corner: (sc, ch 1, sc) in the corner sp.
Second long side: Repeat the long-side instructions. (30 picot groups)
Corner: (sc, ch 1, sc) in the corner sp, then join with a sl st. Fasten off.
Loop Reinforcement
Join cream to one ch-14 loop and work 24 sc over the chain. Sl st to the base and fasten off. Repeat on the second loop.
Why the Math Works
- Long sides: 21 dc rows × 2 + 12 dtr rows × 4 = 90. Since 90 ÷ 3 = 30, the picot groups fit with nothing left over.
- Bottom edge: 25 = 1 + (4 × 6), so the 4 scallops fit exactly.
- Width: The strip’s 5.0 in plus 0.5 in of border on each side gives 6.0 in (15.2 cm).
- Length: 18.0 in plus 0.4 in at the top and 0.6 in at the bottom gives 19.0 in (48.3 cm).
Final Blocking
- Weave in all ends except the sewing tails you already used.
- Spray the strip until it is damp but not dripping.
- Pin it to 6.0 in × 19.0 in (15.2 cm × 48.3 cm).
- Pin out each scallop tip and each picot along the edges.
- Pin the fan spokes straight so they radiate evenly from the hub.
- Shape the bell rims and the bow loops with your fingers. Don’t flatten the popcorn clappers.
- Pin each hanging loop upward to 1.0 in (2.5 cm).
- Let it dry completely before unpinning.
Final Quality-Control Checklist
- Every row has 25 sts.
- Each fan has 7 evenly spaced spokes.
- The strip measures 5.0 in × 18.0 in (12.7 cm × 45.7 cm) before the border.
- Round 1 has 25 / 90 / 25 / 90 sc.
- There are 4 scallops at the bottom and 30 picots on each side.
- All six bells match: 11 sc at the rim, with a popcorn centered in the mouth.
- The bows are centered over the bell tops, with the tails lying flat.
- Both hanging loops are reinforced and the same height.
- The finished size is 6.0 in × 19.0 in (15.2 cm × 48.3 cm).
Troubleshooting
- Fan spokes look slanted: Make sure each spoke dtr goes into the spoke below it, not into a chain space.
- The strip narrows at the bands: Your mesh chains are too tight. Loosen them slightly.
- The side edges ripple: Your side count is off. Recount to exactly 2 sc per dc row and 4 sc per dtr row.
- The scallops curl: Block them firmly, or work the 7 dc a little looser.
- The bells cup: Press them flat under a damp cloth before you sew them on.
- The popcorn sinks: Push it through to the RS from the back.
Care
Hand wash in cool water with mild soap. Roll the strip in a towel to remove water, then dry it flat and re-pin the scallops if needed.
Final Notes
Here is the measurement chain. Gauge is 20 dc = 4 in. The foundation is 25 sts, or 5.0 in (12.7 cm). Each fan-and-band section is 4.8 in (12.2 cm) tall, and the finished strip body is 18.0 in (45.7 cm). The border brings the piece to 6.0 in × 19.0 in (15.2 cm × 48.3 cm). Check your size at each stage and the bells and bows will fit their bands exactly.
Happy crocheting!