
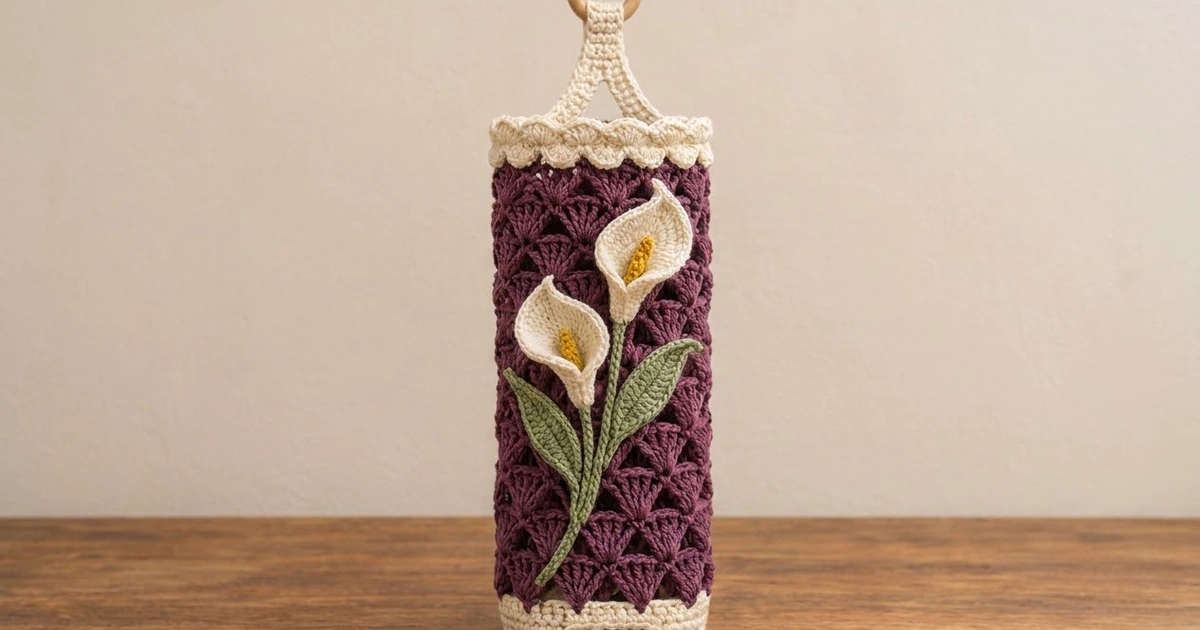
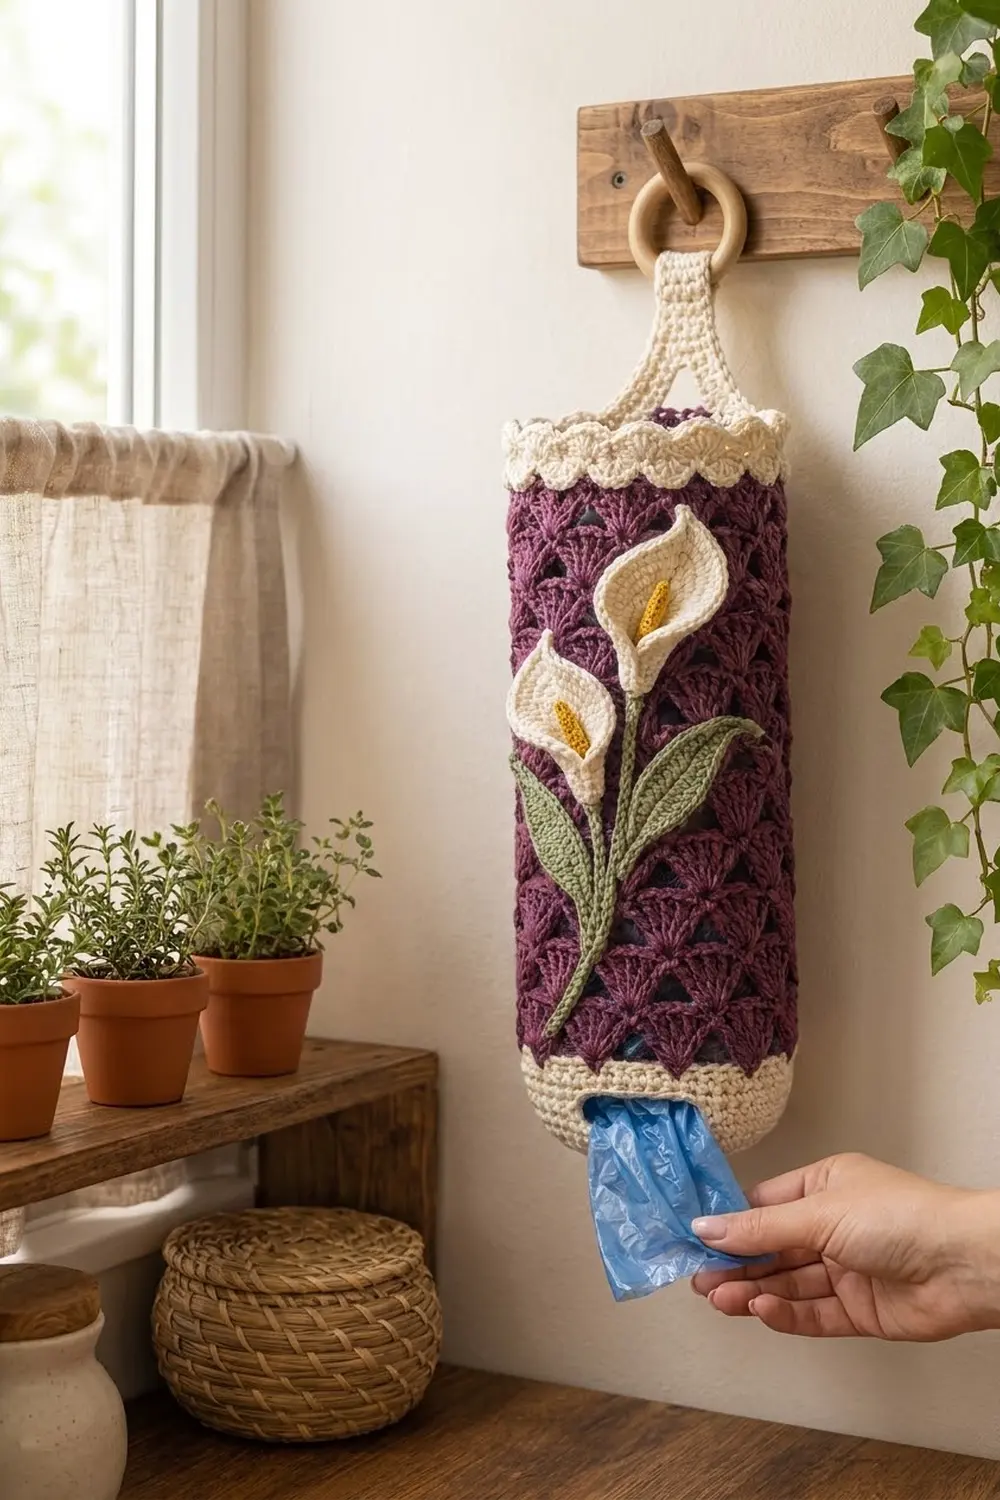
This hanging grocery bag holder has a deep plum fan-shell body, crisp cream trim and a raised calla lily appliqué. You stuff plastic bags in at the top, pull them out through the oval slot at the bottom, and hang it from a natural wooden ring.
The colors are plum for the lacy body; cream for the base, top band, strap and lily flowers; sage green for the stems and leaves; and mustard yellow for the flower centers. The same pattern also works in dusty mauve if you want a softer look.
The pattern uses US crochet terms. The finished body is 15 in (38.1 cm) around, which is 7.5 in (19.1 cm) wide when laid flat, and 14.65 in (37.2 cm) tall. The strap adds about 6.25 in (15.9 cm) above the rim, not counting the ring.
The body is worked in one continuous piece. You start with a flat round base, then work a cream wall with a bag slot, plum shell rounds, and a cream top band with a scalloped flap. Two strap legs are worked up from the rim, joined together and wrapped around the ring. The lilies, leaves and stems are made separately and sewn onto the front.
Finished Size and Construction
- Finished size: 15 in (38.1 cm) around × 14.65 in (37.2 cm) tall body; the strap adds 6.25 in (15.9 cm)
- Skill level: Intermediate
- Terminology: US
- Yarn weight: Worsted (#4) cotton
- Hook: 4.5 mm (US 7)
- Number of pieces: 1 body (base, walls, band and strap all in one) plus 8 small appliqué parts
- Layout: One tube, with the appliqué centered on the front above the bag slot
- Piece size: 7.5 in (19.1 cm) wide when flat × 14.65 in (37.2 cm) tall
- Size before border: 13.4 in (34.0 cm) tall (cream base band plus plum shell body)
- Border depth: 1.25 in (3.2 cm) cream top band, plus a scalloped flap that hangs down over the plum
Materials
Use a smooth worsted-weight cotton or cotton blend with about 85 m (93 yd) per 50 g. Cotton holds its shape when the holder is full of bags, and it shows the shell texture clearly.
- Plum (main color): 120 g / 204 m (223 yd)
- Cream: 70 g / 119 m (130 yd)
- Sage green: 15 g / 26 m (28 yd)
- Mustard yellow: 5 g / 9 m (10 yd)
These amounts include a margin of about 15%.
Tools:
– 4.5 mm (US 7) crochet hook
– Wooden ring, 2 in (5.1 cm) outer diameter
– Tapestry needle
– 4 stitch markers
– Rust-proof pins and a cylinder for blocking (a rolled towel works)
Abbreviations (US Terms)
- ch – chain
- sl st – slip stitch
- sc – single crochet
- hdc – half double crochet
- dc – double crochet
- tr – treble crochet
- sc2tog – single crochet 2 together
- inc – 2 sc in the same stitch
- BLO / FLO – back loop only / front loop only
- MR – magic ring
- sk – skip
- st(s) – stitch(es)
- RS / WS – right side / wrong side
Special stitches:
– Shell: 7 dc in the same stitch.
– Half shell: 3 dc in the same stitch. A B round starts and ends with a half shell, and the two halves make one shell across the join.
– Picot: ch 3, sl st in the 3rd ch from hook.
Join every round with a sl st and do not turn. A beginning ch 1 does not count as a stitch. A beginning ch 3 counts as a dc.
Gauge and Checkpoints
- Sc gauge: 16 sc and 16 rounds = 4 in (10.2 cm)
- Shell gauge: 2 shell repeats and 5 rounds = 3 in (7.6 cm). That makes 1 repeat = 1.5 in (3.8 cm) and 1 round = 0.6 in (1.5 cm).
Use the base as your test piece: work Rounds 1–10 and measure before you go on.
Checkpoints:
1. After Rnd 10: the disc is 4.75 in (12.1 cm) across.
2. After Rnd 18: the cream wall is 2 in (5.1 cm) tall and 7.5 in (19.1 cm) wide when flattened.
3. After Rnd 24: the plum section is 3.6 in (9.1 cm) tall and still 7.5 in (19.1 cm) wide when flat.
4. After Rnd 37: the plum section is 11.4 in (29.0 cm) tall.
5. After Rnd 43: the body is 14.65 in (37.2 cm) tall.
If the piece is too big, go down one hook size. If it is too small, go up one size. If only the shell section flares, use a hook 0.5 mm smaller for the plum rounds only.
Pattern
Base (Cream)
Rnd 1: 6 sc in MR, join. (6)
Rnd 2: Inc in each st. (12)
Rnd 3: Sc 1, inc around. (18)
Rnd 4: Sc 2, inc around. (24)
Rnd 5: Sc 3, inc around. (30)
Rnd 6: Sc 4, inc around. (36)
Rnd 7: Sc 5, inc around. (42)
Rnd 8: Sc 6, inc around. (48)
Rnd 9: Sc 7, inc around. (54)
Rnd 10: Sc 8, inc around. (60)
Checkpoint: 4.75 in (12.1 cm) across when lying flat.
Cream Wall and Bag Slot
Rnd 11: Ch 1, sc in BLO of each st. (60) This turns the wall upward.
Rnds 12–14: Ch 1, sc in each st. (60)
Rnd 15 (slot): Ch 1, sc 20, ch 14, sk 14, sc 26. (60: 46 sc + 14 ch)
Rnd 16: Ch 1, sc in each sc and in each ch. (60)
Rnds 17–18: Ch 1, sc in each st. (60) Change to plum on the last yarn over of the Rnd 18 join. Fasten off cream.
The slot is 3.5 in (8.9 cm) wide and sits about 1 in (2.5 cm) above the bottom edge.
Plum Fan-Shell Body
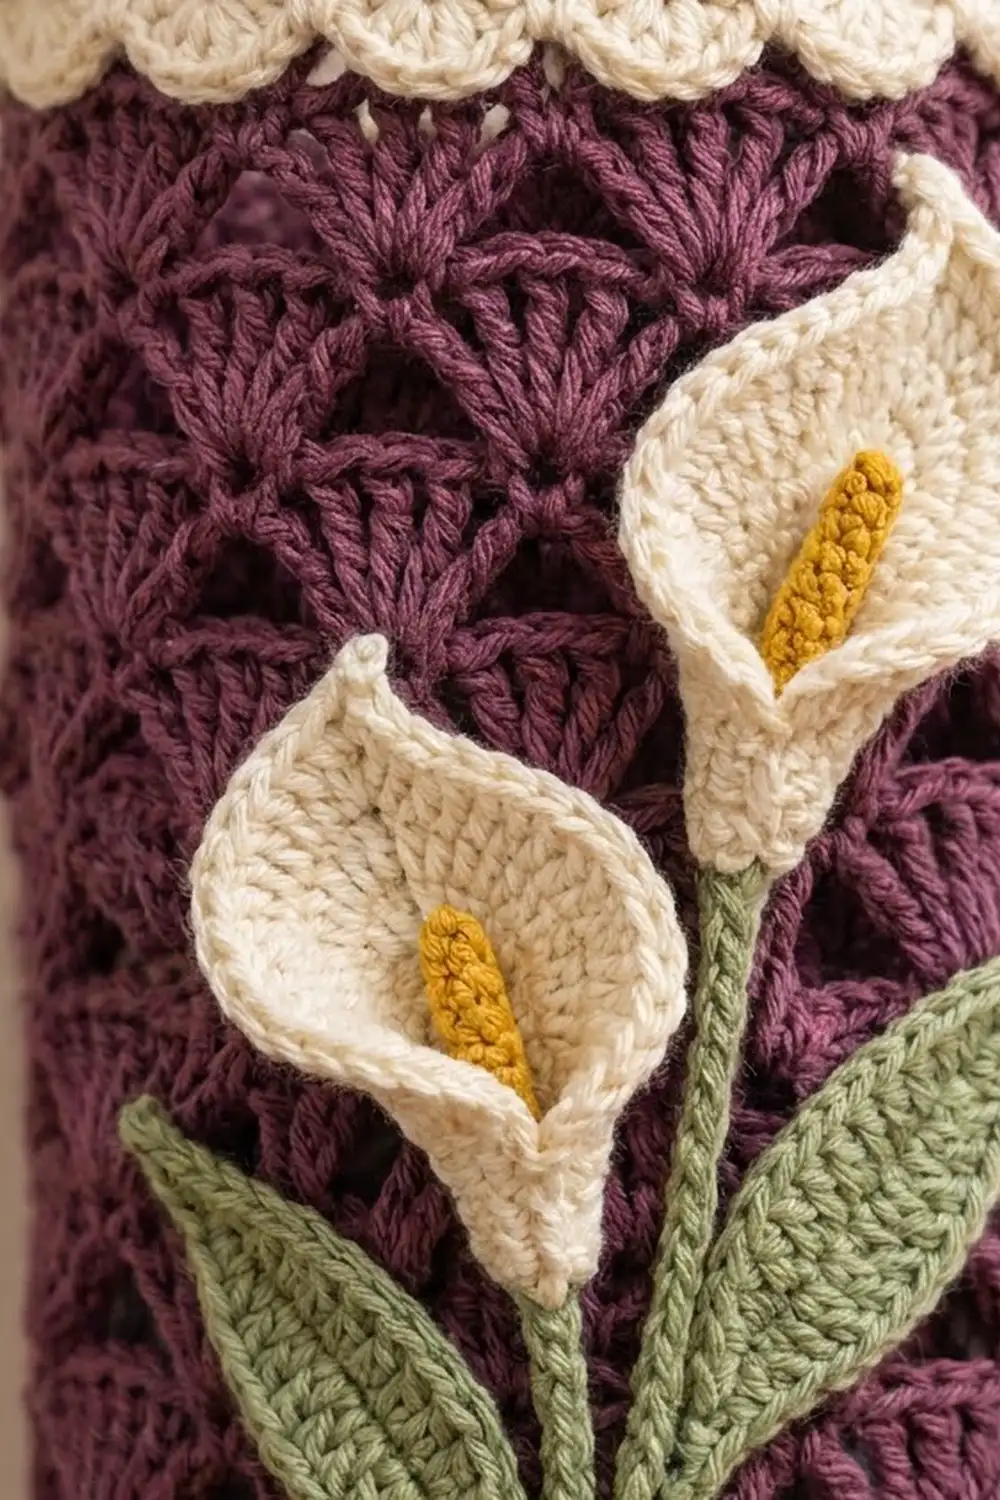
Rnd 19 (A, setup): Ch 1, sc in first st, sk 2, shell in next st, sk 2, sc in next st; repeat around, leaving off the final sc. Join to the first sc. (80: 10 shells + 10 sc)
Rnd 20 (B): Ch 3, 3 dc in same st (half shell). Sk 3 dc, sc in next dc (the center of the shell), sk 3 dc, shell in next sc; repeat 8 more times. Then sk 3 dc, sc in next dc, sk 3 dc, 3 dc in first st, and join to top of ch 3. (80: 10 shells + 10 sc)
Rnd 21 (A): Ch 1, sc in same st (the top of ch 3, which is the center of the split shell). Sk 3 dc, shell in next sc, sk 3 dc, sc in next dc; repeat around, leaving off the final sc. Join to the first sc. (80: 10 shells + 10 sc)
Rnds 22–37: Alternate B rounds (as Rnd 20) and A rounds (as Rnd 21). Rnd 37 is an A round. (80 each round)
Each new shell sits in the sc between two shells below. This staggers the fans in offset columns with triangular openings between them.
Checkpoint: 11.4 in (29.0 cm) of plum, 7.5 in (19.1 cm) wide when flat.
Calla Lily Spathe (Make 2, Cream)
The spathe is the cream petal of the lily.
Ch 12.
Rnd 1: Sc in 2nd ch from hook, hdc in next ch, dc in next 3 ch, tr in next 5 ch, then (2 tr, picot, 2 tr) in last ch. Turn the piece and work along the other side of the chain: tr in next 5 ch, dc in next 3 ch, hdc in next ch, sc in next ch, 2 sc in the base end. Join. (26 sts + picot)
Rnd 2: Ch 1, sc in each st to the picot, (sc, ch 2, sc) in picot, sc in each remaining st. Join. (28 sc + ch-2 tip)
Fasten off, leaving a 12 in (30.5 cm) tail. You now have a teardrop 3.25 in (8.3 cm) long and 2.25 in (5.7 cm) wide.
Shaping: Fold the two lower edges toward each other until they overlap by 0.5 in (1.3 cm) at the narrow end. Whipstitch the overlap from the base up 1.25 in (3.2 cm). This gives a funnel with a flared opening and a pointed tip that curls back.
Spadix (Make 2, Yellow)
The spadix is the yellow center of the lily.
Ch 9. Work 2 hdc in 2nd ch from hook and 2 hdc in each ch across. (16 hdc) The strip coils into a bumpy rod about 2 in (5.1 cm) long. Sew one inside each spathe at the base seam, standing upright.
Leaf (Make 2, Green)
Ch 15.
Rnd 1: Sc in 2nd ch from hook, hdc in next 2 ch, dc in next 7 ch, hdc in next 2 ch, sc in next ch, then (sc, ch 2, sc) in last ch. Turn the piece and work along the other side of the chain: sc in next ch, hdc in next 2 ch, dc in next 7 ch, hdc in next 2 ch, sc in next ch. Join. (28 sts + ch-2 tip)
Each leaf is a pointed shape 3.75 in (9.5 cm) long and 1.25 in (3.2 cm) wide. The foundation chain forms the center vein.
Stems (Green)
- Long stem: Ch 36, sl st in 2nd ch from hook and in each ch across. (35 sl st) About 8 in (20.3 cm) long.
- Short stem: Ch 12, sl st in 2nd ch from hook and in each ch across. (11 sl st) About 2.5 in (6.4 cm) long.
Appliqué Assembly
Lay the body flat with the slot centered on the front. Mark both side folds with stitch markers.
- Pin the long stem so it starts 1 in (2.5 cm) above the lower cream band, left of center. Curve it up and to the right, ending 2.5 in (6.4 cm) below the top band.
- Pin the short stem so it branches to the left from the middle of the long stem.
- Place a spathe at the end of each stem, narrow base down. The upper lily sits right of center and the lower lily sits left of center.
- Pin the leaves on the lower third of the long stem, one pointing up and left and one pointing up and right.
- Whipstitch everything into the shell stitches. Sew the spathes along their back and base only, so they stay three-dimensional.
Top Band (Border)
Work the border at sc gauge (16 sc = 4 in / 10.2 cm). “Per side” means the front or back half of the flattened tube.
Rnd 38 (conversion): Join cream with a sl st in the first sc of Rnd 37. Ch 3 (counts as dc). Sc in 1st dc of shell, sk 1, sc in 3rd, 4th and 5th dc, sk 1, sc in 7th dc, dc in next sc; repeat around, leaving off the final dc. Join to top of ch 3. (60: 50 sc + 10 dc, worked into 60 of the 80 sts with 20 dc skipped; 30 per side) The dc fills the low point between fans and levels the edge.
Rnd 39: Ch 1, sc in each st. (60; 30 per side)
Rnd 40 (scallops, FLO): Ch 1, sc in FLO of next st, sk 2, shell in FLO of next st, sk 2; repeat around, join. (80: 10 scallops + 10 sc; 40 per side, which is 5 scallops)
Rnd 41: Ch 1. Working behind the scallops into the unused back loops of Rnd 39, sc in each st. (60; 30 per side)
Rnds 42–43: Ch 1, sc in each st. (60; 30 per side) Fasten off.
Why the math works:
– 60 sts make 10 repeats of 6, so the 10 scallops line up over the 10 body shells.
– 30 sts per side at 4 sc per inch is 7.5 in (19.1 cm), the same as the body width, so the band neither ruffles nor pulls in.
– The scallops are worked in front loops, so they fold down and add no height. The band stays at 5 sc rounds, or 1.25 in (3.2 cm).
Strap (Cream)
Work Leg A at one side-fold marker and Leg B at the other.
Row 1: Join cream with a sl st 3 sts before the marker. Ch 1, sc in same st and in next 5 sts, turn. (6)
Rows 2–14: Ch 1, sc in each st, turn. (6)
Fasten off Leg A. Work Leg B the same way, but do not fasten off.
Row 15: Bring the tops of the two legs together. Ch 1, sc across the 6 sts of Leg B, then across the 6 sts of Leg A, turn. (12)
Row 16: Ch 1, sc2tog 6 times, turn. (6)
Rows 17–30: Ch 1, sc in each st, turn. (6)
Fasten off, leaving an 18 in (45.7 cm) tail. The strap is 1.5 in (3.8 cm) wide and 7.5 in (19.1 cm) long. Pass the last 1.25 in (3.2 cm) through the ring, fold it to the WS and whipstitch it down. This leaves about 6.25 in (15.9 cm) between the rim and the ring, and the legs spread into a V when the holder hangs.
Final Blocking
- Weave in all ends on the WS.
- Soak the holder in cool water, then press out the water in a towel without wringing.
- Slide a cylinder 4.75 in (12.1 cm) across inside, such as a rolled towel.
- Pin the scallops so they hang evenly over the plum.
- Shape the lily funnels and curl their tips back.
- Check that it measures 15 in (38.1 cm) around and 14.65 in (37.2 cm) tall.
- Let it dry completely.
Final Quality-Control Checklist
- The base is flat and 4.75 in (12.1 cm) across.
- The slot is 3.5 in (8.9 cm) wide and centered under the appliqué.
- Every shell round has 80 sts, and the columns stay offset.
- The top band has 60 sts and 10 scallops lined up over the shells.
- Both strap legs are 14 rows and sit at the side folds.
- The ring is stitched on securely.
- The lilies stay raised and the yellow centers stand upright.
Troubleshooting
- Base cups or ruffles: Recount the increases. Each round should add exactly 6 sts.
- Body flares: Use a hook 0.5 mm smaller for the plum rounds.
- Shells stack instead of staggering: Each shell must go into an sc, and each sc must go into the 4th dc of a shell.
- Top band puckers: Recount Rnd 38. It must have exactly 60 sts.
- Strap twists: Make sure the legs aren’t crossed before you work Row 15.
Care
Hand wash in cool water and dry over a cylinder. Don’t tumble dry.
Final Notes
The measurements build on each other. The 60-st base, 4.75 in (12.1 cm) across, becomes a wall 15 in (38.1 cm) around. Ten shell repeats of 1.5 in (3.8 cm) keep that size through 11.4 in (29.0 cm) of plum. The 60-st top band brings the body to 14.65 in (37.2 cm) tall, and the strap adds about 6.25 in (15.9 cm). If your gauge is right at the base, the rest will fit.
Happy crocheting!