

Tangled charging cables are a daily annoyance, and this little wall panel gives them a cheerful home. The Happy Cloud Cable Organizer is a flat single crochet panel shaped like a tall rounded rectangle. It has a puffy cloud with three bumps on top, a sleepy smiling face, and a center strap that holds five coiled cables.
The colors are soft and simple: a light sky-blue body, a royal blue border and hanging loop, two tiny pink cheeks, and black embroidered eyes and smile. The style is kawaii but tidy, and the firm fabric hangs flat on a wall hook.
This pattern uses US crochet terms. The finished organizer measures 6.9 in (17.5 cm) wide across the body, 7.8 in (19.8 cm) wide across the cloud, and 11.8 in (30.0 cm) tall. The hanging loop adds about 1.25 in (3.2 cm).
You work the panel in rows from the bottom up. Increases widen it for the cloud, and three short-row bumps shape the top. Then you add the face, make and tack on the strap, and finish with a two-round border that also forms the loop.
Finished Size and Construction
- Finished size: 6.9 in (17.5 cm) wide at the body, 7.8 in (19.8 cm) wide at the cloud, 11.8 in (30.0 cm) tall, not counting the loop
- Skill level: Easy / advanced beginner
- Terminology: US
- Yarn weight: Worsted (#4), cotton or cotton blend
- Hook: 4.0 mm (G-6)
- Number of pieces: 1 main panel, 1 strap, 2 cheek appliqués
- Layout: single panel; no motifs to join
- Panel size before border: 6.0 in (15.2 cm) wide at the body, 6.9 in (17.5 cm) wide at the cloud, 10.9 in (27.7 cm) tall at the center bump
- Border depth: 2 rounds, about 0.45 in (1.1 cm)
Materials
Choose a smooth worsted cotton or cotton blend. Cotton keeps the panel firm and stops it from stretching under the weight of the cables.
- Light blue (panel and strap): 45 g, about 90 m
- Royal blue (border and loop): 15 g, about 30 m
- Pink (cheeks): 2 g, about 4 m
- Black (face embroidery): 2 g, about 4 m
All quantities include a margin of about 15 percent for a gauge swatch and small differences in tension.
Tools:
- 4.0 mm (G-6) crochet hook
- Tapestry needle
- 4 locking stitch markers
- Scissors
- Tape measure
- Rust-proof pins and a blocking mat or folded towel
- Optional: spray bottle
Abbreviations (US Terms)
- ch – chain
- sc – single crochet
- sc2tog – single crochet 2 together
- sl st – slip stitch
- st(s) – stitch(es)
- BLO – back loop only
- MR – magic ring
- RS / WS – right side / wrong side
Special stitch – BLO ridge row: work every sc of the row into the back loop only. The unused front loops form a raised horizontal ridge on the side facing you. On the strap, all ridge rows are odd rows, so every ridge appears on the RS.
Gauge and Checkpoints
Gauge: 18 sc and 18 rows = 4 in (10.2 cm) in sc rows with a 4.0 mm hook. One stitch and one row each measure about 0.22 in (0.6 cm).
This square gauge matters. Because a row is as tall as a stitch is wide, you can work exactly 1 border stitch into each row end along the sides without ruffling or pulling.
Make a swatch 20 stitches wide and 20 rows tall first. If you get more than 18 sts per 4 in, go up a hook size. If you get fewer, go down a size. If your stitch count matches but your row count does not, change how tightly you pull up each loop.
Checkpoints:
- After Row 3: 6.0 in (15.2 cm) wide
- After Row 36: 6.0 in (15.2 cm) wide, 8.0 in (20.3 cm) tall
- After Row 44: 6.9 in (17.5 cm) wide, 9.8 in (24.9 cm) tall
- After the bumps: 10.9 in (27.7 cm) tall at the center
- After the border: 6.9 in (17.5 cm) by 11.8 in (30.0 cm)
If the panel is more than 0.25 in (0.6 cm) too wide at Row 10, start again with a smaller hook.
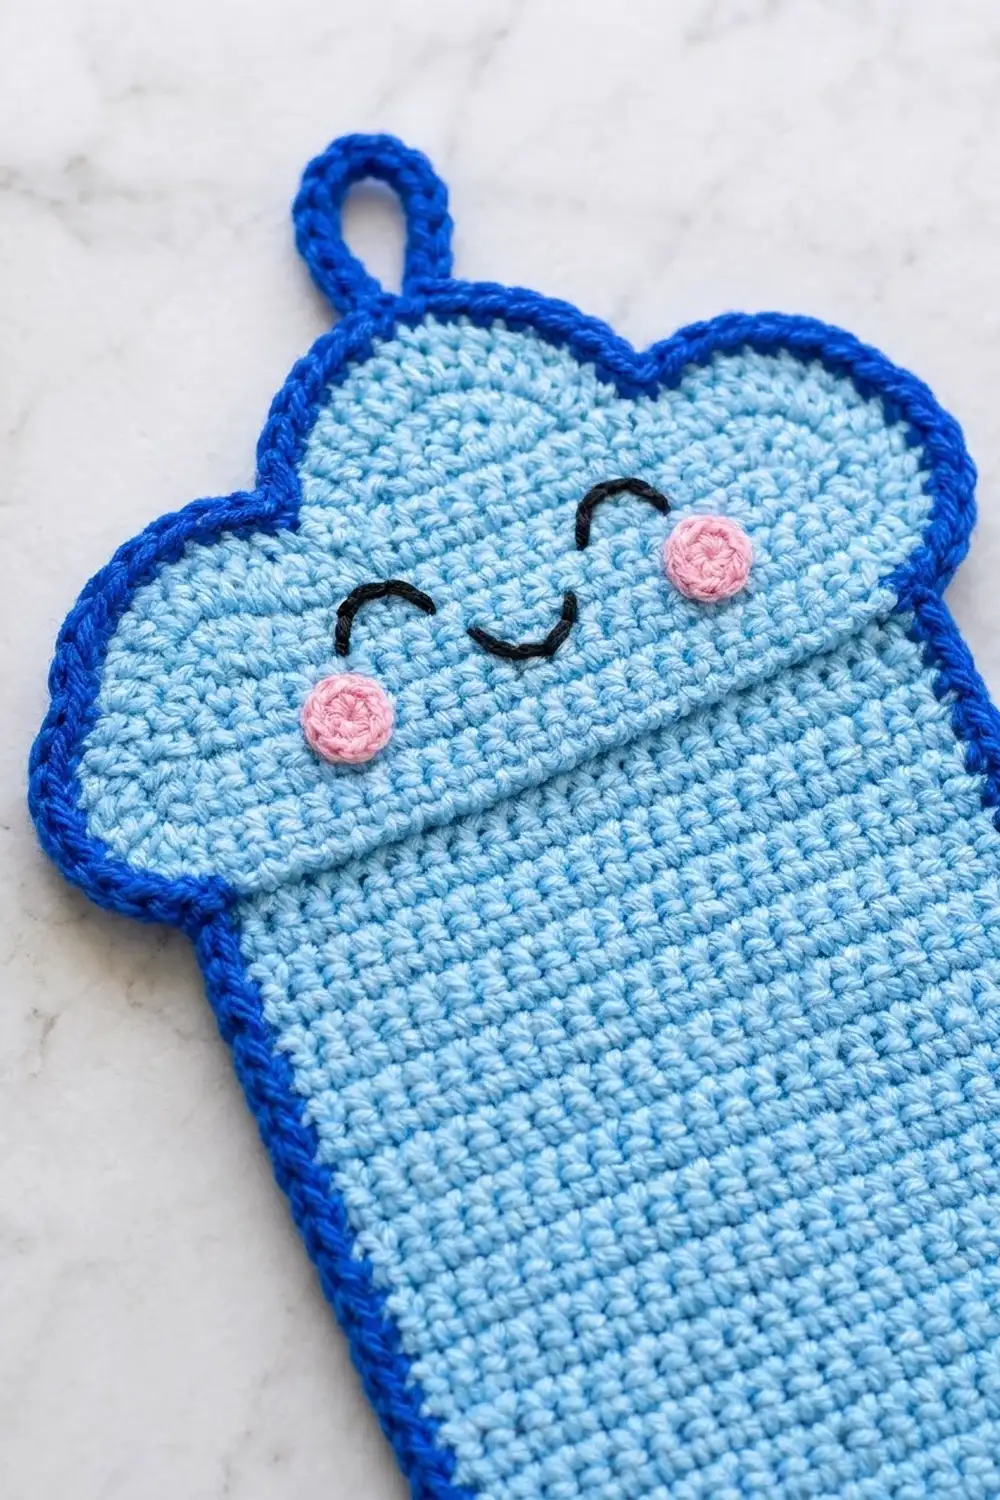
Main Panel
With light blue, ch 24.
Row 1 (RS): Sc in 2nd ch from hook and in each ch across, turn. (23 sts)
Row 2: Ch 1, 2 sc in first st, sc in next 21 sts, 2 sc in last st, turn. (25 sts)
Row 3: Ch 1, 2 sc in first st, sc in next 23 sts, 2 sc in last st, turn. (27 sts)
These two increase rows create the rounded bottom corners.
Rows 4–36: Ch 1, sc in each st across, turn. (27 sts per row)
Check: 6.0 in (15.2 cm) wide and 8.0 in (20.3 cm) tall.
Cloud Base
Row 37: Ch 1, 2 sc in first st, sc in next 25 sts, 2 sc in last st, turn. (29 sts)
Row 38: Ch 1, 2 sc in first st, sc in next 27 sts, 2 sc in last st, turn. (31 sts)
These rows create the small overhang where the cloud is wider than the body.
Rows 39–44: Ch 1, sc in each st across, turn. (31 sts per row)
Check: 6.9 in (17.5 cm) wide and 9.8 in (24.9 cm) tall. Do not fasten off yet.
Place markers in Row 44 to divide it into three groups: sts 1–9 (first side bump), sts 10–22 (center bump), and sts 23–31 (second side bump). 9 + 13 + 9 = 31.
First Side Bump
Continue on sts 1–9 only.
Row 45: Ch 1, sc in next 9 sts, turn. (9 sts)
Row 46: Ch 1, sc2tog, sc in next 5 sts, sc2tog, turn. (7 sts)
Row 47: Ch 1, sc2tog, sc in next 3 sts, sc2tog. (5 sts) Fasten off.
Center Bump
Join light blue in st 10 of Row 44, with the same side facing you as when you worked Row 45.
Row 45: Ch 1, sc in same st and next 12 sts, turn. (13 sts)
Row 46: Ch 1, sc in each st across, turn. (13 sts)
Row 47: Ch 1, sc2tog, sc in next 9 sts, sc2tog, turn. (11 sts)
Row 48: Ch 1, sc2tog, sc in next 7 sts, sc2tog, turn. (9 sts)
Row 49: Ch 1, sc2tog, sc in next 5 sts, sc2tog. (7 sts) Fasten off.
Second Side Bump
Join light blue in st 23 of Row 44 and repeat Rows 45–47 of the first side bump. (9, 7, 5 sts) Fasten off.
Check: the top of the center bump is 10.9 in (27.7 cm) above the foundation edge, and each side bump is 2 rows, or 0.45 in (1.1 cm), lower. Weave in all ends.
Cheeks (Make 2)
With pink, make an MR. Work 8 sc into the ring, pull it closed, and sl st to the first sc. (8 sts) Each cheek is about 0.5 in (1.3 cm) across. Leave a 6 in (15.2 cm) tail for sewing.
Strap
With light blue, ch 4.
Row 1 (RS): Sc in 2nd ch from hook and next 2 ch, turn. (3 sts)
Row 2: Ch 1, 2 sc in first st, sc in next st, 2 sc in last st, turn. (5 sts)
Row 3 (ridge row): Ch 1, sc in BLO of each st across, turn. (5 sts)
Rows 4–10: Ch 1, sc in each st across, turn. (5 sts per row)
Row 11 (ridge row): Ch 1, sc in BLO of each st across, turn. (5 sts)
Rows 12–35: Repeat Rows 4–11 three more times. (5 sts per row) The ridge rows are Rows 19, 27, and 35.
Rows 36–42: Ch 1, sc in each st across, turn. (5 sts per row)
Row 43 (ridge row): Ch 1, sc in BLO of each st across, turn. (5 sts)
Row 44: Ch 1, sc2tog, sc in next st, sc2tog. (3 sts) Fasten off, leaving a 24 in (61.0 cm) tail.
You now have 44 rows and 6 ridges (Rows 3, 11, 19, 27, 35, 43), spaced 8 rows or 1.8 in (4.6 cm) apart. The strap measures 1.1 in (2.8 cm) by 9.8 in (24.9 cm).
Face and Strap Assembly
Face: On the RS, number the stitches of Row 44 from 1 to 31. With black, backstitch an upward arch for each eye, one across sts 10–12 and one across sts 20–22, rising from Row 43 to Row 44. Backstitch a small U-shaped smile across sts 14–18 between Rows 41 and 42. Sew one cheek centered on st 8 and one centered on st 24, both at Row 42.
Strap: Lay the strap RS up over the body, centered on st 14 so it covers sts 12–16. Put the Row 1 end at the bottom. Tack each ridge across its full width to one panel row, in this order from the bottom: Rows 8, 13, 18, 23, 28, and 33. That places the ridges 5 rows, or 1.1 in (2.8 cm), apart on the panel.
Each strap section between ridges is 1.8 in (4.6 cm) long but covers only 1.1 in (2.8 cm) of panel. The extra 0.7 in (1.8 cm) or so of slack makes five loops that lift to hold a coiled cable. Tack each rounded tip down with 1 stitch so the ends lie flat.
Border
Border gauge: the same 18 sc = 4 in (10.2 cm). Each border round adds about 0.22 in (0.6 cm) on every side.
Round 1: With RS facing, join royal blue in the first foundation ch at the bottom edge. Work 1 sc in each st or row end unless stated otherwise:
- Bottom edge: 23 sc in the foundation loops
- Each bottom corner: 2 sc in Row 1 end, 2 sc in Row 2 end, 1 sc in Row 3 end (5 sc)
- Each body side: 1 sc in each row end of Rows 4–36 (33 sc)
- Each cloud overhang: 1 sc in Row 37 end and 1 sc in Row 38 end (2 sc)
- Each cloud base side: 1 sc in each row end of Rows 39–44 (6 sc)
- Each side bump outer edge: 2 sc in each of the 3 row ends (6 sc)
- Each side bump top: 2 sc in first st, sc in next 3 sts, 2 sc in last st (7 sc)
- Each side bump inner edge: 1 sc in Row 47 end and 1 sc in Row 46 end (2 sc)
- Each valley: sc2tog over the Row 45 end of the side bump and the Row 45 end of the center bump (1 st)
- Each center bump side: 1 sc in Row 46 and Row 47 ends, 2 sc in Row 48 and Row 49 ends (6 sc)
- Center bump top: 2 sc in first st, sc in next 5 sts, 2 sc in last st (9 sc)
Sl st to the first sc. (168 sts: 23 + 10 + 66 + 4 + 12 + 12 + 14 + 4 + 2 + 12 + 9)
Round 2: Ch 1, sc in each st around, with these changes:
- Each bottom corner (over its 5 sts): sc, 2 sc, sc, 2 sc, sc (7 sc)
- Each side bump outer edge (over its 6 sts): sc, 2 sc, sc, sc, 2 sc, sc (8 sc)
- Each valley: sc2tog over the last inner-edge st and the valley st (the 2 inner-edge sts plus the valley st become 2 sts instead of 3)
- Center bump top (over its 9 sts): sc in next 3 sts, 2 sc in next st, sc in next st, 2 sc in next st, sc in next 3 sts (11 sc)
Sl st to the first sc. (176 sts: 168 + 4 + 4 − 2 + 2) Fasten off.
Hanging loop: Number the 11 sts of the Round 2 center top from 1 to 11. Join royal blue in st 4. Ch 14, skip the next 3 sts, and sl st in st 8. Work 20 sc into the ch-14 space, then sl st in st 4. Fasten off and weave in the ends. The loop stands about 1.25 in (3.2 cm) tall.
Why the math works: because the gauge is square, 1 sc per stitch or per row end matches the edge length exactly, so the straight edges stay flat. Outward curves, like the corners and bump tops, need extra stitches to go around the outside of the curve. The inward valleys need a decrease so the border doesn’t bunch up. The two rounds add 0.45 in (1.1 cm) per side. That takes the width from 6.0 in (15.2 cm) to 6.9 in (17.5 cm) and the height from 10.9 in (27.7 cm) to 11.8 in (30.0 cm).
Final Blocking
- Lightly dampen the organizer with a spray bottle, or wet it and roll it in a towel to remove extra water.
- Lay it RS up on a blocking mat.
- Pin the straight body sides first so they are parallel and 6.9 in (17.5 cm) apart.
- Pin the bottom edge straight, then ease the corners into smooth curves.
- Shape the three cloud bumps with your fingers and pin the valleys.
- Check the height: 11.8 in (30.0 cm) from the bottom edge to the top of the center bump.
- Slip a folded paper strip under each strap loop so the loops dry slightly open.
- Let it dry completely before unpinning.
Final Quality-Control Checklist
- Body width is 6.9 in (17.5 cm) and cloud width is 7.8 in (19.8 cm)
- Total height is 11.8 in (30.0 cm), not counting the loop
- Border Round 2 has 176 sts and lies flat with no ripples
- The two side bumps mirror each other
- The eyes and cheeks are level and symmetrical
- All 6 ridges are tacked securely, making 5 even loops
- The hanging loop is centered and firm
- All ends are woven in on the WS
Troubleshooting
Border ruffles: your rows are taller than your stitches are wide. Skip 1 row end in every 10 along the body sides.
Border cups or pulls: add 1 extra sc at each bottom corner and each side bump top, or use a hook one size larger for the border.
Panel curls: block it firmly. Next time, use a slightly larger hook for the panel.
Loops are too tight for thick cables: tack the ridges 6 rows apart instead of 5, and move the top and bottom ridges so the strap stays centered.
Valleys look pinched: replace the Round 2 sc2tog with a plain sc.
Care
Hand wash in cool water with mild soap and lay flat to dry. Reshape the cloud bumps while the piece is damp.

Final Notes
Here is the measurement chain. A gauge of 18 sc and 18 rows = 4 in (10.2 cm) gives a 27-st body of 6.0 in (15.2 cm) and a 31-st cloud of 6.9 in (17.5 cm). Forty-nine rows bring the panel to 10.9 in (27.7 cm). The two border rounds add 0.45 in (1.1 cm) per side, for a finished size of 6.9 by 11.8 in (17.5 by 30.0 cm). Each 1.8 in (4.6 cm) strap section tacked over a 1.1 in (2.8 cm) span leaves room for one cable. Hang it near your desk and enjoy a tidier workspace.
Happy crocheting!