

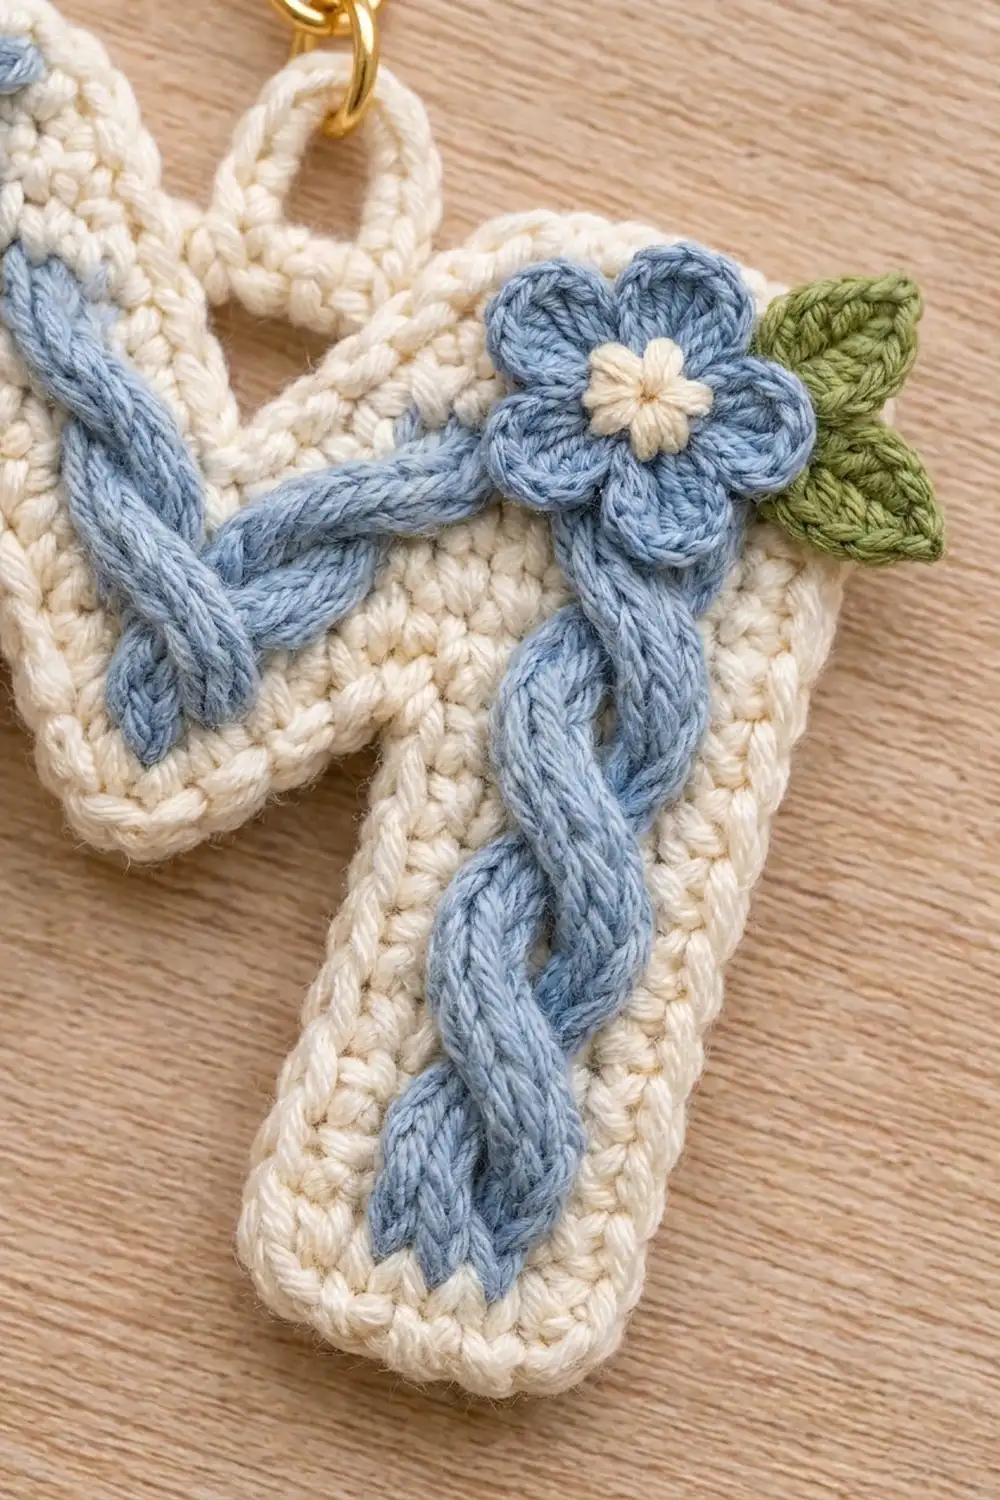
This little letter M keychain looks like a tiny cabled sweater. The cream base is solid single crochet, and chunky light-blue twisted cords sit on top like rope cables. Two blue flowers with green leaves, a raised cream rim, and a built-in hanging loop finish it off.
The palette is soft and fresh: cream, light denim blue, and a touch of leaf green. It suits a tote bag, backpack zipper, or set of keys, and it makes a thoughtful personalized gift.
This pattern uses US crochet terms. The finished charm measures 3.2 in (8.1 cm) wide by 3.4 in (8.6 cm) tall, not counting the hanging loop.
The construction is simple. You work the letter flat in rows from the bottom up: two separate legs, a joining row, a short center band, then two shaped peaks. A two-round border tidies every edge and adds the hanging loop. Last, you make twisted cords, flowers, and leaves and sew them on.
Finished Size and Construction
- Finished size: 3.2 in (8.1 cm) wide x 3.4 in (8.6 cm) tall
- Skill level: Advanced beginner
- Terminology: US crochet terms
- Yarn weight: DK (light worsted, #3)
- Hook: 3.5 mm (US E-4)
- Number of pieces: 1 letter base, plus small sewn-on appliqués (6 cord strands, 2 flowers, 4 leaves)
- Layout: Single letter; no grid or joining of motifs
- Piece size before border: 2.8 in (7.1 cm) wide x 3.0 in (7.6 cm) tall
- Border depth: 0.2 in (0.5 cm) on every edge
- Hanging loop: rises about 0.4 in (1.0 cm) above the top edge
Materials
Choose a smooth cotton or cotton-blend DK yarn. Cotton holds the letter shape well and shows the twisted cords clearly. Avoid fuzzy yarns, which blur the cable look.
- Cream (base, border, flower centers): 10 g, about 23 m
- Light blue (cords, petals): 5 g, about 12 m
- Green (leaves): 2 g, about 5 m
These quantities include a margin for your gauge swatch and tails.
Tools:
– 3.5 mm (US E-4) crochet hook
– Tapestry needle
– 2 locking stitch markers
– Scissors and a few straight pins
– 1 in (2.5 cm) gold split key ring with a short chain
– 1 jump ring, 8 mm, and flat-nose pliers
Abbreviations (US Terms)
- ch – chain
- sl st – slip stitch
- sc – single crochet
- hdc – half double crochet
- dc – double crochet
- sc2tog – single crochet 2 together
- MR – magic ring
- st(s) – stitch(es)
- RS – right side
Special technique – twisted cord strand: Ch the stated number, then sl st into the back bump of the 2nd ch from the hook and each ch across. Two strands twisted together form one rope cable.
Gauge and Checkpoints
Gauge: 20 sc and 24 rows = 4 in (10.2 cm). A 10-st by 12-row swatch should measure 2 in (5.1 cm) square.
Work tightly. A firm fabric keeps the letter flat and stops the cords from sinking into the base.
Treat the first leg as your real test piece. Measure it before you go on.
Checkpoints:
– After Row 10 of one leg: 1.0 in (2.5 cm) wide x 1.7 in (4.3 cm) tall
– After Row 13: 2.8 in (7.1 cm) wide x 2.2 in (5.6 cm) tall
– After Row 18: 2.8 in (7.1 cm) wide x 3.0 in (7.6 cm) tall
– After the border: 3.2 in (8.1 cm) wide x 3.4 in (8.6 cm) tall
If your leg is too big, go down to a 3.25 mm hook. If it is too small, go up to a 3.75 mm hook. For a keychain, being slightly small is better than being slightly big.
Letter Base
Use cream throughout. Ch 1 at the start of a row does not count as a stitch.
Leg A
Row 1: Ch 6, sc in 2nd ch from hook and in each ch across. (5 sts)
Rows 2–10: Ch 1, turn, sc in each st across. (5 sts)
Do not fasten off. Place a marker in the working loop and set Leg A aside.
Leg B
Rows 1–10: Work as for Leg A. (5 sts)
Fasten off, leaving a short tail. The M is symmetric, so either leg can sit on the left.
Joining and Center Band
Row 11 (joining row): Pick up Leg A. Ch 1, turn, sc in each of the 5 sts, ch 4, then sc in each of the 5 sts of Row 10 of Leg B. (5 sc + 4 ch + 5 sc = 14 sts)
Lay both legs flat with the same side facing before you join. Check that the legs are parallel and the chain is not twisted.
Row 12: Ch 1, turn, sc in each sc and in each ch across. (14 sts)
Row 13: Ch 1, turn, sc in each st across. (14 sts)
The 4-ch bridge forms the top of the gap between the legs. That gap is 0.8 in (2.0 cm) wide and 1.7 in (4.3 cm) tall.
First Peak
Row 14: Ch 1, turn, sc in the first 7 sts. Leave the remaining 7 sts unworked. (7 sts)
Row 15: Ch 1, turn, sc2tog, sc in the next 5 sts. (6 sts)
Row 16: Ch 1, turn, sc in the next 4 sts, sc2tog. (5 sts)
Rows 17–18: Ch 1, turn, sc in each st across. (5 sts)
Fasten off.
Second Peak
Row 14: Join cream in the 8th st of Row 13, the first unworked st next to the first peak. Ch 1, sc in the same st and in the next 6 sts. (7 sts)
Row 15: Ch 1, turn, sc in the next 5 sts, sc2tog. (6 sts)
Row 16: Ch 1, turn, sc2tog, sc in the next 4 sts. (5 sts)
Rows 17–18: Ch 1, turn, sc in each st across. (5 sts)
Fasten off.
The decreases on Rows 15 and 16 are always at the inner edges. Together they open a V-shaped notch at the top center. It starts as a point at Row 13 and is 4 sts (0.8 in, 2.0 cm) wide at the top. This notch forms the center V of the M.
Weave in all tails on the wrong side now. The border will cover the edges.
Twisted Cords
Use light blue. Each cable is made of 2 strands twisted together.
Leg Cords (make 4 strands)
Strand: Ch 21, sl st in back bump of 2nd ch from hook and each ch across. (20 sl sts, about 3.5 in, 8.9 cm long)
Fasten off, leaving an 8 in (20.3 cm) tail on one strand of each pair.
V Cord (make 2 strands)
Strand: Ch 19, sl st in back bump of 2nd ch from hook and each ch across. (18 sl sts, about 3.2 in, 8.1 cm long)
Fasten off, leaving an 8 in (20.3 cm) tail on one strand.
Twisting
Hold 2 strands together and pin one end. Twist them around each other firmly, about one full twist every 0.5 in (1.3 cm). Each finished leg cable should be about 2.8 in (7.1 cm) long. The V cable should be about 2.6 in (6.6 cm) long, or 1.3 in (3.3 cm) per arm.
Stitch through both strands at each end so the twist cannot relax.
Flowers (make 2)
Round 1: With cream, MR, 5 sc in ring, pull closed, sl st to first sc. (5 sts) Fasten off.
Round 2: Join light blue in any sc. *(Sl st, ch 2, 2 dc, ch 2, sl st) in the same sc, move to next sc; repeat from * 4 more times. (5 petals)
Fasten off and join with a sl st into the first sl st. Each flower measures about 0.8 in (2.0 cm) across, with a cream center.
Leaves (make 4)
Row 1: With green, ch 5, sl st in 2nd ch from hook, sc in next ch, hdc in next ch, dc in last ch. (4 sts)
Fasten off, leaving a tail for sewing. Each leaf is about 0.7 in (1.8 cm) long.
Border
The border is cream and has 2 rounds. It turns the stepped row edges into a smooth, raised rim.
Border gauge: Work 1 sc in each st along top and bottom edges and 1 sc in each row end along the sides. At 20 sc and 24 rows per 4 in (10.2 cm), this is slightly firm on the sides, which keeps the rim from rippling.
Corners: Each of the 8 outside corners (4 at the leg bottoms, 4 at the peak tops) gets 3 sc in the corner st. Each of the 3 inside corners (2 at the top of the gap, 1 at the bottom of the notch) gets a sc2tog.
Round 1
With RS facing, join cream in the bottom-left corner of the left leg. Work the edges in this order:
- Left leg bottom: 3 sc in corner st, sc in next 3 sts, 3 sc in corner st. (9 sc)
- Gap: sc in 9 row ends up the inner leg side, sc2tog over the last row end and the first ch of the bridge, sc in next 2 ch, sc2tog over the last ch and the first row end of the other leg, sc in 9 row ends down. (22 sc)
- Right leg bottom: 3 sc in corner st, sc in next 3 sts, 3 sc in corner st. (9 sc)
- Outer right side: sc in each of 18 row ends. (18 sc)
- Right peak top: 3 sc in corner st, sc in next 3 sts, 3 sc in corner st. (9 sc)
- Notch: sc in 4 row ends down, sc2tog over the last row end on this side and the first row end on the other side, ch 16 (hanging loop), sl st in top of the sc2tog, sc in 4 row ends up. (9 sc; the loop chain is not counted)
- Left peak top: 3 sc in corner st, sc in next 3 sts, 3 sc in corner st. (9 sc)
- Outer left side: sc in each of 18 row ends. (18 sc)
Sl st to first sc. (103 sc, plus the ch-16 loop)
Why the math works: The plain edges hold 90 sts and row ends. That is 18 + 18 on the outer sides, 5 + 5 + 5 + 5 on the leg bottoms and peak tops, 10 + 10 + 4 in the gap, and 5 + 5 in the notch. Each of the 8 outside corners adds 2 sts, for +16. Each of the 3 inside sc2tog corners removes 1 st, for −3. So 90 + 16 − 3 = 103.
Round 2
Ch 1. Sl st in each sc around. When you reach the hanging loop, work 22 sc into the ch-16 space instead, then keep going with sl sts. Sl st to the first sl st. (103 sl sts + 22 sc on the loop)
The sl st round sits on top of Round 1 like a raised chain. It makes the plump, defined rim. Fasten off and weave in the ends.
Checkpoint: 3.2 in (8.1 cm) wide x 3.4 in (8.6 cm) tall. The loop should rise about 0.4 in (1.0 cm) above the peaks.
Assembly
- Leg cables: Pin one leg cable down the center of each leg. Keep about 0.2 in (0.5 cm) of cream showing at the top and bottom. Couch it in place with the blue tail, stitching between the twists every 0.3 in (0.8 cm).
- V cable: Fold the V cable at its center. Pin the fold at the center of Row 12, then lay one arm up toward the top inner corner of each peak. Sew it down the same way.
- Flowers: Sew one flower at the upper-right corner of the right peak. Sew the other at the lower-left corner of the left leg. Let each flower overlap the border slightly.
- Leaves: Tuck 2 leaves behind each flower, pointing outward from the corner, and stitch them in place.
- Hardware: Open the jump ring, slide it through the hanging loop and the end of the chain, then close it.
Final Blocking
- Lay the charm face down on a towel before adding hardware, if you can.
- Pin the outer edges straight: 3.2 in (8.1 cm) wide by 3.4 in (8.6 cm) tall.
- Pin each leg bottom square and keep both legs parallel.
- Hold a steam iron 1 in (2.5 cm) above the back. Do not press.
- Let it dry completely, at least 30 minutes.
- Turn it over and gently fluff the cables and petals with your fingers.
Final Quality-Control Checklist
- Charm measures 3.2 in (8.1 cm) x 3.4 in (8.6 cm)
- Both legs are 5 sts wide and the same height
- Round 1 has exactly 103 sc
- Notch and gap are both centered and 0.8 in (2.0 cm) wide
- Cables are firmly twisted and anchored at both ends
- Flowers sit at the upper-right and lower-left corners
- Hanging loop is solid and the jump ring is fully closed
- All tails are woven in and hidden on the back
Troubleshooting
Legs are uneven heights: Recount rows on both legs. Each needs exactly 10 rows before joining.
Letter curls or cups: Your tension is too loose on the sides or too tight on the corners. Re-block with steam and check that each outside corner has exactly 3 sc.
Border ripples: You worked extra sts in the row ends. Use exactly 1 sc per row end.
Notch looks lopsided: Check that both peaks used 7 sts on Row 14 and that the decreases are on the inner edges.
Cables untwist: Add a few more anchor stitches between twists, and secure both ends tightly.
Loop feels flimsy: Pack the 22 sc tightly, or add 2 more sc.
Care
Hand wash in cool water with mild soap, squeeze gently in a towel, and lay flat to dry. Remove the metal hardware first if the charm needs a full soak.

Final Notes
The measurement chain is simple. Each leg is 1.0 in (2.5 cm) wide by 1.7 in (4.3 cm) tall. The joined base reaches 2.8 in (7.1 cm) wide after Row 11 and 3.0 in (7.6 cm) tall after Row 18. The two-round border adds 0.2 in (0.5 cm) on every edge, for a finished 3.2 in (8.1 cm) by 3.4 in (8.6 cm). If your first leg matches its checkpoint, every later stage will match too.
Happy crocheting!