
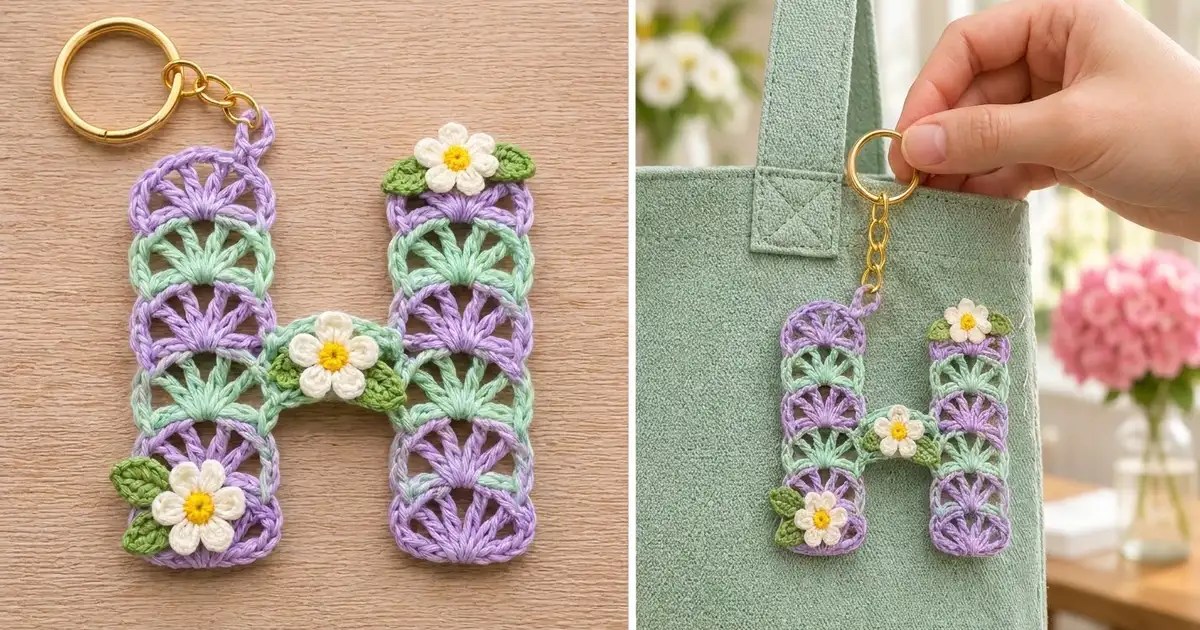
This letter H bag charm is made of stacked fan stitches. Each leg is a column of small half-circle fans in alternating lavender and mint, a single mint fan forms the crossbar, and a slim lavender outline finishes the edge. Three cream flowers with sunny yellow centers and green leaves add a spring-garden look.
The style is soft, lacy and light. It works as a keychain, a bag charm or a personalized gift tag, and it uses only small amounts of yarn.
This pattern uses US crochet terms. The finished letter measures 4 3/4 in (12.1 cm) wide by 5 1/2 in (14.0 cm) tall, not counting the keyring.
You make the H as one piece. First you work two identical legs from the bottom up in two-row stripes. Next you crochet the crossbar directly between the legs at mid-height, and then you work one border round around the whole letter. Last, you sew on the flowers and leaves and attach the hardware.
Finished Size and Construction
- Finished size: 4 3/4 in (12.1 cm) wide x 5 1/2 in (14.0 cm) tall
- Skill level: Easy-Intermediate
- Terminology: US terms
- Yarn weight: Sport (#2 fine), cotton or cotton blend
- Hook: 3.0 mm (between US C/2 and D/3)
- Number of pieces: 1 letter (2 legs plus a crossbar, joined as you go), plus 3 flower and 6 leaf appliqués
- Layout: Two vertical legs with one crossbar between them at mid-height
- Leg size before border: 1 1/2 in (3.8 cm) wide x 5 1/4 in (13.3 cm) tall
- Letter size before border: 4 1/2 in (11.4 cm) wide x 5 1/4 in (13.3 cm) tall
- Border depth: 1/8 in (0.3 cm) on every edge
Materials
Use a smooth, mercerized sport-weight cotton. It shows fan stitch definition clearly and holds its shape on a keychain. Do not use fuzzy or very stretchy yarn, because the fan spokes will blur.
- Lavender (A): 10 g / 31 m
- Mint (B): 6 g / 19 m
- Cream (C): 3 g / 9 m
- Yellow (D): 1 g / 3 m
- Leaf green (E): 2 g / 6 m
These quantities include a margin of about 20% for swatching and weaving in ends.
Tools:
– 3.0 mm crochet hook
– Tapestry needle
– Scissors
– Gold split keyring, 1 in (2.5 cm), with a short chain and jump ring
– Rust-proof pins and a blocking mat
– Stitch marker (optional)
Abbreviations (US Terms)
- ch – chain
- sl st – slip stitch
- sc – single crochet
- hdc – half double crochet
- dc – double crochet
- sp – space
- MR – magic ring
- RS – right side
- st(s) – stitch(es)
Special stitch – Fan: (dc, ch 1) 4 times, then dc, all worked in the same stitch. Each fan has 5 dc and 4 ch-1 sps.
Gauge and Checkpoints
Gauge: 6 sc = 1 in (2.5 cm). One stripe band (a fan row plus a leveling row) = 3/4 in (1.9 cm) tall.
Make one complete leg first and measure it before you go on.
- After Row 1: the strip is 1 1/2 in (3.8 cm) wide.
- After Row 3: the leg is 1 in (2.5 cm) tall.
- After Row 9: the leg is 3 1/4 in (8.3 cm) tall.
- After Row 13: the leg is 4 3/4 in (12.1 cm) tall.
- After Row 14: the leg is 5 1/4 in (13.3 cm) tall.
If your leg is too big, go down 0.25 mm in hook size. If it is too small, go up 0.25 mm. If the width is correct but the bands are too tall, pull the dc stitches a little snugger instead of changing hooks.
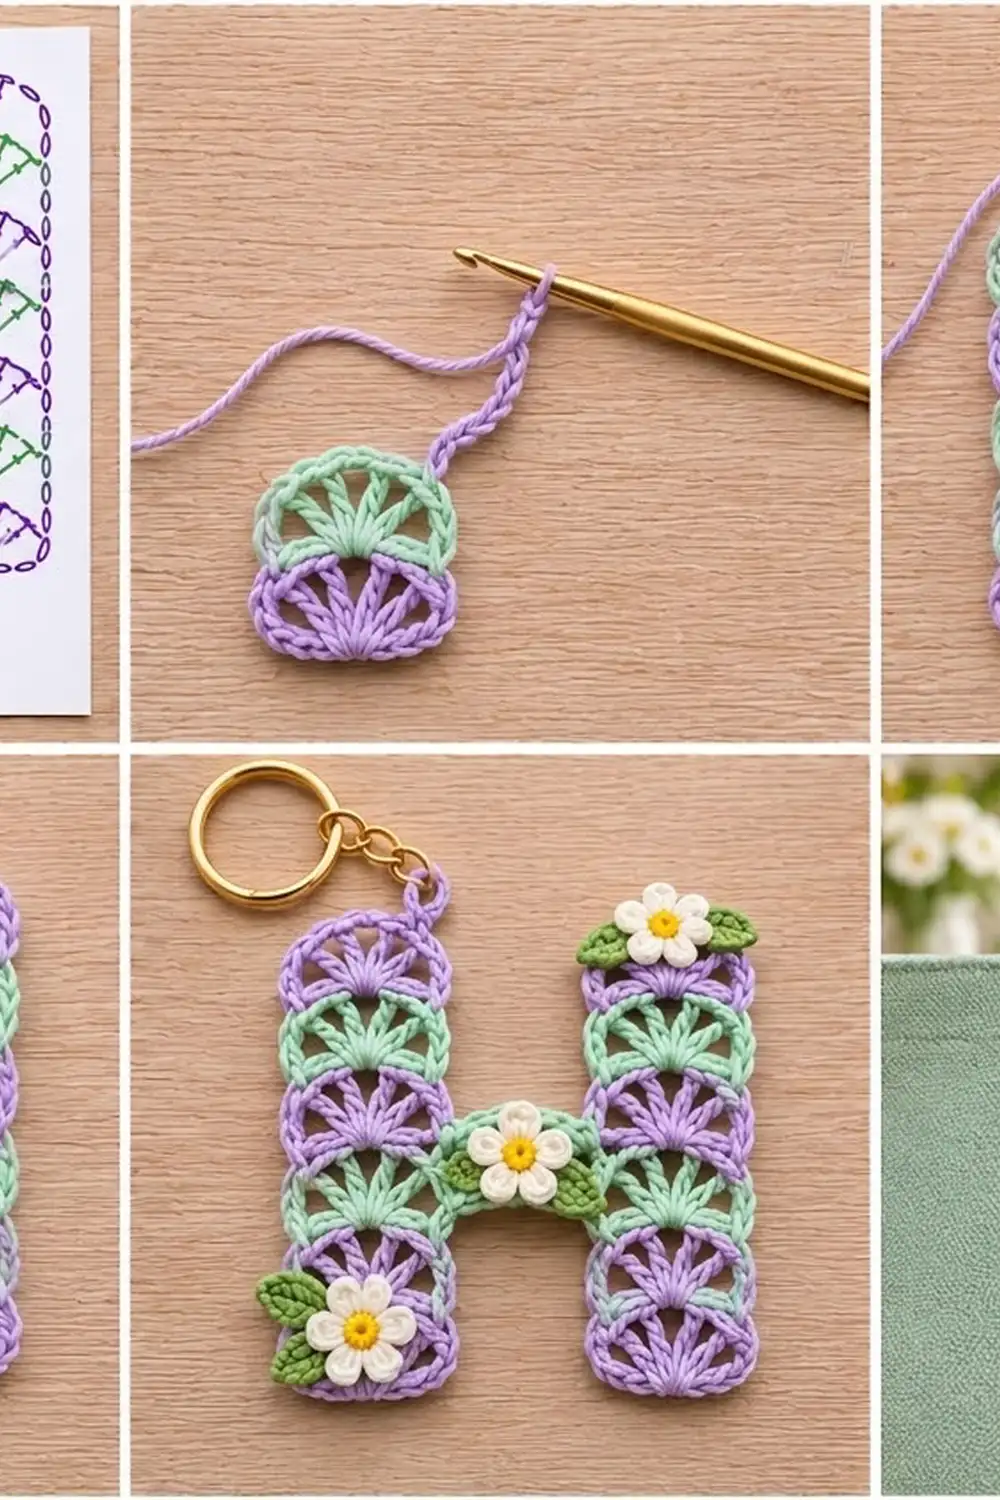
Legs (Make 2)
Carry the color you are not using loosely up the side edge. The border will cover it. For each color change, switch on the last yarn over of the last stitch of the previous row.
Row 1 (A): Ch 10. Sc in 2nd ch from hook and in each ch across, turn. (9 sc)
Row 2 (A, fan row): Ch 1, sc in first sc, skip 3 sc, Fan in next sc, skip 3 sc, sc in last sc, turn. (2 sc, 5 dc, 4 ch-1 sps = 11 sts and sps)
Row 3 (A, leveling row): Ch 3 (counts as dc), dc in same sc. Hdc in next dc, sc in each of next 3 dc, hdc in next dc, 2 dc in last sc, turn. Skip all ch-1 sps. (9 sts)
The leveling row is a conversion row: 7 stitches go 1 into each existing sc or dc, and 1 extra dc is added at each end (7 + 2 = 9). The tall stitches at the edges fill the low corners beside the fan, so the next row starts flat.
Rows 4–5 (B): Repeat Rows 2–3. (11 sts and sps after Row 4; 9 sts after Row 5)
Rows 6–7 (A): Repeat Rows 2–3.
Rows 8–9 (B): Repeat Rows 2–3.
Rows 10–11 (A): Repeat Rows 2–3.
Rows 12–13 (B): Repeat Rows 2–3.
Row 14 (A, top fan): Ch 1, sc in first st, skip 3 sts, Fan in next st, skip 3 sts, sc in top of turning ch-3. (11 sts and sps) Fasten off.
This gives 7 stripes from bottom to top: lavender (Rows 1–3), mint, lavender, mint, lavender, mint, and a lavender top fan. Weave in ends. The leg should measure 1 1/2 in x 5 1/4 in (3.8 x 13.3 cm).
Crossbar
Lay both legs flat, RS up, bottoms level. Leg A goes on the left and Leg B on the right, with a 1 1/2 in (3.8 cm) gap between them.
Row C1 (B): Join B with sl st at the top right corner of Row 7 on Leg A. Ch 9, then sl st into the top left corner of Row 7 on Leg B. Turn.
Row C2 (B): Ch 1, sc in each of the 9 ch. Sl st into the side of Row 8 on Leg A. Turn. (9 sc)
Row C3 (B): Sc in first sc, skip 3 sc, Fan in next sc, skip 3 sc, sc in last sc. Sl st into the side of Row 8 on Leg B. (11 sts and sps) Fasten off.
The crossbar is exactly as wide as a leg (9 sts = 1 1/2 in / 3.8 cm), so the chain does not pull the legs inward. Check that the letter lies flat and measures 4 1/2 in (11.4 cm) across.
Border
Border gauge: Across stitches, 1 sc per stitch (6 sc per 1 in / 2.5 cm). Along the side edges, work 1 sc per Row 1 end and 4 sc per band: 1 sc in the end of the fan row (sc height) and 3 sc around the dc post at the end of the leveling row.
Border Round (A): Join A at the bottom left corner of Leg A, RS facing. Work counterclockwise along these edges, in this order. Every count includes the corner stitches for that edge.
- Leg A bottom: 3 sc in first foundation ch, sc in next 7 ch, 3 sc in last ch. (13 sc)
- Leg A inner side, Rows 1–7 going up: 1 + (3 bands x 4). (13 sc)
- Crossbar underside: sc in each of the 9 free ch loops. (9 sc)
- Leg B inner side, Rows 7–1 going down: (13 sc)
- Leg B bottom: as Leg A. (13 sc)
- Leg B outer side, Rows 1–13: 1 + (6 bands x 4). (25 sc)
- Leg B top arch: sc in first sc, 2 sc in each dc, sc in each ch-1 sp, sc in last sc. (2 + 10 + 4 = 16 sc)
- Leg B inner side, Rows 13–9 going down: 4 + 4 + 3 from the Row 9 dc end. Skip Row 8, where the crossbar is attached. (11 sc)
- Crossbar top arch: as the leg arch. (16 sc)
- Leg A inner side, Rows 9–13 going up: (11 sc)
- Leg A top arch: (16 sc)
- Leg A outer side, Rows 13–1 going down: (25 sc)
Sl st to the first sc. Total: 181 sc.
Do not add stitches at the four inside corners where the crossbar meets the legs. Each inner side has 24 rows’ worth of edge stitches (13 + 11). That is exactly 1 sc fewer than the outer side’s 25, because Row 8 is attached to the crossbar.
Why the math works: Along the rows, 24 sc cover 4 1/2 in (11.4 cm) of bands, which is about 5 1/3 sc per inch. Row-end edges are looser than stitch tops, so this count lies flat. If you used 6 per inch here, the edge would ruffle. The 2-sc increases in each dc on the arches give the curve enough stitches to stay round without cupping. The border adds 1/8 in (0.3 cm) on every edge, so the letter becomes 4 3/4 x 5 1/2 in (12.1 x 14.0 cm).
Hanging Loop: Without fastening off, sl st along the Leg A top arch to the 8th sc (the center). Ch 8, sl st in the same sc. Fasten off.
Flowers (Make 3)
Rnd 1 (D): Make an MR, ch 1, 5 sc in ring, sl st to first sc. Pull the ring closed and fasten off. (5 sc)
Rnd 2 (C): Join C in any sc. *(Ch 2, 2 dc, ch 2, sl st) in same sc, sl st in next sc; repeat from * 4 more times, working the final sl st into the joining st. (5 petals) Fasten off, leaving a 6 in (15.2 cm) tail.
Each flower measures about 1 in (2.5 cm) across.
Leaves (Make 6)
Leaf (E): Ch 6. Starting in 2nd ch from hook, work sc, hdc, dc, hdc. Work 3 sc in the last ch. Working along the other side of the chain, work hdc, dc, hdc, sc, then sl st to the first sc. (11 sts) Fasten off, leaving a tail.
Each leaf is about 3/4 in (1.9 cm) long.
Appliqué Placement
Block the letter before you sew on the appliqués (see below). Stack each group with the leaves underneath and the flower on top.
- Top of Leg B: 1 flower centered on the top band, with 1 leaf pointing out to each side.
- Center of crossbar: 1 flower over the mint fan, with 2 leaves angled down-left and down-right.
- Bottom of Leg A: 1 flower over the bottom band, with 2 leaves fanning out to the left edge.
Sew the leaves on first along their center line. Then sew each flower through its yellow center and petal bases, so the petal tips stay free. Attach the jump ring and chain to the hanging loop, then add the keyring.
Final Blocking
- Before adding the appliqués, spray the letter until it is lightly damp.
- Pin it flat to 4 3/4 in (12.1 cm) wide and 5 1/2 in (14.0 cm) tall.
- Check that each leg is 1 3/4 in (4.4 cm) wide and the gap between the legs is 1 1/4 in (3.2 cm).
- Use one pin in each fan tip so the arches stay round.
- Let it dry completely.
- For extra stiffness, brush on a diluted fabric stiffener and dry it again.
Final Quality-Control Checklist
- Each leg has 14 rows and 7 color stripes, with lavender at the top and bottom.
- Every fan has 5 dc spokes and 4 open spaces.
- Every leveling row has 9 stitches.
- The crossbar is 9 sts wide and sits at the top of Row 7.
- The border has 181 sc and lies flat.
- The finished size is 4 3/4 x 5 1/2 in (12.1 x 14.0 cm).
- The flowers and leaves are stitched on securely, and all ends are woven in.
- The keyring hardware is closed tightly.
Troubleshooting
- The fans cup or bulge: Your dc stitches are too tall. Make the ch-1 spaces tighter, or go down a hook size.
- The leg gets narrower as it grows: Check that each leveling row has 2 dc at both ends.
- The crossbar pulls the legs together: Your ch 9 is too tight. Redo it with a looser chain or a larger hook.
- The border ruffles along the sides: You have more than 4 sc per band. Rework those edges with the correct count.
- The arches look pointed: Make sure you worked 2 sc in every dc on the arch.
- The flower petals curl under: Steam them lightly and pin them flat to dry.
Care
Hand wash in cool water, press out excess water in a towel, and dry flat. Remove the metal hardware before washing if possible.

Final Notes
Here is how the measurements build up:
– Each leg is 9 sts wide, which is 1 1/2 in (3.8 cm).
– Row 1 plus six 3/4 in (1.9 cm) bands plus the top fan makes each leg 5 1/4 in (13.3 cm) tall.
– Two legs plus a 9-st crossbar make the letter 4 1/2 in (11.4 cm) wide.
– The 181-st border adds 1/8 in (0.3 cm) to every edge.
– The finished letter is 4 3/4 x 5 1/2 in (12.1 x 14.0 cm).
Check each of these numbers as you go and your H will come out flat, even and ready for its flowers. Happy crocheting!